
Creating a panoramic image from a bunch of digital photos is something that I have always enjoyed doing because it makes me feel like some kind photography professional! In this article, I’m going to be specifically talking about desktop software and online tools since pretty much every smartphone has a panorama option built into the camera software. Using free desktop software and photos that were taken with some care, you can create some pretty fantastic looking wide-angle or 360-degree panoramas.
The best thing is that you really don’t have to know much about photography in order to create panoramic images; you just have to keep a few simple rules in mind when taking photos. Before you begin the process of creating your own panorama, read through the following tips first:
- Consistent – Firstly, make sure you are using consistent settings for all of your photos. Basically, if you’re taking a picture of a street, don’t take one with flash, the second without, and the third in night mode! It’ll all be stitched together, but will look completely different. Stick with one mode and one type of exposure. Manually adjust the white balance and flash settings so they don’t “auto-adjust” themselves.
- Centered – When taking the photos, keep all the photos along the same plane. For example, if you’re taking shots from left to right of a scene (x-axis), keep the camera in the same vertical position the entire time (y-axis).
- Overlap – When shooting the photos, if you’re going for a horizontal panorama, then move from left to right and make sure that you overlap each adjacent picture by 20 to 30 percent. The photo stitching software needs to be able to have the overlap in order to know what to blend together.
- Orientation – When you view the thumbnails for your pictures in Explorer, make sure they are all rotated right side up.
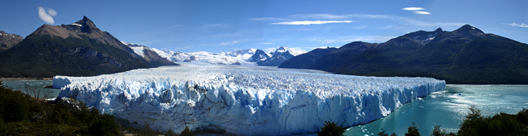
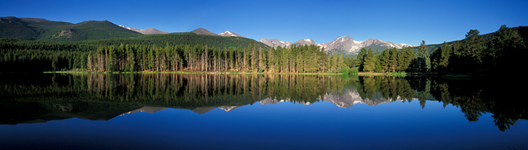
Before we get into the details, here are some cool examples of panoramic pictures you can create from your own digital camera:

There are several different programs that I have used to create panoramic photos, each with its own advantages and disadvantages.
AutoStitch
AutoStitch is what I started out using and still use quite a bit when I have pictures that I know will easily create a great panorama. AutoStitch is a free program, which takes multiple digital photos of a scene and blends them together smoothly to create a panoramic photo automatically for you.
It’s mostly for beginners and creates the panorama for you without any user input. You can set a few options, but for the most part, AutoStitch handles everything.
Once you have it installed on your system and run it, you’ll see three big icons of which you can only click on two. The folder icon is to select the folder with the panorama pictures and the gear icon is for the settings.

You can click the settings button first to make sure the defaults are ok. You can adjust the output size, blending options, interface options and advanced options. For starters, I really wouldn’t mess with any of these settings unless you need too.

Go ahead and click on the folder icon and select all the photos for your panorama. When you click OK, the program will automatically start processing the images and creating the panorama. There is literally nothing else you have to do with this program.

After a few seconds, your panorama will be created and should open in your default picture viewer. Below I took five photos of a room in my house and it stitched them together perfectly.

AutoStitch is very easy to use and is best for photos that are well planned and abide by all the rules mentioned above. In terms of manipulation or editing options, there are none, so if you want something that gives you more control, then check out the programs below.
Hugin
The other piece of free software that allows you to create great panoramic photos is Hugin. Hugin is different from AutoStitch because it’s a bit more complicated, but allows for greater customization and control of your final panorama. Actually, they have three modes depending on your level: Simple, Advanced and Expert. You can switch between these by clicking on the Interface menu item.
To start off, stick with simple and as you learn how to use the program, you can switch to the other modes. To start, go ahead and click on the Load Images button.

Depending on which camera you used to take your pictures, you may get a message saying that the program could not find any information about the field of view for an image.

I took a couple of photos from my iPhone and that information apparently is not included in the metadata for the image. Just Google your iPhone model and HFOV and you should be able to find it. Basically, it’s anywhere from 52 to 56. Type that in and it will automatically fill in the Focal length. Most people should not see this dialog at all hopefully.

You should now see all the images loaded and a preview of the panorama. Don’t worry if things look awry because the next step to complete is alignment. Go ahead and click on the Align button and the program will run some tools on the images to align them properly. Basically, these are control points that are created automatically which tell the software what parts of two different images are the same.

Finally, click on Create Panorama and choose your output options. Click OK and a couple of windows will pop up to start the image processing. Also, the program will create a bunch of temp files in the same directory as the final panorama so just be patient and wait for everything to be completed as the temp files will automatically be removed.
That’s how you can use Hugin in its most basic form. If you want more control, simply click on the various tabs (Layout, Projection, Move/Drag, Crop) and you’ll be able to fine-tune pretty much every aspect of the panorama. If you want to create professional panoramas then Hugin is the better option.
The final results in my test were very good. The corrected exposure that was applied to the photos made the scene look better overall compared to AutoStitch. However, there were more small misalignments in the Hugin output that were not there in AutoStitch.
Microsoft Image Composite Editor
Another great free tool that is a few years old, but works amazing well, is Microsoft Image Composite Editor (ICE). What’s really cool about this program is the fact that you can create a panorama from a video. If you took a video of a mountainside while panning your video camera from left to right, then you can use ICE to create a panorama from the stills extracted from the video. It does all of this for you, so you don’t have to do anything complicated.
In this post, however, I’ll only talk about stitching together pictures. The process is super simple. Once you install it and run it, you can either just drag the photos onto the interface or click on File and then New Panorama. Pick your images and they will instantly be loaded and stitched together in the preview window.
You can change the camera motion, crop the image, change the export settings and the size of the panorama. The program supports unlimited photos, so you can actually create gigapixel panoramas using ICE. It’s also convenient that you can export to other formats like BMP, TIFF, PNG, PSD, etc. Click on Export to disk to save your file out.
The results in my test were very good and better than both the programs mentioned above. There were less artifacts and the final color of the image was better too. Of course, you have to be working with a very good set of images in order to get good results with ICE.
There are many other panorama applications, many of them paid, but you really should never need to spend money creating panoramas. The programs mentioned above can create great professional looking panoramas with hard to stitch images. If you have any questions, post a comment. Enjoy!