Share drives, audio, and printers to increase functionality
Available in Windows 7 Professional, XP Mode allows you to integrate your physical computer’s resources with a Virtual Machine. Components you can share include drives, audio, printers, Clipboard, and smart cards.
Learn how to enable and use the integration features of an XP Mode Virtual Machine.
Table of Contents
Why Enable XP Mode Integration?
An XP Mode Virtual Machine uses your physical computer’s resources to run a fully licensed copy of Windows XP right from within Windows 7 Professional.
Part of your computer’s RAM, processing power, and other components are used by the Virtual Machine to allow XP to run.
Using XP Mode’s integration features, you can also share other resources such as drives, audio, and printers to increase the functionality of XP running in the Virtual Machine.
Enabling and Using XP Mode Integration Features
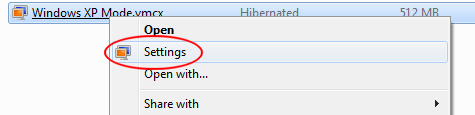
Click on Start>All Program>Windows Virtual PC>Windows Virtual PC to open the Virtual Machine folder.
Right click on the Windows XP Mode Virtual Machine and select Settings from the menu.
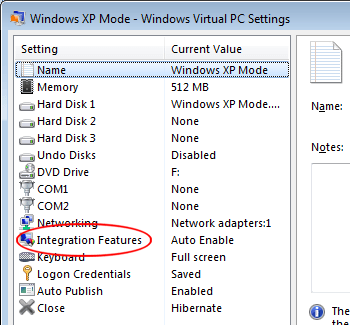
In the Windows XP Mode – Windows Virtual PC Settings window, click on the setting labeled Integration Features.
Note that the right hand side of the window changes to show you the integration settings available for your XP Mode Virtual Machine.
On the right side of the window, you will notice several options. Below is a description of each and some hints on how to use them to make your XP Mode Virtual Machine more integrated with your physical computer.
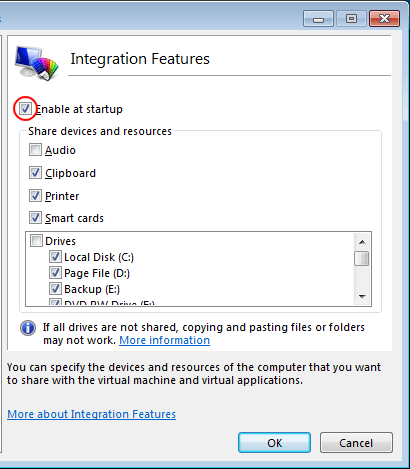
Enable at Startup – This option allows you to specify whether the integration features are available each time you startup XP Mode. Unless you want to manually integrate each feature when you use XP Mode, leave this option checked.
Audio – XP Mode can use your PC’s audio to add sound to your Virtual Machine sessions. Keep in mind that integrating audio adds one more component that can go wrong. If you really have no need for sound while using XP Mode, leave this option unchecked.
Clipboard – Integrating the Clipboard with XP Mode means that text, images, or other elements can be cut, copied, and pasted between your physical PC and the Virtual Machine running XP Mode.
This is one of the most useful integration features. Consider enabling it if you need to share documents quickly and easily between your PC and XP Mode.
Printer – If you plan to print from within XP Mode, check this option. Using printer integration, XP Mode will treat your printer as if it were connected directly to it rather than to your physical PC. Most people find that integrating the printer is essential to get the most from XP Mode.
Smart Cards – If you have any smart cards connected to your PC and you want to use them in XP Mode, you must check this option. If you have no smart cards, leave this one unchecked.
Drives – This option lets you specify whether all drives or only the ones you choose are integrated with XP Mode. At the very least, make sure you integrate the drive on which Windows 7 Professional is installed (C drive for most people). This way, you have access to your user account, desktop, My Documents folder, etc. while in XP Mode.
For drives you know you will never use with XP Mode, leave them unchecked. This saves you the trouble of having to wade through drives you’ll never use while opening and savings files to your PC while in XP Mode. When done, click the OK button.
Windows 7’s Virtual Machine technology allows you to integrate and share the resources of your physical PC with XP Mode.
By doing so, you can gain access to the drives, printers, smart cards, Clipboard, and audio features of your PC. Luckily, the Virtual Machine lets you select which components to integrate so you can make your XP Mode sessions more streamlined and less complicated.


