It's a little more advanced but will give you more control
Earlier, I had written a post on how to turn your computer into a Windows file sharing server using a couple of different programs. If you’re looking for a quick way to share the files on your local computer with friends or family, this is an easy way to do so.
However, if you’re looking to setup your own FTP server in Windows using IIS, you can do so, but it requires more technical knowledge. Of course, it also gives your more granular control over sharing and security, so it’s better for anyone who has a little computer know-how. Plus, IIS is all about running websites, so if you want to run a couple of websites along with an FTP server, then IIS is the best choice.
Table of Contents
It’s also worth noting that different versions of IIS come with each flavor of Windows and they all have slightly different feature sets. IIS 5.0 came with Windows 2000 and 5.1 came with Windows XP Professional. IIS 6 was for Windows Server 2003 and Windows XP Professional 64-bit. IIS 7 was a complete rewrite of IIS and was included with Windows Server 2008 and Windows Vista.
IIS 7.5 was released along with Windows 7, IIS 8 released with Windows 8 and IIS 8.5 released with Windows 8.1. It’s best to use IIS 7.5 or higher if possible as they support the most features and have better performance.
Setup and Configure an FTP Server in IIS
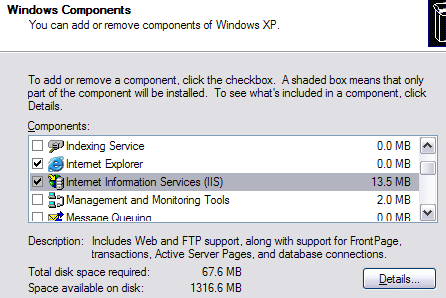
The first thing you’ll need to setup your own FTP server in Windows is to make sure you have Internet Information Services (IIS) installed. Remember, IIS only comes with Pro, Professional, Ultimate or Enterprise versions of Windows.
In Windows Vista and earlier, click on Start, Control Panel and go to Add/Remove Programs. Then click on Add/Remove Windows Components. For Windows 7 and higher, click on Programs and Features from Control Panel and then click on Turn Windows features on or off.


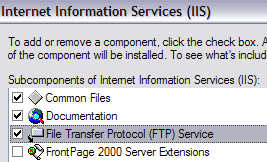
In the components wizard, scroll down until you see IIS in the list and check it off. Before you click Next though, make sure you click on Details and then check File Transfer Protocol (FTP) Service.
For Windows 7 and up, go ahead and click on the box next to Internet Information Services and FTP Server. You also need to make sure you check the Web Management Tools box otherwise you won’t be able to manage IIS from Administrative Tools later on. For FTP, you need to check the FTP Service box otherwise you won’t have the option to create an FTP server.

Click OK and then click Next. Windows will go ahead and install the necessary IIS files along with the FTP service. You may be asked to insert your Windows XP or Windows Vista disc at this point. You shouldn’t need a disc for Windows 7 or higher.
Setup and configure IIS for FTP
Once IIS has been installed, you may have to restart your computer. Now we want to go ahead and open the IIS configuration panel to set up the FTP server. So go to Start, then Control Panel and click on Administrative Tools. You should now see an icon for Internet Information Services.

When you open IIS in Vista or earlier for the first time, you’ll only see your computer name in the left hand menu. Go ahead and click the + symbol next to the computer name and you’ll see a couple of options like Web Sites, FTP Sites, etc. We’re interested in FTP Sites, so expand that out also. You should see Default FTP Site, click on it.
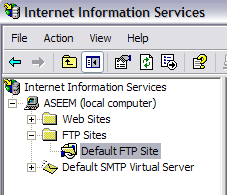
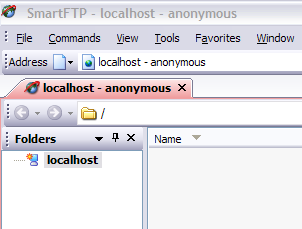
You’ll notice after you click on the default FTP site that there are a couple of buttons at the top that look like VCR buttons: Play, Stop, and Pause. If the Play button is greyed out, that means the FTP server is active. Your FTP server is now up and running! You can actually connect to it via your FTP client software. I use SmartFTP, but you can use whatever you like best.
For Windows 7 and higher, you’ll see a different look to IIS. Firstly, there is no play button or anything like that. Also, you’ll see a bunch of configuration options right on the home screen for authentication, SSL settings, directory browsing, etc.

To start the FTP server here, you have to right-click on Sites and then choose Add FTP Site.

This opens the FTP wizard where you start by giving your FTP site a name and choosing the physical location for the files.

Next, you have to configure the bindings and SSL. Bindings are basically what IP addresses you want the FTP site to use. You can leave it at All Unassigned if you don’t plan on running any other website. Keep the Start FTP site automatically box checked and choose No SSL unless you understand certificates.

Lastly, you have to setup authentication and authorization. You have to choose whether you want Anonymous or Basic authentication or both. For authorization, you choose from All Users, Anonymous users or specific users.

You can actually access the FTP server locally by opening Explorer and typing in ftp://localhost. If all worked well, you should see the folder load with no errors.

If you have an FTP program, you can do the same thing. Open the FTP client software and type in localhost as the host name and choose Anonymous for the login. Connect and you should now see the folder.
Ok, so now we got the site up and running! Now where do you drop the data you want to share? In IIS, the default FTP site is actually located in C:\Inetpub\ftproot. You can dump data in there, but what if you already have data located somewhere else and don’t want to move it to inetpub?
In Windows 7 and higher, you can pick any location you want via the wizard, but it’s still only one folder. If you want to add more folders to the FTP site, you have to add virtual directories. For now, just open the ftproot directory and dump some files into it.

Now refresh your FTP client and you should now see your files listed! So you now have an up and running FTP server on your local computer. So how would you connect from another computer on the local network?
In order to do this, you’ll have to open up the Windows Firewall to allow FTP connections to your computer; otherwise all external computers will be blocked. You can do this by going to Start, Control Panel, clicking on Windows Firewall and then clicking on the Advanced Tab.
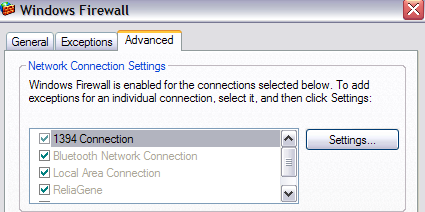
Under the Network Connection Settings section, make sure all of the connections are checked in the left list and then click on the Settings button. You’ll now be able to open certain ports on your computer based on the service your computer is providing. Since we are hosting our own FTP server, we want to check off FTP Server.
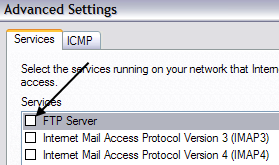
A little popup window will appear with some settings that you can change, just leave it as it is and click OK. Click OK again at the main Windows Firewall window.
In Windows 7 and higher, the process is different for opening the firewall port. Open Windows Firewall from the Control Panel and then click on Advanced Settings on the left hand side. Then click on Inbound Rules and scroll down till you see FTP Server (FTP Traffic-In), right click on it and choose Enable Rule.

Then click on Outbound Rules and do the same thing for FTP Server (FTP Traffic-Out). You have now opened up the firewall for FTP connections. Now try to connect to your FTP site from a different computer on your network. You’ll need to get the IP address of the computer first before you can connect into it from a different computer.
Go to Start, click Run and type in CMD. Type IPCONFIG and jot down the number for IP Address:

In your FTP client on the other computer, type in the IP Address you just wrote down and connect anonymously. You should now be able to see all of your files just like you did on the FTP client that was on the local computer. Again, you can also go to Explorer and just type in FTP:\\ipaddress to connect.
Now that the FTP site is working, you can add as many folders as you like for FTP purposes. In this way, when a user connects, they specify a path that will connect to one specific folder.
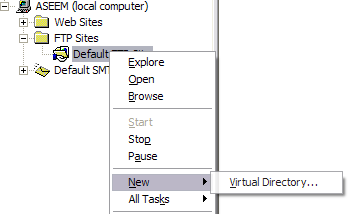
Back in IIS, right click on Default FTP Site and choose New, and then Virtual Directory.
In Windows 7, you right-click on the site name and choose Add Virtual Directory.

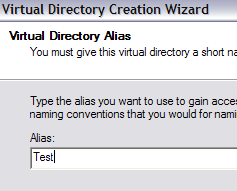
When you create a virtual directory in IIS, you’re basically going to create an alias that points to a folder on the local hard drive. So in the wizard, the first thing you’ll be asked is for a alias name. Make is something simple and useful like “WordDocs” or “FreeMovies”, etc.
Click Next and now browse to the path where you want the alias to refer to. So if you have a bunch of movies you want to share, browse to that folder.
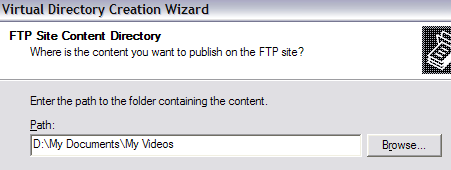
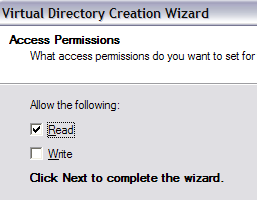
Click Next and choose whether you want it as Read access only or Read and Write access. If you simply want to share files, check Read. If you want people to be able to upload files to your computer, choose Read and Write.
Click Next and then click Finish! Now you’ll see your new virtual directory below the default FTP site. In Windows 7 and up, the process is reduced to one dialog shown below:

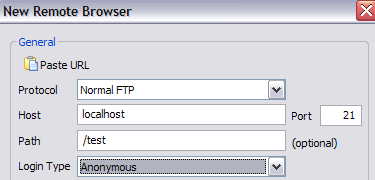
You can connect to you using your FTP client by putting in the Path field “/Test” or “/NameOfFolder”. In Explorer, you would just type in ftp://ipaddress/aliasname.
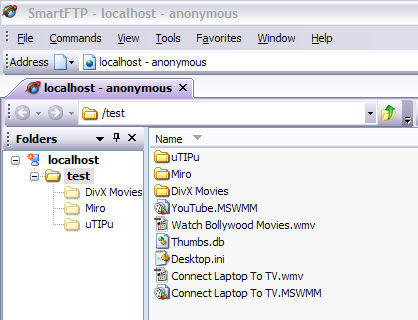
Now you’ll only see the files that are in the folder that we created the alias for.
That’s about it! You can create as many folders as you like! The only thing other thing that you would need to do is to give out your public IP address to anyone who is connecting from outside of your internal network. If you want users to connect from anywhere in the world, you’ll have to give them your public IP address, which you can find out by going to http://whatismyipaddress.com/.
Finally, you’ll need to forward the FTP port on your router to your local computer that is hosting the FTP server. Port Forward is a great site to show you how to forward ports on your router to computers on your home network. You should also read my other posts on port forwarding and dynamic DNS:
Setup Dynamic DNS for Remote Access
This is definitely a lot of info with a bunch of steps; if you have any questions about all of this, post a comment! Enjoy!