Get rid of that stuck print job
Have you ever run into the situation where you try to print something and nothing happens? You wait for it to print, but the job doesn’t go through? There are a ton of reasons why a print job may not actually print, but one of the common causes is that the printer queue has a stuck print job.
This can happen for a number of reasons. Let’s say you tried to print something a few hours back, but the printer was off. You ended up not needing the document and you forgot about it. Then you come back and try to print. The print job is added to the queue and if the previous job didn’t get removed automatically, it will be behind that print job that never got printed.
Sometimes you can manually go in and delete the print job, but sometimes you just can’t get rid of it! In this type of case, you have to clear the print queue manually. In this article, I’ll show you the steps to clear the print queue.
Clear Print Queue in Windows
In order to get the printing services back up and running, follow these steps:
1. Go to Start, Control Panel and Administrative Tools. Double click on Services icon.
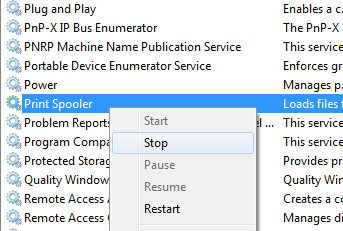
2. Scroll down to the Print Spooler service and right click on it and select Stop. In order to do this, you need to be logged in as Administrator. At this point, no one will be able to print anything on any of the printers that are being hosted on this server.
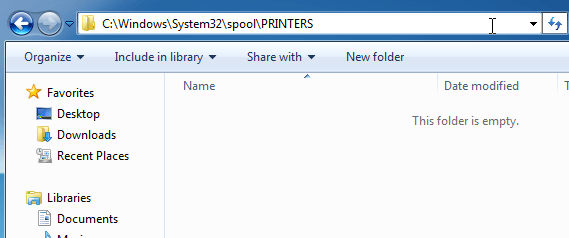
3. Next you need to go to the following directory: C:\WINDOWS\System32\spool\PRINTERS. You can also type %windir%\System32\spool\PRINTERS into the address bar in Explorer if the C drive is not the default Windows partition. Delete all the files in this folder.
This will clear all print queues (If you’re doing this on a server, it’s a good idea to first make sure there are no other print jobs being processed for any of the other printers on the server because doing this step will delete those jobs also).
4. Now you can go back to the Services console and right-click and choose Start for the Print Spooler service!
At this point, you should be able to print without a problem. If you prefer to use a script, i.e. for a server, then you can create a batch file with the commands below or just type them into the command prompt:
net stop spooler
del %systemroot%\System32\spool\printers\* /Q /F /S
net start spooler
The first and third commands are fairly obvious: they stop and start the print spooler service. The middle command deletes everything in the printers folder and the /Q is for quiet mode, which means you won’t get a prompt asking if you want to delete each file. /F will force delete all read-only files and /S will delete any subdirectories if those exist. Deleting content from this folder can never harm your computer, so don’t worry if you see some files or folders and aren’t sure what they are for.
You can read my previous post if you want to know how to create a batch file. Then all you have to do is run the batch file anytime you want to clear out the print queue. Luckily, the procedure for clearing out the print queue is the same for Windows 8, Windows 7, Vista, and XP.


