Let the formulas do the heavy lifting
Calculating amounts in a spreadsheet is one of the most basic reasons to use a spreadsheet program like Excel or a spreadsheet website like Google Sheets. It’s useful when dealing with large sets of data, automating expense tracking, and more.
A formula that automatically adds cells is much easier than pulling out a calculator to do the math manually. The same is true for other math calculations. All you need are the values that you’ll be working with, and the formulas we’ll look at below will do all the heavy lifting for you.

Most spreadsheet software work the exact same when it comes to adding, subtracting, multiplying, and dividing, so these steps should work no matter what spreadsheet tool you’re using.
Automatically Add & Subtract In a Spreadsheet
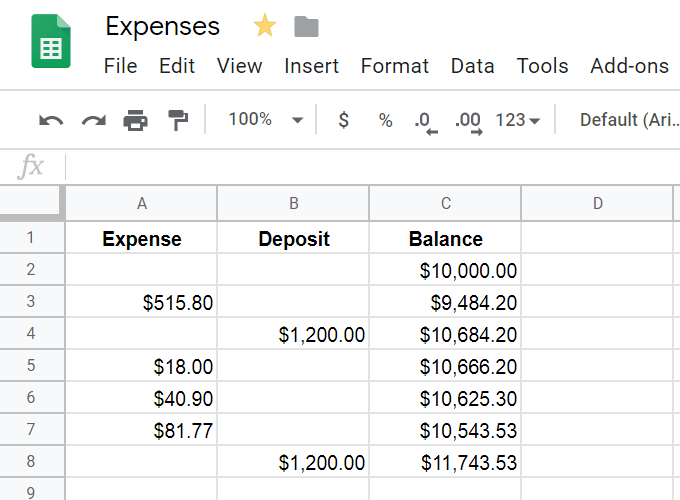
Consider a simple spreadsheet that holds expenses, deposits, and the current balance. You start with a balance that shows how much money you have available, and it needs to have expenses subtracted and deposits added to stay current. Formulas are used to easily calculate the balance.
Here’s a simple example of how to subtract a large expense from a balance:
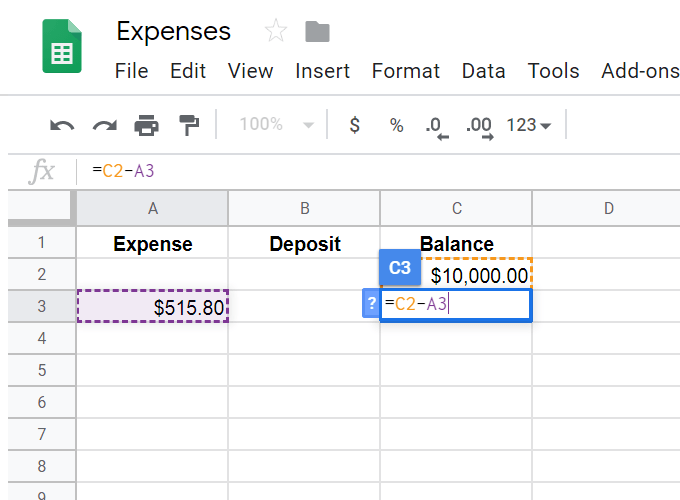
We’re wanting the current balance to show up below the existing one of $10,000. To do that, we’ve selected the cell where we want the calculation to show up in, and then put an = sign followed by the calculation.
The = sign is always necessary to start off any formula in a spreadsheet. The rest is pretty straightforward: Take the current balance (C2) minus the expense (A3), just like you would if you were subtracting these values on paper. Pressing Enter when finished with the formula automatically calculates the value of $9,484.20.
Similarly, if we wanted to add a deposit to the balance, we’d select the cell we want the data to show up in, put an = sign in it, and then continue with simple math for what we need added: C3+B4.
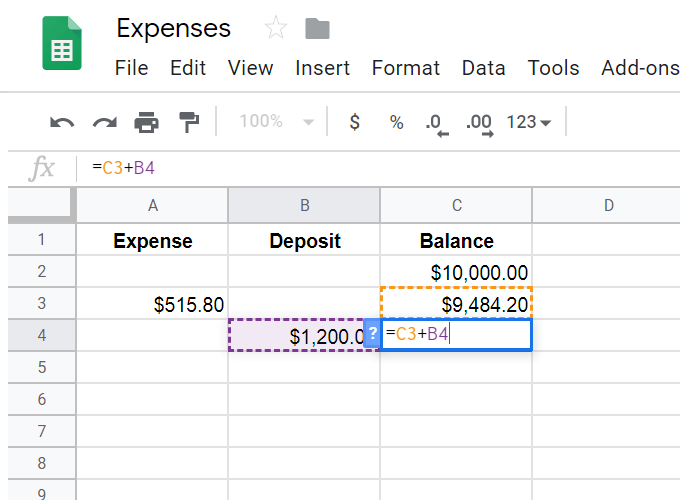
What we’ve done so far is show how to do simple adding and subtracting in a spreadsheet, but there are some advanced formulas we could use that calculate these results right after you enter the expense or deposit. Using them will let you enter numbers into those columns to have the final balance show up automatically.
To do this, we need to create if/then formulas. It can be a little confusing if this is your first time looking at a long formula, but we’ll break it all down into small chunks to see what they all mean.
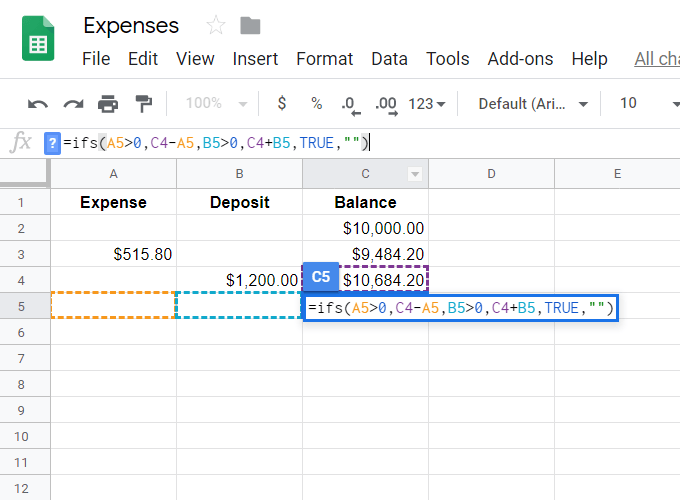
=ifs(A5>0,C4-A5,B5>0,C4+B5,TRUE,””)
The ifs part is simply saying that we’re wanting to match more than one “if” because we don’t know if the expense or the deposit will be filled out. We want one formula to run if the expense is filled out (this would be subtraction like shown above) and a different one (addition) if the deposit if entered.
- A5>0: This is the first if statement that says if A5 is greater than 0 (i.e., if there’s a value there at all), then do the following…
- C4-A5: This is what happens if there’s a value in A5; we’ll take the balance minus the value in A5.
- B5>0: This is the other ‘if’ statement that asks whether the deposit field is filled out.
- C4+B5: If there’s a deposit, then add it to the balance to calculate the new balance.
- TRUE,””: This is a placeholder that will mark the cell with nothing unless there’s something to calculate. If you omit this, then every cell that uses the formula but doesn’t have something to calculate, will show #N/A, which doesn’t look very nice.
Now that we have a formula that will automatically calculate these amounts, we can drag the formula down the spreadsheet to prepare for any entries we make in the expense or deposit column.
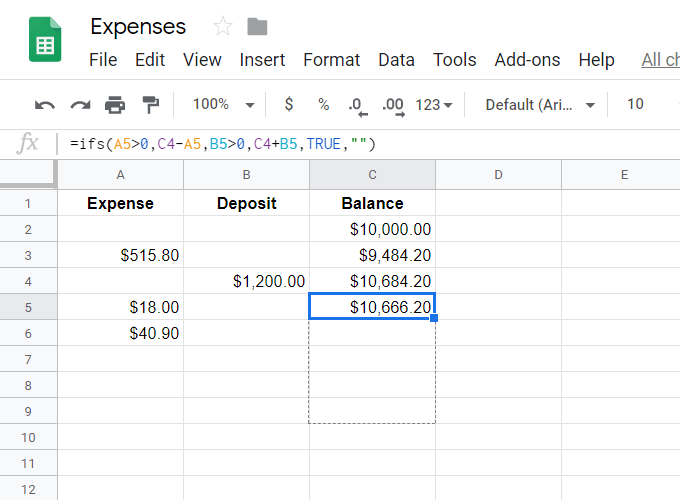
As you fill out these values, the balance column will calculate the amounts immediately.
Spreadsheet programs can deal with more than two cells at once, so if you need to add or subtract multiple cells simultaneously, there are a couple ways to do it:
- =ADD(B2,B30)
- =MINUS(F18,F19)
- =C2+C3+C4+C5
- =A16-B15-A20
How To Divide, Multiply, & More
Dividing and multiplying is just as easy as adding and subtracting. Use * to multiply and / to divide. However, what can get a little confusing is when you need to merge all these different calculations into one cell.

For example, when division and addition is used together, it might be formatted as =sum(B8:B9)/60. This takes the sum of B8 and B9 and then takes that answer divided by 60. Since we need the addition to be performed first, we write it first in the formula.
Here’s another example, where all the multiplication is nested in their own sections so that they’re done together, and then those individuals answers are added together: =(J5*31)+(J6*30)+(J7*50).
In this example, =40-(sum(J3:P3)), we’re determining how many hours are left out of 40 when the sum of J3 through P3 is calculated. Since we’re subtracting the sum from 40, we put 40 first like a regular math problem, and then subtract from it the total sum.
When nesting calculations, remember the order of operations to know how everything will be calculated:
- Parentheses calculations are performed first.
- Exponents are next.
- Then multiplication and division.
- Adding and subtracting are last.
Here’s an example of the proper and improper use of the order of operations in a simple math problem:
30 divided by 5 times 3
The correct way to calculate this is by taking 30/5 (which is 6) and multiplying it by 3 (to get 18). If you go out of order and take 5*3 first (to get 15) and then take 30/15, you get the wrong answer of 2.
