Plus we explain what it means
The DNS_PROBE_FINISHED_NXDOMAIN error in the Google Chrome browser can be a frustrating and confusing experience for many users. This error typically appears when a user tries to access a website, but the DNS server cannot resolve the domain name.
The browser error can be due to several reasons, such as a wrongly typed domain name, the website’s server being down, or when the DNS server cannot resolve the domain name. This article will provide some simple steps to help users fix this error and get back to browsing the web.
What Does the DNS_PROBE_FINISHED_NXDOMAIN Error Code Mean?
The DNS_PROBE_FINISHED_NXDOMAIN error in Google Chrome indicates that the domain name cannot be found on the DNS server. This error typically appears when you try to access a website, but the DNS server cannot resolve the domain name.
A DNS (Domain Name System) server is a server that translates human-readable domain names (such as example.com) into machine-readable IP addresses (such as 192.0.2.1). This allows users to access web servers and other internet resources by typing in easy-to-remember domain names instead of difficult-to-remember IP addresses.
Some causes of this error are out of your hands, but you can resolve the problem yourself in a few cases. Here’s what you can do to troubleshoot the issue systematically.
1. Reset Your Internet Connection
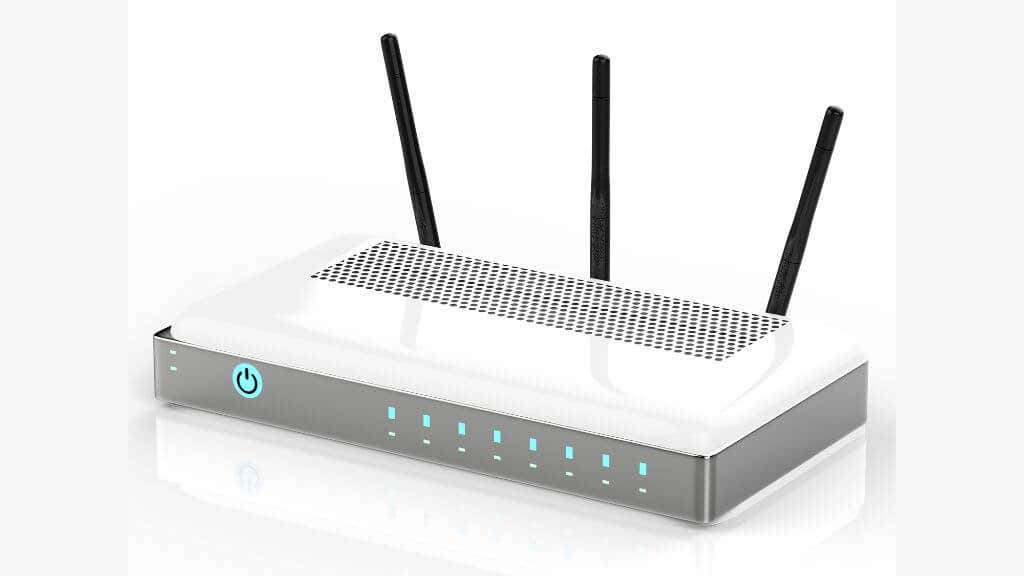
Try disconnecting and reconnecting your router or modem to reboot your internet connection. Here are the steps to follow:
- Locate your router or modem and unplug it from the power outlet.
- Wait a few minutes, then plug the router or modem back in.
- Wait for the router or modem to restart and establish the internet connection.
- Finally, try reaccessing the website to see if the DNS_PROBE_FINISHED_NXDOMAIN error has been resolved.
If you’re using a Wi-Fi connection, try switching to a wired connection to see if that makes a difference or vice versa. If a specific adapter is giving you this problem, you may have to perform a “Netsh Winsock Reset” or one of the other commonnetwork adapter troubleshooting tips.
2. Check Your Localhosts File
You may have used the local hosts file to specify which IP addresses certain websites should use. Chrome will always use the IP settings specified in the localhosts file, so if it’s wrong or has become outdated, it can generate an error.
3. Disable Your VPN, Antivirus, or Firewall (Or Change Them)
If you have an active firewall (and you should!), disable it temporarily to see if it’s the culprit. Check its settings to see if it’s blocking specific sites or domains. The same goes for antivirus software, which may interfere with some websites. If your antivirus package is blocking a particular site, ensure the site is safe and that you’re typing in the URL correctly.
You can also try changing your VPN location if you use a VPN. Alternatively, turn your VPN off completely.
When you use a VPN, your internet traffic is routed through a VPN server before it reaches its destination. This can sometimes cause issues with DNS, such as slow DNS lookups or DNS errors.
However, it’s important to note that turning off your VPN will also disable the security and privacy benefits that it provides. Suppose you’re using a VPN for security or privacy reasons. In that case, you should only turn it off if you’re sure it’s causing a problem with DNS resolution and if you’re willing to sacrifice the security and privacy benefits it provides.
4. Clear Your DNS Cache
The DNS cache is a temporary storage area on your computer that holds information about recently visited websites. Clearing your DNS cache can help to resolve any issues with corrupted or outdated information that may be causing the error.
To use the flushdns command in Windows, you can follow these steps:
- Open the Command Prompt on your computer. Select the Start button and search for Command Prompt or CMD.
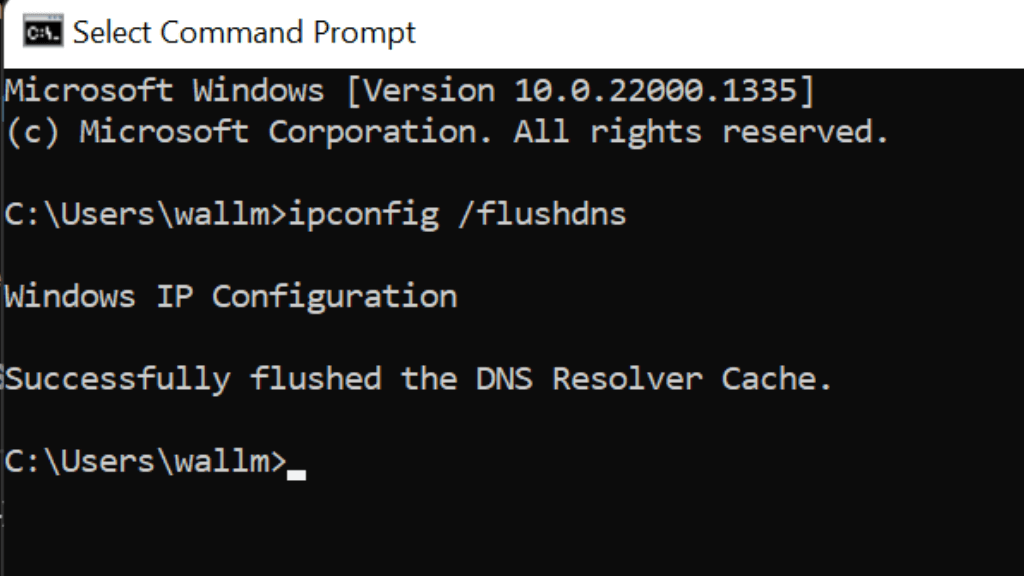
- In the Command Prompt window, type: ipconfig /flushdns
- Hit Enter, which will flush the DNS cache on your computer, removing any stored DNS information and resolving any DNS issues you may be experiencing.
- If the flushdns command was successful, you should see a message saying, “Successfully flushed the DNS Resolver Cache.”
You can close the Command Prompt window when done.
Any DNS issues should be resolved now. Flushing the DNS cache will not affect any active connections, but it may cause a temporary delay when accessing web pages or other internet resources for the first time after the flush.
5. Use an Alternative DNS Server on Your Router
Your Internet Service Provider usually offers its DNS servers, but they can vary in quality and reliability. Often the best way to fix DNS_PROBE_FINISHED_NXDOMAIN errors is to use a different set of servers altogether.
The following DNS server addresses are some good alternatives you can use:
- Google Public DNS Server: 8.8.8.8 and 8.8.4.4
- Cloudflare DNS: 1.1.1.1 and 1.0.0.1
- OpenDNS: 208.67.222.222 and 208.67.220.220
- Quad9: 9.9.9.9 and 149.112.112.112
- Comodo Secure DNS: 8.26.56.26 and 8.20.247.20
- Norton ConnectSafe: 199.85.126.10 and 199.85.127.10
These DNS servers are free and offer a good balance of speed, security, and reliability. You can use any of these DNS servers as an alternative to your current DNS server. However, it’s important to note that every user’s experience will be different, so you may want to try a few different DNS servers to see which one works best for you.
To change DNS servers on your router, you can follow these steps:
- Open a web browser on your computer and type your router’s IP address into the address bar. This is typically something like 192.168.1.1 or 192.168.0.1, but the exact address will vary depending on your router’s model and settings.
- When prompted, enter the username and password for your router. You can find this information on a sticker on the bottom or side of your router or in the documentation that came with your router.
- After logging in to your router, look for a Settings or Configuration section. This will usually be called something like “Advanced,” “Settings,” or “Configuration,” but the exact name will vary depending on your router’s model and settings.
- In the settings or configuration section, look for a DNS settings option. This will typically be called something like “DNS,” “Network,” or “Internet,” but the exact name will vary depending on your router’s model and settings.
- In the DNS or network settings section, you should see an option to specify the DNS server you want to use. This may be called “Primary DNS” or “Preferred DNS,” but the exact name will vary depending on your router’s model and settings.
- Enter the DNS server addresses you want to use in the fields provided. This may be a single DNS server address, or it may be multiple DNS servers.
If you just want to change your DNS server settings for Windows, here’s how:
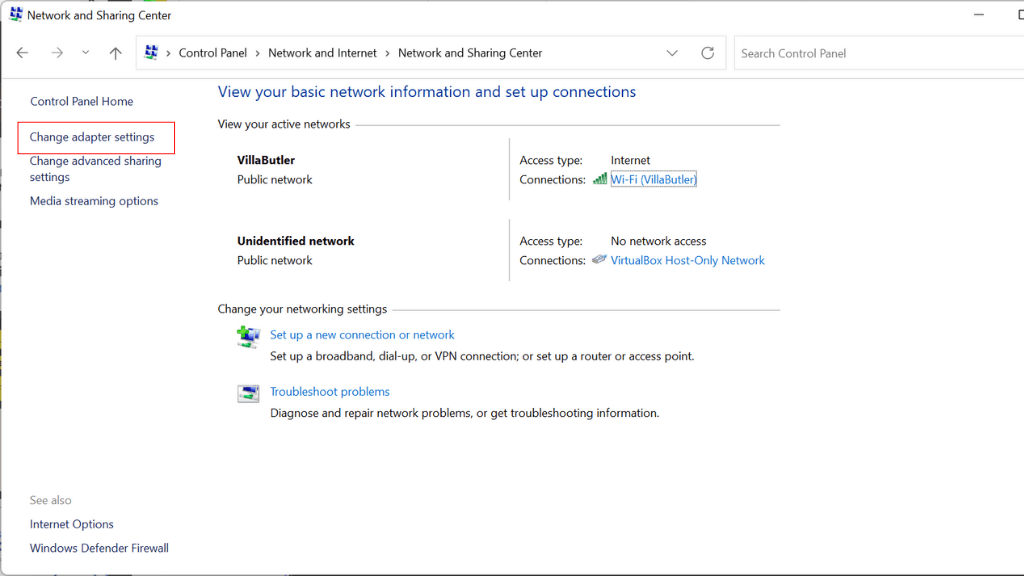
- Open Control Panel > Network and Internet > Network and Sharing Center on your computer. You can find this by opening the Start Menu and searching for Network and Sharing Center.
- Select Change adapter settings in the left-hand menu.
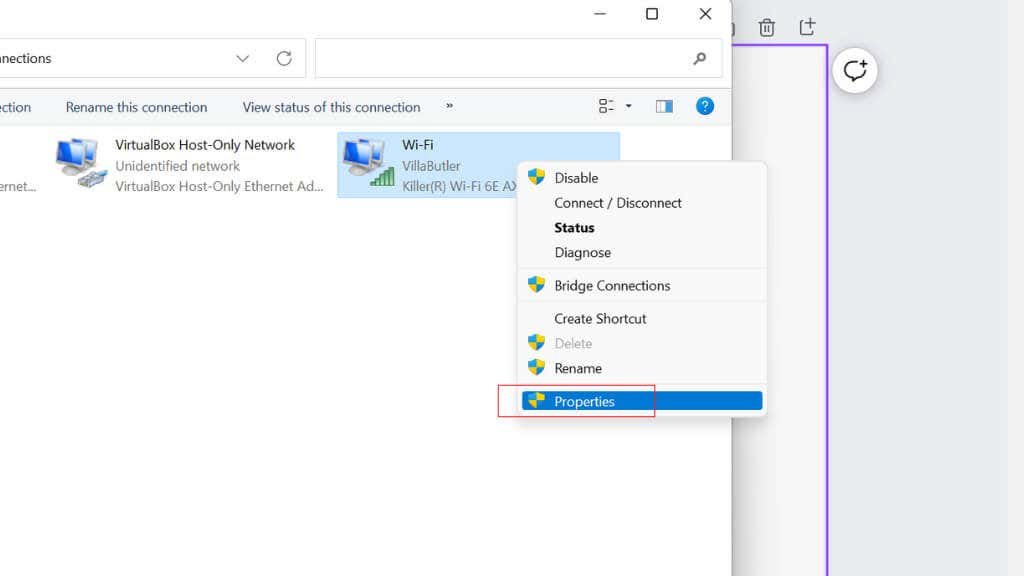
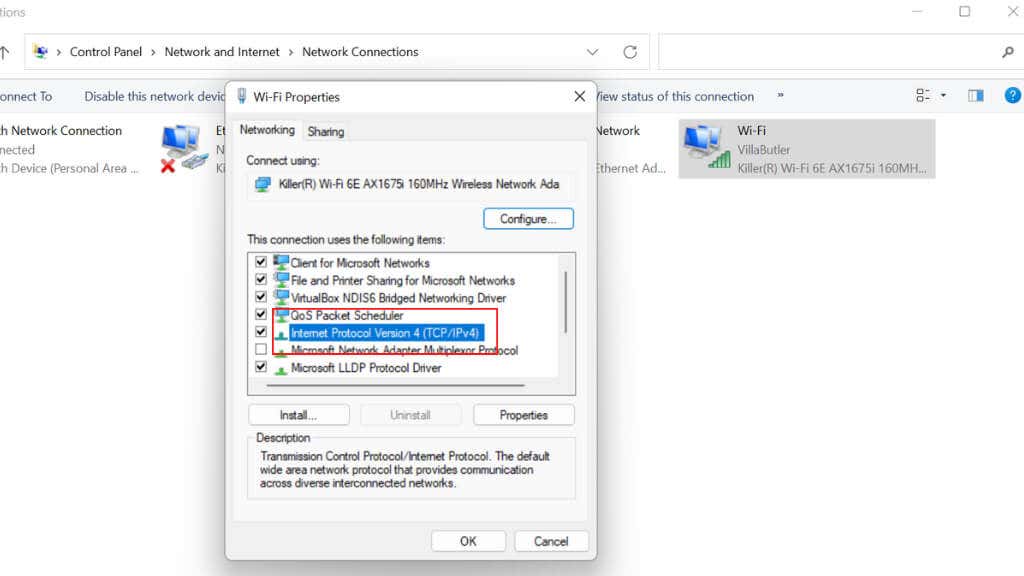
- Right-click on the network adapter for which you want to change the DNS servers, and select Properties from the menu.
- In the network adapter’s properties window, select Internet Protocol Version 4 (TCP/IP v4) and choose the Properties button.
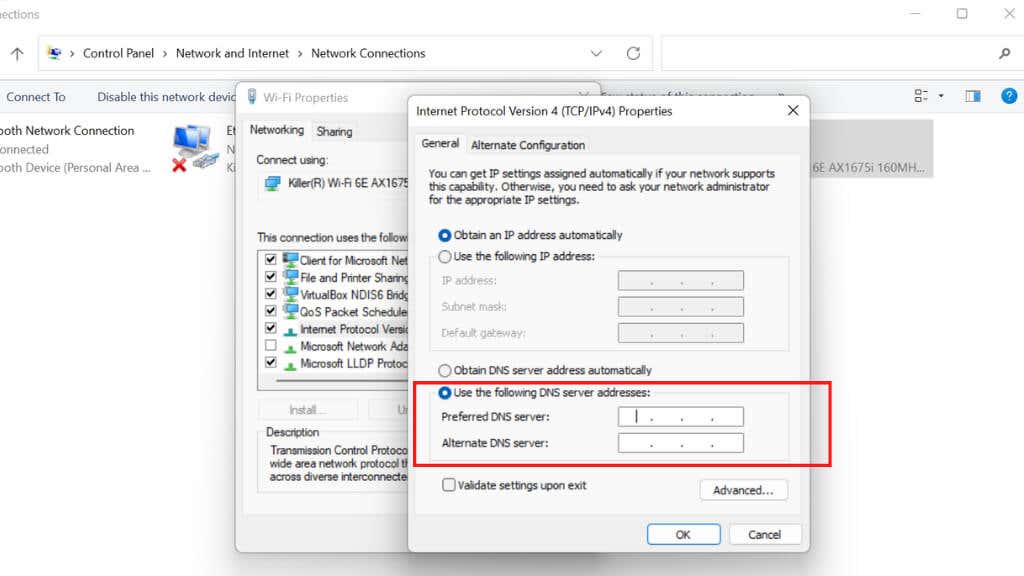
- In the Internet Protocol Version 4 (TCP/IPv4) Properties window, select the Use the following DNS server addresses option.
- Enter the DNS server addresses you want to use in the Preferred DNS server and Alternate DNS server fields.
- Select the OK button to save your changes.
- Close the network adapter’s properties window and the Network and Sharing Center window.
After completing these steps, your computer will use the specified DNS servers for resolving domain names. You may need to restart your computer for the changes to take effect. You can use Mozilla Firefox or Microsoft Edge as alternative browsers until Chrome-specific errors are resolved.
6. Reset Chrome Flags
Resetting Chrome “flags” sometimes resolves DNS errors. To reset Chrome flags to their default values, follow these steps:
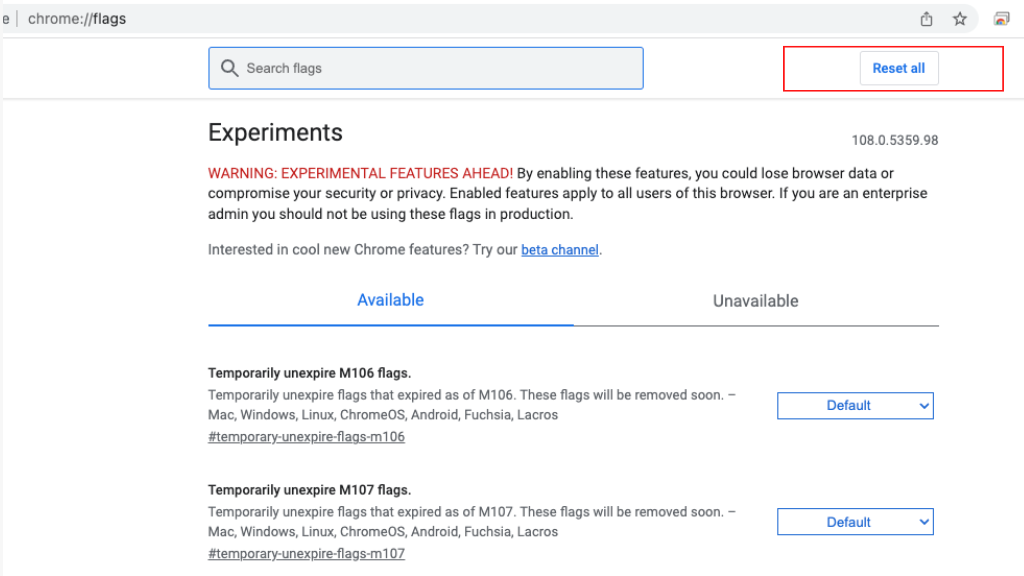
- In the Chrome address bar, type chrome://flags and press Enter.
- On the Experiments page that appears, click the Reset all button at the top.
- This will reset all Chrome flags to their default values. Chrome may remove some flags from the list if they are no longer available or have been removed from Chrome.
Chrome flags are experimental features that are not fully tested and may have bugs. Resetting these can help resolve problems you may be experiencing with Chrome, but it may remove features you rely on. Review the list of flags after resetting them. Flags are also present in the iOS and Android versions of the browser.
7. Get In Touch With Your ISP
Your ISP may have a website or user dashboard you can visit to check if there are any known issues on the network., If you get the error while using one internet connection but not the other, it’s likely a problem on the ISP’s side.
If the ISP’s official channels don’t mention such a problem, log a support ticket to make them aware of the problem and to get direct assistance.


