Shortcuts, workflows and other time-savers
Video editing is a time-eating process. There are so many things you might feel like you need to do, but on the other hand you may sometimes feel like you’re just waiting around for things to process.
There are, however, many quick changes you can make that can effectively streamline your video editing workflow and the rendering processes that eat up your time. Most of these involve very quick changes that aren’t difficult to work into your video editing.
With Adobe Premiere especially, you have tons of features at your disposal. Although these might be overwhelming at times, they also provide lots of opportunities for shortcuts and workarounds to some time-eating processes.
Adobe Premiere Keyboard Shortcuts
One of the easiest changes you can make while video editing to speed up your workflow is to switch from using your mouse to your keyboard. In fact, you can edit entirely using your keyboard if you know how to set these keyboard shortcuts.
To do this, all you need to do is go to Edit > Keyboard Shortcuts. You’ll see a screen with a keyboard layout which will allow you to see how the shortcuts are already set. You can also choose a preset for these shortcuts by choosing from the Keyboard Layout Preset dropdown.
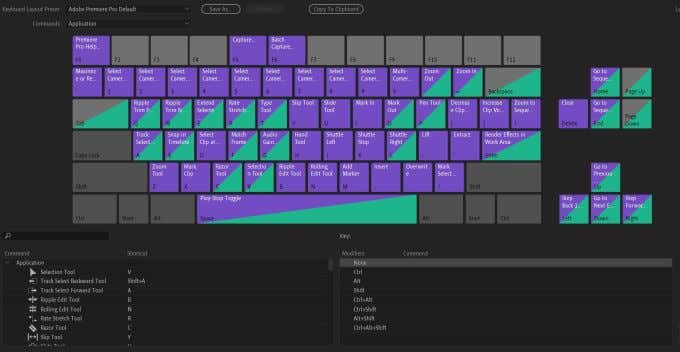
Further, you can set up your own shortcut layout and save it to use at any time. To set a certain action to a key, double click on the action in the list in the area where the keyboard shortcut is listed. A small black box should show up where you can use the key you want to assign to the action, or press the X to clear it.
Change Your Playback Resolution
Another super quick way to increase your productivity rate is to play with the playback resolution on the program or source monitor. In these panels, you should see a small dropdown box next to the settings icon.
You’ll see choices of Full, ½, ¼, ⅛, and 1/16. This is the output resolution that your video will be rendered in. Full resolution is more than likely going to greatly slow the process of your editing, because it will take much more power for your computer to render the preview video.
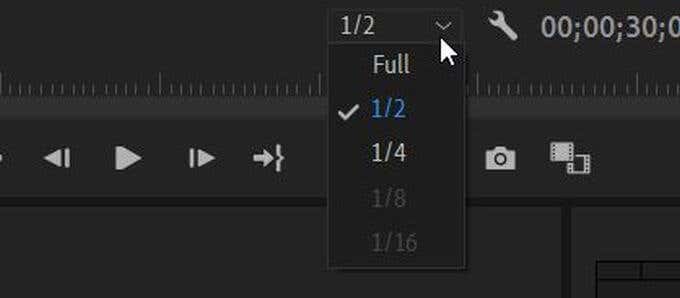
If you choose ½ or ¼, which you can pick if your video is 1080p, it will reduce the resolution by that amount, giving your computer less work to do. You can only use the ⅛ or 1/16 options if your video is in 4K. This also has no effect on the final rendering of the video. It’s only so Premiere can show you this preview of your video while you edit it.
Reformat Your Footage
You might not know how the format of your footage actually affects the speed of your editing process. Basically, some of the video formats that your footage may already be in could make it more difficult for your computer to edit.
However, there’s a way you can reformat your media beforehand in order to help make your editing move along faster. The formats you should edit with do not have to be what you render the final video to, either. In fact, the file size of formats that work best when editing are usually a lot larger than what you’d want the final file size to be.
You can use Adobe Media Encoder to reformat your media. Some good formats to use for editing are:
- Uncompressed files
- ProRes
- M-JPEG
- JPEG2000
Use Proxies On Your Footage
If your computer is having a hard time editing footage, and you’re experiencing super slow load times, it might be due to the resolution of your video. If this is too high for your computer to handle, it could cause problems.
By using proxies in Premiere, you can edit your footage in a lower quality, while still maintaining the same resolution in your final render output. To start using these, just find the clip you want to create a proxy for in the project browser, and select Proxy > Create Proxies.
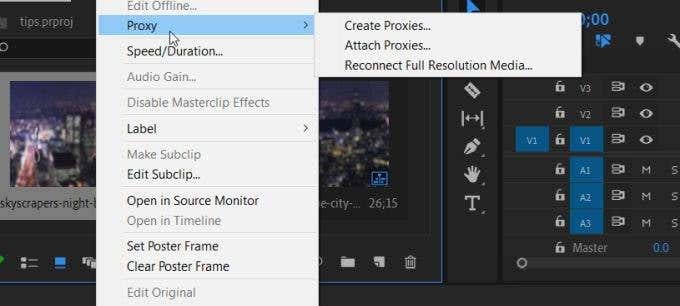
A menu will come up where you can choose a format for the file to be changed to. After clicking OK, Adobe Media Encoder will open and reformat the clips you chose. These should be much easier for your computer to handle and result in faster rendering.
You can also set an option so that you can turn these proxies on and off while editing these clips. On the bottom right of your preview panel, you will find the Button Editor. Click this and find the Toggle Proxies icon, which is two boxes with arrows between them. Drag this onto your toolbar and you can use it to turn the proxies on your clips on or off.
Change Playback Zoom Level
Changing the size of your project’s preview window can actually have an effect on how fast it is processed. You can find the Playback Zoom Level on the bottom left of the Program Monitor. This is normally set to 100%, but you can change this to suit your needs.
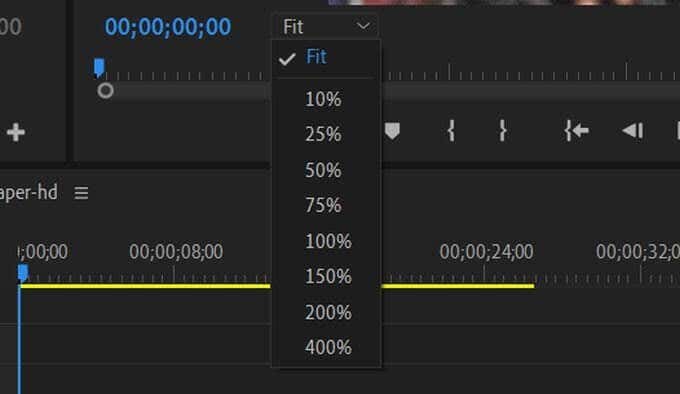
Working with the Program Monitor at a smaller scale will help your computer render the preview faster, making your editing time fly by. There are options for 75%, 50%, 25%, and smaller, so you can change it in increments if needed. Even scaling it back slightly can help improve processing times.
Set In And Out Points
Another way you can get through your editing much faster is to cut your clips before setting them in your timeline. You can easily do this by using In and Out points.
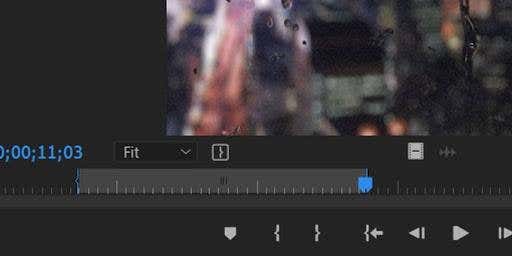
To use these, select a clip from your media browser and it should come up in the source preview panel. Just below this preview are a set of icons. The ones that look like brackets can be used to set an In point, with { , or an Out point, with } .
Alternatively, you can press the I key to set the in point and O for the out point. This will automatically cut your clip to the span between these points. Your original clip will stay the same, you’ll just have the cut version in your timeline.
After setting these, you can put the clip into your timeline by either dragging from the icon that looks like film, or you can select the Insert button.
Use Adjustment Layers In Your Timeline
Putting effects on every single clip, one at a time, can become tedious. It also takes up a lot of time that could be spent doing other things. In Premiere, though, there is a way you can put effects over multiple clips at the same time. This is by using what is called an Adjustment Layer.
To access and begin using these, go to New Item > Adjustment Layer from the Project Browser. A window will appear where you can set different options, but just leave them as they are and click OK.
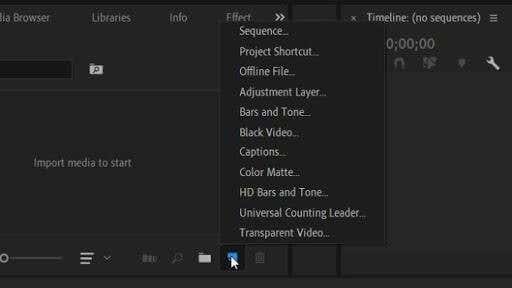
This layer will appear in your clip library, and you can drag it onto your timeline like a regular clip. Place it above whatever clips you wish to have the effects added to. You can lengthen or shorten this layer so that it affects whatever clips you want.
Dragging effects onto the Adjustment Layer will also place the effect on the clips below it. So you only need to apply them one time, and you don’t need to worry about each individual clip.
Change Your Adobe Premiere Workspace
Sometimes, a different setup in Adobe Premiere might be what you need to improve your editing process. You do have the ability to set up the panels in Premiere however you want, so if you feel like having them set up in a certain way could help you edit faster, it’s worth a try.
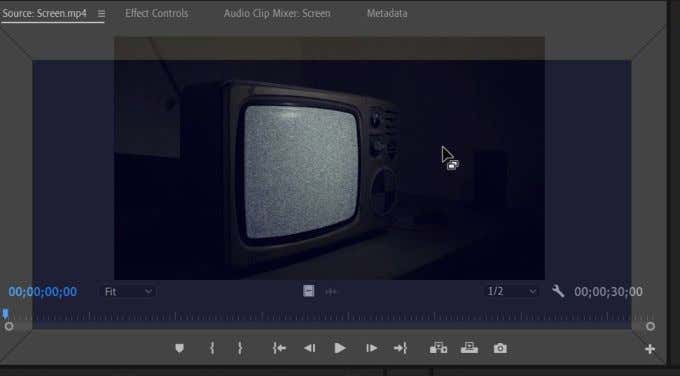
To change your workspace in Premiere, you can use the very top bar to switch between some pre-created workspaces. You can also create your own. If you move your mouse to the edge of any panel, you should see a box icon pop up on your cursor. This means you can click and drag the panel.
When you drag this around the screen, you should see greyed-out boxes. When you move the panel you have grabbed over one of these it will turn blue, meaning you can place it there. After you’ve set it up how you like, you can go to Window > Workspaces > Save as New Workspace.
Get Your Workflow In Order
One of the more important things you can do to really speed up the editing process is looking at your workflow. Doing certain tasks in a certain order can definitely help you streamline the process and also make things quicker later on down the line.

If you’re unsure what order you should do things in, here is an example workflow that many editors swear by:
- Upload your footage and organize it.
- Create a rough timeline of your video.
- Upload, edit and add your audio.
- Add your transition effects.
- Do color correcting.
- Add any text or graphics and final touches.
- Export your project.
Try to keep your workflow in this order or whatever other order of things you choose to do. Try not to add effects or color correction until you have your footage all cut and organized, as this can cause issues later on.
Upgrade Your Computer
If you’re finding you’re still having issues with your editing going too slowly, and your computer processing it at a snail’s pace, it may be a good idea to look into upgrading your computer setup.
When it comes down to it, video editing is a very heavy workload for even some high-end computers to handle, so if you’re working with an outdated computer it can make editing a lot more difficult. Just be aware that you’re going to have to pay a substantial amount in order to get something capable of doing heavy editing.
When finding a new computer, looking for one with a good processor is most important. You should also decide whether you want a desktop or laptop computer, because both of these have options you can choose from for editing video.
