
It’s 9:47 a.m. A photo lands in your inbox – a politician shaking hands with a foreign official. It’s already been shared 40,000 times. Your editor wants a decision in ten minutes. Is it real?
This guide is a tiered newsroom stress test that takes you from zero to a repeatable verification workflow, no AI background required! Work through all three levels and you’ll have a printable checklist you can use under real deadline pressure.
What Is AI Image Detection — and Why 2026 Is Different?
AI image generators fall into two main families. Diffusion models (powering tools like Midjourney and DALL-E) start with visual noise and gradually refine it into a coherent image. GANs (Generative Adversarial Networks) pit two neural networks against each other – one generates, one critiques – until the output looks convincing. Both approaches handle textures and global composition well. Where they struggle is semantic consistency: understanding how objects relate to each other in the real world. A hand gripping a microphone, text on a protest sign, a reflection in a window, all these require spatial logic that generators still get wrong.
By 2026, training datasets are vastly larger. Built-in filters patch many classic artifacts. Inpainting tools let creators fix obvious errors after generation. No single tell is reliable enough on its own. Detection now requires building a weight of evidence across visual, contextual, and tool-based signals.
Introducing Hallucination Zones
Think of an AI image as having hot zones: areas where the generator is most likely to slip up. Memorize this list and you’ll always know where to look first:
- 🖐 Hands and fingers
- 🔤 Text and signage
- 👂 Ears, jewelry, and accessories
- 💇 Hair at background edges
- 🏙 Background crowds and architecture
- 💡 Lighting and shadows
Every stress test in this guide will send you back to these zones.
Before You Begin
Set yourself up for the full workflow before you need it under pressure.
- A modern web browser — Chrome, Firefox, Safari, or Edge (current versions)
- Active internet connection
- Hive Moderation bookmarked: hivemoderation.com/ai-generated-content-detection
- AI or Not bookmarked: aiornot.com
- Illuminarty bookmarked: illuminarty.com
- Google Images bookmarked: images.google.com
- TinEye bookmarked: tineye.com
- Yandex Images bookmarked: yandex.com/images
- Jeffrey’s Exif Viewer bookmarked: exifdata.com
- EXIF Viewer Pro browser extension installed (Chrome or Firefox — free)
- C2PA Verify tool bookmarked: verify.contentauthenticity.org
No accounts or software installs are required for basic use of any tool above.
Level 1 — Easy Fakes: Visual Cues You Can Spot With Your Eyes
🕐 Time budget: 60 seconds
This is your first line of defense. It requires nothing but a browser and a zoomed-in eye. Many obvious fakes never make it past Level 1.
Step 1: Open the Image at Full Size and Zoom In
Right-click the suspicious image and select Open image in new tab (Chrome/Firefox) or Open Image (Safari). Once it’s isolated, use your browser’s zoom to magnify it.
- Windows/Linux: Press
Ctrl++repeatedly, or holdCtrland scroll up - macOS: Press
Cmd++repeatedly, or holdCmdand scroll up - Target 150–200% zoom for hallucination zone inspection

Step 2: Scan the Hallucination Zones in Order
Work through each zone systematically. Don’t form a conclusion yet, just log what you notice.
🖐 Hands and fingers Look for extra digits, fused fingers, or impossible bends at joints. Check whether a hand’s size matches the body’s pose. In 2026, generators handle isolated hands better than before — but hands interacting with objects (gripping a microphone, holding a document) still produce errors under magnification.
2026 caveat: Six fingers is no longer a reliable universal tell. Some fakes now have anatomically correct hands. A clean hand does not mean the image is real.
🔤 Text and signage Zoom into any visible text — protest signs, storefront lettering, newspaper headlines, ID badges, screen displays. AI generators fabricate plausible-looking glyphs that don’t form real words. Look for letters that blend together, repeated characters, or text that shifts style mid-word.
👂 Ears, jewelry, and accessories Check for asymmetric ears, mismatched earrings, glasses frames that disconnect from the temples, or watch faces with garbled numbers. These details are low-priority for the generator and frequently carry artifacts.
💇 Hair at background edges Zoom to where hair meets a background. Look for a subtle “halo” glow, strands that loop back into themselves, or hair color that bleeds into the sky or wall behind it.
🏙 Background crowds and architecture Scan any crowd for faces that blur together or repeat. Look for buildings with misaligned windows, or street scenes where the same element appears mirrored.
💡 Lighting and shadows Check whether shadows fall in the same direction. Look for faces lit from the front while the background suggests side lighting, or reflections that don’t match the scene.
🎯 Stress Test — Level 1 (Easy)
Scenario: You receive an image showing a well-known local politician at a podium during a “surprise press conference.” The photo is sharp, well-composed, and the subject’s face looks natural.
Your challenge (60 seconds): Before scrolling down, scan the hallucination zones in order. Write down every anomaly, even small ones.
What to look for in this scenario:
- The microphone cable vanishes into the podium at an impossible angle
- The nameplate shows blurred characters that don’t spell anything
- Two background figures have near-identical faces
- The subject’s left hand has an extra knuckle
Result: Three or more flags = strong visual evidence. A clean visual pass doesn’t mean the image is real, it means you escalate to Level 2.
Level 2 — Medium Fakes: Contextual and Metadata Red Flags
🕐 Time budget: 90 seconds
A polished fake can sail through visual inspection. Level 2 focuses on the image’s history and data — things a generator can’t fabricate as easily.
Step 3: Run a Reverse Image Search
Google Images:
- Go to images.google.com
- Click the camera icon inside the search bar (right side)
- Paste the image’s URL into the Paste image link tab, or click Upload a file to upload a saved copy
- Review results for the earliest known appearance of the image

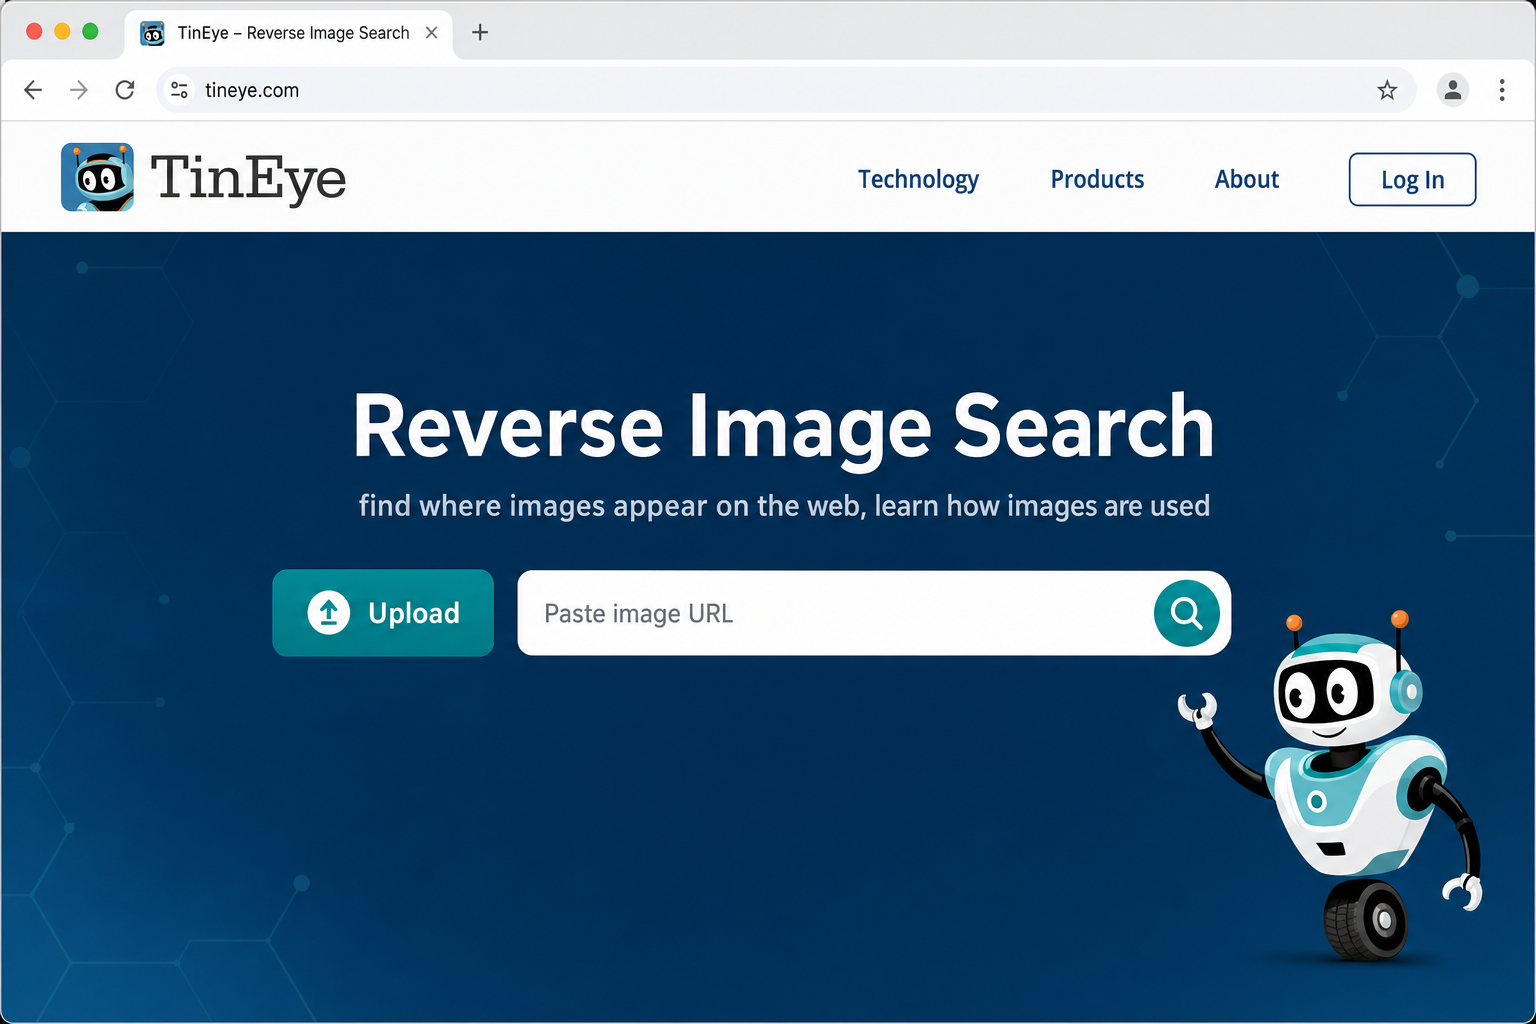
TinEye:
- Go to tineye.com
- Drag the image file into the upload zone, or paste the image URL into the URL field
- Click Search and sort results by Oldest to find the earliest known appearance
Yandex Images (especially valuable for faces and international content):
- Go to yandex.com/images
- Click the camera icon in the search bar
- Choose Upload file or paste the image URL
- If results appear in Russian, use your browser’s built-in translation (Chrome: click the translate icon in the address bar)

What zero results mean: AI-generated images are novel — they don’t exist elsewhere online. Zero reverse search results is a red flag when the image claims to show a real event. It’s not a clearance.
Step 4: Inspect the EXIF Metadata
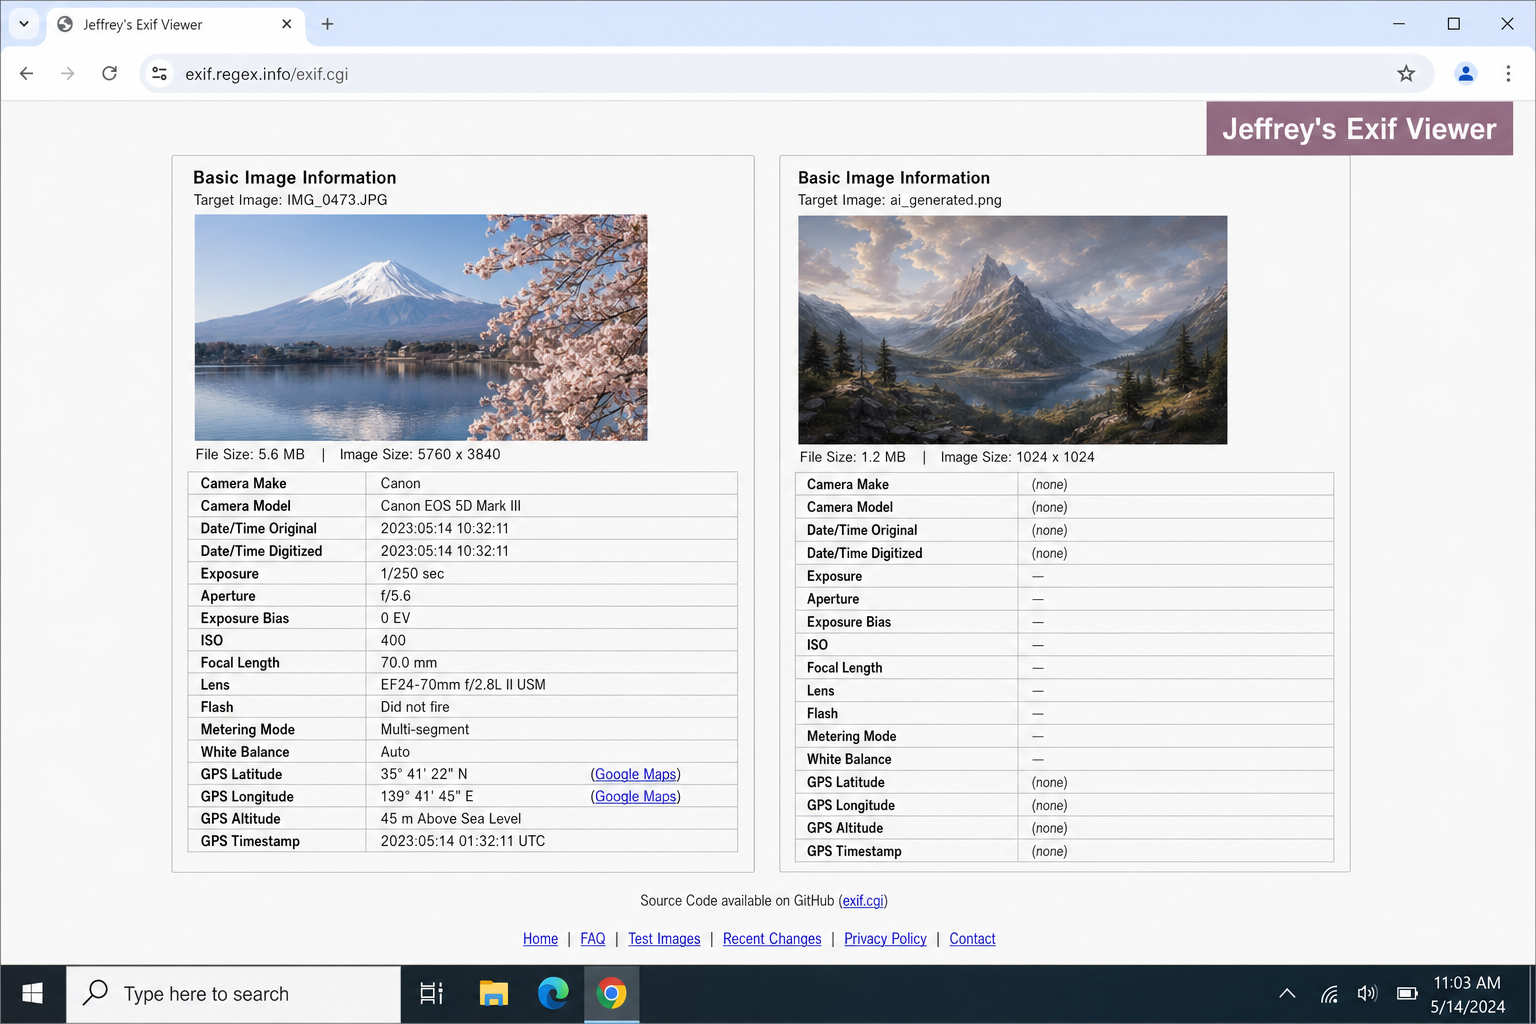
EXIF data is the hidden information a camera embeds in every photo: device model, GPS coordinates, shutter speed, timestamp, and more. AI generators don’t use cameras, so they typically produce images with no EXIF data at all.
Option A — Jeffrey’s Exif Viewer (no install needed):
- Go to exifdata.com
- Paste the image URL into the input field and press Enter
- A real camera photo will show fields like Camera Model, GPS Latitude/Longitude, Shutter Speed, and ISO
- An AI-generated image typically shows a blank or near-empty result
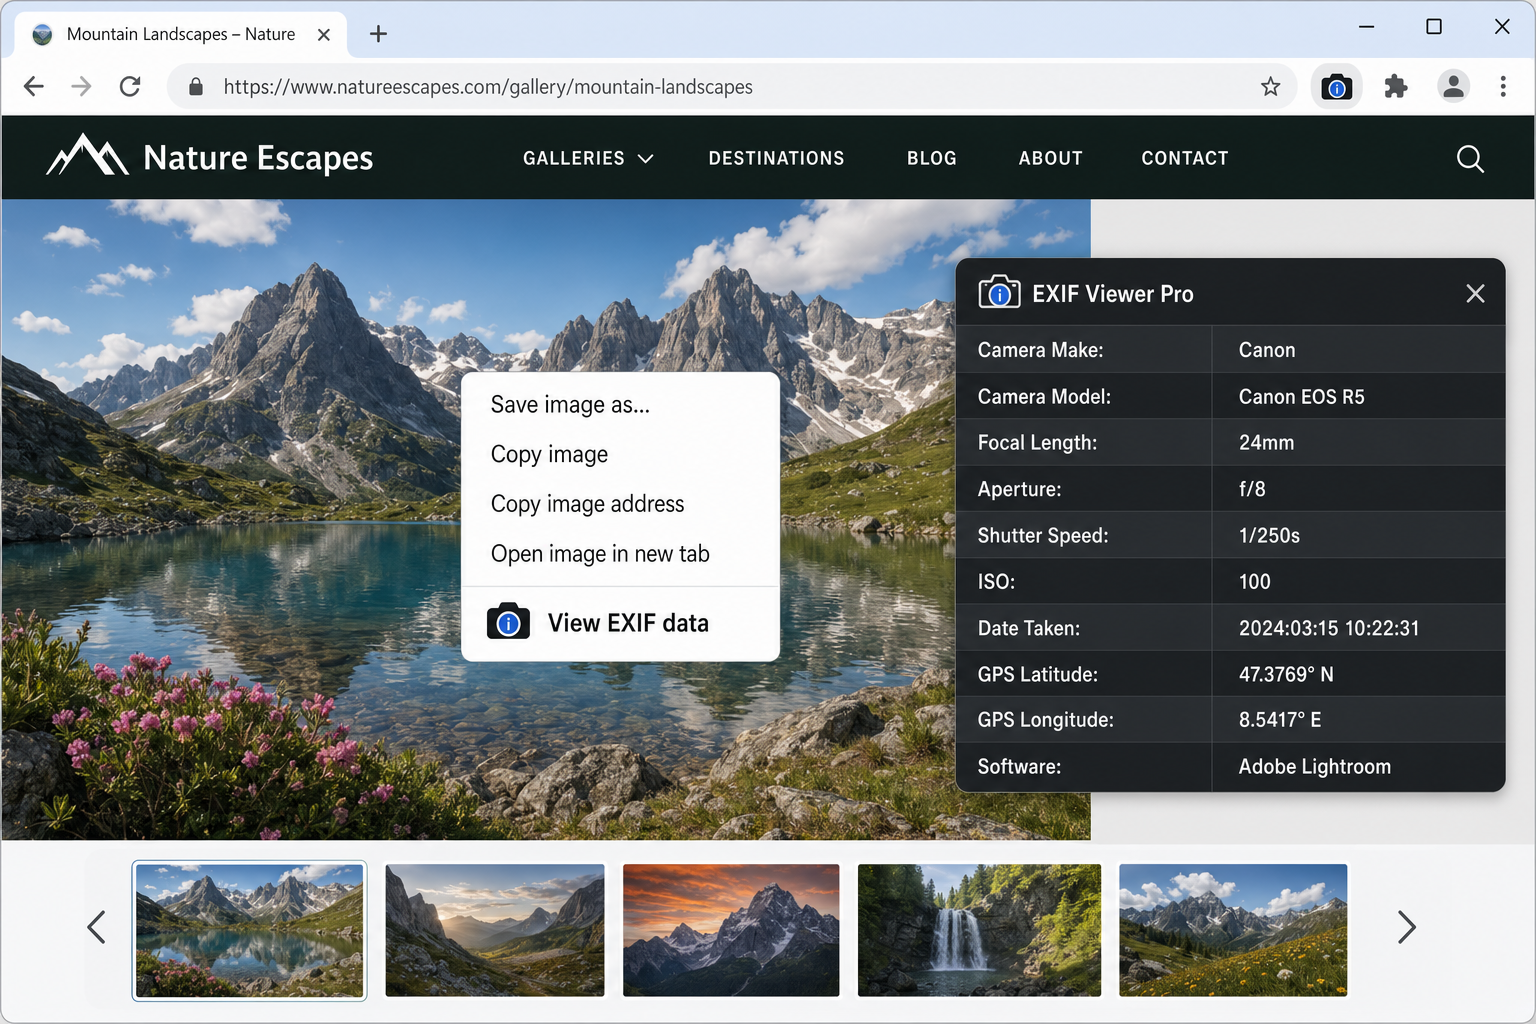
Option B — EXIF Viewer Pro browser extension (faster for inline images):
- Install EXIF Viewer Pro from the Chrome Web Store or Firefox Add-ons (free)
- Right-click any image on a webpage and select View EXIF data from the context menu
- A panel opens showing all available metadata without leaving the page
Important nuance: Social media platforms like Instagram, X/Twitter, and Facebook strip EXIF data from all uploads by default. Missing metadata on a social-media-sourced image is a yellow flag, not a red one. The key question is: does the claimed provenance match? If someone says they took this photo on a specific camera at a specific location but there’s no device or GPS data, that’s suspicious.
Step 5: Check Filename, Provenance, and Context
- Filename: AI generators often produce files with random strings (
IMG_4829301.jpg) or generic stock-style names. A filename that doesn’t match the claimed event is a minor flag. - Upload timestamp: Does the image’s first known appearance predate the event it supposedly shows? That’s a significant red flag.
- Contextual mismatch: Does the weather match the claimed date and location? Does the architecture match the claimed city? Are there seasonal cues that contradict the caption?
- Source chain: Work backward from the viral post. Where did it first appear? If the trail ends at an anonymous or recently created account, that’s meaningful.
Step 6: Check for C2PA Content Credentials
This step covers something most readers won’t yet know about and it’s becoming one of the most reliable positive signals available in 2026.
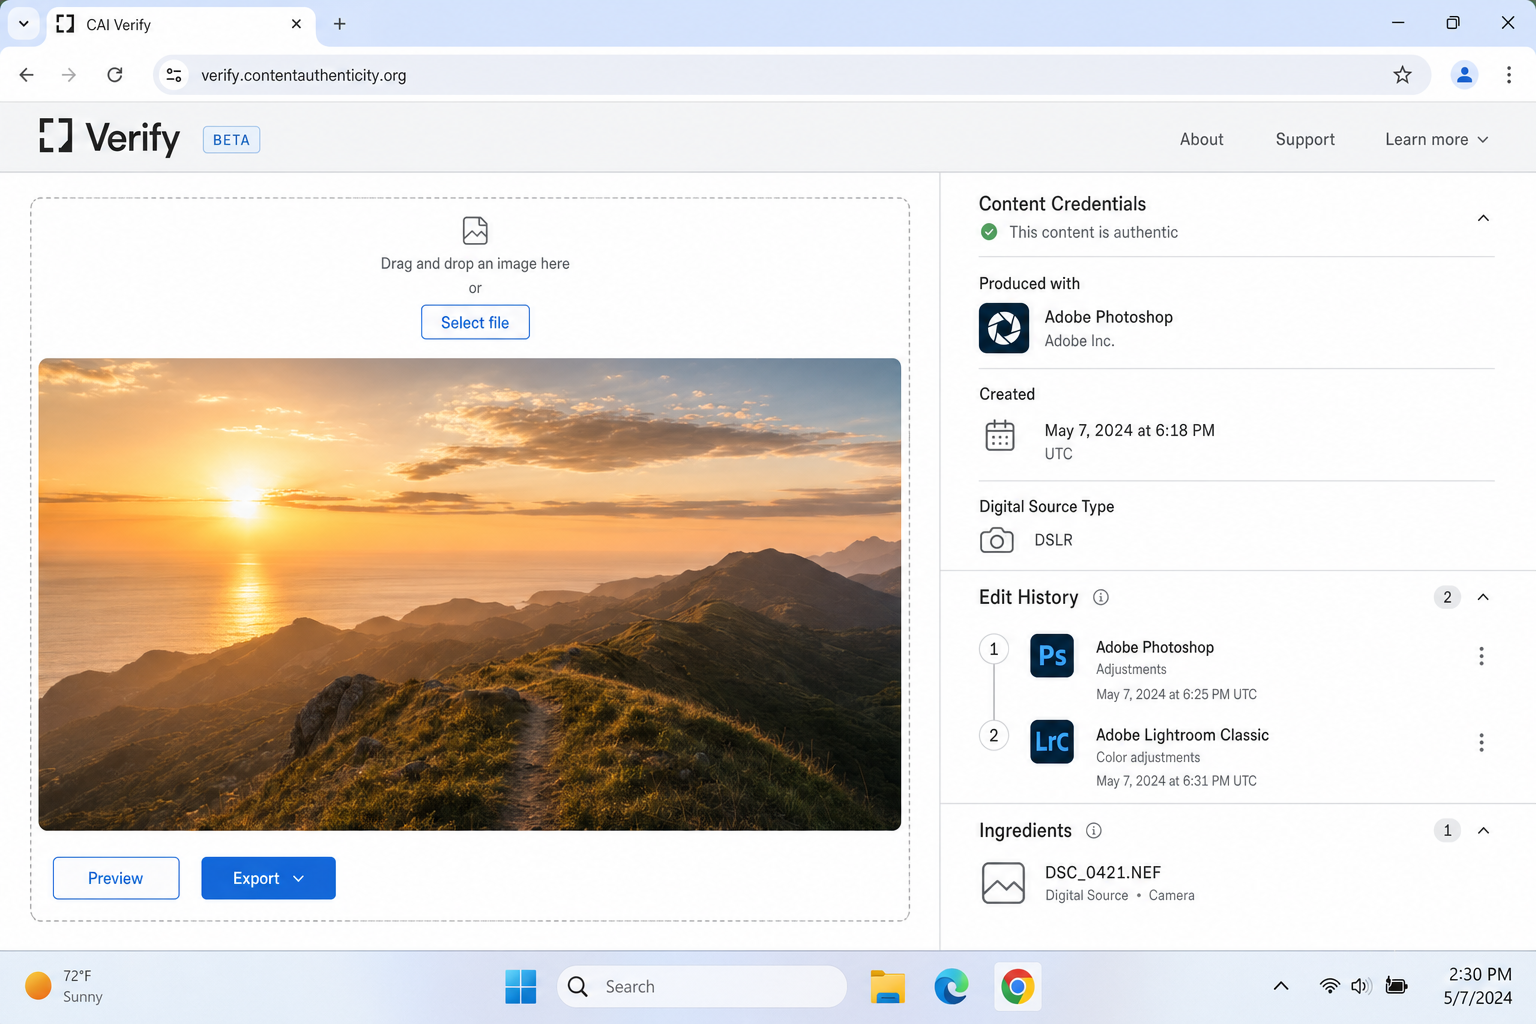
What is C2PA? The Coalition for Content Provenance and Authenticity is an industry standard that lets cameras, editing software, and publishing platforms embed a cryptographically signed provenance record into an image file. Think of it as a tamper-evident chain of custody: who created the image, what device was used, and what edits were made.
When an image carries C2PA credentials, you’ll see a small “CR” badge (Content Credentials) on platforms that support it, including certain news organizations, Adobe-ecosystem tools and some social platforms in 2026.
How to check:
- Go to verify.contentauthenticity.org
- Upload the image file or paste its URL
- If credentials exist, you’ll see a provenance panel showing the creation tool, device, and edit history
- If no credentials exist, that’s not a red flag — C2PA adoption is growing but not yet universal
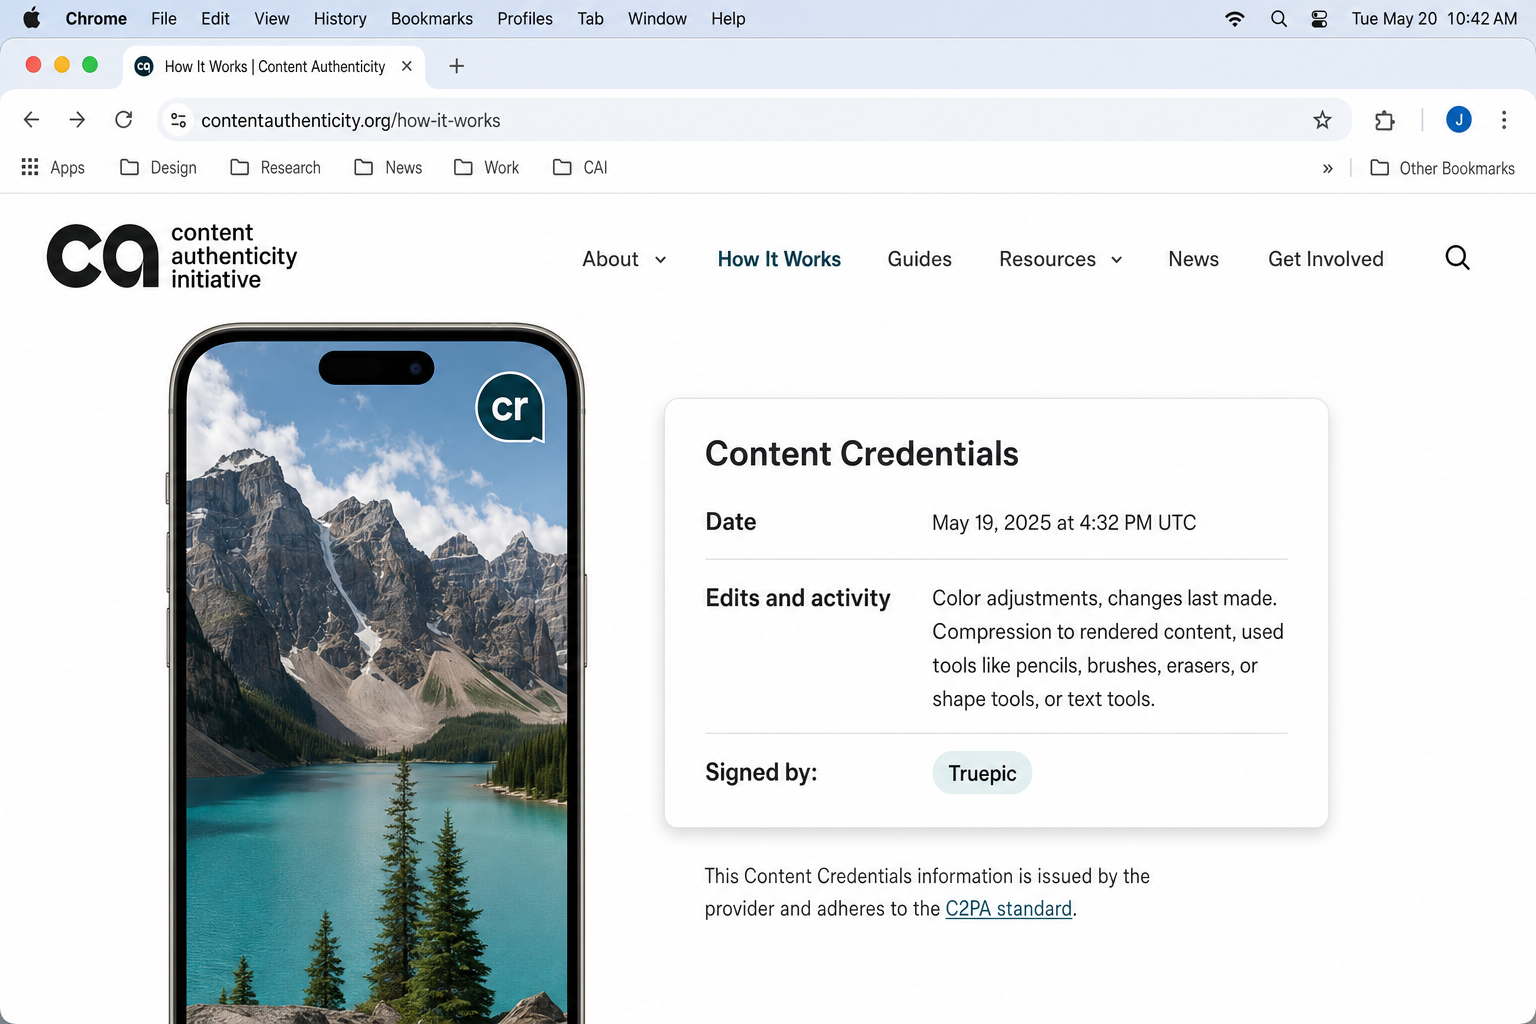
Treat C2PA as additive: A CR badge that traces to a legitimate camera and news organization is a strong positive signal. An absent badge simply means you continue with the rest of your workflow.
🎯 Stress Test — Level 2 (Medium)
Scenario: A photo circulates showing a large crowd at an apparent protest in a major European city. The image is visually clean — no obvious hand errors, no garbled text, sharp edges throughout. The caption claims it was taken “yesterday.”
Your challenge (90 seconds): Apply the Level 2 checklist. You find: Google Images returns zero results. TinEye returns zero results. Yandex returns one result, from a stock image site, uploaded six months ago. The EXIF data is completely empty. The filename is protest_scene_final_v2.jpg. No C2PA credentials are present.
What does this evidence stack tell you? Zero reverse search results + stock site match + empty metadata + suspicious filename = strong multi-signal case for AI generation, even without a single visual tell. This is exactly where Level 2 catches what Level 1 missed.
Level 3 — Hard Fakes: AI Detection Tools and Their Limits
🕐 Time budget: 3 minutes
Some fakes pass visual inspection and have clean-looking metadata. Tool-based detection adds a probabilistic layer, not a verdict, but another signal for your evidence stack.
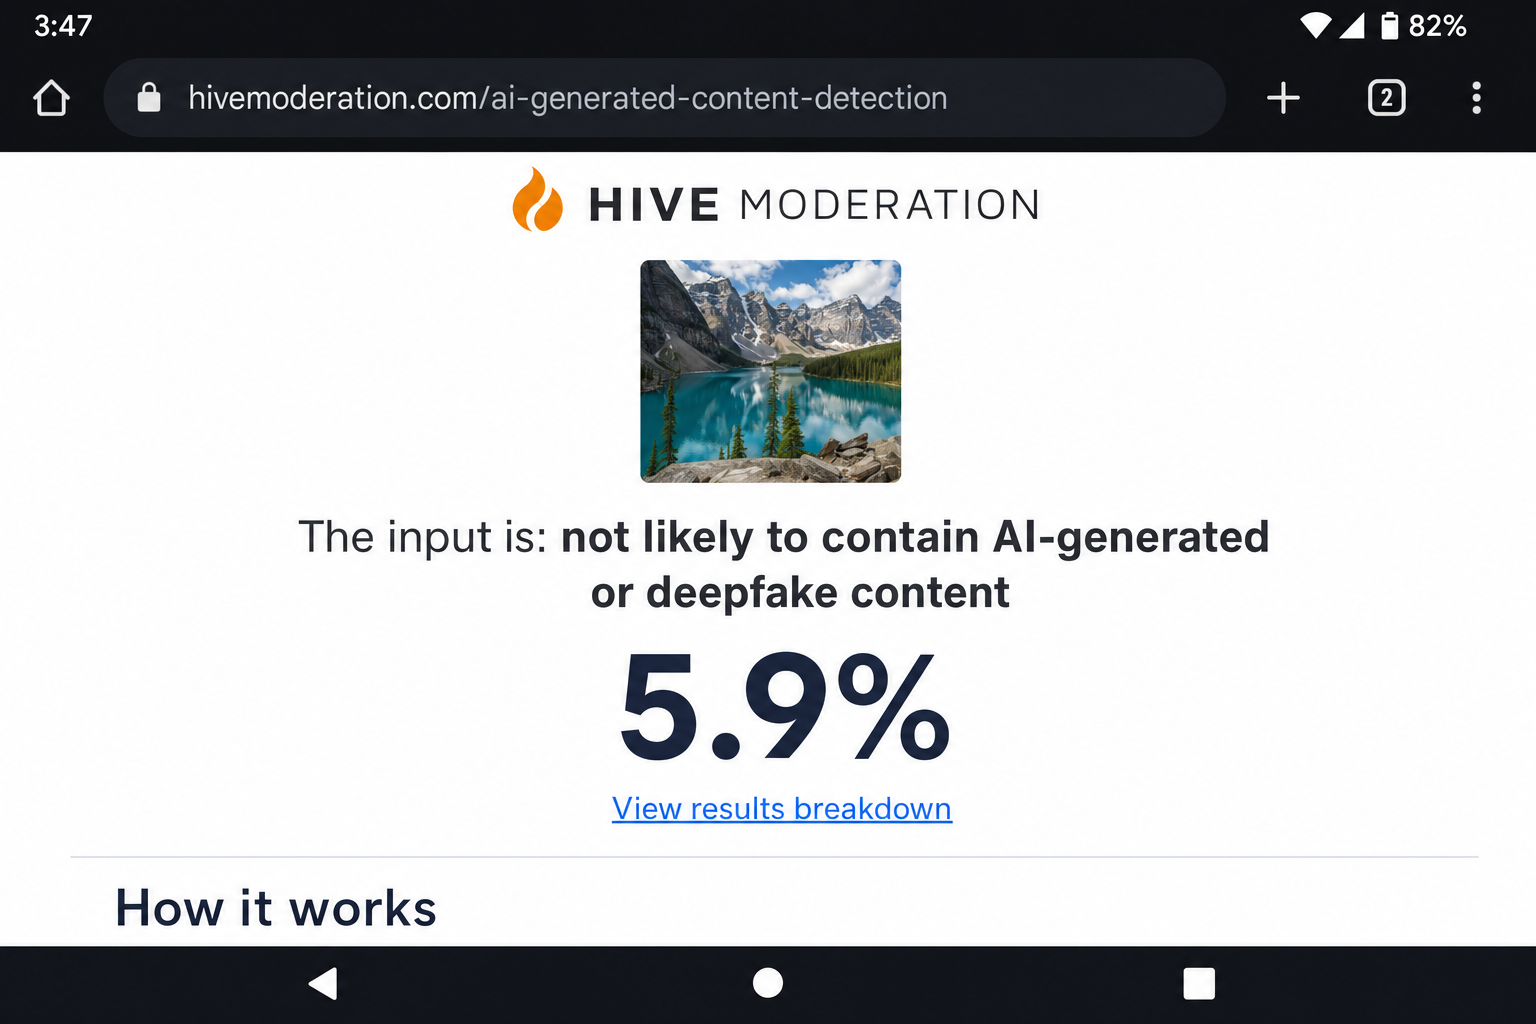
Step 7: Run Hive Moderation
Hive Moderation is the strongest free tool for photorealistic faces and body images in 2026.
- Go to hivemoderation.com/ai-generated-content-detection
- Drag and drop the image file onto the upload zone, or paste the image URL into the URL input field
- Click Analyze (or the equivalent submit button)
- Wait for the result — typically under 10 seconds
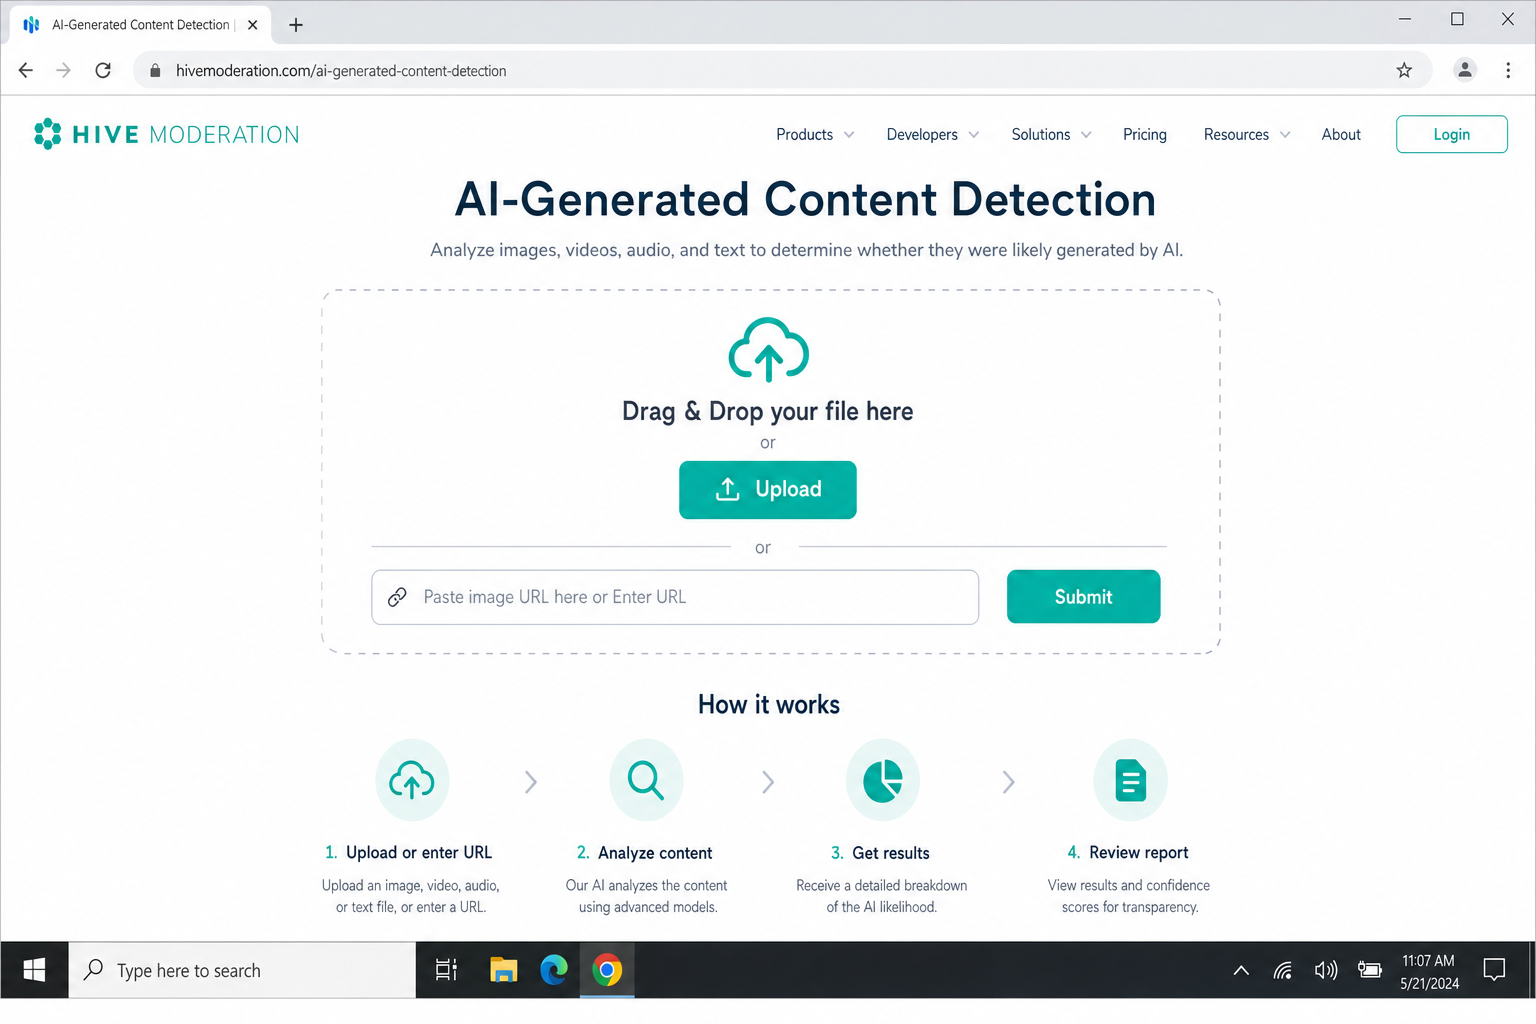
- Read the confidence score. Hive returns a percentage likelihood that the image is AI-generated, along with a verdict label.
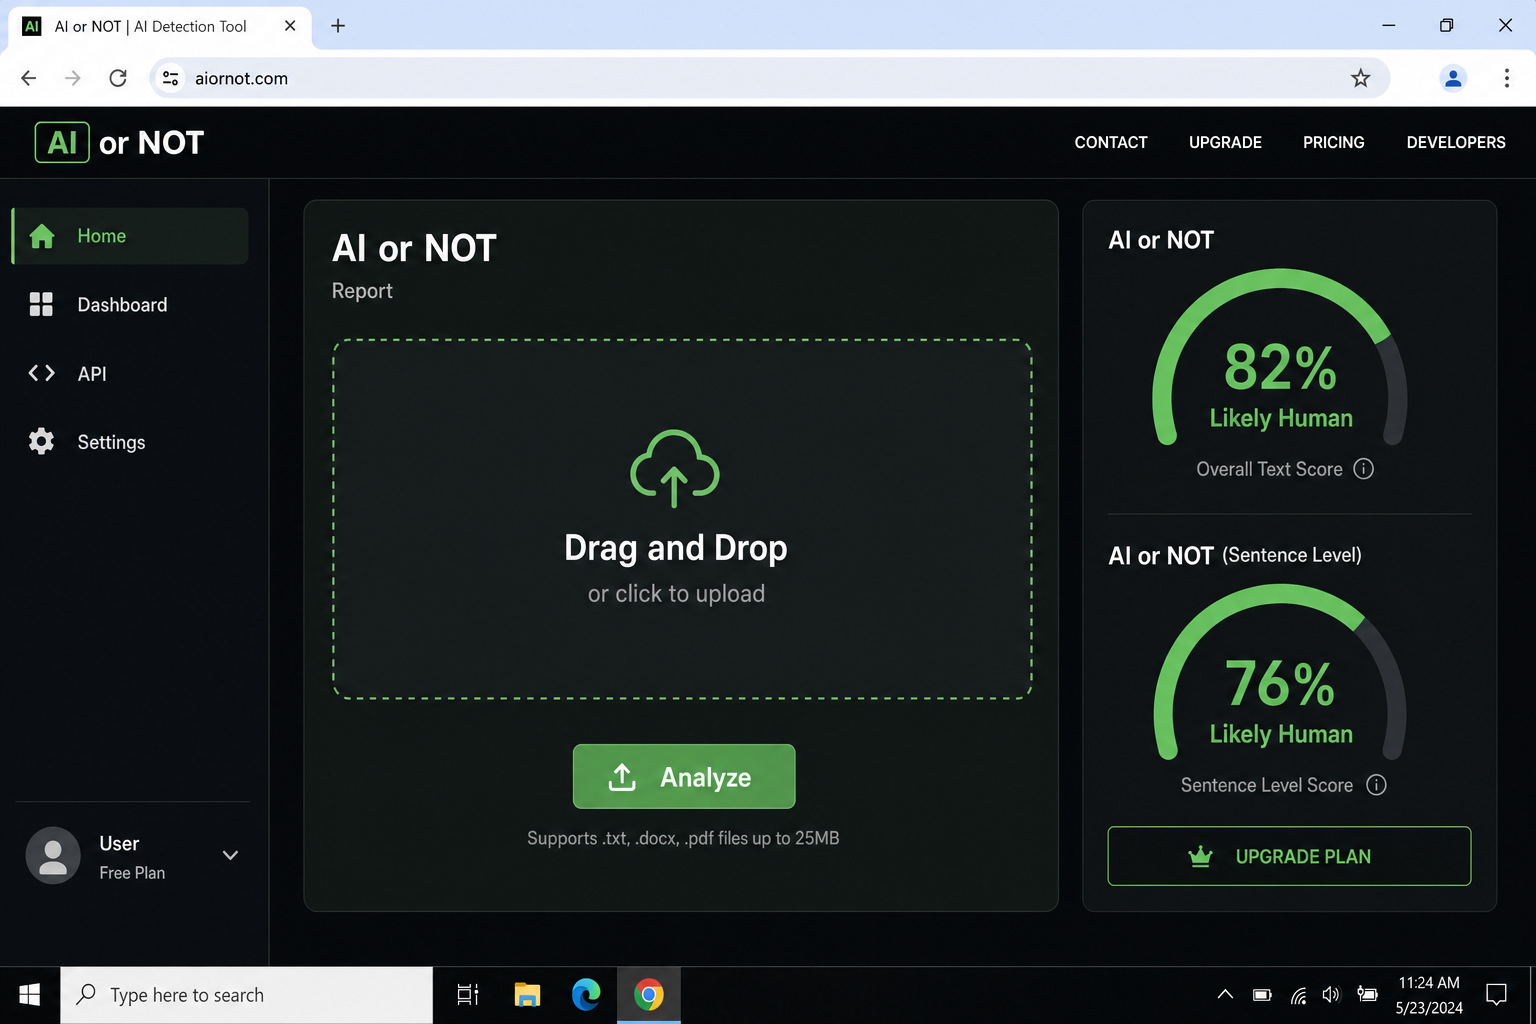
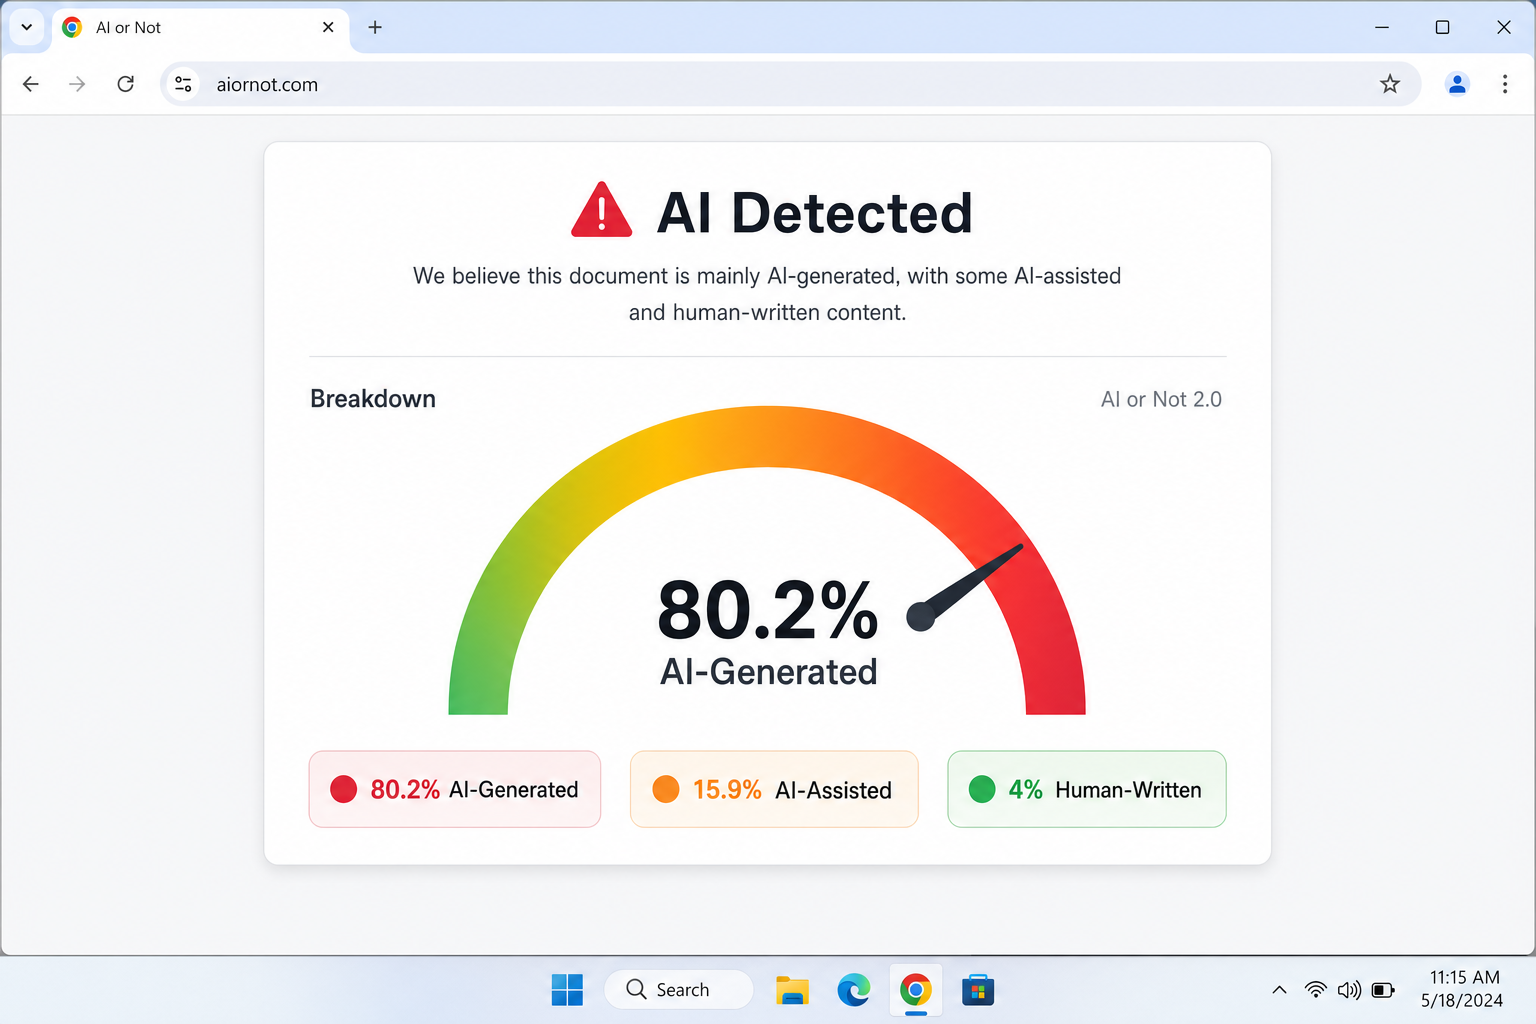
Step 8: Run AI or Not
AI or Not is the fastest option and works well on mobile, good for a quick first-pass or when Hive is slow.
- Go to aiornot.com
- Click Upload Image or drag the file onto the submission area; alternatively, paste an image URL
- The result appears within seconds — a verdict and a confidence percentage
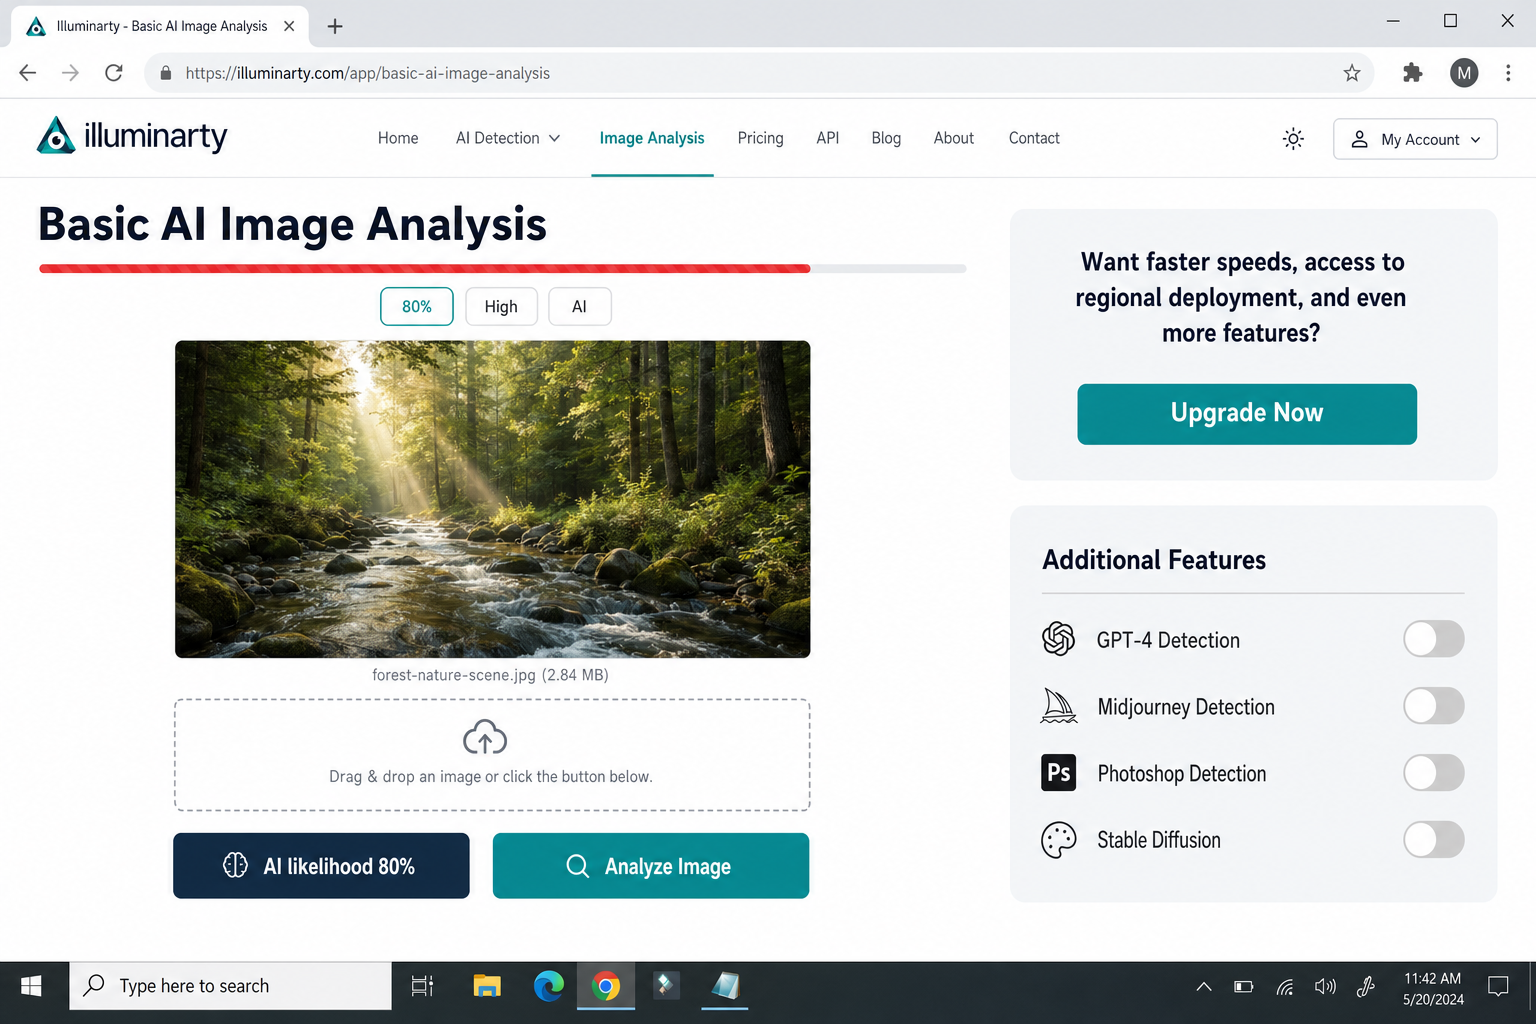
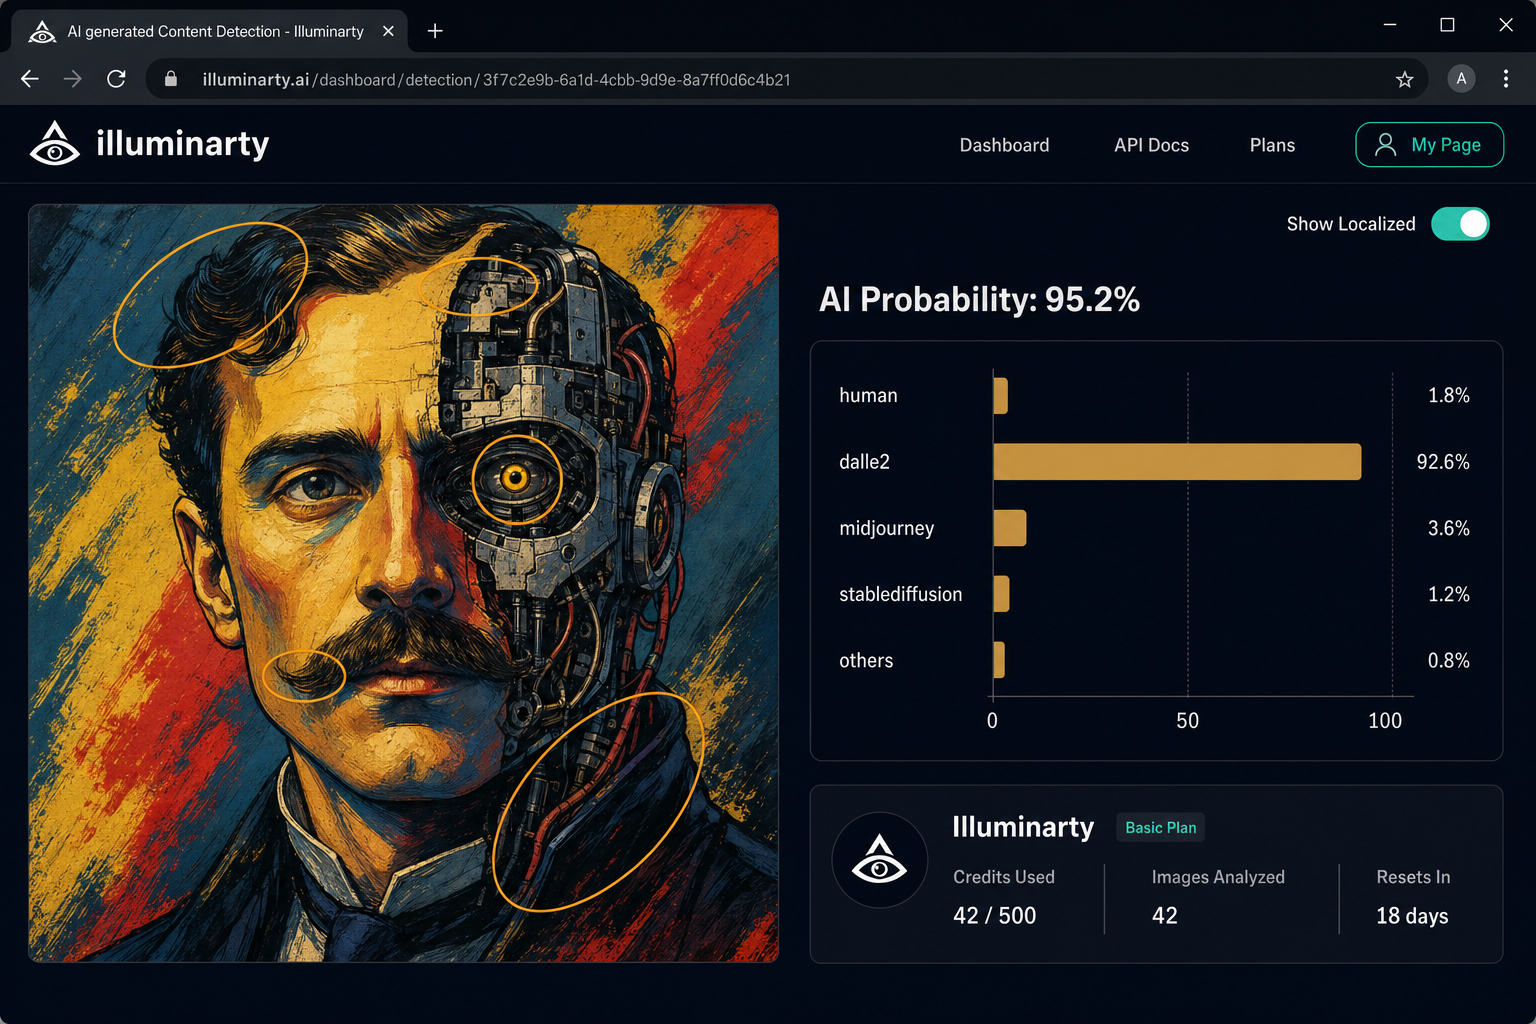
Step 9: Run Illuminarty (Especially for Art-Style Images)
Illuminarty performs better than Hive on illustrated, painterly, or art-style images. If your suspicious image has a non-photographic aesthetic, start here instead.
- Go to illuminarty.ai
- Navigate to the detection or Check feature on the homepage
- Upload the image file or paste a URL
- Review the AI probability output — Illuminarty returns a percentage score and highlights regions it finds statistically suspicious
Step 10: Check for Google SynthID (When Applicable)
Google’s SynthID embeds an invisible watermark into images generated by Gemini and other Google AI tools. When the detector finds this watermark, it’s highly reliable, but it only catches images made with Google’s tools.
- SynthID detection is integrated into certain Google platforms and Adobe tools as of 2026
- Check deepmind.google/technologies/synthid/ for current availability
- A positive SynthID result is a very strong signal — treat it as near-conclusive for that specific generator family
How to Interpret Tool Results Honestly
| Score | What It Means | What to Do |
|---|---|---|
| 90–100% AI | Strong signal | Add to evidence stack; do not publish as real |
| 70–89% AI | Moderate signal | Treat as yellow flag; check other levels |
| 50–69% (any direction) | Inconclusive | Do not use as evidence either way |
| 70–89% Real | Moderate signal | Not a clearance; check other levels |
| 90–100% Real | Relatively strong signal | Still not a clearance if other red flags exist |
Critical caveats:
- Heavily compressed, filtered, or screenshot images confuse all classifiers and inflate false positive rates
- Some 2026 generators are trained to fool detectors — a “likely authentic” result is not a clearance to publish
- False positives are real. Authentic photos that are heavily edited, low-resolution, or shot in unusual lighting can score as AI-generated
When Tools Disagree
If Hive returns 85% AI and AI or Not returns 72% real, don’t average them or pick the one you prefer. Instead:
- Return to your Level 1 visual evidence — how many hallucination zone flags did you log?
- Return to your Level 2 evidence — how many contextual red flags did you find?
- If you have 3 or more independent red flags across all levels, treat the image as likely AI regardless of one tool’s “real” verdict
- Document your reasoning
- For high-stakes decisions, escalate to Snopes or PolitiFact, or contact the relevant wire service directly
🎯 Stress Test — Level 3 (Hard)
Scenario: A photorealistic image shows a uniformed official signing a document at a formal ceremony. It passes Level 1 completely — hands are correct, text is plausible, lighting is consistent. Level 2 turns up empty EXIF data (ambiguous, since it came via social media) and no reverse search matches. Now you run the tools: Hive returns 78% AI. AI or Not returns 61% real. Illuminarty returns 82% AI.
Your challenge (3 minutes): Two tools say AI, one says real. What’s your call?
Reasoning: Two tools flag AI at moderate-to-high confidence. Zero reverse search results and missing metadata on a claimed official ceremony — where wire service photos would normally exist — tips the weight of evidence toward likely AI. The single “real” result at 61% barely clears the inconclusive threshold. It doesn’t override the stack. You would not publish this image as authentic without additional verification.
The Full Verification Workflow: Your Printable Checklist
Screenshot or print this section (Ctrl+P on Windows, Cmd+P on macOS — select Save as PDF). This is the complete workflow in one place.
### 🗂 AI Image Verification Checklist — 2026
Image being checked: ___________________________
Date/Time: ___________________________
Claimed source/caption: ___________________________—
☐ Step 1 — First Look (60 sec)
Scan all six hallucination zones. Note anomalies without forming a conclusion.
Flags noted: ___________________________☐ Step 2 — Zoom and Inspect (60 sec)
Magnify to 150–200%. Check hands, text, ears/jewelry, hair edges, background, shadows.
Flags noted: ___________________________☐ Step 3 — Metadata Pull (60 sec)
Run EXIF check via exifdata.com or EXIF Viewer Pro extension.
☐ Camera model present? ☐ GPS present? ☐ Timestamp consistent?
Notes: ___________________________☐ Step 4 — Reverse Search (90 sec)
Run Google Images → TinEye → Yandex. Note earliest known appearance.
Earliest match: ___________________________ Date: ___________☐ Step 5 — Context Audit (60 sec)
Does weather/season/architecture/crowd match claimed location and date?
Mismatches noted: ___________________________☐ Step 6 — Provenance Check (30 sec)
Check verify.contentauthenticity.org for C2PA credentials.
☐ CR badge present? ☐ Provenance chain intact?☐ Step 7 — Run Detection Tools (2–3 min)
Run at least two tools. Record scores.
Hive Moderation: ______% AI / Real
AI or Not: ______% AI / Real
Illuminarty: ______% AI / Real☐ Step 8 — Weigh the Evidence
Count independent red flags across all steps:
☐ 0–1 flags → Likely authentic (document and proceed with caution)
☐ 2 flags → Inconclusive (seek additional verification before publishing)
☐ 3+ flags → Likely AI-generated (do not publish as authentic; escalate if high-stakes)Goal: Defensible due diligence — not certainty.
Checklist version: 2026 — online-tech-tips.com
Audience-Specific Adaptations
For Journalists and Fact-Checkers
Add Steps 3–8 of this checklist to your CMS pre-publication template as a mandatory field. Keep Yandex Images and EXIF Viewer Pro bookmarked in a dedicated Verification browser folder. When you complete the checklist, paste your evidence notes into the story file. This creates an editorial paper trail that protects you and your organization if the image is later disputed. For breaking news under extreme time pressure, at minimum run Steps 1, 4, and 7 before publishing.
For Educators
The Easy / Medium / Hard stress test structure maps directly to differentiated instruction. Assign Level 1 to introductory students, Level 2 to intermediate, and Level 3 as an extension activity. Each timed challenge works as a ready-made classroom exercise with a built-in debrief: what did you notice first? What would you have missed? Pair the checklist with a discussion of why AI fakes spread: emotional triggers, confirmation bias, and the speed advantage of misinformation. The printable checklist makes an effective lab handout.
For Social Media Users
If you only do one thing before sharing a surprising image, run a reverse image search (Step 4). It takes 30 seconds, requires nothing beyond Google Images, and catches the majority of recycled or misattributed fakes. The rule: if the image is emotionally charged and you can’t trace it to a credible source in 60 seconds, don’t share it. Sharing a fake, even with good intentions, amplifies it. When in doubt, wait. For more on how artificial intelligence can be dangerous when misused, see our dedicated guide.
For Marketing and Communications Professionals
Establish a written policy requiring source documentation for all user-generated content before it enters your production pipeline. For stock images, run at minimum Hive Moderation and one reverse search before campaign use. Document tool results in your asset management system. Inadvertently publishing AI-generated content as authentic brand photography is a preventable reputational risk. You may also want to check an image for copyright as part of your standard review process.
What Detection Can’t Do: Honest Limitations
Detection methods are inherently reactive. They’re built to recognize patterns from known generators, and they always lag behind the latest capabilities. By the time a new model’s artifacts are well understood, the next version has patched them.
Even trained experts disagree on ambiguous cases. Tool confidence scores are probabilistic, not diagnostic. A result of 78% AI means the classifier leans that way based on statistical patterns, not that the image is definitively fake.
The false positive problem is serious. Authentic photographs, especially heavily processed or low-resolution images can score as AI-generated. Wrongly labeling a real photojournalist’s work as fake causes direct harm. It undermines documentation of real events, damages the photographer’s reputation, and can suppress visual evidence where it matters most. Before publishing any claim that an image is AI-generated, make sure you have multiple independent red flags, not just a tool result and attempt to contact the original photographer or wire service.
The individual verification burden also shouldn’t fall entirely on readers. Platform-level solutions – mandatory C2PA credential embedding, AI-generation labeling at upload, and regulatory standards for synthetic media disclosure – are necessary complements to the skills in this guide. Advocate for them.
Quick-Reference Resources
| Tool | URL | Best For |
|---|---|---|
| Hive Moderation | hivemoderation.com | Photorealistic faces and bodies |
| AI or Not | aiornot.com | Fast first-pass; mobile-friendly |
| Illuminarty | illuminarty.ai | Art-style and illustrated images |
| Google SynthID | deepmind.google/technologies/synthid | Gemini-generated content |
| Google Images | images.google.com | General reverse search |
| TinEye | tineye.com | Earliest known image appearance |
| Yandex Images | yandex.com/images | Faces; international content |
| Jeffrey’s Exif Viewer | exifdata.com | EXIF metadata inspection |
| C2PA Verify | verify.contentauthenticity.org | Content credentials check |
| Snopes | snopes.com | AI image case studies; escalation |
| PolitiFact | politifact.com | Political image fact-checking |
Recommended browser extensions (free):
- EXIF Viewer Pro — Chrome and Firefox — right-click EXIF inspection on any image
- RevEye Reverse Image Search — Chrome and Firefox — right-click reverse search across multiple engines simultaneously
Tips and Troubleshooting
Reverse image search returns nothing — does that mean it’s fake?
Not automatically, but it’s a meaningful signal. AI images are novel by definition as they won’t appear elsewhere online. Zero results on all three search engines, combined with a claimed real-world event, is a red flag. Escalate to Level 2 metadata and Level 3 tools.
The image has no EXIF data, but it came from Twitter/X
That’s expected as X strips metadata from all uploads by default. Missing EXIF on a social-media-sourced image is a yellow flag, not a red one. The more important question is whether the claimed provenance holds up. If someone says this was taken at a specific location with a specific device and there’s no supporting data anywhere in the chain, that’s worth pursuing further. For more on how content is handled on Twitter/X, including sensitive material policies, see our related guide.