
Ever stumbled across a website that loads lightning-fast and thought, “I want that hosting for my own site”? Or maybe you’re doing a little competitive research and want to know what’s powering a rival’s setup? Either way, figuring out who hosts a website sounds like it should be simple, but in 2026, it’s gotten a bit more complicated than just typing a domain into a WHOIS lookup.
Thanks to privacy regulations, Cloudflare being on seemingly every website, and the rise of multi-cloud infrastructure, a single tool won’t always cut it anymore. The good news? With the right combination of methods, you can usually track down a website’s hosting provider in just a few minutes. Here’s how to do it.
Why Finding a Web Host Is Harder in 2026
Back in the day, you could pop a domain into a WHOIS database and get a pretty clear answer. Those days are mostly gone. Here’s what’s changed:
- WHOIS privacy is now the default: GDPR and similar privacy regulations pushed most registrars to hide registrant details by default. You’ll often just see the privacy protection service, not the actual owner or host.
- Cloudflare is everywhere: A huge chunk of websites now sit behind Cloudflare, which masks the real server’s IP address. So an IP lookup might just point you to Cloudflare’s network instead of the actual hosting company.
- Multi-cloud setups: Many modern websites use a mix of services — maybe AWS for the server, Cloudflare for CDN, and a third-party DNS provider. There’s no single “host” to point to anymore.
- Managed hosting is booming: Services like Kinsta, WP Engine, and SiteGround use their own nameservers and infrastructure, which doesn’t always match the company name you’d expect.
None of this means it’s impossible, it just means you’ll want to use a layered approach rather than relying on one tool. Let’s walk through the best methods, starting with the easiest.
Method 1: Use BuiltWith or Wappalyzer (Easiest)
If you just want a quick answer without any technical digging, browser extensions like Wappalyzer and BuiltWith are your best friends. They analyze a website in real time and tell you what technology it’s built on, including the hosting provider, CMS, CDN, and more.
Wappalyzer is free and works as a browser extension for Chrome, Firefox, and Edge. BuiltWith has both a free browser extension and a web-based tool. Both are significantly more accurate than older “who is hosting this” services because they look at live data rather than just DNS records.
How to Use Wappalyzer
- Go to the Wappalyzer website and install the browser extension for Chrome or Firefox.
- Navigate to the website you want to investigate.
- Click the Wappalyzer icon in your browser toolbar. A panel will pop up showing the full technology stack, including the hosting provider under the Hosting category.

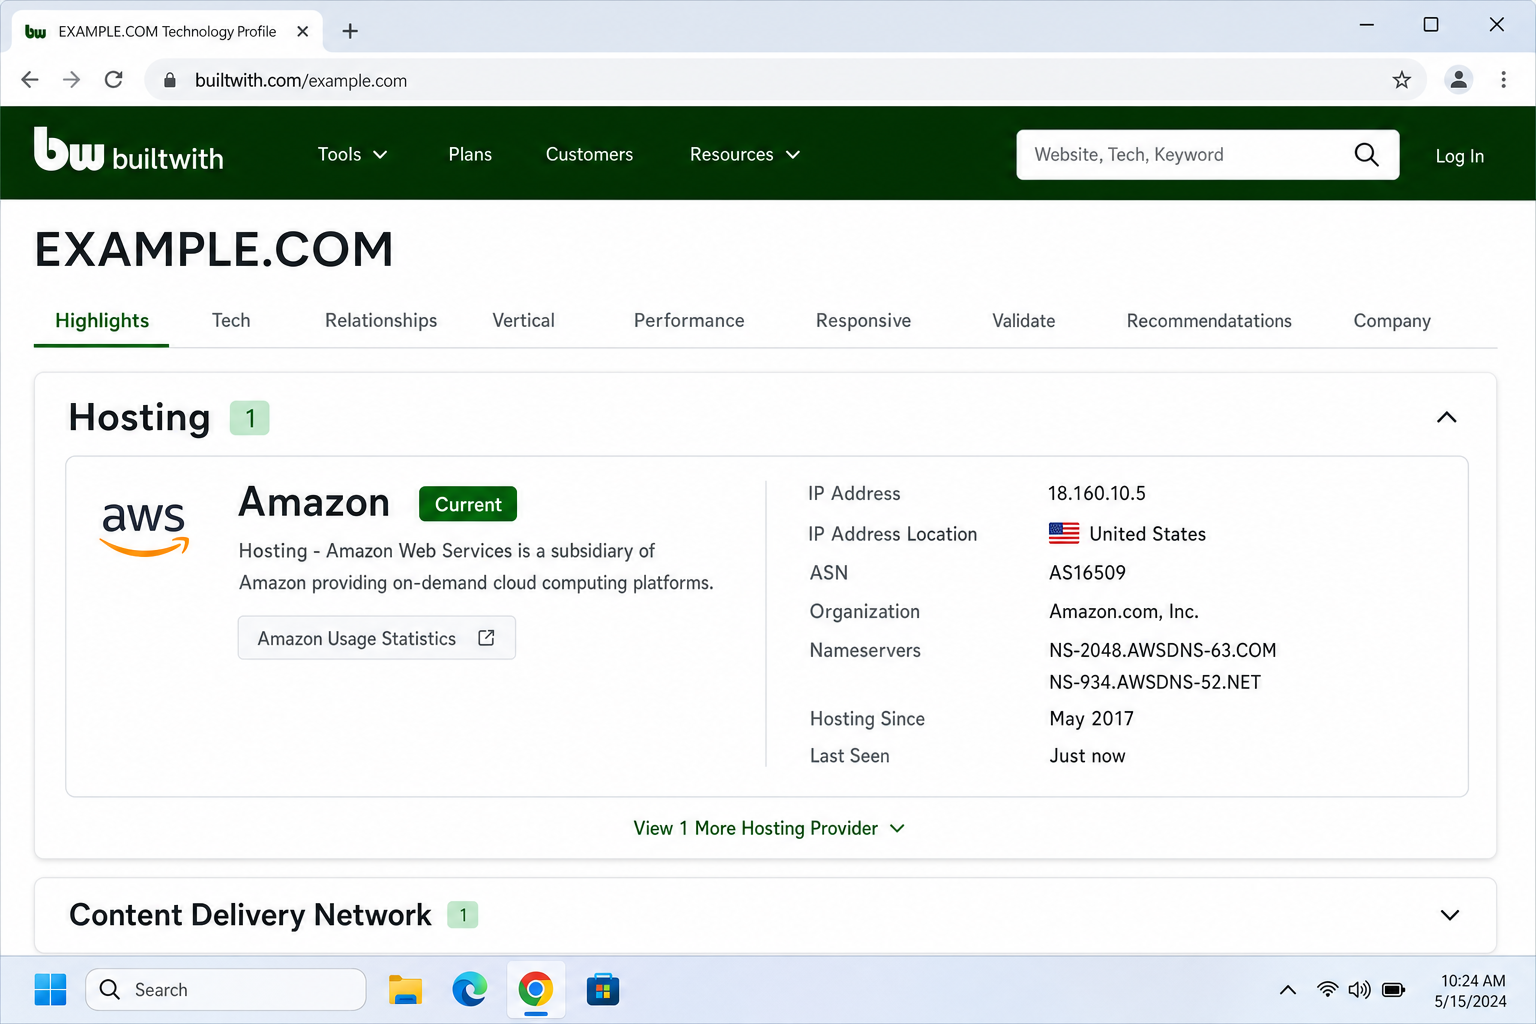
How to Use BuiltWith
- Go to builtwith.com.
- Type the domain name you want to look up into the search bar and press Enter.
- Scroll through the results to find the Hosting section — it’ll list the provider, data center location, and sometimes the specific cloud platform.
Method 2: Check the DNS Nameservers (Most Reliable)
Nameservers (NS records) are often the most reliable clue for identifying a hosting provider. When a company hosts your website, they usually ask you to point your domain’s nameservers to their servers — and those nameserver names often include the hosting company’s name. For example, if you see ns1.kinsta.com, that’s a pretty clear giveaway.
You can check nameservers using a free tool like MXToolbox, or directly from your command line if you’re comfortable with that.
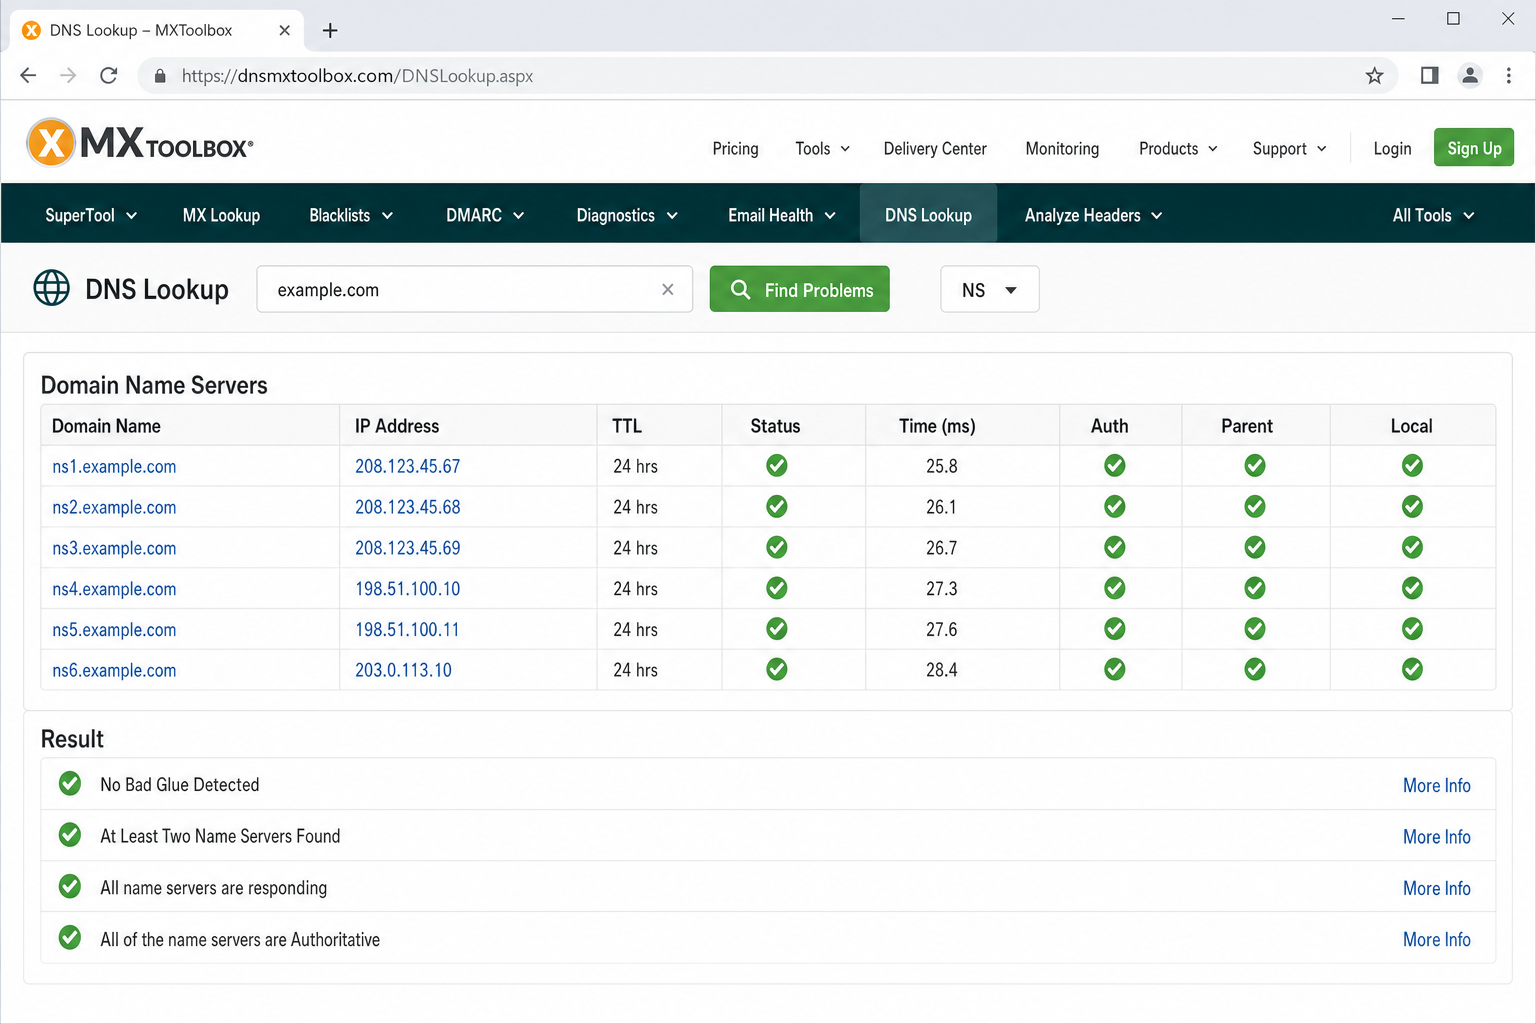
Using MXToolbox (No Command Line Needed)
- Go to mxtoolbox.com/DNSLookup.aspx.
- Type the domain name into the search bar.
- Click DNS Lookup. Look for the NS (nameserver) records in the results — the domain names listed there often reveal the hosting provider.
Using the Command Line (Windows or macOS)
If you’re comfortable opening a terminal or command prompt, you can run a quick lookup directly from your computer with no browser needed.
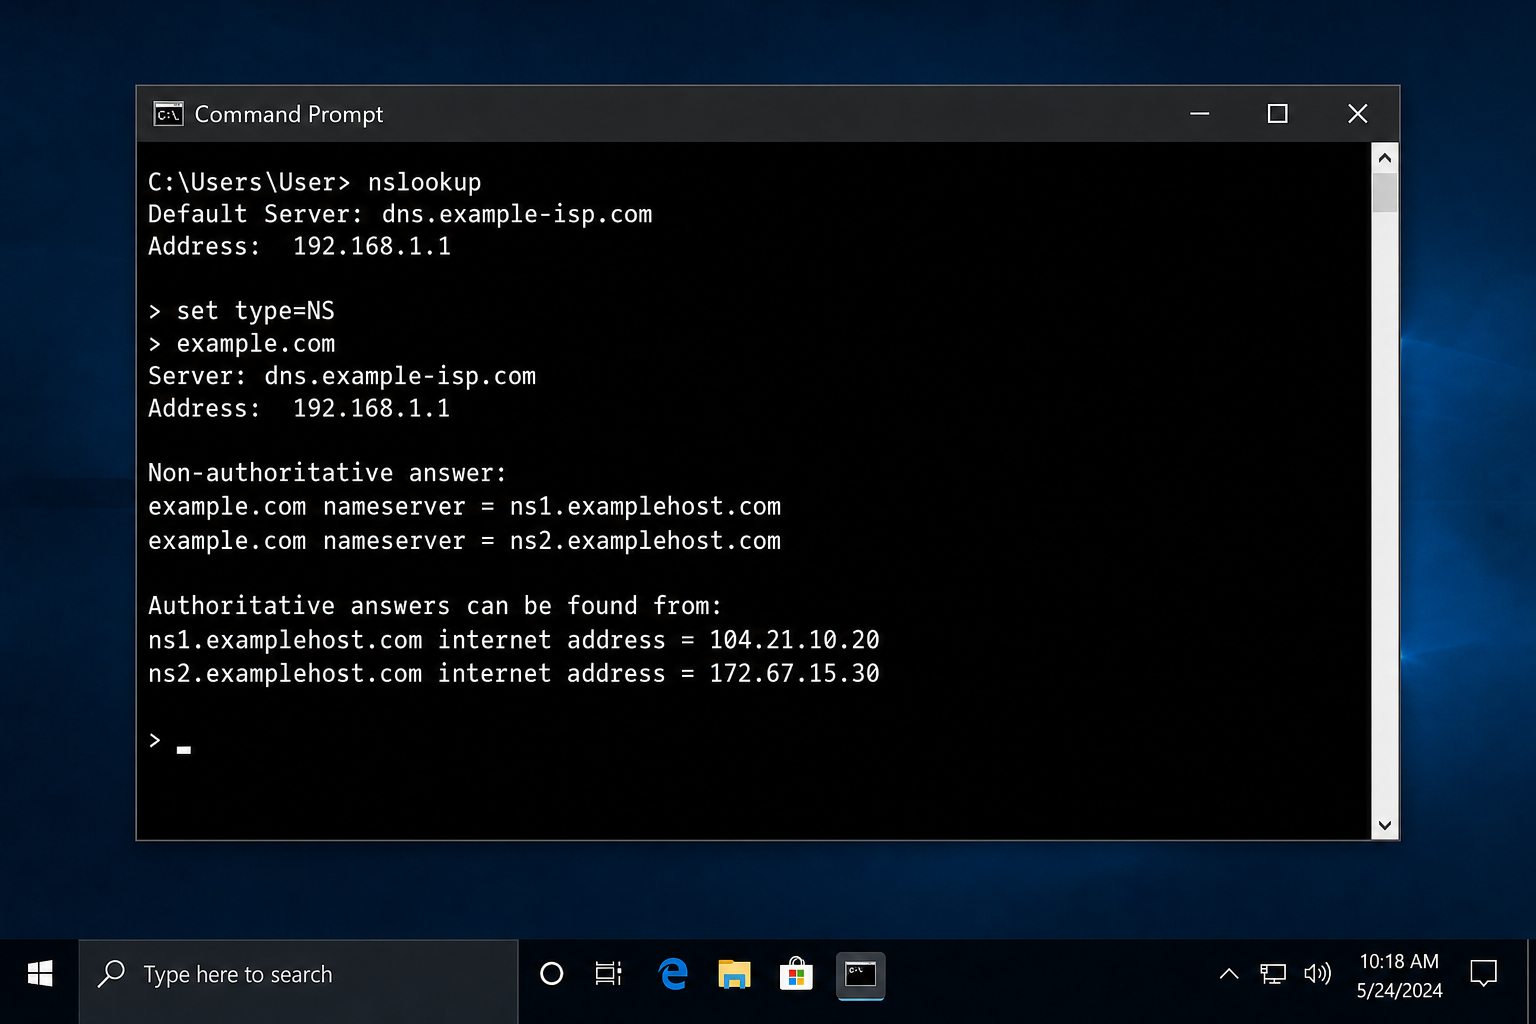
On Windows
- Press
Windows + R, typecmd, and press Enter to open Command Prompt. - Type the following command and press Enter, replacing
example.comwith the domain you’re looking up:nslookup -type=NS example.com - Look for the nameserver entries in the output — those are your clues.
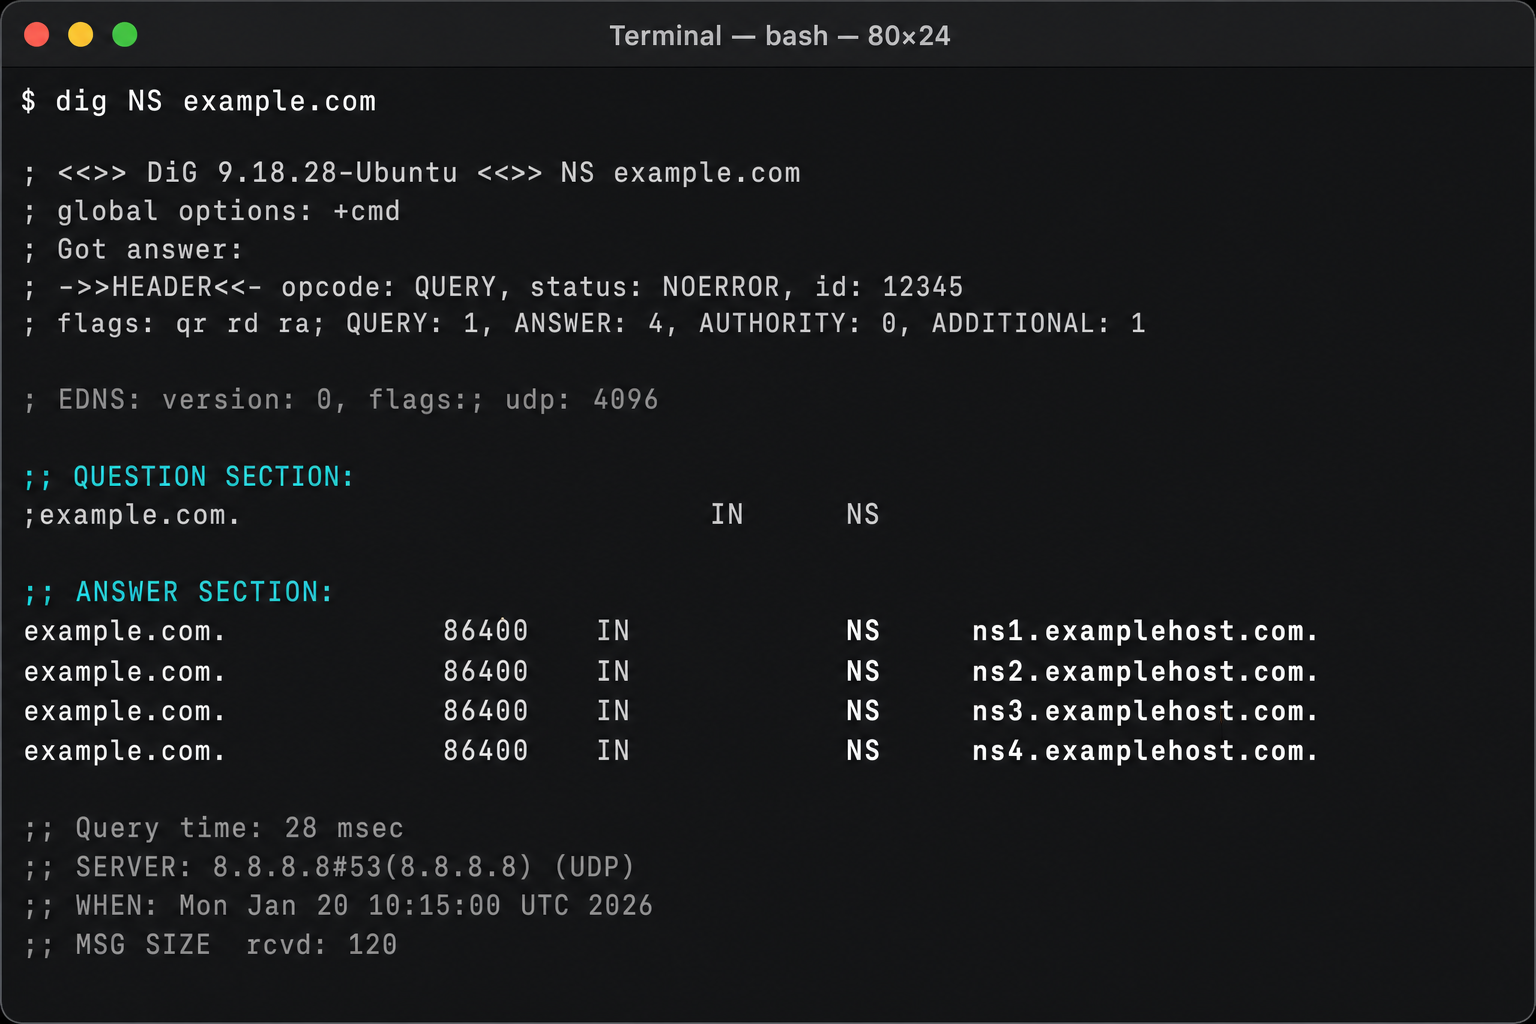
On macOS
- Open Terminal (find it in Applications > Utilities, or search with Spotlight using
Cmd + Space). - Type the following and press Enter:
dig NS example.com - Look at the ANSWER SECTION for the NS records.
Method 3: Do an IP Address Lookup
If the nameservers don’t give you a clear answer, looking up the website’s IP address can help. Tools that check the ASN (Autonomous System Number, basically a label that identifies which company owns a block of IP addresses) can tell you who’s actually serving the site.
A good free tool for this is AbuseIPDB or the IP lookup at MXToolbox. You can also use whois.com and search the IP address directly (not just the domain name).
- First, find the website’s IP address. Go to MXToolbox DNS Lookup, enter the domain, and look for the A record — that’s the IP address.
- Copy the IP address, then go to whois.com and paste it into the search bar.
- The results will show you the organization that owns that IP range — which is usually the hosting company.
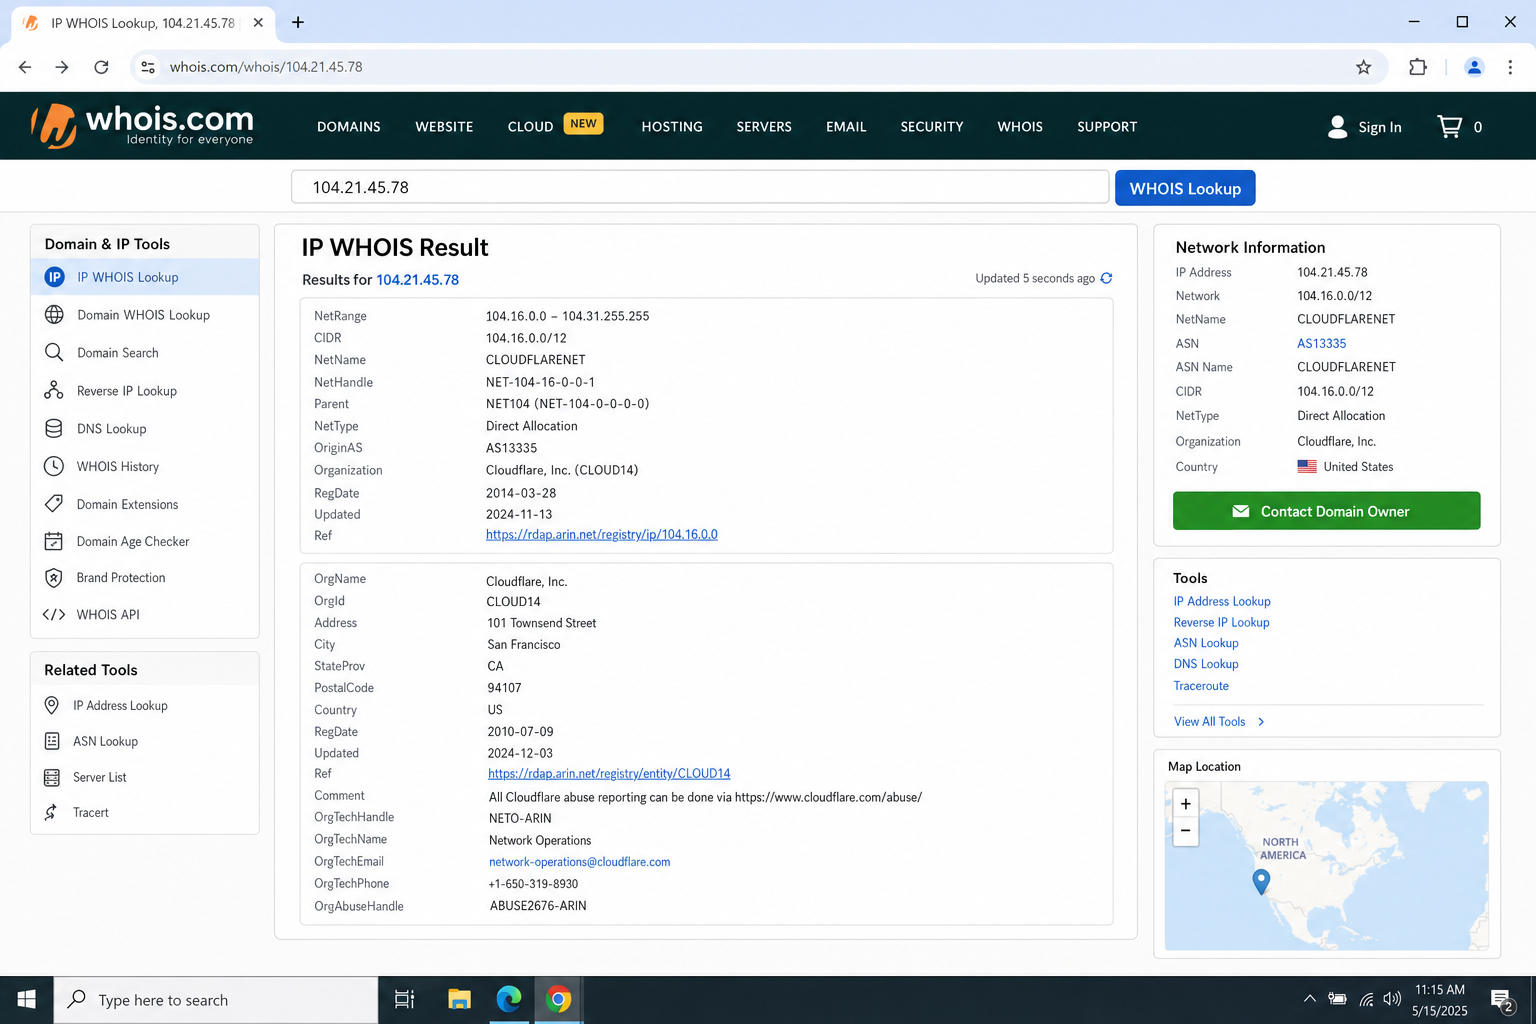
Heads up: If the IP lookup returns “Cloudflare, Inc.” as the organization, the site is behind Cloudflare’s network. That doesn’t mean Cloudflare is the host, it’s just acting as a middleman (a CDN and security layer). Jump to Method 5 for tips on digging deeper past Cloudflare.
Method 4: Check HTTP Response Headers
This one’s a bit more technical, but it’s surprisingly useful. Every time you load a webpage, the server sends back hidden information called response headers. These headers sometimes contain clues about the hosting setup – things like the server software, caching system, or even the hosting provider’s name.
You can check these headers right in your browser using the built-in developer tools (no extra software needed).
On Windows or macOS (Chrome, Firefox, or Edge)
- Go to the website you want to investigate.
- Press
F12(Windows) orCmd + Option + I(macOS) to open Developer Tools. - Click the Network tab at the top of the Developer Tools panel.
- Reload the page with
F5(Windows) orCmd + R(macOS). You’ll see a list of requests appear. - Click on the first item in the list (usually the domain name itself).
- Click the Headers tab in the right panel, then scroll down to Response Headers.
- Look for headers like
Server,X-Powered-By,X-Served-By, orX-Cache— these can reveal the hosting provider or server type.
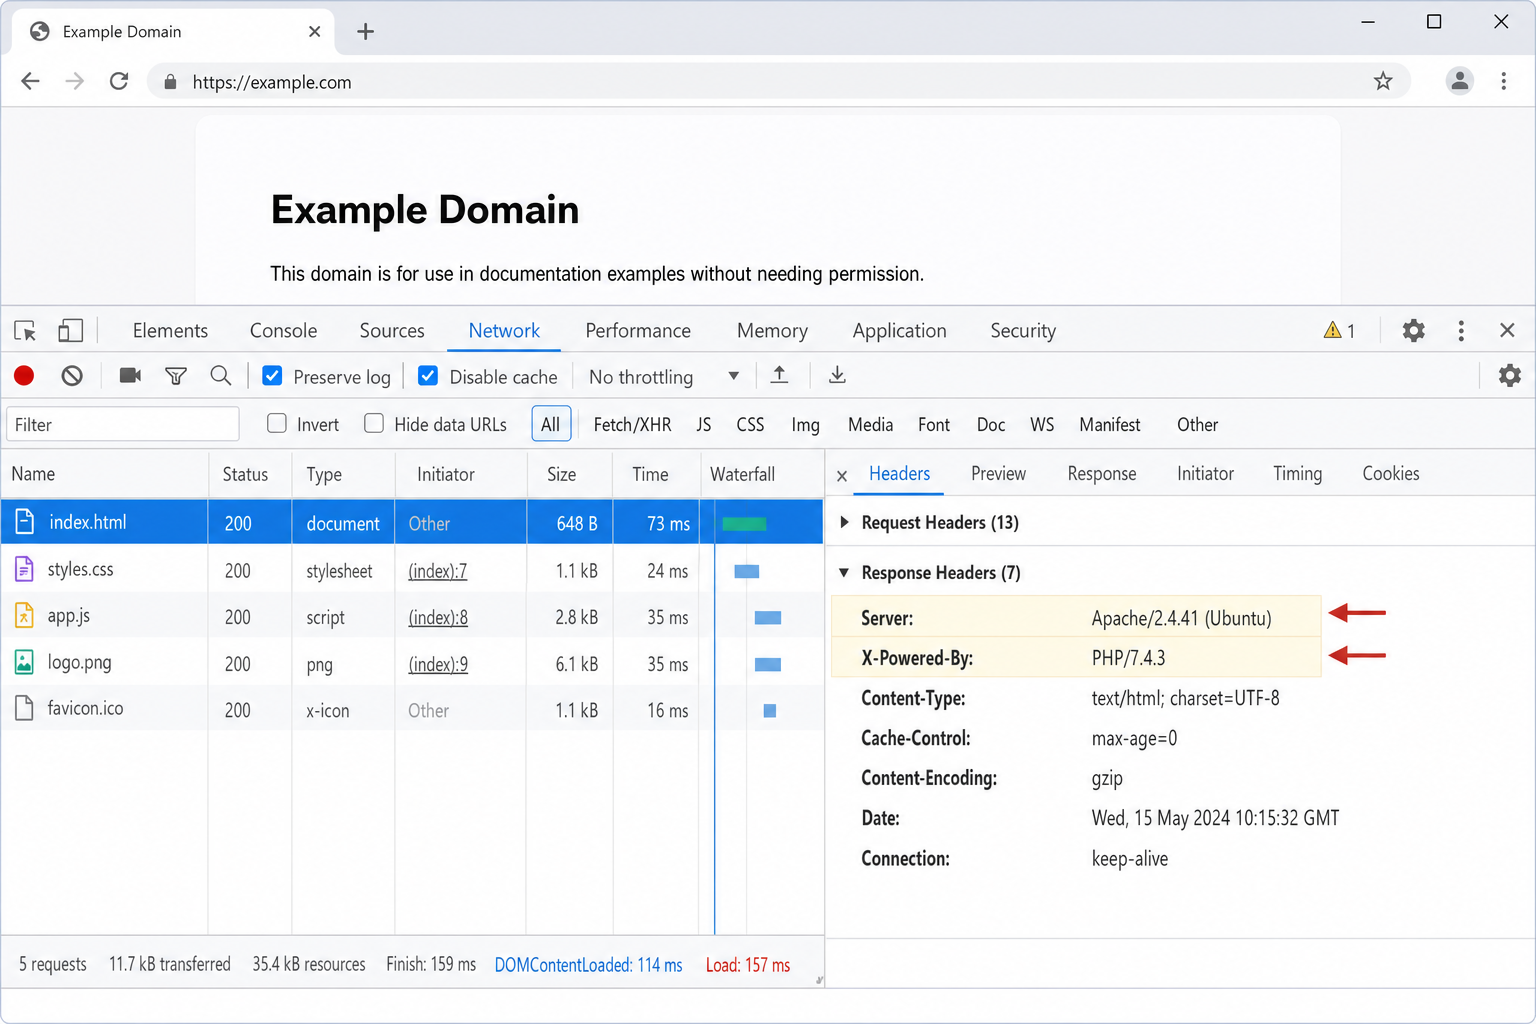
For example, a header like X-Cache: kinsta-cache is a dead giveaway that the site is hosted on Kinsta. X-Powered-By: WP Engine points to WP Engine managed hosting. Not every site will have these, but when they do, it’s one of the most reliable signals you can find.
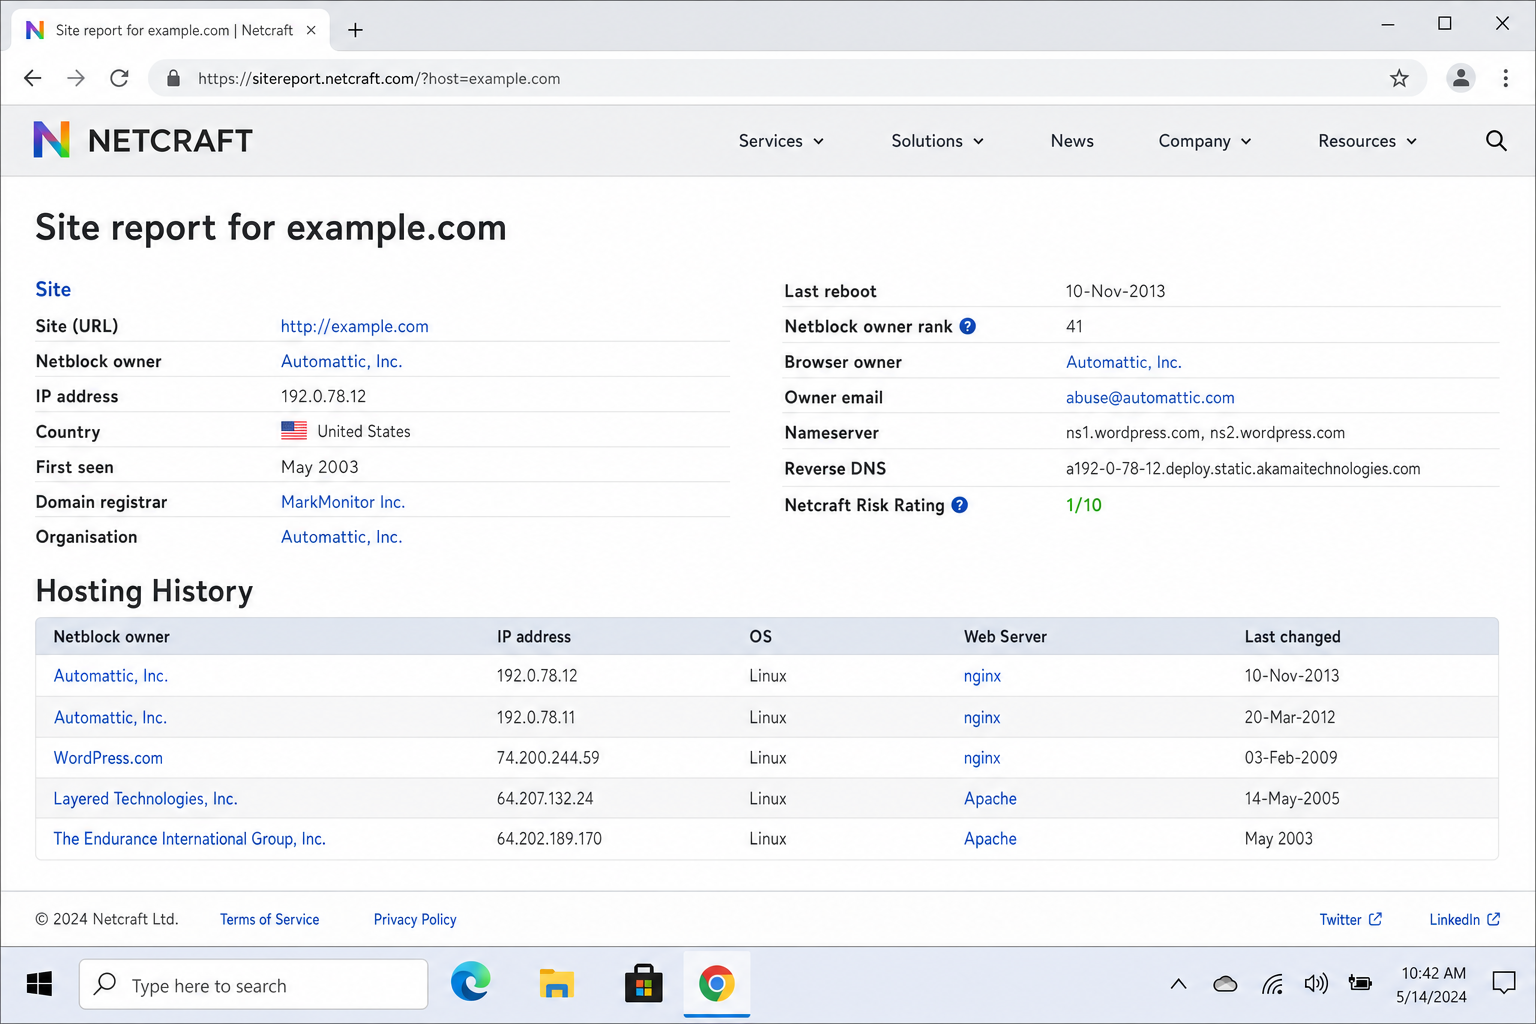
Method 5: Use Censys or Netcraft for Deeper Research
If you’ve hit a wall, especially with Cloudflare-protected sites, tools like Censys.io and Netcraft’s Site Report can dig deeper. These are more powerful (and more technical) options that look at SSL certificate data, historical hosting records, and infrastructure details.
- Censys.io: Searches internet-wide scan data, including SSL certificates and open ports. It can sometimes reveal the origin server even when a site is behind Cloudflare. Free to use with a registered account.
- Netcraft Site Report: Shows the current and historical hosting providers for a domain — great for tracking when a site switched hosts. Just go to sitereport.netcraft.com and enter the domain.
Tips and Troubleshooting
Common Issues
Problem: Every lookup just says “Cloudflare”
This is really common in 2026 as Cloudflare is used by a huge percentage of websites as a CDN and security layer. To get past it, try Censys.io to look for SSL certificate data that might reveal the origin server, or check the HTTP response headers (Method 4) for hosting-specific cache headers.
Problem: WHOIS shows privacy protection, nothing useful
Skip WHOIS entirely for the registrant info and focus on the nameservers (Method 2) and IP address (Method 3) instead. Those are much harder to fully hide.
Problem: The nameservers don’t match any hosting company name
Some hosting companies use generic or custom nameserver names. In that case, do an IP address lookup (Method 3) and check the ASN, the organization name tied to that IP block is usually the hosting company.
Problem: The site says it’s on AWS but I need more detail
AWS is a huge platform with dozens of services. Check the response headers for more specific clues: things like S3 bucket signatures, Lambda indicators, or specific caching headers can narrow it down. BuiltWith is also good at distinguishing between AWS services.
Pro Tips
- Use multiple methods: No single tool is 100% reliable in 2026. Cross-referencing two or three methods gives you a much more confident answer.
- Big sites won’t give useful results: Companies like Google, Meta, and Netflix manage their own global infrastructure. Don’t expect a hosting lookup to tell you anything meaningful about them.
- Managed WordPress hosting has telltale signs: Look for cache headers like
X-Kinsta-Cache,X-WP-Engine, orEverCache(WP Engine’s caching system) in the response headers. - Wappalyzer is your quickest starting point: Install it once and you’ll have instant hosting info on every site you visit — no extra lookups needed.
Quick Reference: Which Tool to Use
| Situation | Best Tool |
|---|---|
| You want a quick answer with no technical steps | Wappalyzer or BuiltWith |
| You want the most reliable method | DNS Nameserver lookup (MXToolbox) |
| The nameservers don’t reveal anything | IP address lookup (whois.com) |
| The site is behind Cloudflare | Censys.io or HTTP response headers |
| You want historical hosting data | Netcraft Site Report |
| You need full tech stack details | BuiltWith (web tool) |
Wrapping Up
Finding out who hosts a website used to be a one-step job. In 2026, it takes a bit more digging but with tools like Wappalyzer, MXToolbox, and Censys, you can usually get a solid answer in under five minutes. For most sites, starting with Wappalyzer or a DNS nameserver lookup will get you there. If you hit a wall (especially with Cloudflare-protected sites), layering in the IP lookup and HTTP header checks should crack it open.
Honestly, the multi-method approach is worth bookmarking as it’s useful for competitive research, security checks, or just satisfying your curiosity about what’s powering a site you admire. If you’re still stuck after trying all five methods, the site owner is going out of their way to hide that information, and at that point, you’ve done everything you reasonably can.