One of the first things you should learn
One of the things you’ll do frequently during video editing is splitting and cutting clips. It removes parts of videos you may not want or helps get the pace of your video just right. If you’re just starting out with video editing on Adobe Premiere, you might be overwhelmed with all the tools available and are wondering how you can easily split your clips.
There are several ways you can split a clip in Premiere Pro.
Method 1: Using the Razor Tool
The easiest way to cut or split clips in Premiere is by using the Razor tool. This allows you to split clips at any point in the clip you want, right from the project timeline. The only downside to this method is that it can be less precise, however, it’s a good way to do a first rough cut of your clips.
- Make sure the clip you want to be split is placed in your timeline.
- Look to the left-hand side of the timeline, and you’ll see some tool icons. Move your mouse over them until you find the Razor tool, with an icon that looks like a razor, and select it.
- When you hover over your clip in the timeline, your mouse pointer should look like the Razor icon. Find where you want to split the clip.
- Click where you want to make a split, and you’ll see the two portions will now be disconnected.
- Each split portion will now act like their own separate clips.
You can now delete the part of the clip you don’t want, or add effects and transitions to either clip portion without it affecting the other part. Splitting a clip in the timeline also won’t affect the original clip from the Project panel, so if you want the entire clip again you can simply find it there and place it in the timeline again.
Method 2: Using the Source Panel
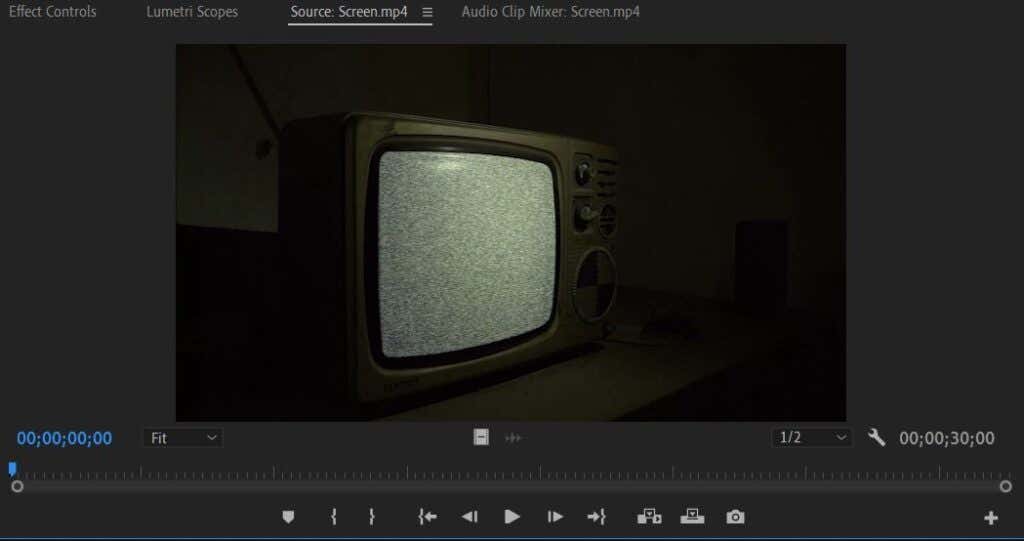
Another way to split a clip in Adobe Premiere can be done before you put it in the timeline. This method is a bit more precise as you can change the exact in and out points of the portion of the clip you want. With this method, instead of going to the timeline, you’ll be using the Source panel. This is the panel usually in the top-left side, and when you select a clip in the Media library, a preview of it will show up here.
So, choose the clip from the Project panel you want to split so it comes up in the Source panel. Then follow these steps.
- At the beginning of the clip’s time bar in the Source panel, you’ll see an arrow-shaped marker. You can use this to scrub through the clip and set In and Out markers. Wherever the In marker is placed is where the clip will start when placed in the timeline, and vice versa for the Out marker.
- Hit the I or O keys wherever you want the In and Out markers to be placed. I is for In, O for out. There are also icons in the toolbar in the Source panel you can click to set these, which look like brackets.
- Once you have your markers set, in the Source panel tools, select Insert. This will put the clip into your timeline wherever the timeline marker is placed at. You can insert a video with or without audio.
This is a good method to use to be precise, as you can watch the clip frame-by-frame and place the In and Out marker at these specific points. It also won’t affect the original clip from the Project panel at all, just like the other method. And, you won’t have to deal with the remnants of cut-up clips cluttering your timeline.
How to Delete Part of a Clip
If you used the Razor method, you will likely want to clean up those pieces of the clip you don’t want in your project. To do this, you’ll just want to delete the part of the clip. Don’t worry though, if you later realize you want part of the clip back, you can just go into your Media library and find the original clip again to put in the timeline.
Here are a couple of easy ways to delete parts of a clip:
- Right-click on the part of the clip you don’t want. From here, select the Cut option. The clip portion will be removed from the timeline.
- Alternatively, you can just select the clip portion you don’t want in the timeline and hit Backspace on your computer. You can also click and drag in the timeline to select multiple clips and delete them this way too.
Splitting a Clip in Adobe Premiere Pro
Using these methods, getting the perfect cut of a clip is very easy to achieve. Over time these techniques will become second nature, as they are some of the most often used tools during a video project.


