
Ever been watching a video and spotted the perfect frame you wanted to save as a photo? Maybe it’s a funny expression, a beautiful landscape, or a scene you want to use as a wallpaper. Whatever the reason, grabbing a still image from a video isn’t as obvious as it should be and the old tricks like pressing PrintScreen or using Windows Media Player don’t really cut it anymore (Windows Media Player isn’t even pre-installed on Windows 11).
The good news? In 2026, there are several free, easy ways to capture a still frame from a video or DVD and they work at full resolution, no quality loss. Whether you’re on Windows or macOS, this guide has you covered.
What You’ll Need
Before diving in, here’s a quick overview of what each method requires:
- A video file (MP4, MKV, AVI, etc.) or a DVD
- A free media player — we’ll recommend the best ones below
- Windows 11 or macOS Sequoia (though most methods work on older versions too)
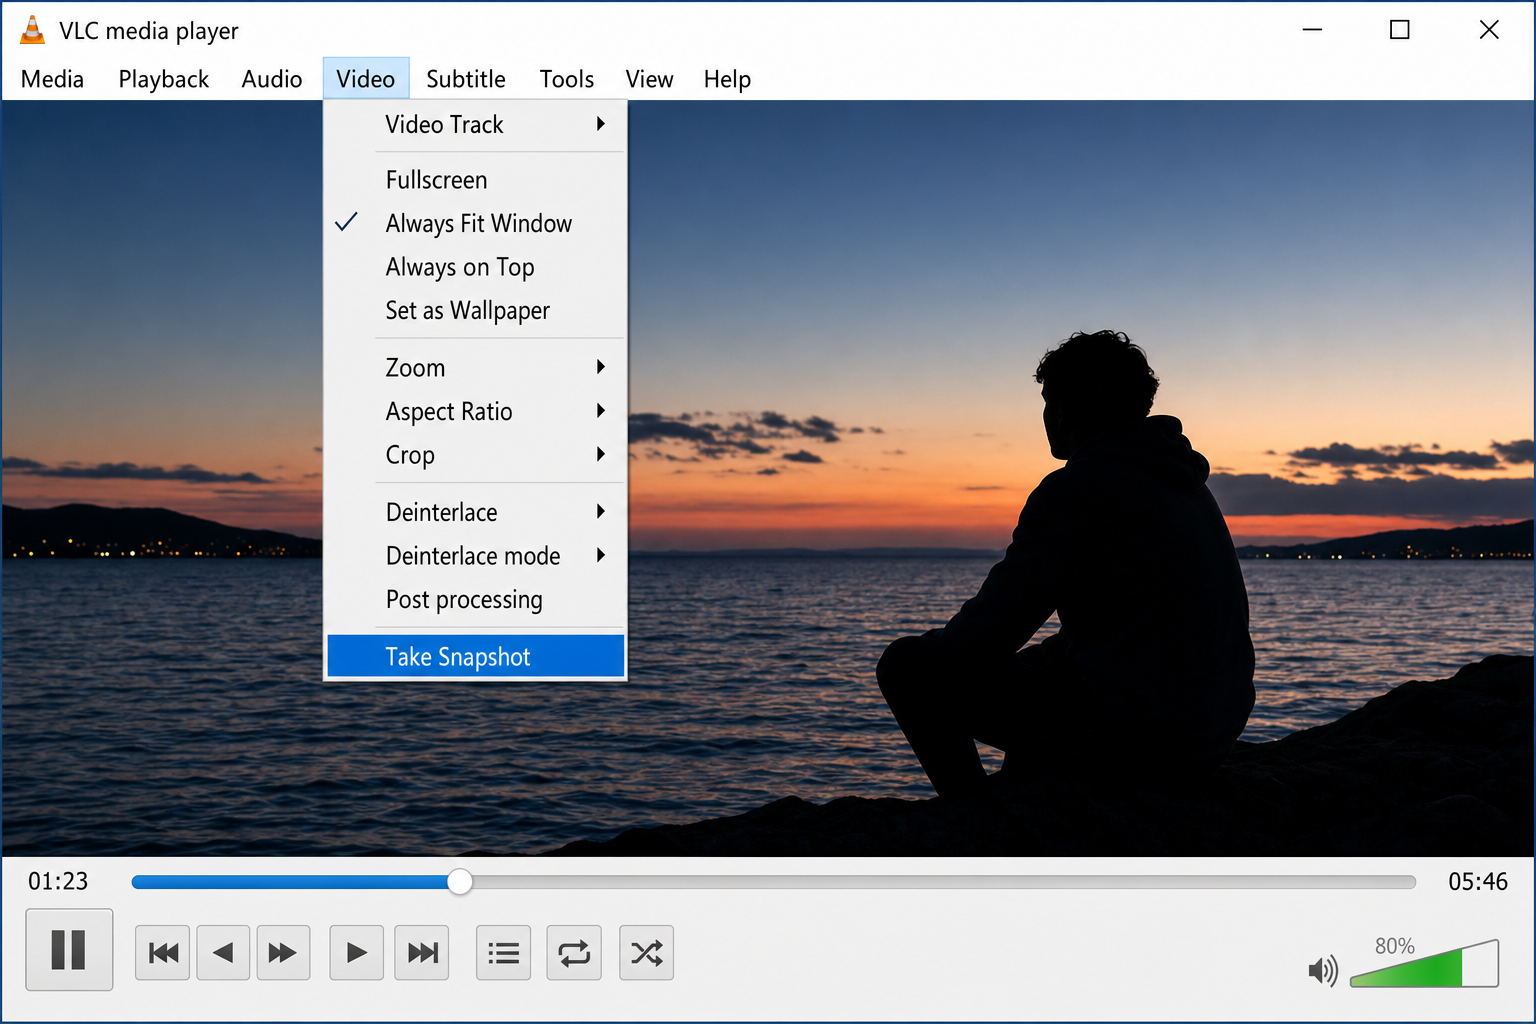
Method 1: VLC Media Player (Best for Most People)
VLC is the go-to free media player for a reason as it plays almost anything, it’s available on Windows, macOS, and Linux, and it has a built-in snapshot feature that saves frames as full-resolution PNG files. As of 2026, VLC is on version 4.x and still going strong.
On Windows
- Download and install VLC from videolan.org.
- Open your video: click Media > Open File (or Open Disc for a DVD).
- Play the video and pause it on the frame you want to capture. Use the left and right arrow keys to move frame by frame.
- Click Video in the menu bar, then select Take Snapshot. Or just press
Shift + S. - VLC saves the image as a PNG file in your Pictures\VLC Screenshots folder.
On macOS
- Download and install VLC from videolan.org.
- Open your video via Media > Open File.
- Pause on the frame you want, using arrow keys to fine-tune.
- Click Video > Take Snapshot, or press
Cmd + Option + S. - The PNG file saves to your Pictures folder.
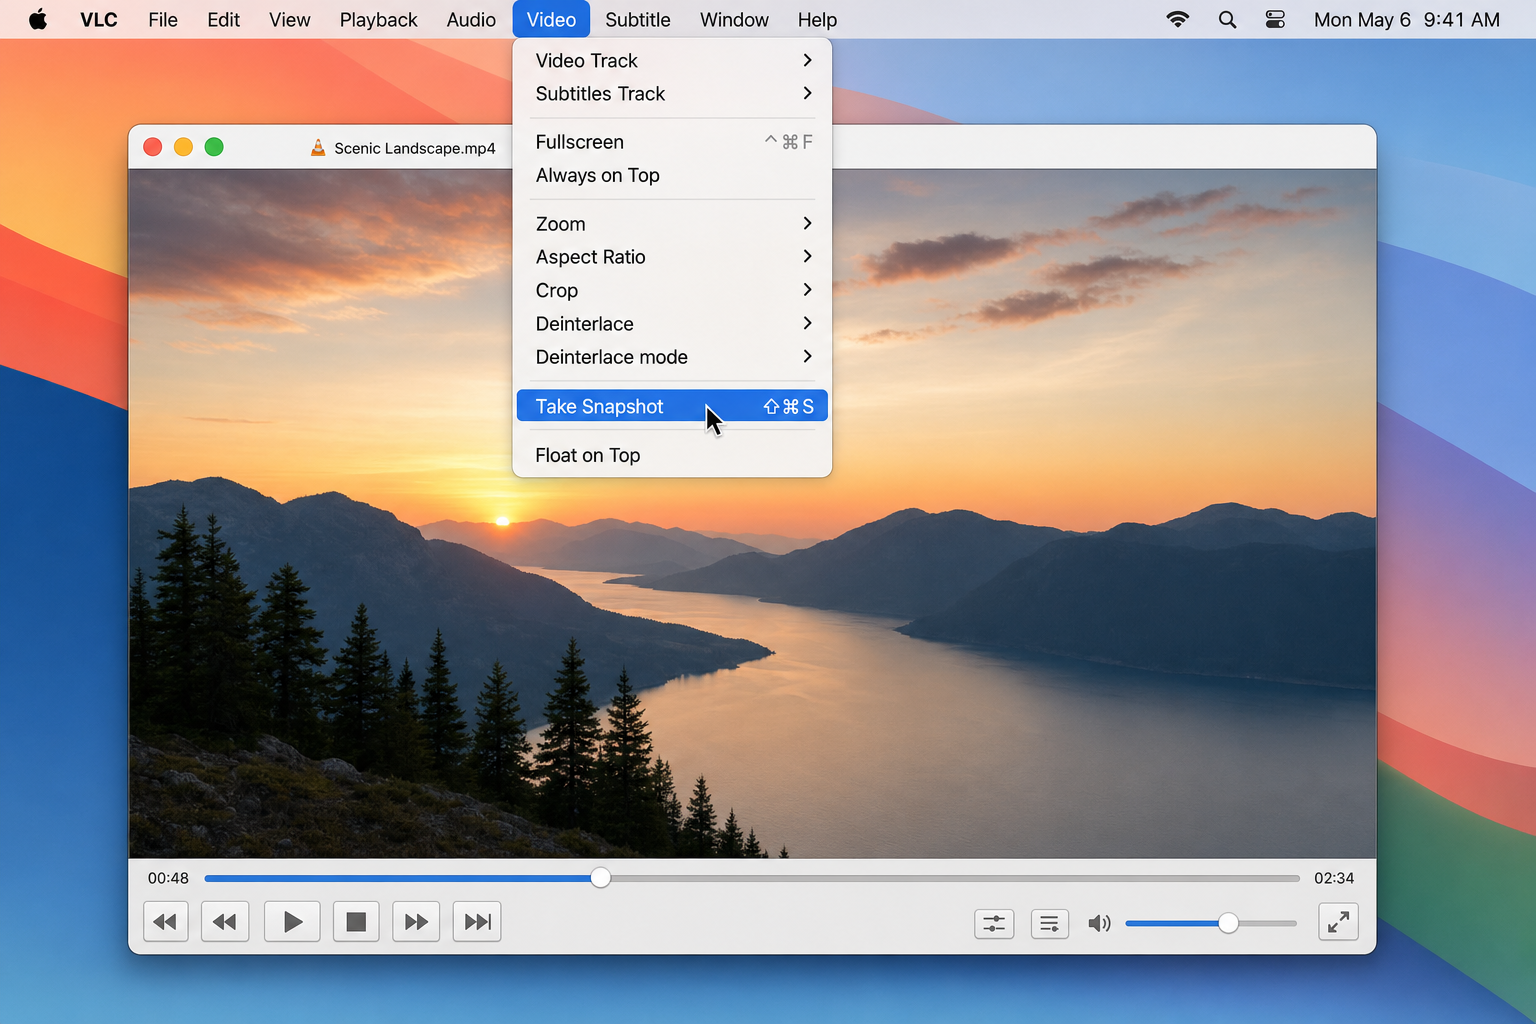
Pro tip for DVDs: If your DVD frame looks stretched or squished, go to Tools > Preferences > Video and make sure the aspect ratio is set correctly (usually 16:9 or 4:3 depending on the disc).
Method 2: MPV Player (Best Quality, for Power Users)
If you care about getting the absolute best quality frame, especially from high-resolution video files like 4K MKVs, MPV is worth trying. It’s lightweight, free, and handles frame-accurate seeking better than most players. The downside: it’s a bit more barebones in the interface department.
- Download MPV from mpv.io and install it (Windows and macOS versions are available).
- Open your video file by dragging and dropping it onto the MPV window.
- Press
Spaceto pause. Use the,and.keys to step backward and forward one frame at a time. - Press
sto save a PNG screenshot, orS(capital S) to save a JPEG. - Screenshots save to your desktop by default.
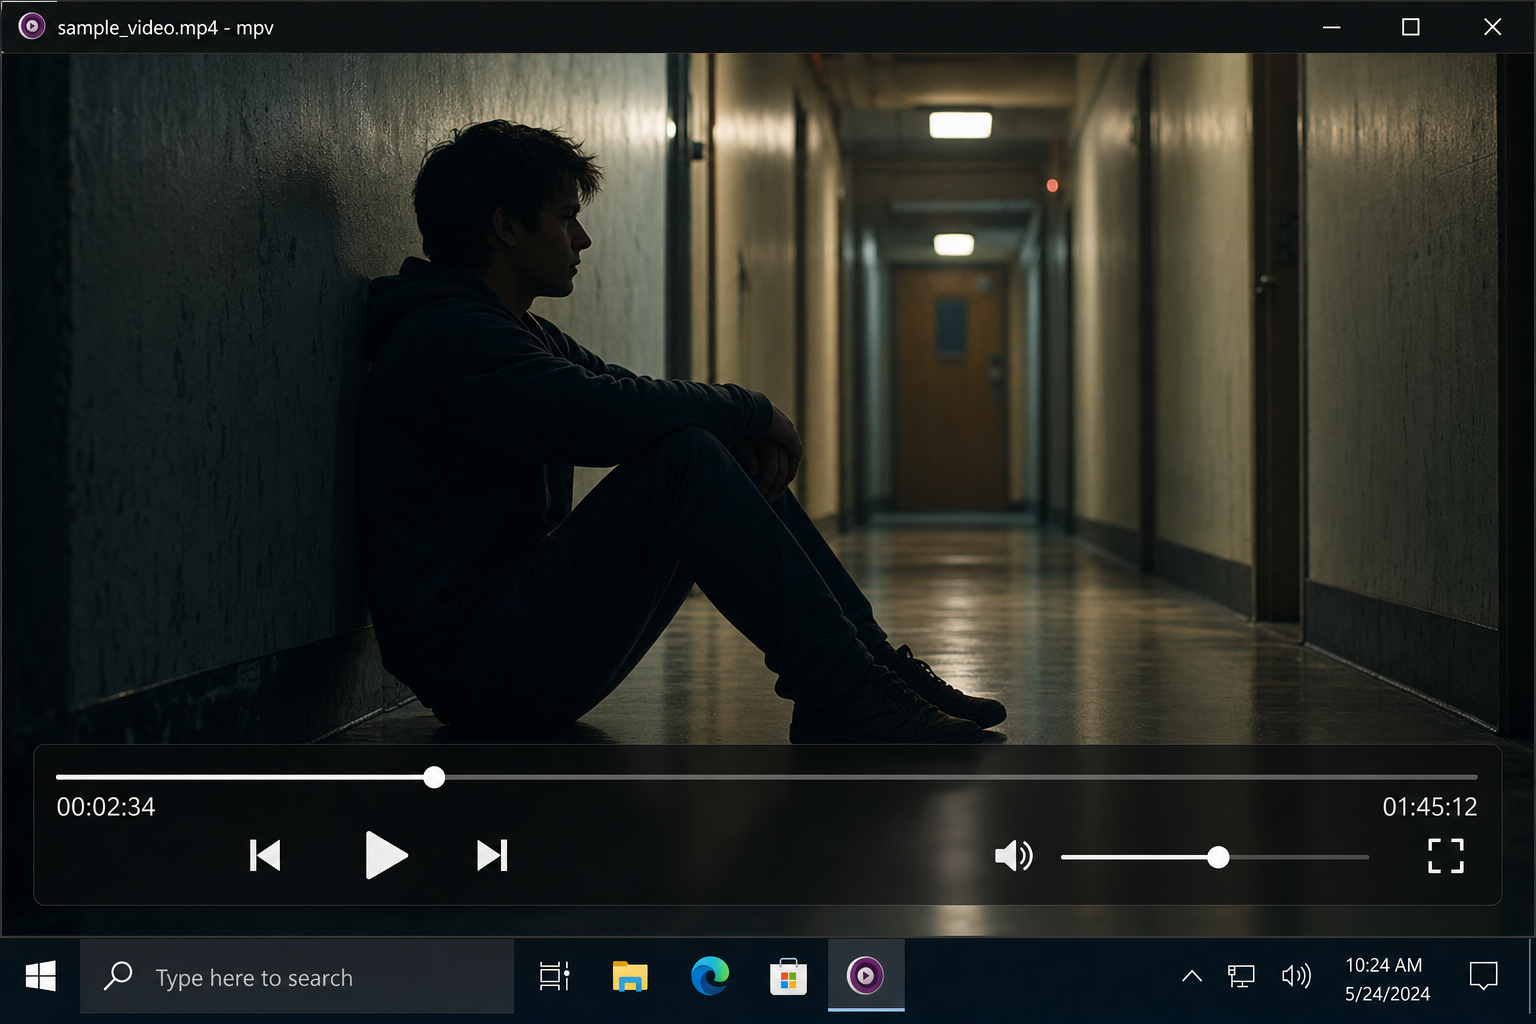
Capturing from DVDs with MPV: For the best results with DVDs, it’s worth ripping the disc to an MKV file first using MakeMKV (free for personal use). Direct DVD playback can cause aspect ratio and interlacing issues that mess up your screenshots. Ripping to MKV keeps everything clean.
Method 3: Built-In Tools on Windows 11 and macOS
Don’t want to install anything? Both Windows 11 and macOS have native options that work surprisingly well these days.
On Windows 11
- Open your video in the Media Player app (the modern one, pre-installed on Windows 11 — not the old Windows Media Player).
- Pause the video on the frame you want.
- Press
Windows + Shift + Sto open the Snipping Tool overlay. - Draw a rectangle around the video frame to capture it.
- The screenshot copies to your clipboard and opens in the Snipping Tool, where you can save it. Note: This method captures at your screen’s display resolution, not the video’s native resolution — so it may not be full quality for high-res video files.
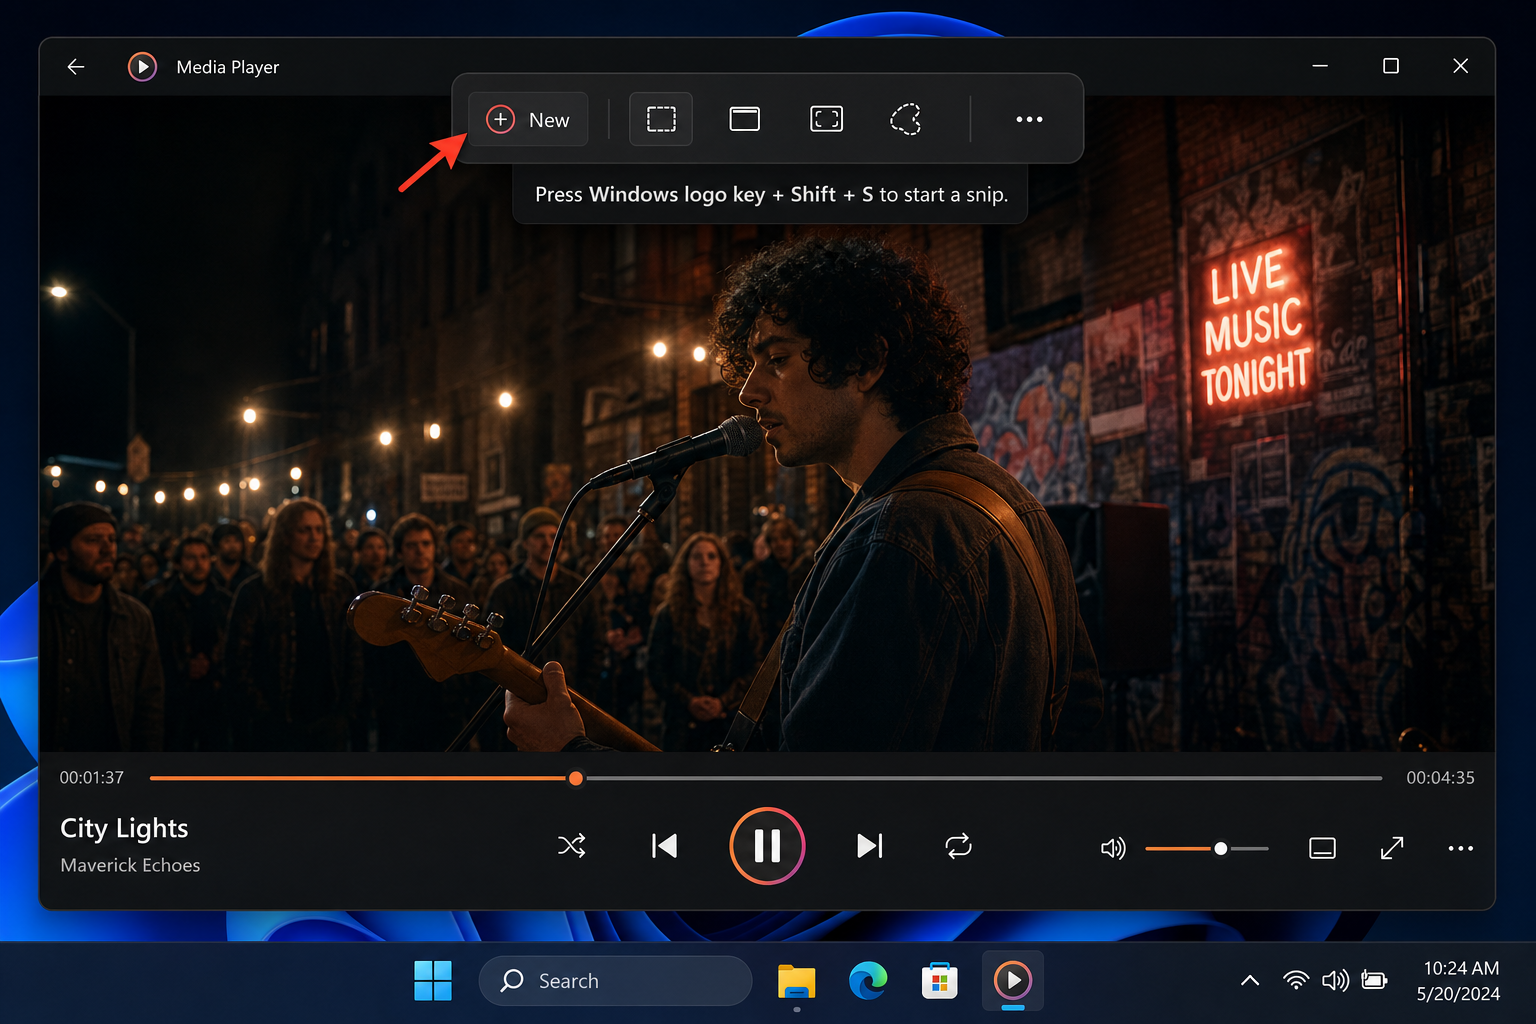
You can also right-click any video file in File Explorer, choose Open with > Photos, scrub the timeline to your frame, and use the export option from there.
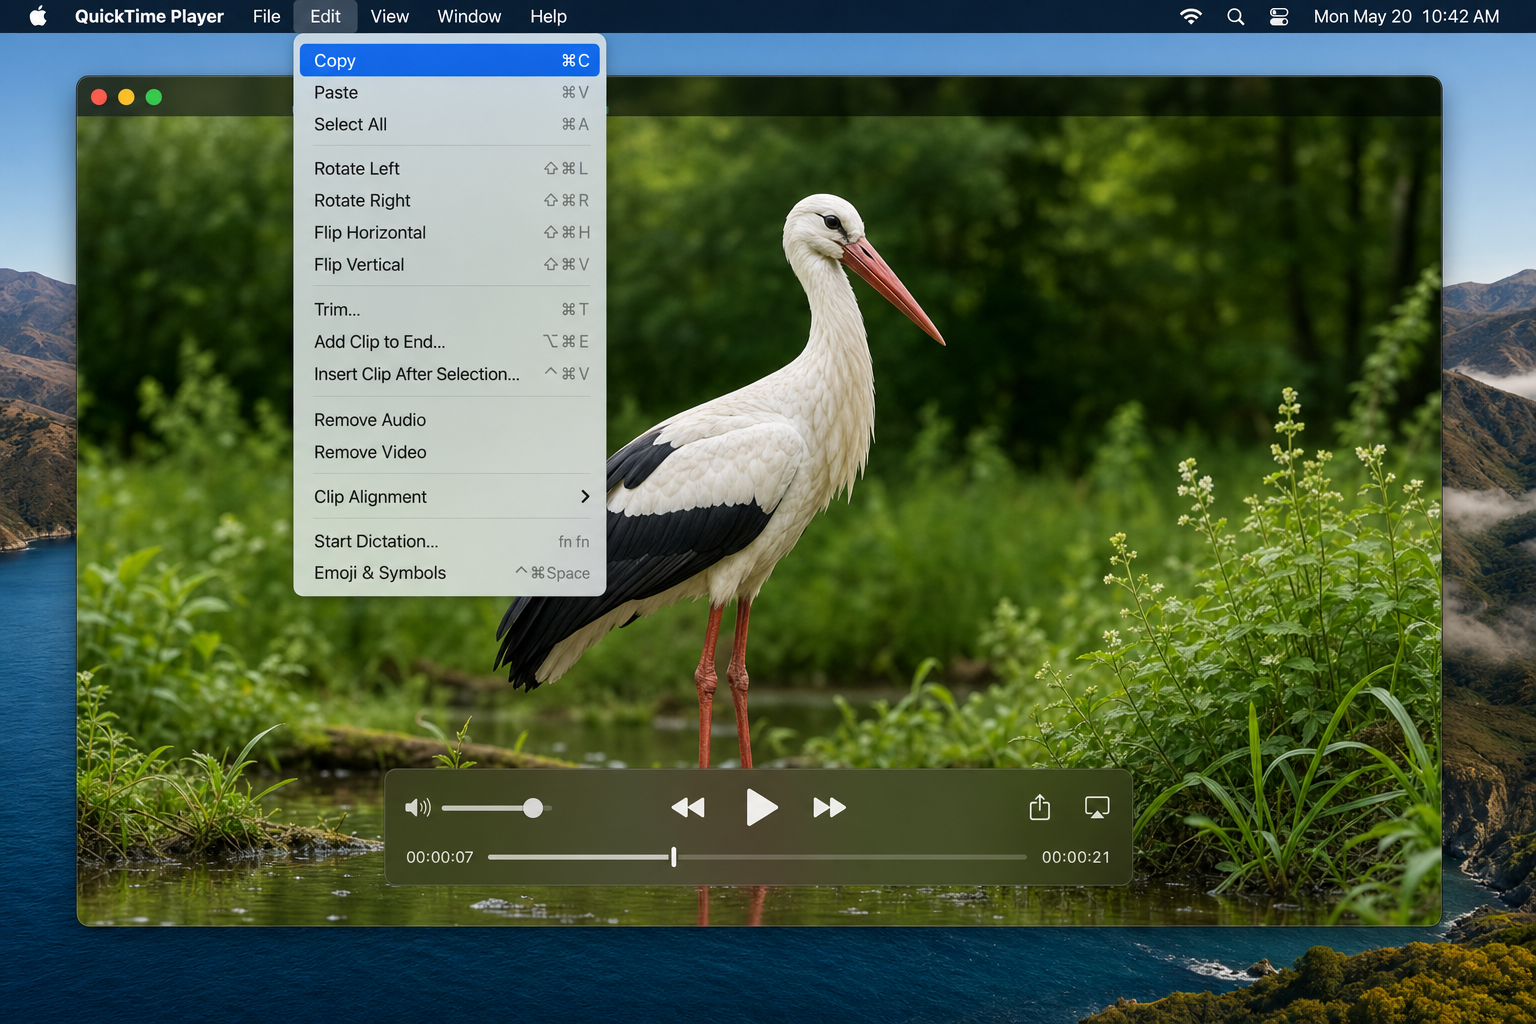
On macOS Sequoia
- Open your video in QuickTime Player (it’s in your Applications folder).
- Press
Spaceto pause on the frame you want. Use the left and right arrow keys to nudge frame by frame. - Go to Edit > Copy (or press
Cmd + C). - Open Preview or Photos and paste with
Cmd + Vto save the frame as an image. Note: For most standard video formats, QuickTime exports the frame at the video’s native resolution. However, DRM-protected or hardware-decoded content may be limited to screen resolution.
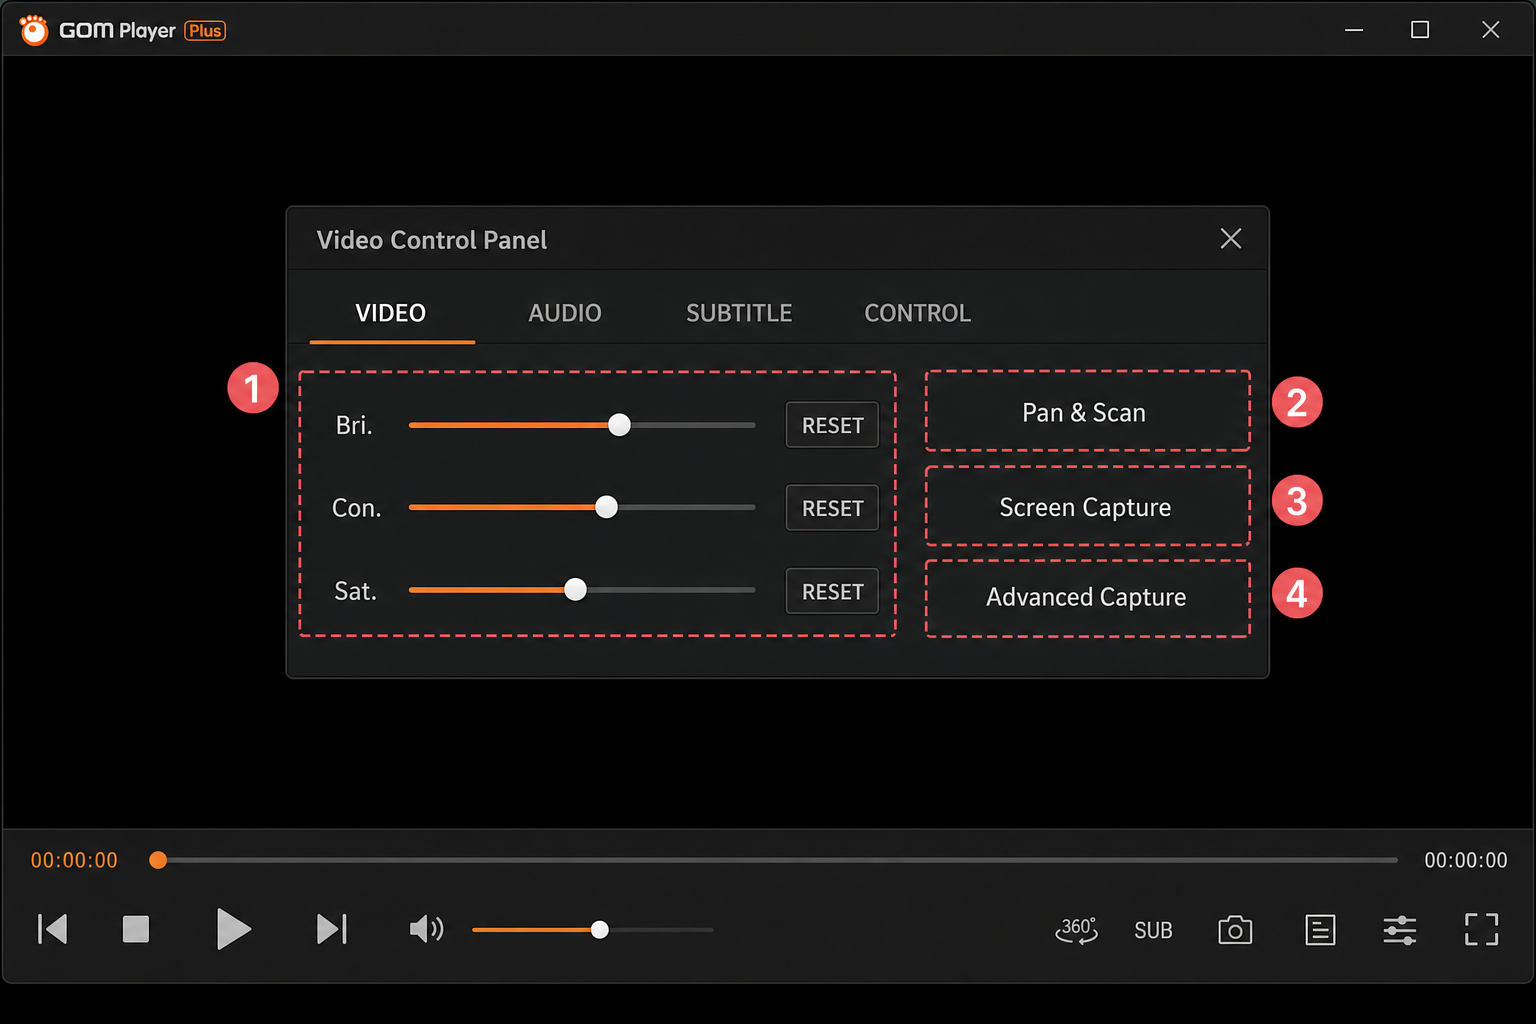
Method 4: GOM Player (Best for Burst Capture)
If you need to capture a lot of frames at once — say, you want to grab 50 screenshots from a scene to pick the best one – GOM Player is still a solid Windows-only option in 2026. Its standout feature is Burst Capture, which lets you automatically take up to 999 screenshots in a row at set intervals. Great if you’re trying to nail a split-second moment.
- Download and install GOM Player from player.gomlab.com.
- Open your video file.
- Click the Control Panel icon at the bottom right of the player (it looks like a slider icon).
- Click Screen Capture for a single screenshot, or Advanced Capture for more options.
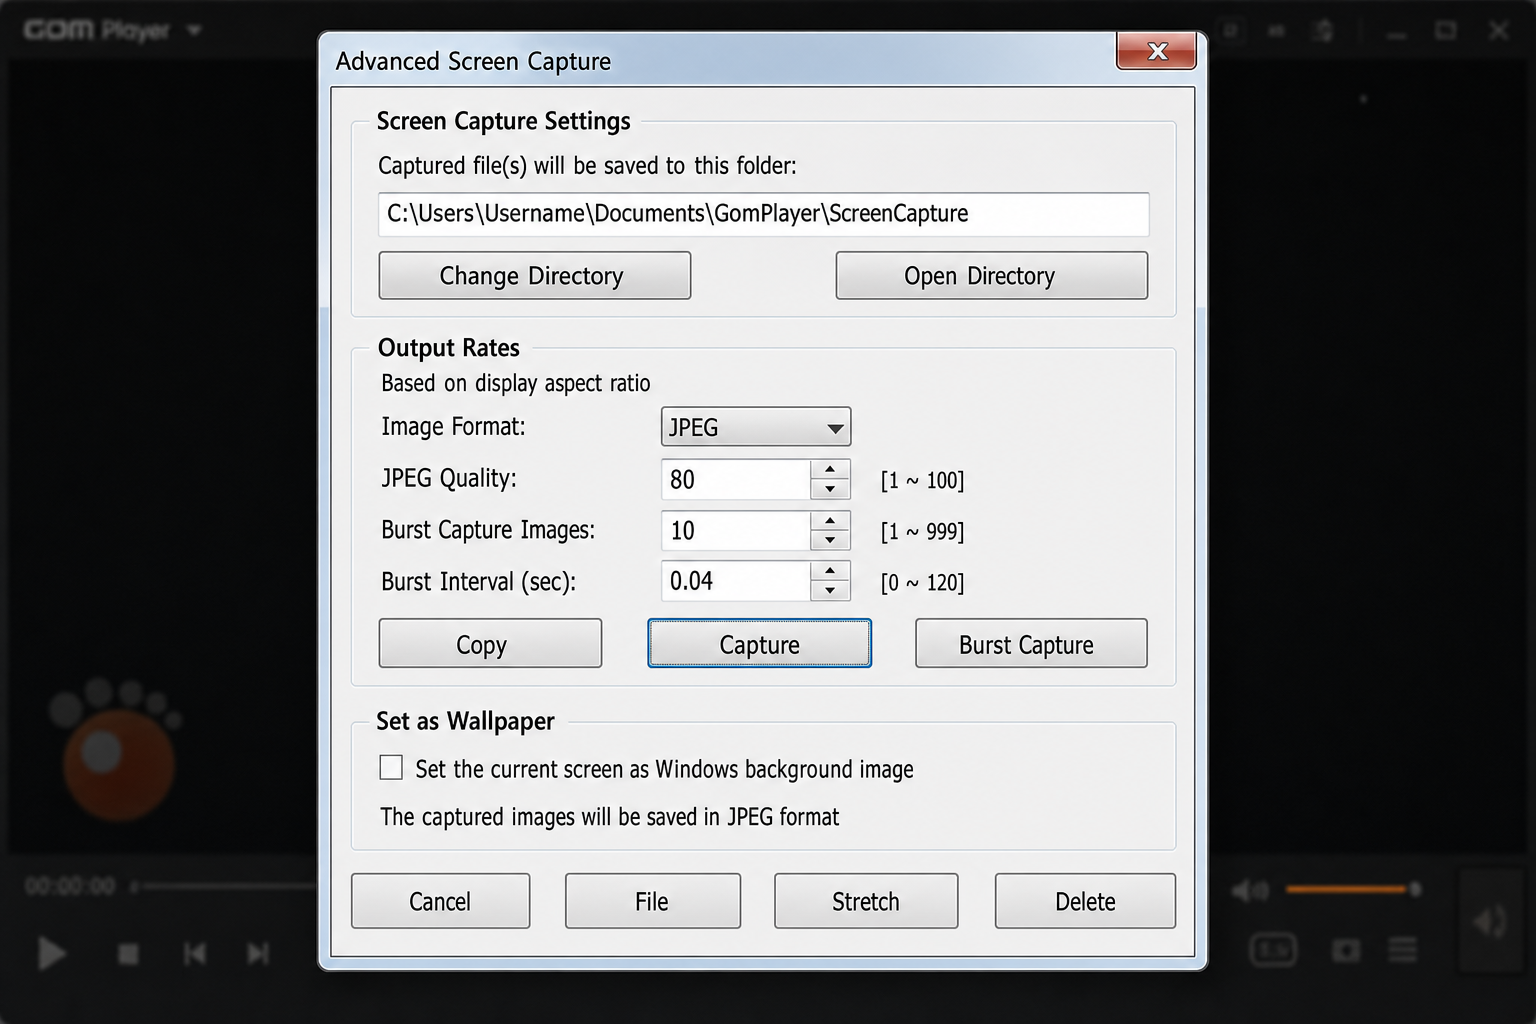
In Advanced Capture, you can set:
- Output folder: Where your screenshots get saved
- Image format: JPEG or BMP
- JPEG quality: Higher = better quality, bigger file size
- Burst capture count: Up to 999 frames in a row
- Burst interval: How many seconds between each captured frame
- Brightness and contrast: Handy if the video is too dark or washed out
Method 5: Adobe Photoshop or DaVinci Resolve (Pro-Level Options)
If you’re already working in a professional editing environment, you don’t need a separate tool at all.
- Adobe Photoshop: Go to File > Open and select your video file. Use the Timeline panel to scrub to the right frame, then go to File > Export > Export As to save it as a PNG or JPEG.
- DaVinci Resolve (Free): Open your video in the Edit or Color page, park the playhead on your frame, then go to File > Export Frame. DaVinci handles up to 8K video and is completely free from blackmagicdesign.com.
Quick Comparison: Which Method Should You Use?
| Method | Platform | Best For | Output Quality |
|---|---|---|---|
| VLC Media Player | Windows, macOS, Linux | Most people — quick and easy | Full-res PNG |
| MPV Player | Windows, macOS, Linux | Power users, 4K/HDR video | Full-res PNG/JPEG |
| Windows 11 (Snipping Tool) | Windows | No install needed | Good (screen-res) |
| macOS QuickTime | macOS | No install needed | Good (native res for most formats) |
| GOM Player | Windows only | Burst capture (multiple frames) | JPEG/BMP |
| DaVinci Resolve | Windows, macOS, Linux | Pro editing workflows | Full-res, any format |
Tips and Troubleshooting
Common Issues
Problem: Screenshot comes out black or blank
This is a hardware acceleration issue — the video is being rendered directly to your GPU and the screenshot tool can’t grab it. To fix it in VLC: go to Tools > Preferences > Input / Codecs and set Hardware-accelerated decoding to None. Restart VLC and try again.
Problem: DVD frames look stretched or have weird lines
DVDs use an older interlaced format that can cause horizontal lines or aspect ratio issues in screenshots. The easiest fix is to rip the DVD to an MKV file first using MakeMKV (free), then capture frames from the MKV. Alternatively, enable the deinterlace filter in VLC under Video > Deinterlace > On.
Problem: macOS says it can’t capture the screen
Go to System Settings > Privacy & Security > Screen Recording and make sure your media player (VLC, QuickTime, etc.) has permission to record the screen.
Pro Tips
- Frame-by-frame seeking: In VLC, use the
Ekey to advance exactly one frame at a time while paused. In MPV, use,(back) and.(forward). - Save as PNG, not JPEG: PNG is lossless — you won’t get any compression artifacts. JPEG is fine for sharing, but PNG is better if you’re printing or editing the image further.
- Capturing from 4K video: Make sure you’re working from the original high-res file, not a compressed copy. VLC and MPV will capture at whatever resolution the source file is.
- Need dozens of frames automatically? FFmpeg is a free command-line tool that can extract frames in bulk. The command
ffmpeg -ss 00:01:23 -i input.mkv -frames:v 1 output.pnggrabs one frame at the 1:23 mark. It’s a bit technical, but incredibly powerful for batch jobs.
Wrapping Up
Grabbing a still frame from a video used to be way more painful than it needed to be, but in 2026, it’s genuinely easy. For most people, VLC is all you need: pause, press Shift + S, done. If you’re on a Mac and don’t want to install anything, QuickTime’s copy-and-paste trick works great. And if you need to capture a ton of frames at once, GOM Player’s burst capture feature is hard to beat.
If you’re regularly working with video and need more control, it’s worth taking a look at DaVinci Resolve as it’s free, incredibly powerful, and handles everything from frame exports to full color grading. Got a method we didn’t cover? Drop it in the comments below!