
Ever consolidated files from multiple computers, old hard drives, or phone backups into one place and ended up with what looks like a digital hoarder’s nightmare? Same photos saved three times, documents copied across four folders, and a Downloads folder that’s basically a black hole. Manually sorting through all of that is not how anyone wants to spend their weekend.
The good news: there are some genuinely great free tools that can scan your drives, find all the duplicates, and help you clean things up without accidentally deleting something important. I stumbled upon a few worth a look while cleaning up my own drive chaos, and they’re actually pretty impressive. Here’s what’s working well right now.
Before You Start: A Few Things Worth Knowing
Before you unleash any duplicate finder on your files, take two minutes to understand what you’re dealing with. It’ll save you a headache later.
Exact duplicates vs. similar files: An exact duplicate is a file that is byte-for-byte identical to another, with the same content and same size. A similar file is something like the same photo saved in two different resolutions, or a JPEG and a HEIC version of the same shot. Most tools can find both, but they work differently. Exact-match scanning is faster and safer (fewer false positives). Similarity scanning is more powerful but needs a careful eye. Don’t auto-delete without checking the previews first.
Back up before you delete anything. Seriously. Copy your files to an external drive or make sure your cloud backup is current before running any bulk deletion. Start by moving duplicates to a separate folder rather than deleting them permanently. That way, if something goes wrong, you can get it back.
Cloud photos are a different story. Google Photos, iCloud Photos, and OneDrive each handle duplicates differently, and none of them automatically clean up duplicates sitting in local folders on your PC or Mac. We’ll cover the specifics below.
The 4 Best Free Duplicate File Finders
1. dupeGuru (Free & Open Source, Windows, macOS, Linux)
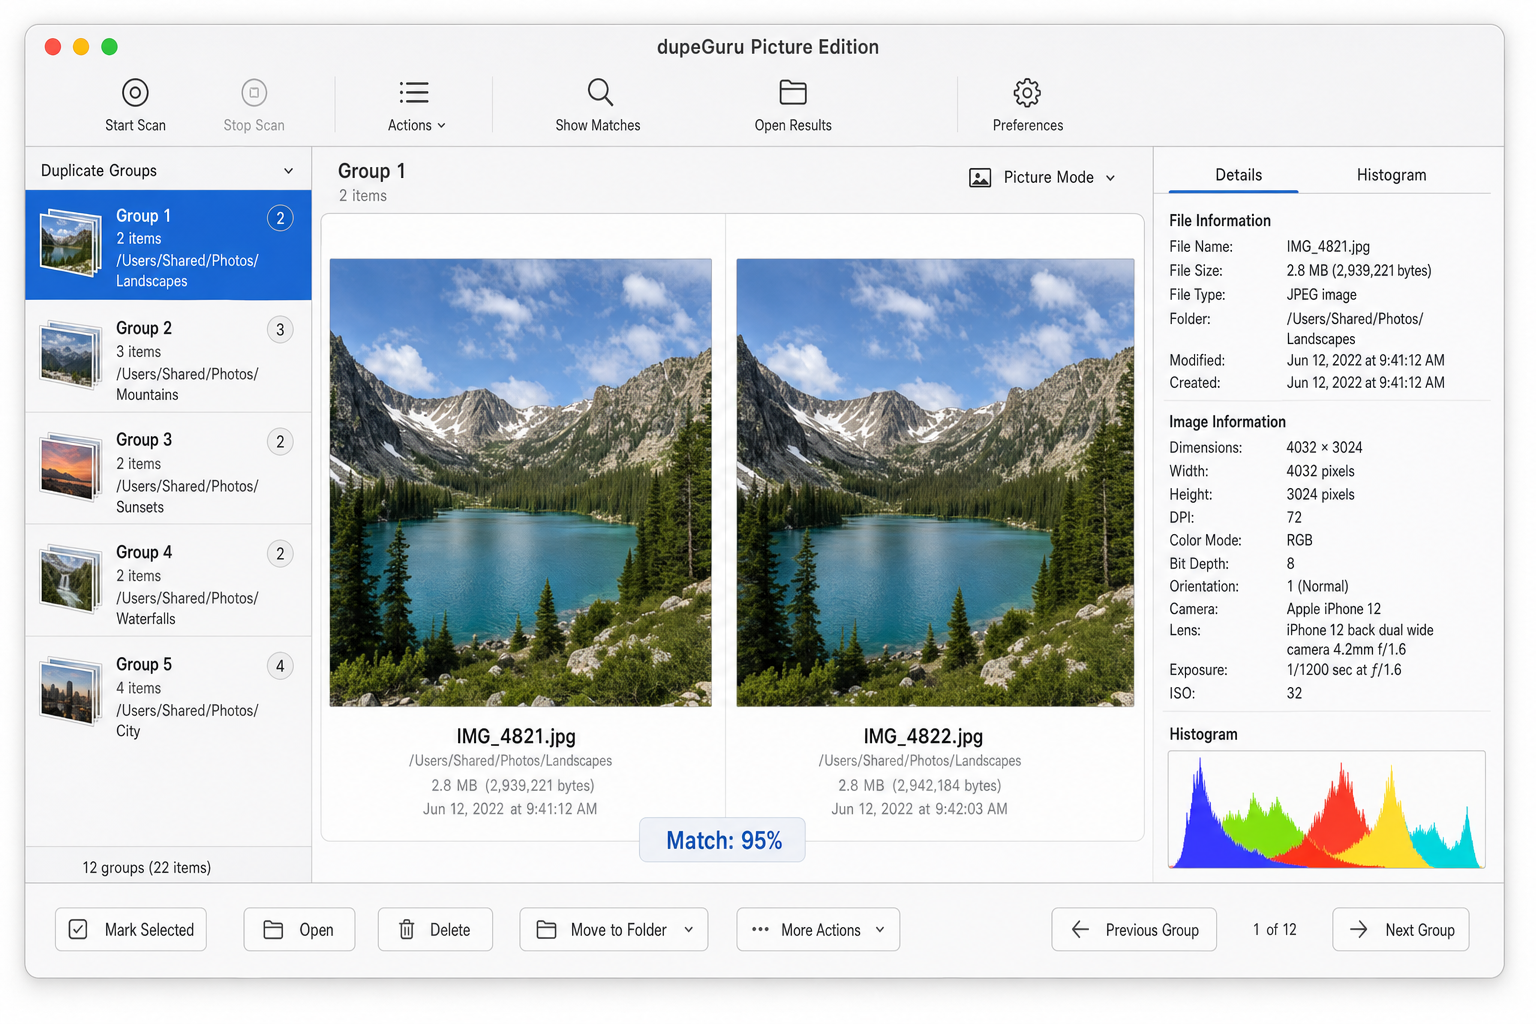
dupeGuru is probably the best all-around free duplicate finder you can get right now. It’s completely free, open source, works on Windows and macOS, and has a dedicated Picture mode that finds visually similar photos, not just exact copies. No upsell popups, no bundled junk. It just works.
Here’s how to use it:
- Download and install dupeGuru from dupeguru.voltaicideas.net.
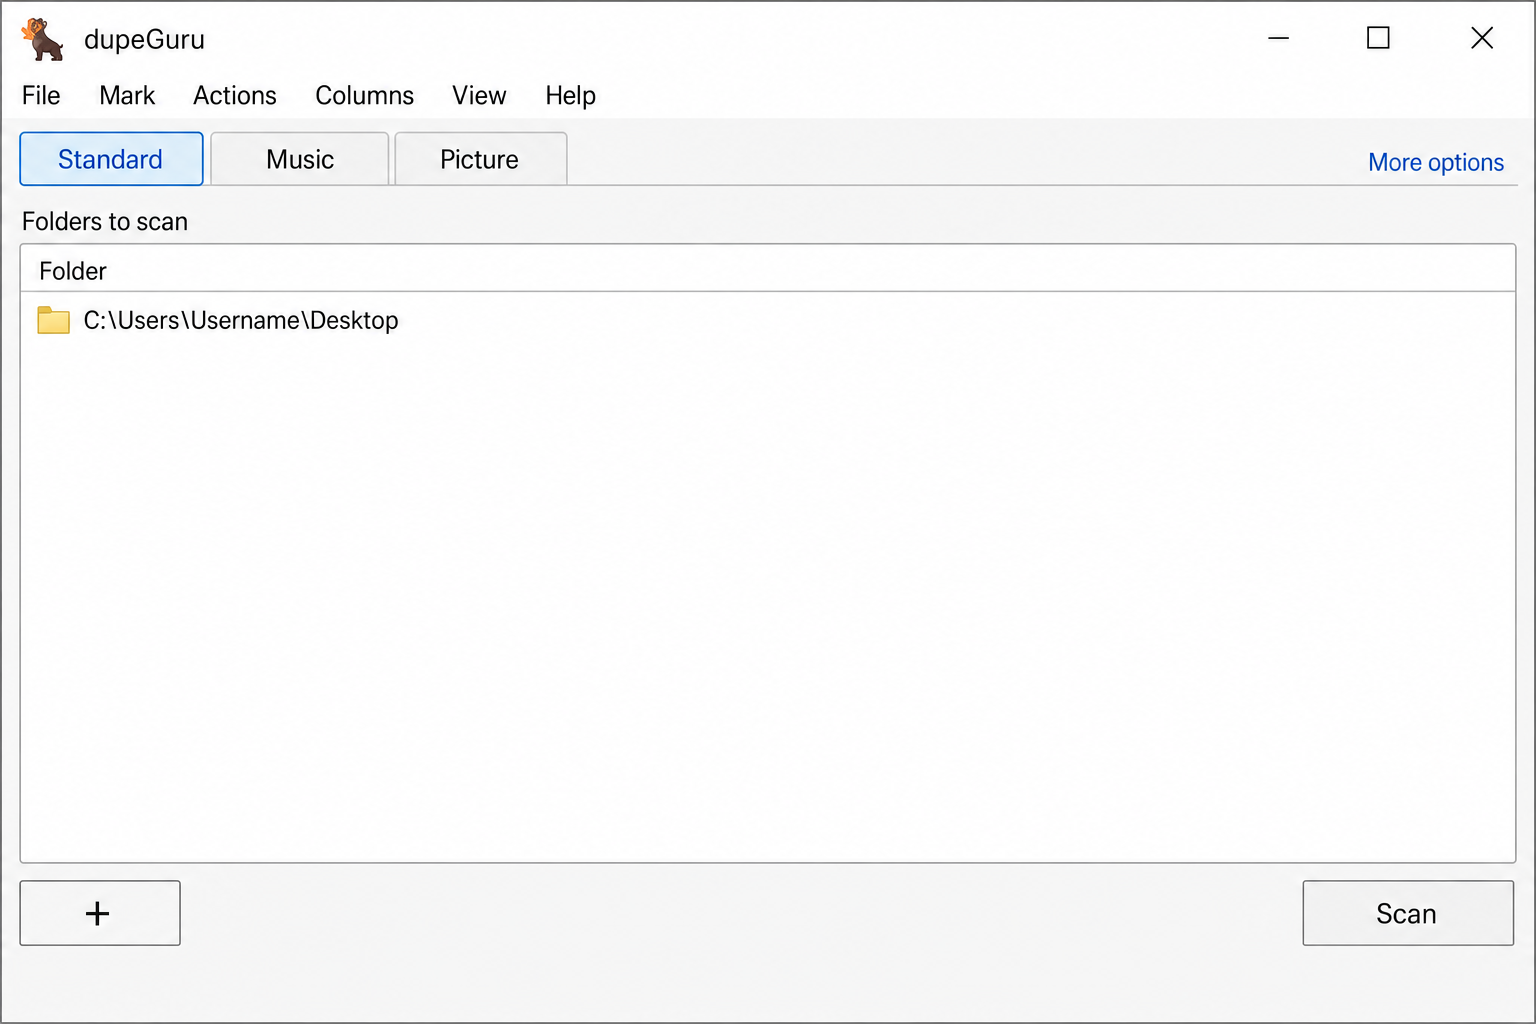
- Open the app and choose your scan mode in the top-left: Standard for all file types, or Picture if you’re focused on photos.
- Click the + button to add the folders you want to scan, your Pictures folder, an external drive, a backup folder, whatever you want to check.
- If you’re in Picture mode, go to Preferences and set the Filter Hardness to around 70–80%. Lower means it’ll catch more similar-but-not-identical photos; higher means it only flags very close matches.
- Click Scan and wait for the results.
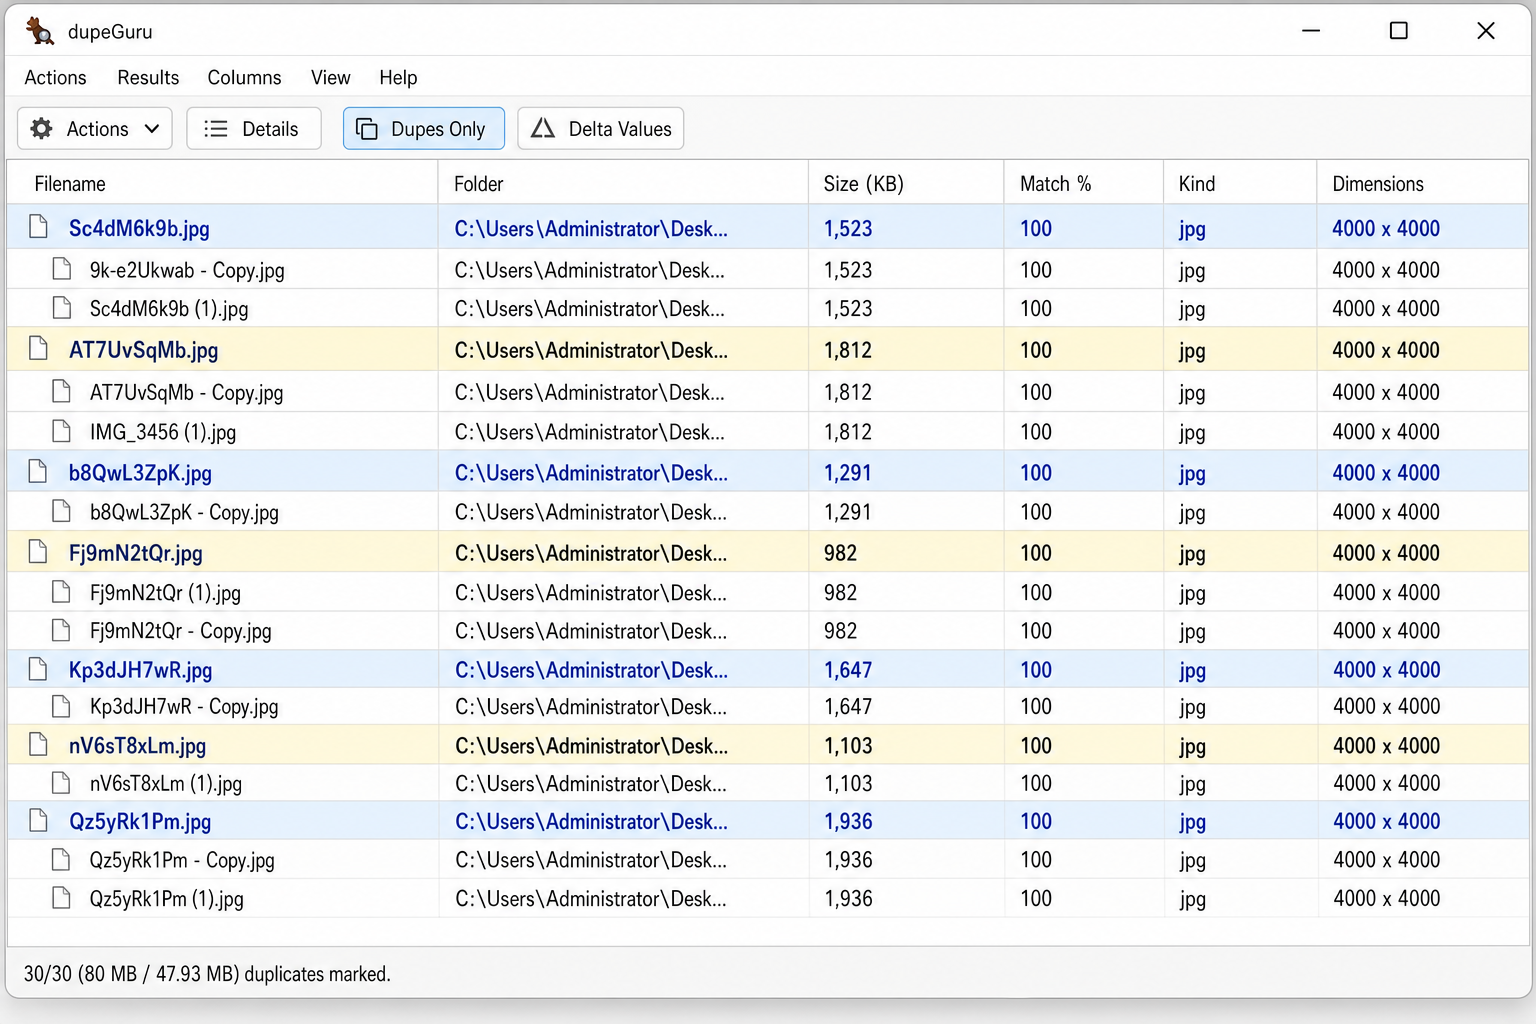
- Results appear in groups. dupeGuru marks one file as the reference (the one to keep) and flags the others as duplicates.
- Use Actions > Mark All Duplicates to select everything flagged, then manually uncheck anything you want to keep.
- Click Actions > Send Marked to Recycle Bin (Windows) or Trash (macOS), or choose Move to send them to a safe holding folder first.
A note on HEIC and RAW files: If you shoot on an iPhone or a DSLR, you may have HEIC or RAW files (like .CR2, .NEF, or .ARW). dupeGuru handles common formats well, but support for RAW files can be hit-or-miss. If you’re a photographer with a big RAW library, scroll down to the Duplicate Cleaner section. It handles those formats more reliably.
Best for: Everyone. It’s the go-to free option for both Windows and macOS.
2. AllDup (Free, Windows Only)
AllDup is a Windows-only tool, but if you’re on a PC and want serious power over your duplicate search, this one’s a gem. It’s free, it’s fast, and it gives you a ridiculous number of options for how to find and filter duplicates. You can search by file content, file name, metadata, image similarity, and it can even scan inside ZIP archives, which is surprisingly handy.
- Download AllDup from alldup.de and install it.
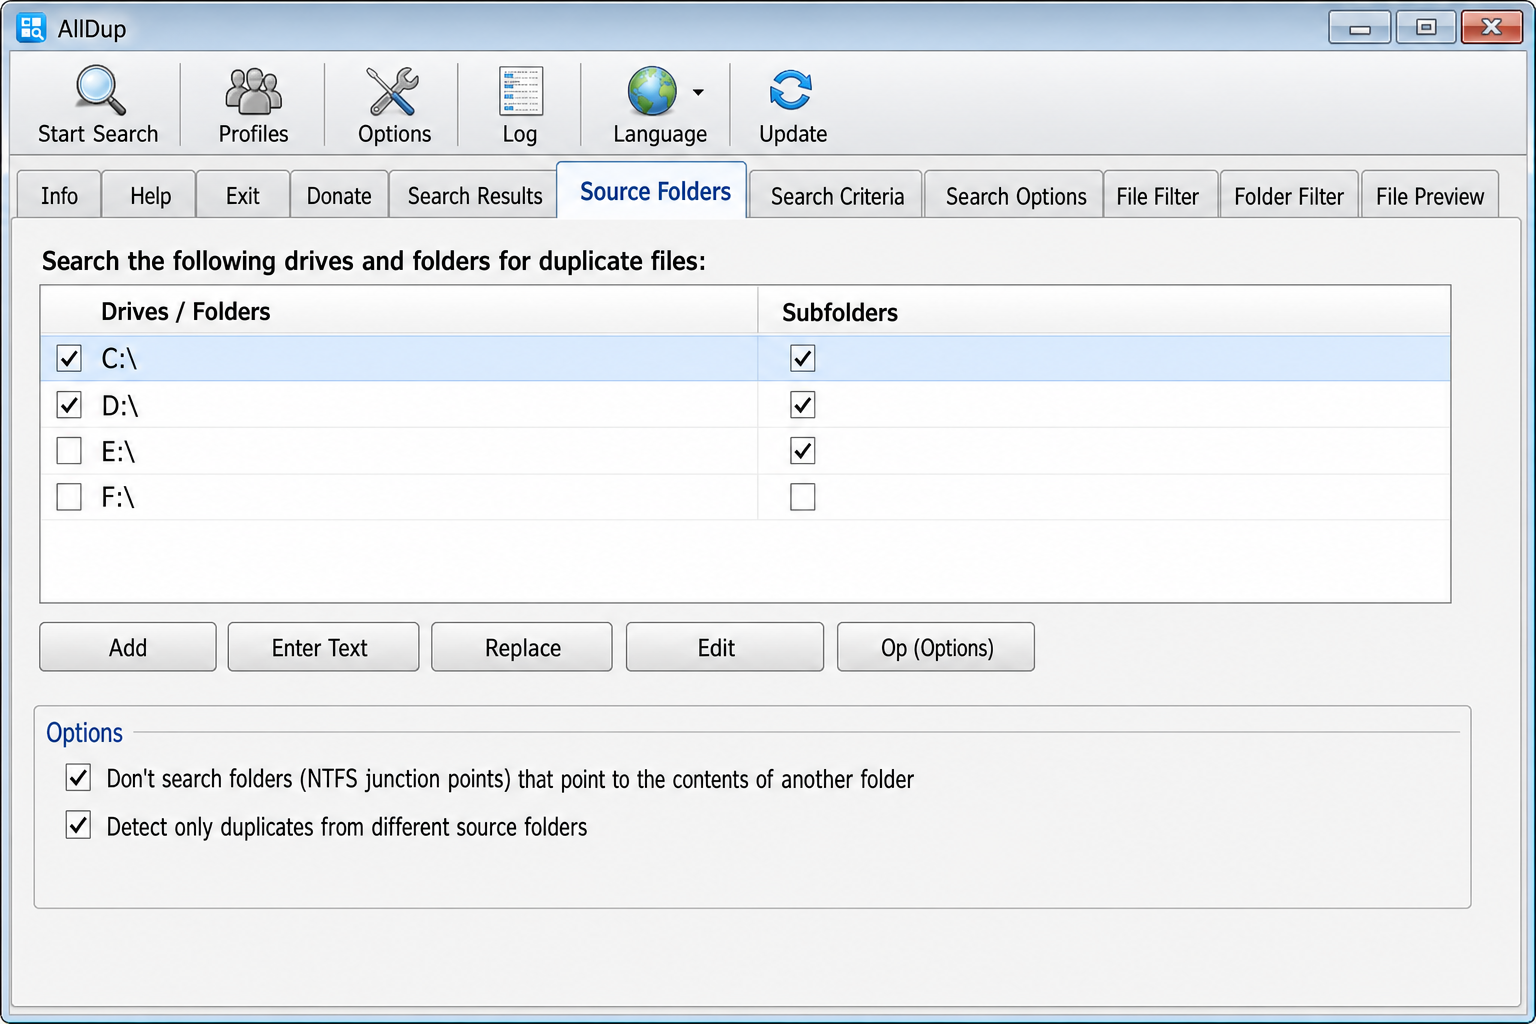
- In the main window, click Source Folders and add the drives or folders you want to scan.
- Go to Search Method and choose how you want to compare files:
- For exact duplicates: select File Content.
- For photos: enable image similarity options to catch near-duplicate shots.
- Under File Filter, restrict the scan to image types if you want, add extensions like
.jpg,.png,.heic,.cr2,*.nefto keep things focused. - Click Start Search.
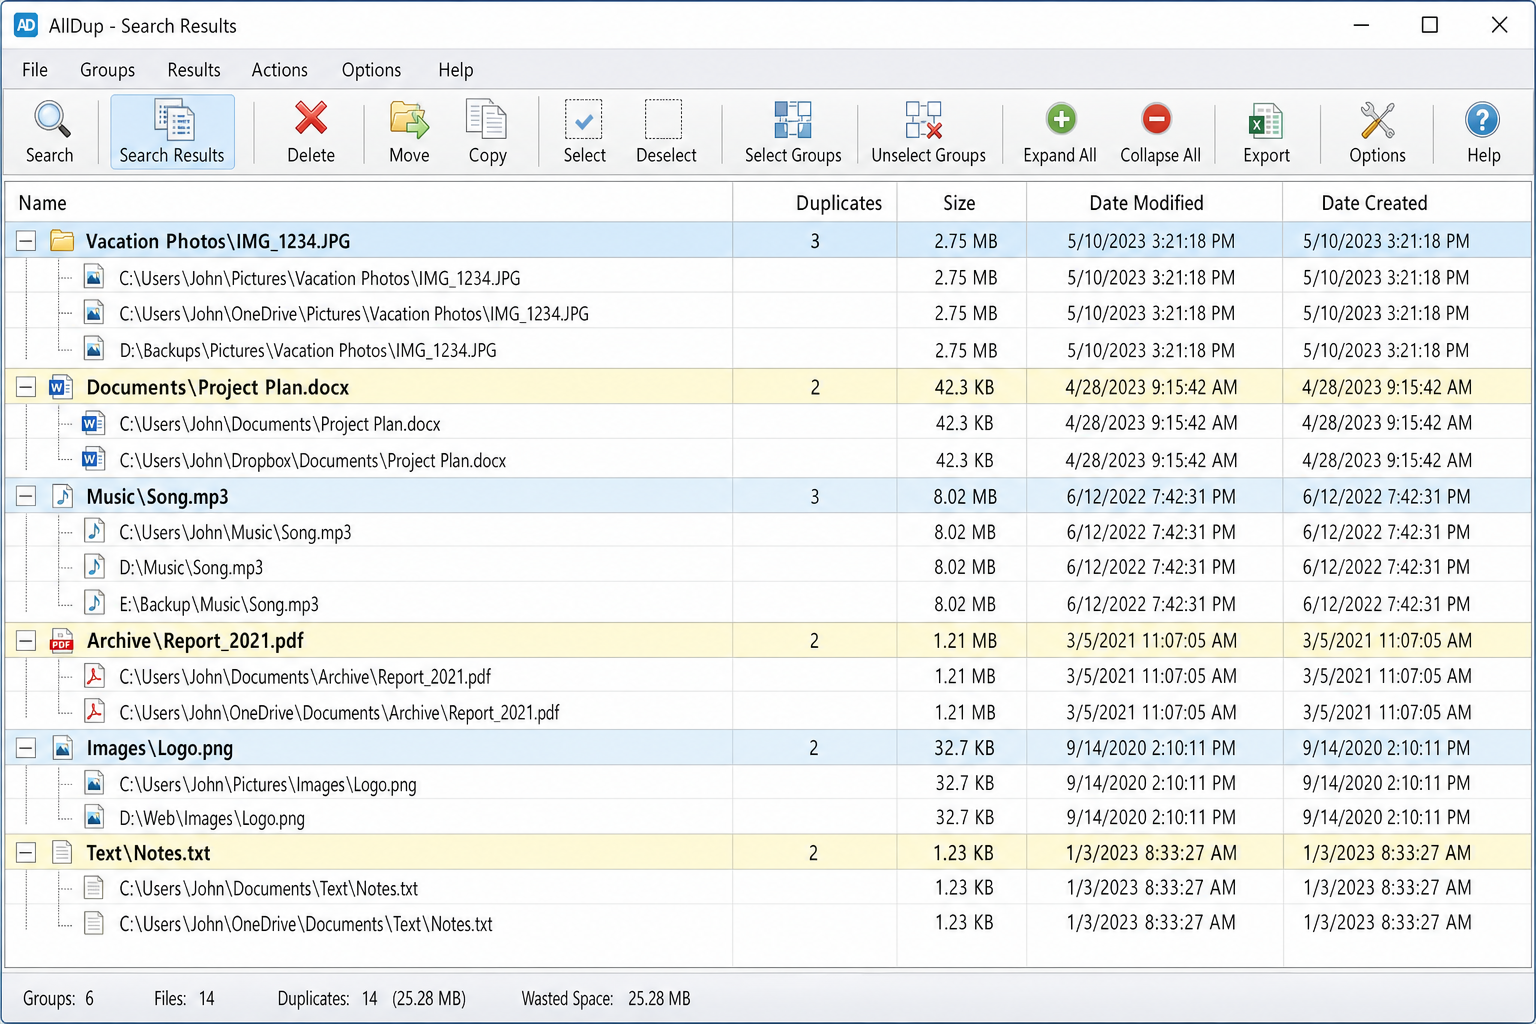
- Results appear in groups with full file paths, sizes, and dates. Use the preview pane to check what you’re looking at.
- Use the auto-selection rules to mark duplicates automatically. For example, keep the newest file, or keep files in a specific folder. Check a few groups manually to make sure the rules are doing what you expect.
- Choose to move duplicates to a backup folder or send them to the Recycle Bin.
Best for: Windows users with large, messy file collections who want fine-grained control over the search.
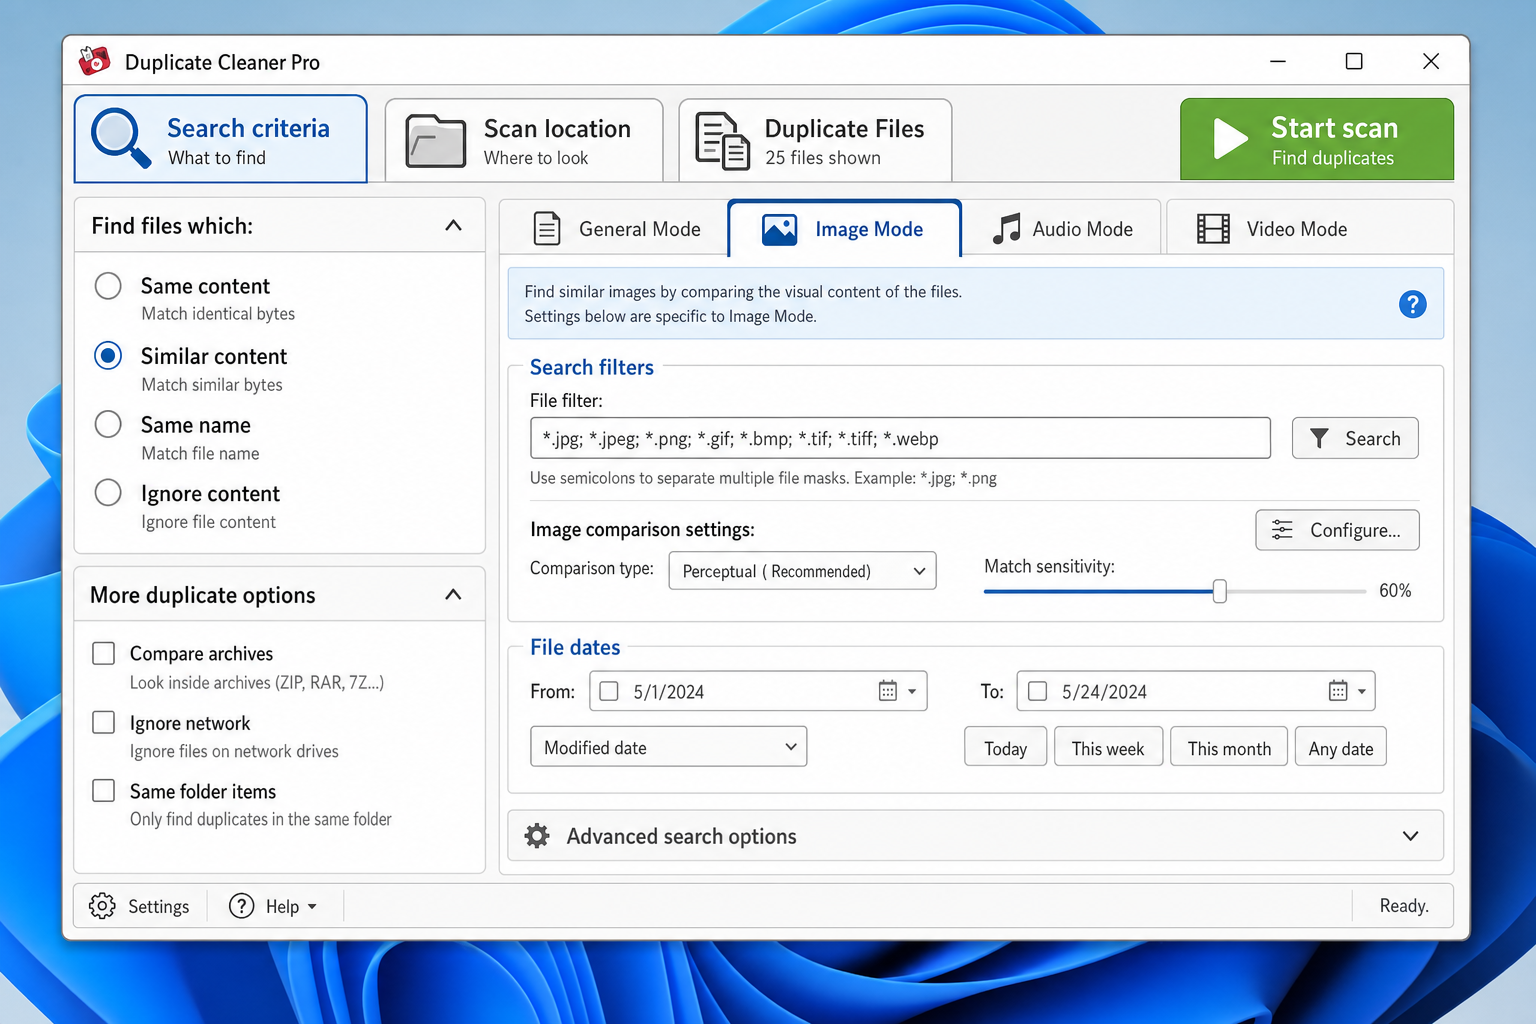
3. Duplicate Cleaner by DigitalVolcano (Freemium, Windows)
Duplicate Cleaner has been around for a while and it’s still one of the most polished options on Windows. The free version gives you a capable scan with a clean visual interface, and it includes standard image comparison that can catch exact and near-exact photo duplicates. You can scan, review results side by side (with dimensions, date taken, and file size shown), use the Selection Assistant to auto-mark all but one file per group, and delete or move the marked files — all without paying anything.
Where the free tier hits its limits: the advanced Image Mode features that detect photos that have been rotated, flipped, resized, or lightly retouched are locked behind the paid Pro version. Audio file comparison is also Pro-only. So if your main goal is cleaning up straightforward photo duplicates (same file, same content), the free version handles that well. If you need to catch edited or transformed near-duplicates, you’ll need to upgrade. Check the feature comparison on their site before committing.
- Download Duplicate Cleaner from duplicatecleaner.com and install it.
- In the Search Criteria panel, choose what you want to match, same content, same file name, similar file names, same size, or a combination.
- For photos, select Image Mode and set your similarity threshold (starting around 85–90% is a good balance).
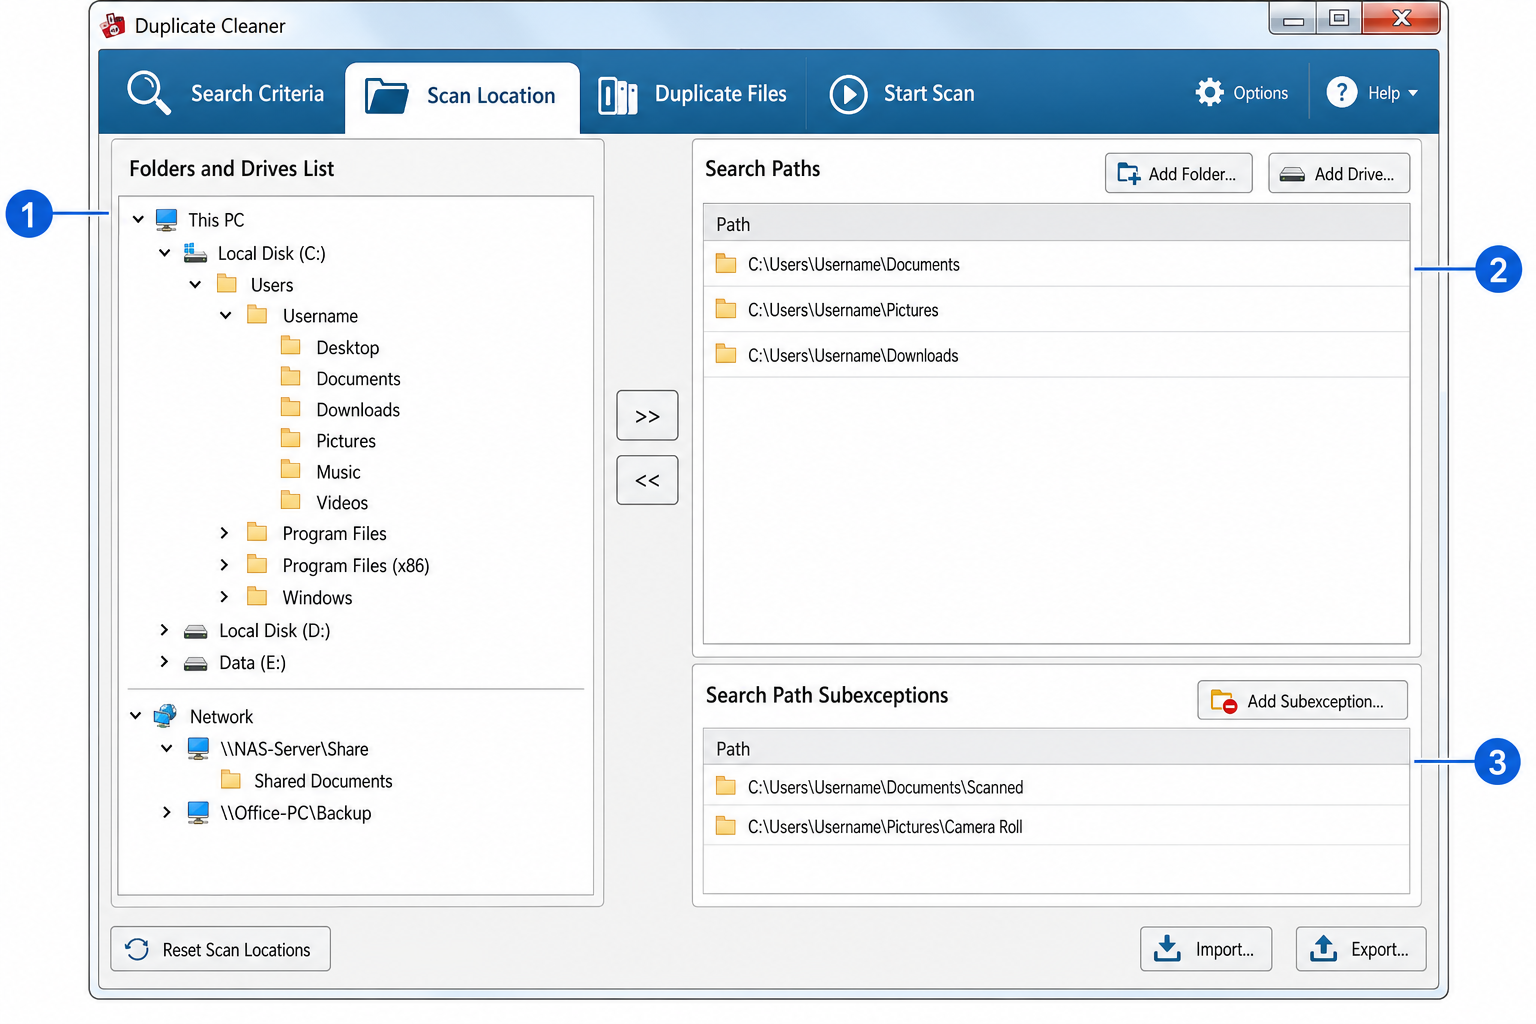
- Go to Scan Locations, navigate to your folders, and click the arrow to move them into the Search Paths list.
- Click Scan Now at the top.
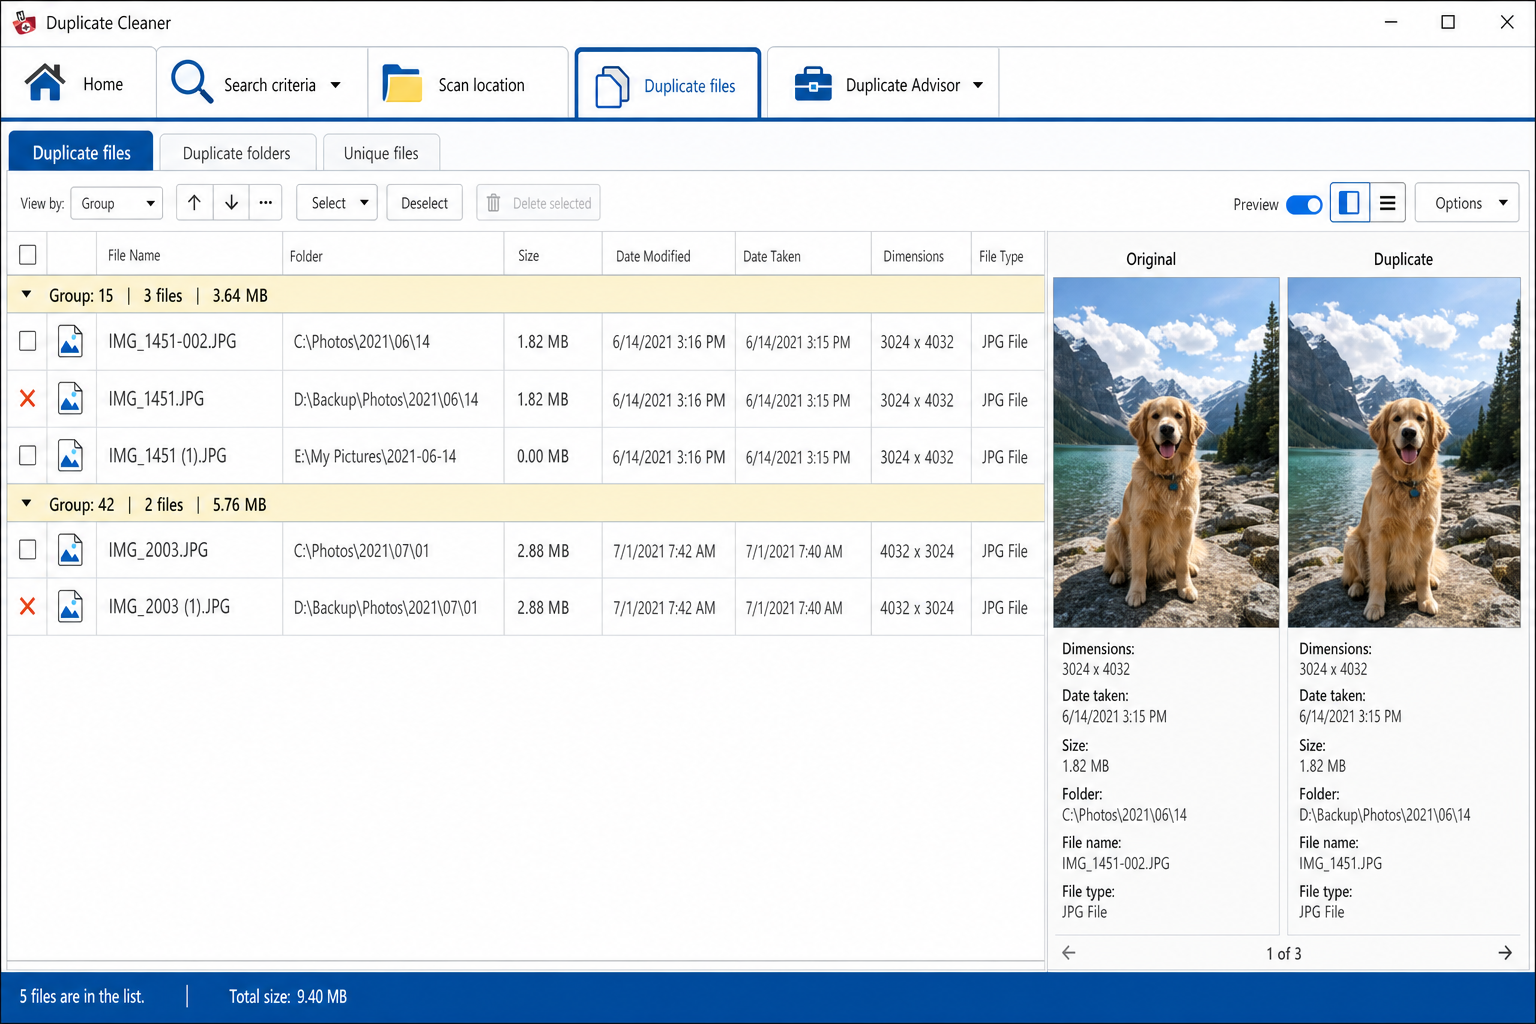
- Results appear in the Duplicate Files tab. Use the built-in image browser to view groups side by side. You can see dimensions, date taken, and file size right there to help you decide what to keep.
- Click the Selection Assistant (the magic wand icon), then choose Mark > Select by group > All but one file in each group. This keeps one copy and marks the rest for deletion.
- Click the File Removal icon to delete or move the marked files.
Best for: Windows users who want a polished interface and solid photo comparison in the free tier. Also a good choice if you expect to upgrade to Pro for rotated/retouched duplicate detection, RAW support, or audio comparison.
4. macOS Photos Built-In Duplicates (Free, macOS Ventura and Later)
If you’re on a Mac and your main concern is duplicate photos, you might already have the best tool for the job, and you didn’t even have to install anything. Starting with macOS Ventura, the Photos app automatically scans your library and surfaces a dedicated Duplicates album in the sidebar. It’s genuinely clever.
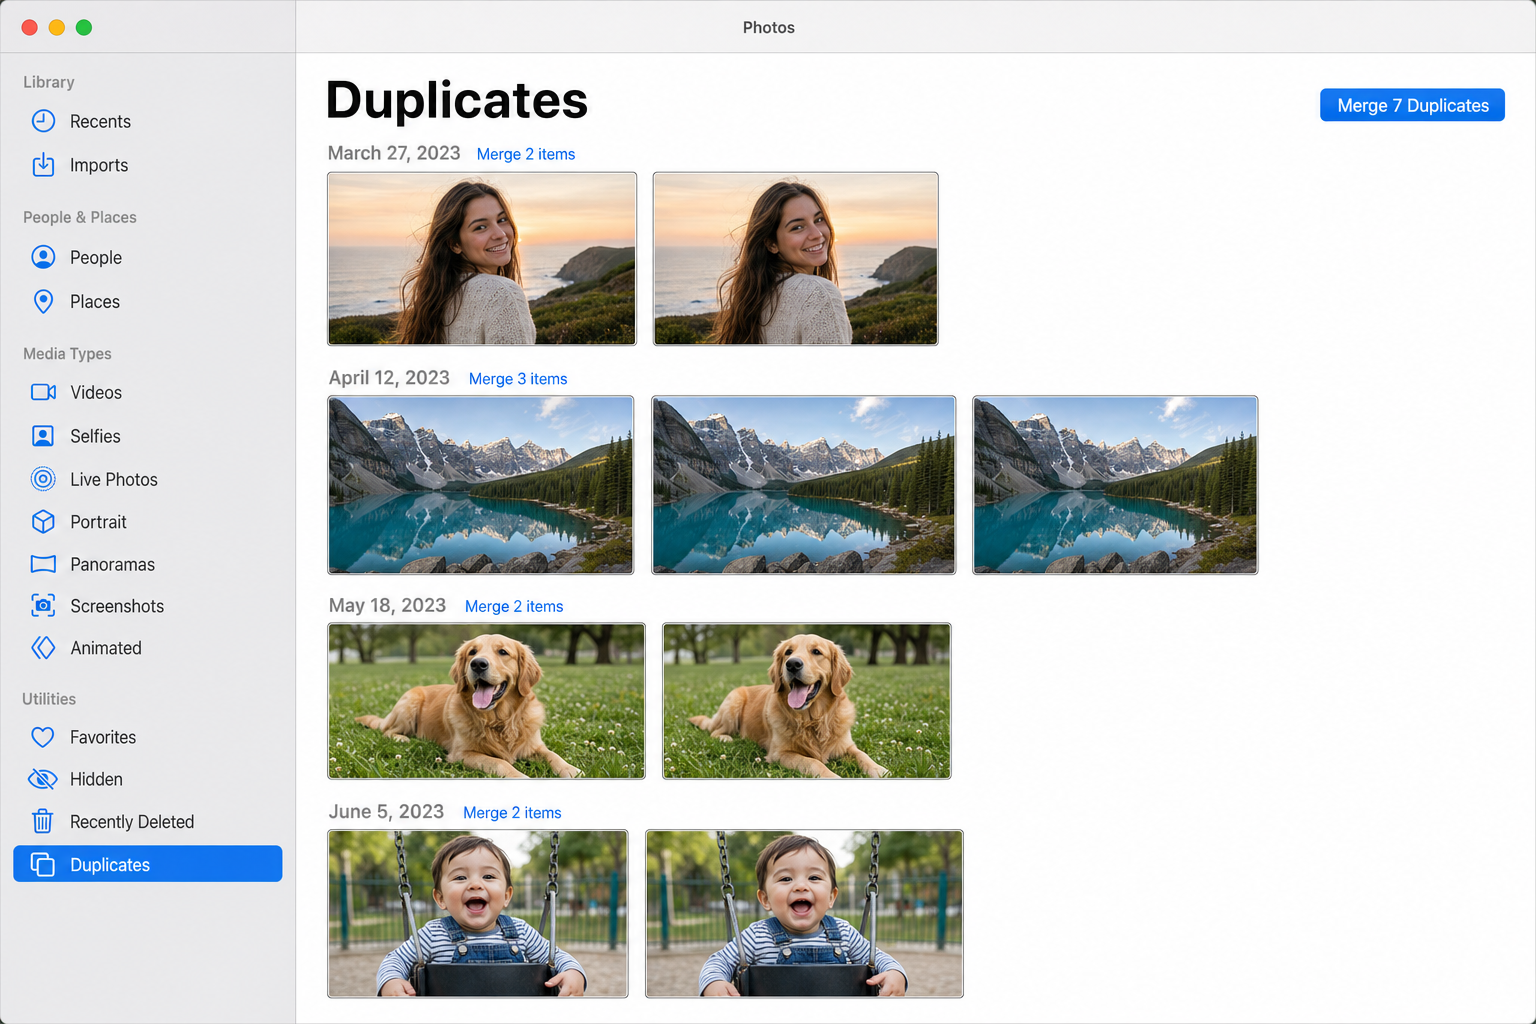
- Open the Photos app on your Mac.
- In the left sidebar, scroll down to find the Duplicates album. (If you don’t see it yet, Photos may still be scanning. Give it a few minutes.)
- Click into the album. You’ll see groups of duplicate photos and videos.
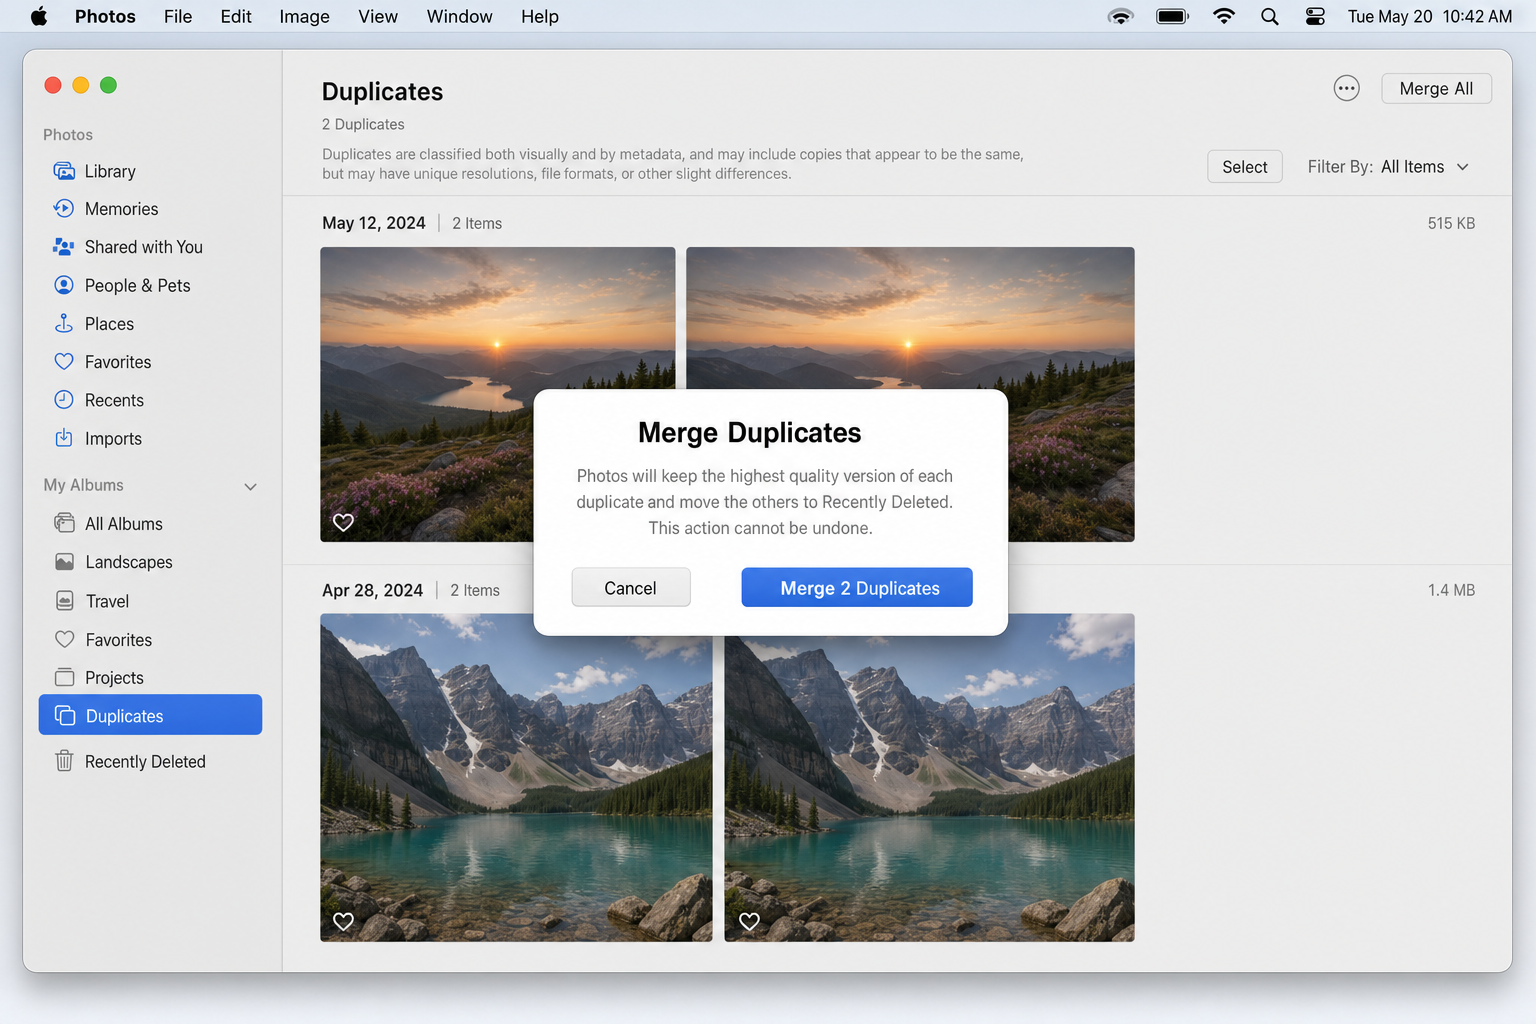
- Click Merge for each group. Photos keeps the highest-quality version and combines any metadata, captions, or album assignments from the duplicates into the one you’re keeping.
- Repeat until the album is empty.
The catch: this only works for photos inside your Photos library. If you have duplicate images scattered around in random folders on your Mac, such as Downloads, Desktop, or old backup folders, the Photos app won’t find those. For that, use dupeGuru on macOS.
Best for: Mac users who want the easiest possible way to clean up their Photos library. Zero setup required.
What About Cloud Duplicates?
A question that comes up a lot: “I cleaned up Google Photos, why are there still duplicates in my local folders?” Here’s the deal, broken down by service:
- Google Photos generally avoids creating duplicate cloud copies when you upload the same photo twice, though this behavior can depend on how the upload was triggered and your account settings. Either way, it has no awareness of files sitting in local folders on your PC or Mac that aren’t part of an active upload. Cleaning up Google Photos won’t touch those local files.
- iCloud Photos works similarly: it syncs your Photos library across devices and typically avoids storing exact duplicates in the cloud, but the specifics can vary depending on your iCloud plan and sync configuration. It also doesn’t scan or clean up photos outside your Photos library (like files in your Downloads or Desktop folders).
- OneDrive generally does not de-duplicate files in your synced folders, it mirrors whatever is on your local drive, so if you have duplicate files in your OneDrive folder locally, they’ll typically exist in the cloud too. Importantly, in most sync configurations, if you delete a file from a synced OneDrive folder on your PC, that deletion will propagate to the cloud as well — so be careful when running duplicate cleaners against OneDrive-synced directories. The same generally applies to iCloud Drive folders on a Mac or PC, though behavior can vary based on your sync settings.
- For Google Drive duplicates specifically, check out FileRev – it’s a web-based tool that scans your Google Drive and lets you batch-delete duplicates without touching your local files.
The safest approach with any synced folder: move duplicates to a local-only staging folder first, confirm the results look right, then delete from there rather than deleting directly from the synced directory.
Tips and Troubleshooting
Common Issues
Problem: The scan is taking forever
If you’re scanning a massive drive with hundreds of thousands of files, that’s normal. A few things help:
- Scan one folder at a time instead of your entire drive.
- Exclude system folders and temp directories.
- Run exact-match scans first (faster) before trying similarity/visual scans (slower).
- Let it run overnight if needed. Most tools are fine running in the background.
Problem: The tool isn’t finding my iPhone photos or camera RAW files
Not every free tool supports HEIC (the default iPhone photo format) or RAW formats like .CR2, .NEF, or .ARW. If you’re not seeing your photos in the results, check the file filter settings and make sure those extensions are included. Duplicate Cleaner and some Mac-focused tools handle HEIC and RAW much better than others.
Problem: The tool found “duplicates” that are clearly different files
This is a false positive. It happens, especially with similarity-based scanning. Lower the similarity threshold (try 90% or higher) to reduce false matches. And always, always preview before you delete.
Problem: A tool is trying to install extra software during setup
Some free tools bundle browser toolbars, system optimizers, or other extras in their installer. Read each screen carefully and decline anything you didn’t ask for. dupeGuru and AllDup are both clean installs with no bundled extras.
Pro Tips
- Move, don’t delete: Set your tool to move duplicates to a “Duplicates” folder instead of deleting them. Review that folder for a week, then empty it once you’re confident nothing important ended up there.
- Test on a small folder first: Before scanning your entire drive, run the tool on one small folder to get a feel for how it works and what the results look like.
- Exact match before similarity: Start with exact duplicate scanning (100% match). It’s faster, safer, and usually clears out the bulk of the problem. Then run a similarity scan if you still have obvious near-duplicates to deal with.
- Watch out for freemium limits: Some tools scan for free but charge you to delete. dupeGuru and AllDup are genuinely free with no deletion limits. Duplicate Cleaner’s free tier covers scanning and deletion for standard duplicates, but advanced image comparison (rotated/retouched photos) and audio comparison require Pro — check their site for the current breakdown.
Which Tool Should You Use?
| Tool | Platform | Cost | Best For |
|---|---|---|---|
| dupeGuru | Windows, macOS, Linux | Free (open source) | Best all-around pick for most people |
| AllDup | Windows only | Free | Power users with large, complex file libraries |
| Duplicate Cleaner | Windows | Freemium | Visual photo comparison, polished UI |
| macOS Photos (built-in) | macOS Ventura+ | Free (built-in) | Mac users cleaning up their Photos library |
Wrapping Up
Cleaning up duplicate files doesn’t have to be a nightmare. The right tool makes it pretty painless. If you’re on Windows or macOS and want something reliable with zero cost, dupeGuru is the one to bookmark. Mac users with a Photos library mess should check the built-in Duplicates album first, as it’s already there waiting for you. And if you’re a Windows power user with a seriously chaotic drive, AllDup will give you all the control you need.
Just remember: move before you delete, back up before you start, and don’t trust any tool blindly. A quick preview pass before hitting delete can save you from a very bad day. If you’re also dealing with bloated storage on your Android device, check out our guide on what “Other” storage on Android is and how to clean it up.