

Playing couch co-op on a gaming PC has always been trickier than it should be. If you’ve been struggling to get two players going on the same machine, you know that frustration, especially when console gamers can just plug in a second controller and go.
There are two real paths here. Many PC games now ship with genuine local split-screen or co-op support, and finding them is easier than ever. If your favorite game doesn’t have it built in, you can also run two separate game instances side by side on two monitors using ASTER Multiseat and Sandboxie-Plus. That second method takes more work, and it won’t cooperate with every game (anti-cheat software has gotten a lot stricter), but it’s still a viable option for many titles.
Before You Begin
The right checklist depends on which route you’re taking.
For native split-screen (the easy route):
- A Windows 10 or 11 PC
- Two controllers, Xbox-style pads work with almost every PC game, since most use XInput (the Microsoft input standard Windows recognizes automatically)
- A game with local co-op or split-screen support (you’ll learn how to find these below)
For ASTER multi-instance (the advanced route):
- A Windows 10 or 11 PC with a powerful GPU and plenty of RAM, you’ll be running two full game instances simultaneously
- Two monitors connected to the same graphics card
- Two keyboards and two mice
- ASTER Multiseat, free 30-day trial available; lifetime license costs around $60, or roughly $17 for a one-year license
- Sandboxie-Plus, free and open-source
- Two copies of any paid game you want to play
- About 1–2 hours for setup and testing
Method 1: Find a Game That Already Supports Split-Screen
If the game handles local co-op natively, you’re looking at maybe five minutes of setup. Start here before anything else.
Step 1: Find a Compatible Game
On Steam, search the Split Screen or Shared/Split Screen Co-op tags in the store, either from the tags browser or by filtering search results. On Epic Games, browse the co-op section and look for local co-op labels on individual game pages.
Popular PC games with solid local split-screen or couch co-op support include It Takes Two, A Way Out, Overcooked 2, Moving Out 2, and Human: Fall Flat. Sports and racing titles, EA SPORTS FC, NBA 2K, the Dirt series, tend to have the strongest split-screen support on PC.

Step 2: Connect Your Controllers
Plug in your controllers before launching the game. Most modern PC games use XInput, so Xbox-style controllers get detected automatically. If Windows isn’t seeing a controller, open Settings and go to Bluetooth & devices > Devices (for wired) or Bluetooth & devices > Bluetooth (for wireless) to verify the connection.
Step 3: Launch the Game and Pick Local Mode
Start the game and check the main menu for options labeled Local Multiplayer, Couch Co-op, Split Screen, Shared Screen, or Co-op. Some games put this behind a multiplayer lobby where you then choose Local or Same device.
For games that use a “press a button to join” system, have Player 2 press a button on their controller from the main menu, the game adds them automatically.
Step 4: Set Your Display Mode
Once you’re in, check whether the game offers layout options, horizontal or vertical split are the most common. Switch to borderless window mode instead of exclusive fullscreen if the option exists. It causes fewer issues with two-player setups and makes switching between windows much less painful.
Method 2: Multi-Monitor, Multi-Instance Gaming with ASTER
This method is for games without native local co-op. ASTER Multiseat turns your single PC into two separate computing environments, each with its own monitor, keyboard, and mouse. Sandboxie-Plus handles running two Steam instances at the same time.
A few honest caveats before you get started:
- Games with kernel-level anti-cheat (Easy Anti-Cheat, BattlEye, and similar) will block multiple instances. No workaround exists.
- Some games refuse multiple simultaneous logins from the same machine.
- A game update can break this setup overnight. Compatibility is not guaranteed.
- Running two demanding 3D games at once puts serious strain on your hardware, expect to lower graphics settings on both.
Step 1: Plug In Your Hardware
Connect both monitors to your PC, both must go into the same graphics card, not one into the GPU and one into the motherboard’s video output. Plug in both keyboards and both mice as well. The monitors don’t have to be the same size or model.
Step 2: Install ASTER Multiseat
Download and install ASTER Multiseat from the ASTER website. During the installation wizard, accept the option to create a system restore point. ASTER modifies some low-level display and input drivers, and a restore point gives you an easy way back if something breaks.
If you use an NVIDIA card, uninstall GeForce Experience before running ASTER, these two don’t get along and the combination can cause display driver crashes.
Restart your PC once installation finishes.
Step 3: Open ASTER and Handle the Initial Prompts
After your PC restarts, open ASTER Multiseat. It’ll prompt you to run an update, click OK.
Then either enter your license key or click I do not have an ASTER activation ID to start the 30-day trial.
Step 4: Check the General Settings Tab
On the General Settings tab, you’ll see your Places, the two separate workplaces ASTER creates. Both have Display Login Dialog checked by default. Nothing here needs to change yet.
Step 5: Assign Hardware in the Workplaces Tab
Click the Workplaces tab. ASTER shows every piece of input and display hardware it’s detected, keyboards, mice, monitors, and audio devices.
Drag one keyboard, one mouse, and one monitor into Place 2, that’s Player 2’s setup. Player 1’s gear stays in Place 1.
Not sure which keyboard or mouse is which? Type on one or wiggle it; whichever device you use gets highlighted with a blue square in the ASTER interface.
If you’re unsure which monitor graphic is which, hover your mouse over each one to see its display name.
After assigning everything, each Place should have one keyboard, one mouse, and one monitor.
Click Apply at the bottom left. A notice will pop up about enabling workplaces, switch over to the General Settings tab.
Step 6: Set ASTER to Start Manually
Find the How to start workplaces dropdown and set it to Manually by the ‘Run ASTER workplaces’ button. This stops ASTER from activating on every boot, you only want it running when you actually need the split setup.
Click Apply, then click Enable ASTER and reboot PC.
Step 7: Activate Your Workplaces After Reboot
When your PC starts back up, open ASTER again. The General Settings tab shows a different status at the bottom, ASTER is now active.
Click Run ASTER workplaces. The second monitor activates and asks for a Windows login. You’ll need a separate Windows user account for Place 2, create one under Settings > Accounts > Family & other users if you haven’t already. Log in on the second monitor, and you’ve now got two independent Windows sessions running side by side.
Step 8: Prepare Your Steam Files
Running two copies of Steam at the same time requires some prep work. Navigate to your Steam folder, by default at C:\Program Files (x86)\Steam. Right-click the steamapps folder and copy it.
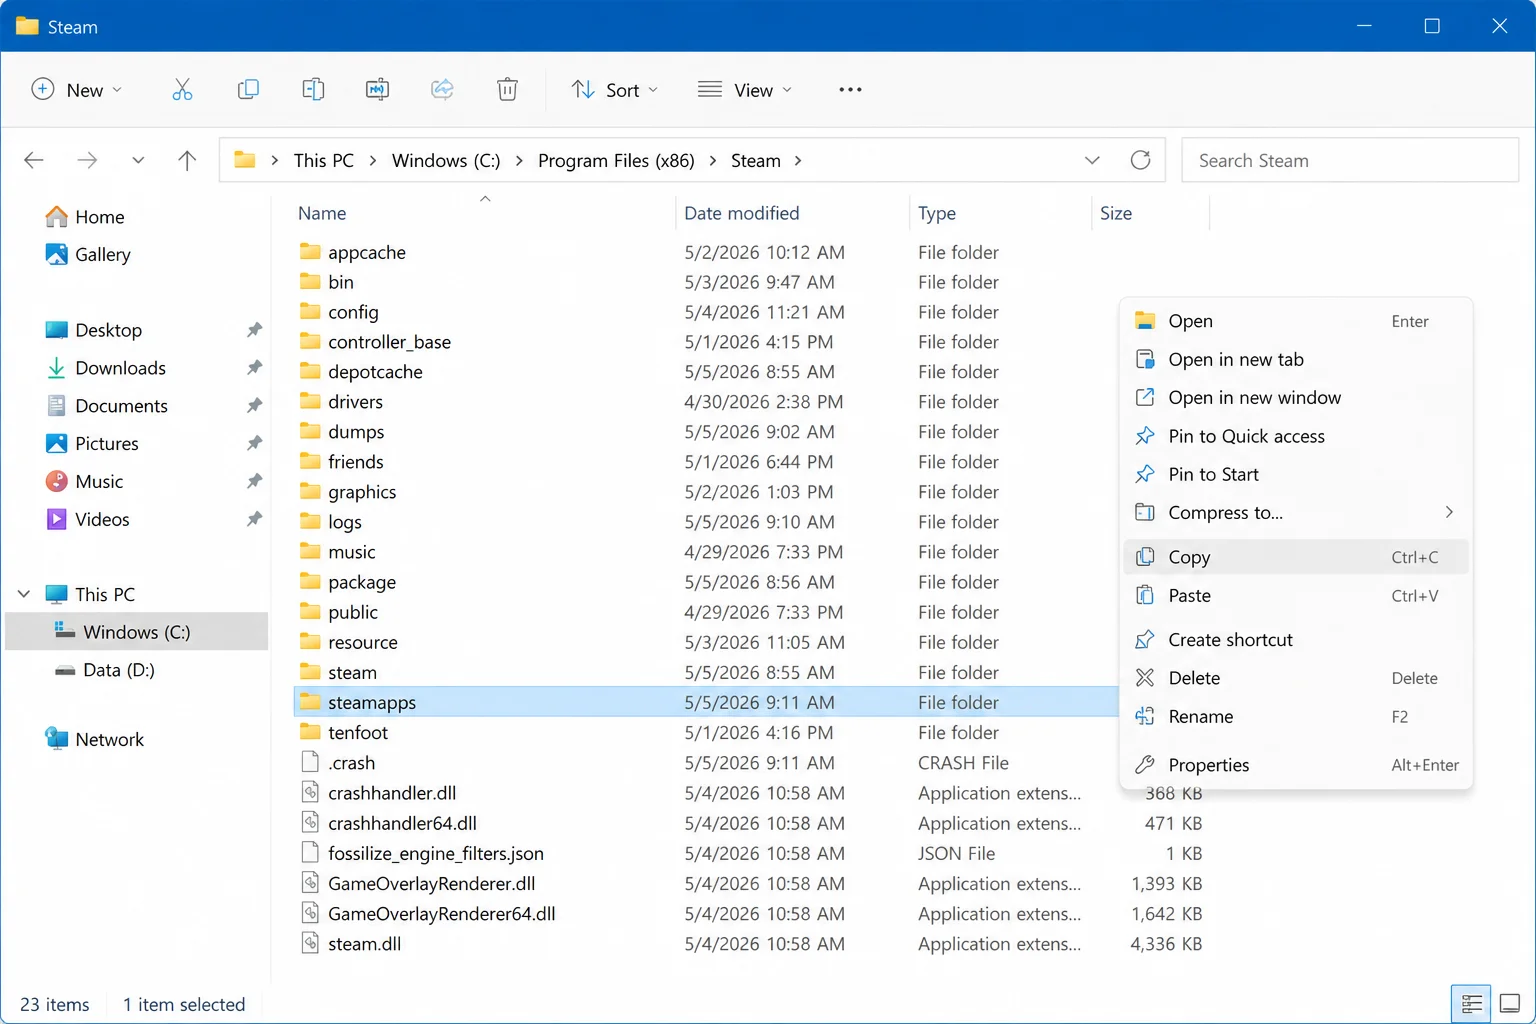
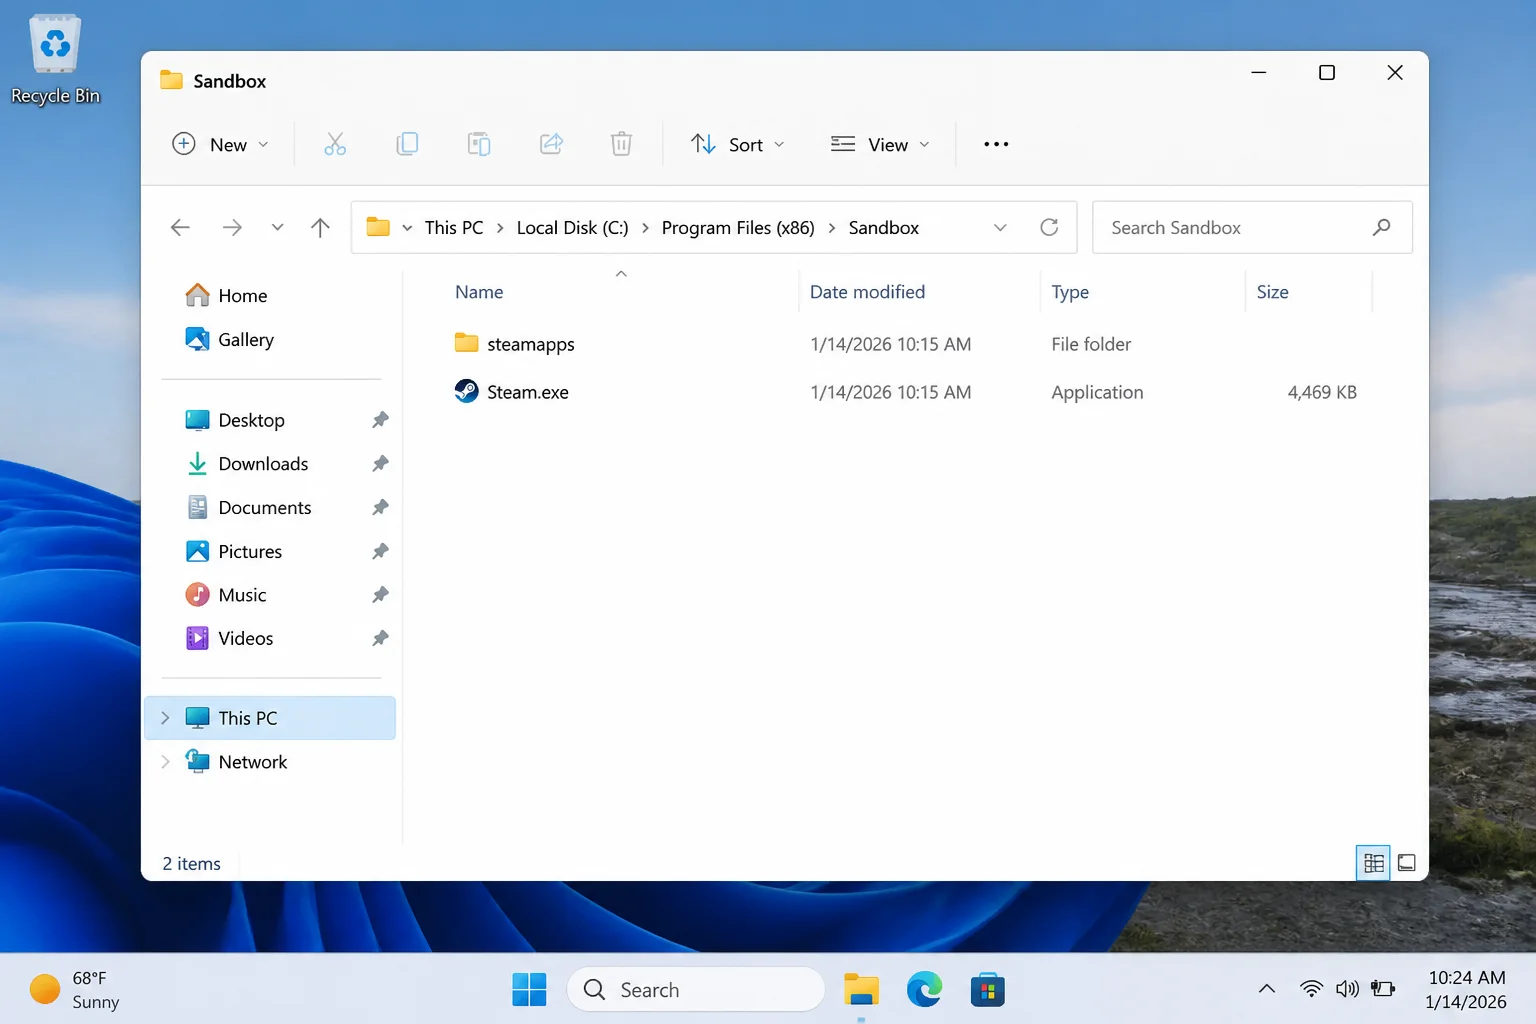
Go up a level to C:\Program Files (x86)\ and create a new folder called Sandbox. Open it, then paste the steamapps folder inside. This step takes a while, you’re copying every installed game file, so the time depends on your library size and drive speed.
Also copy Steam.exe from the original Steam folder and paste it into the Sandbox folder. When you’re done, the Sandbox folder should contain both the steamapps folder and Steam.exe.
Step 9: Set Up Sandboxie-Plus
Download and install Sandboxie-Plus, the free, open-source tool that lets the second Steam instance run in its own isolated bubble, completely separate from the first. Open it after installing. If a tutorial window appears, close it.
In Sandboxie-Plus, click Sandbox in the top menu, then click Create New Sandbox.
Give the sandbox a name, “splitscreen” works fine, then press OK.
Your new sandbox appears in the list. Right-click it and select Sandbox Settings.
In the settings window, click the + next to Resource Access, then the + next to File Access, then click Full Access.
Click Add, navigate to the Sandbox folder you created, then click OK > Apply > OK. Dismiss any pop-up that appears.
Step 10: Launch the Sandboxed Game for Player 2
On Player 2’s monitor (logged into its own Windows session), navigate to C:\Program Files (x86)\Sandbox. Right-click Steam.exe, select Run Sandboxed, choose the sandbox you created (e.g., “splitscreen”), click Run as UAC Administrator, and confirm.
Player 2 now has a sandboxed Steam session to sign into with a separate account. Player 1 runs Steam normally from the original install. Both can launch the same multiplayer game and join each other through the game’s online lobby system.
This works for many online multiplayer titles, GTA 5, ARK: Survival Evolved, Dota 2, and others. Games with Easy Anti-Cheat will block two instances outright. And for anything with VAC (Valve Anti-Cheat) enabled, Counter-Strike, for example, Valve hasn’t confirmed this method is safe from bans, so run it at your own risk on competitive titles.
For games on other launchers like Battle.Net or Epic Games, the same Sandboxie-Plus steps apply, just swap the launcher files and folder paths for the one you’re targeting.
An Easier Alternative: Steam Remote Play Together
If the goal is simply playing together rather than physically sharing a screen, Steam Remote Play Together might solve the whole thing without any of this setup. It lets a second player join your game remotely, as if they were sitting right next to you, over the internet. The host runs the game; the guest streams it and sends their controller input back. The game sees all players as local.
Not every game supports it, and a solid connection on both ends helps. For the right situation, it’s far simpler than anything above.
Tips and Troubleshooting
Common Issues
Anti-cheat is blocking the second game instance
Games using Easy Anti-Cheat, BattlEye, or similar kernel-level systems specifically detect and block multiple instances. There’s no getting around it. Use a different game or try Steam Remote Play Together instead.
The game only sees one controller
Many PC games only accept input from a single local player, even with two instances running. Both controllers may send input to the same window. Check the game’s input settings for controller assignment options, or look up whether the title supports simultaneous multiple controllers at all.
Performance is rough on both screens
Two GPU-hungry games running at once is demanding. Drop the graphics settings, including resolution, texture quality, and shadow detail, on one or both instances. If performance is still hurting, your GPU or CPU may not have the headroom for this approach.
The window layout resets when the game goes full-screen
Switch both instances to borderless window mode. Then use Windows 11’s Snap Layouts to arrange them side by side, press Win + Z over a window to pull up the layout picker, or drag each window to a screen edge. The keyboard shortcuts Win + Left Arrow and Win + Right Arrow snap windows to screen halves fast.
Pro Tips
- Check Steam’s “Split Screen” tag first: Spending an afternoon on ASTER when the game already supports local co-op natively is a frustrating waste of time. Search Steam’s tags before anything else.
- Use borderless window everywhere in Method 2: Nearly every step goes more smoothly without exclusive fullscreen getting in the way.
- Always disable ASTER before shutting down: Go to the General Settings tab and disable it before powering off. Skipping this step can cause boot problems.
- Lower settings on both instances from the start: Even powerful hardware struggles to run two modern games at high settings. Start low, then push settings up if you have frame rate to spare.
Wrapping Up
If the game you want already has local split-screen or couch co-op built in, that’s the clear path: connect the controllers, pick local mode, and you’re done. The ASTER + Sandboxie-Plus method still works for many games without native support, but it requires real setup time and won’t play nice with everything. Anything competitive with active anti-cheat is a no-go, full stop.
The couch co-op problem on PC is more solvable than it used to be. Between more games adding native local support and Steam Remote Play Together covering the gap when you just want to play together, you’ve got more options than just forcing dual instances and crossing your fingers.