

If you’ve been staring at your plain, boring email signature and wondering why it doesn’t look anything like the polished, professional ones you see from other people, you’re not alone. The good news? Setting up a great-looking HTML email signature in Gmail, Yahoo Mail, or Outlook is a lot easier than it used to be, and you don’t need to know a single line of code to pull it off.
In this guide, you’ll learn exactly how to add a formatted HTML signature in each of the three major web email clients, where to find or build a signature design you actually like, and how to avoid the most common pitfalls (like broken images and formatting that falls apart in Outlook). Let’s get into it.
What Is an HTML Email Signature?
An HTML email signature is a formatted block of text and images that gets automatically added to the bottom of your emails, kind of like a digital business card. Instead of just typing your name and phone number, an HTML signature can include your photo, company logo, social media icons, clickable links, and a polished layout that makes you look like you mean business.
Key things to know:
- It’s not raw code you type in: Gmail, Yahoo Mail, and Outlook web don’t let you paste raw HTML code directly into the signature box. What you do instead is build or generate the signature, render it (preview it in a browser), then copy and paste the formatted result.
- Images need to be hosted online: Any images in your signature, your headshot, company logo, social icons, need to be publicly accessible on the web via a secure HTTPS link. Images sitting on your computer won’t show up for anyone else.
- Simple designs work best: Fancy CSS and complex layouts often break across different email clients. Table-based layouts with inline styles are the safest bet.
- Mobile is a different story: Mobile email apps often simplify or strip signature formatting. Your signature will look best on desktop web clients.
Before You Begin
Make sure you have:
- A desktop browser (Chrome, Edge, Firefox, or Safari, latest version)
- An HTML signature ready to go, either from a generator tool or a template (see the How to Find or Create an HTML Signature section below if you don’t have one yet)
- Any images in your signature hosted on a public HTTPS server or image hosting service
How to Add an HTML Signature in Gmail
Gmail’s signature editor doesn’t have a “paste HTML code” option, but you can still get a fully formatted signature in there. The trick is to paste the rendered version of your signature (what it looks like in a browser) rather than the raw HTML code. Gmail is surprisingly good at preserving the formatting when you do it this way.
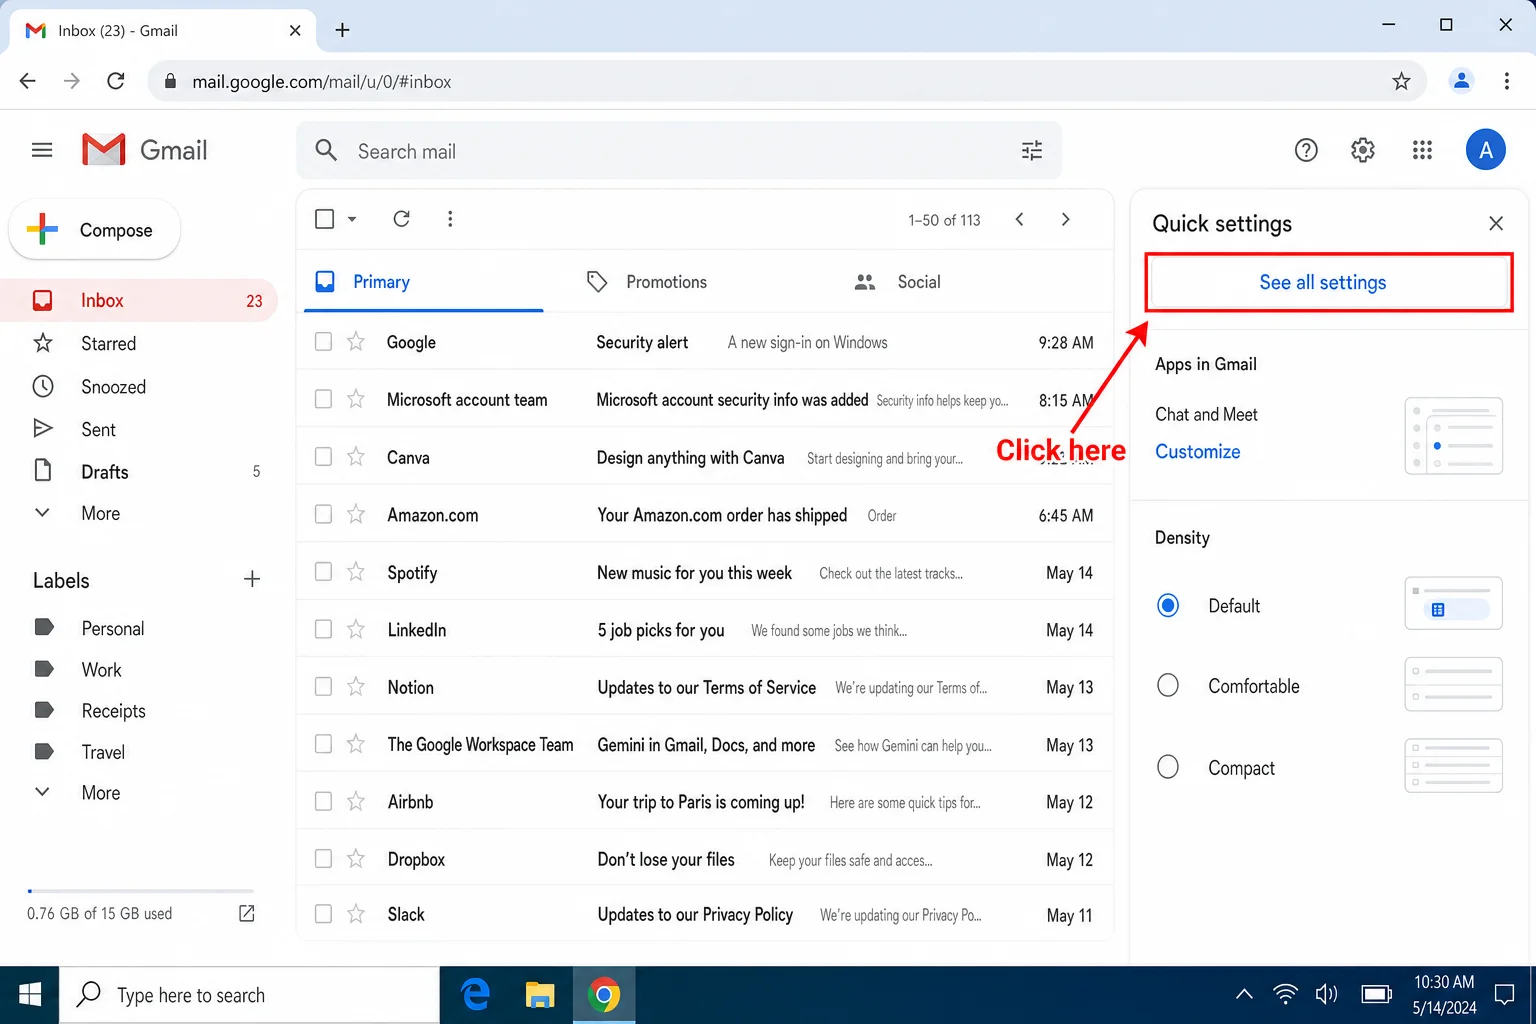
Step 1: Open Gmail Settings
Click the gear icon in the top-right corner of Gmail, then click See all settings.
Step 2: Go to the Signature Section
You’ll land on the General tab by default. Scroll down until you see the Signature section. Click Create new.
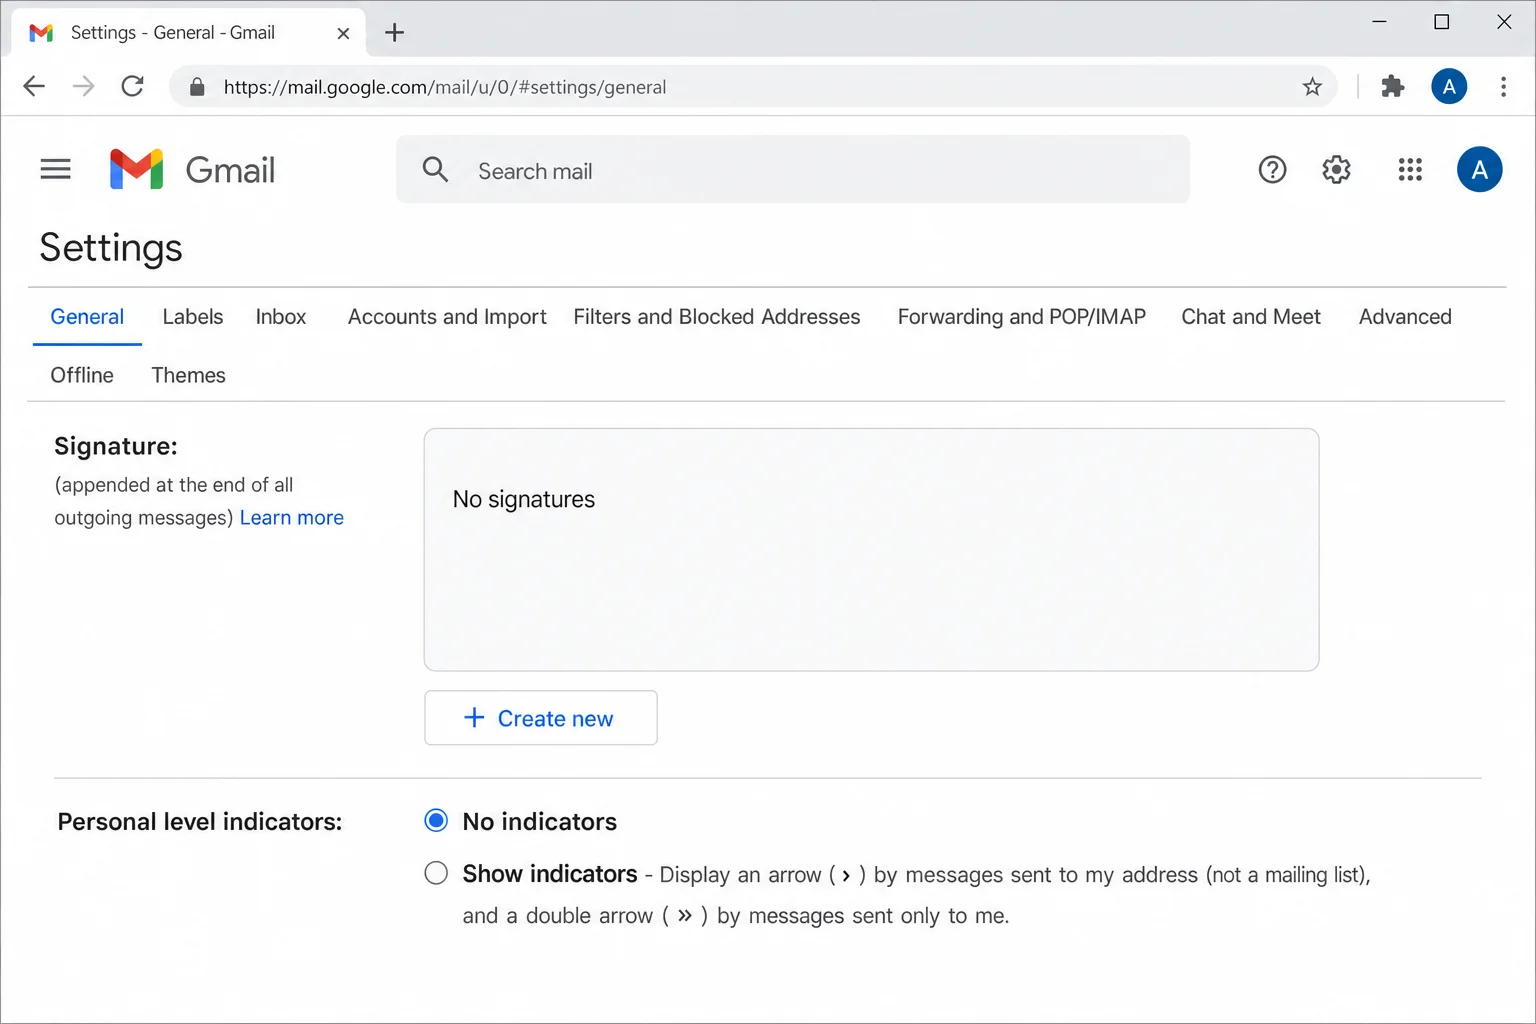
Step 3: Name Your Signature
Give your signature a name, something like “Work Signature” or “Personal”, and click Create. The name is just for your reference; recipients won’t see it.
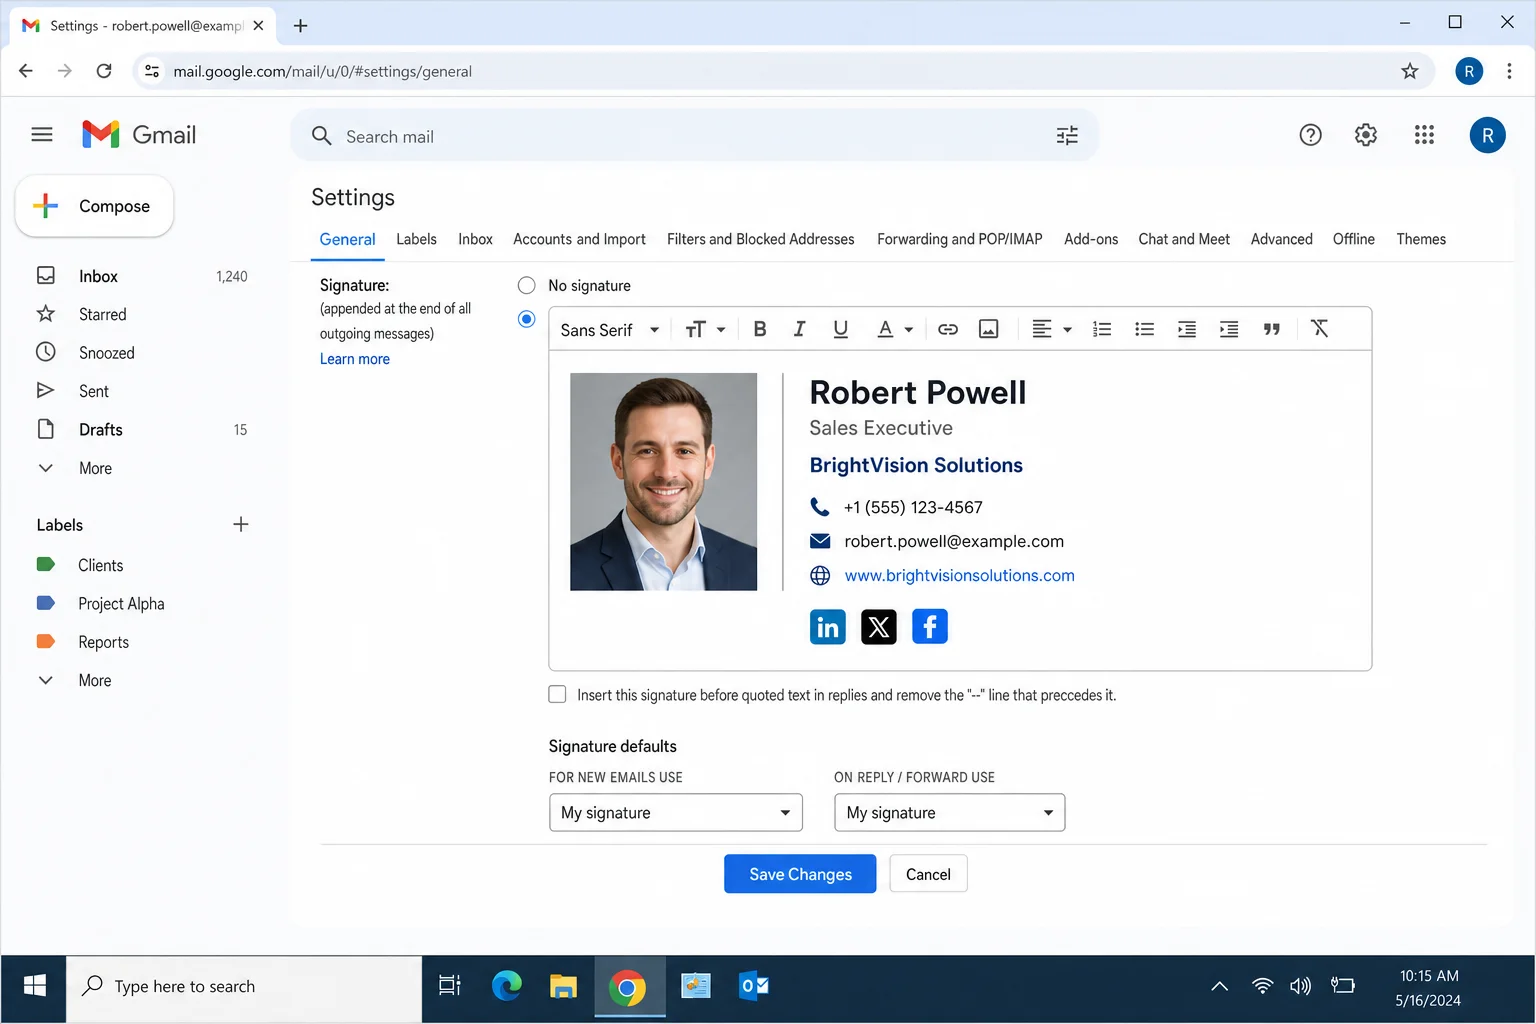
Step 4: Paste Your Formatted Signature
Open your HTML signature file in a web browser (or open the preview from your signature generator). Select everything, the whole signature, and copy it with Ctrl + C (Windows) or Cmd + C (macOS). Then click inside the Gmail signature editor box and paste it with Ctrl + V / Cmd + V.
You should see your formatted signature appear, fonts, colors, layout and all. If images show up broken, it means they’re not hosted online yet (see the troubleshooting section below).
Step 5: Set Your Default Signature
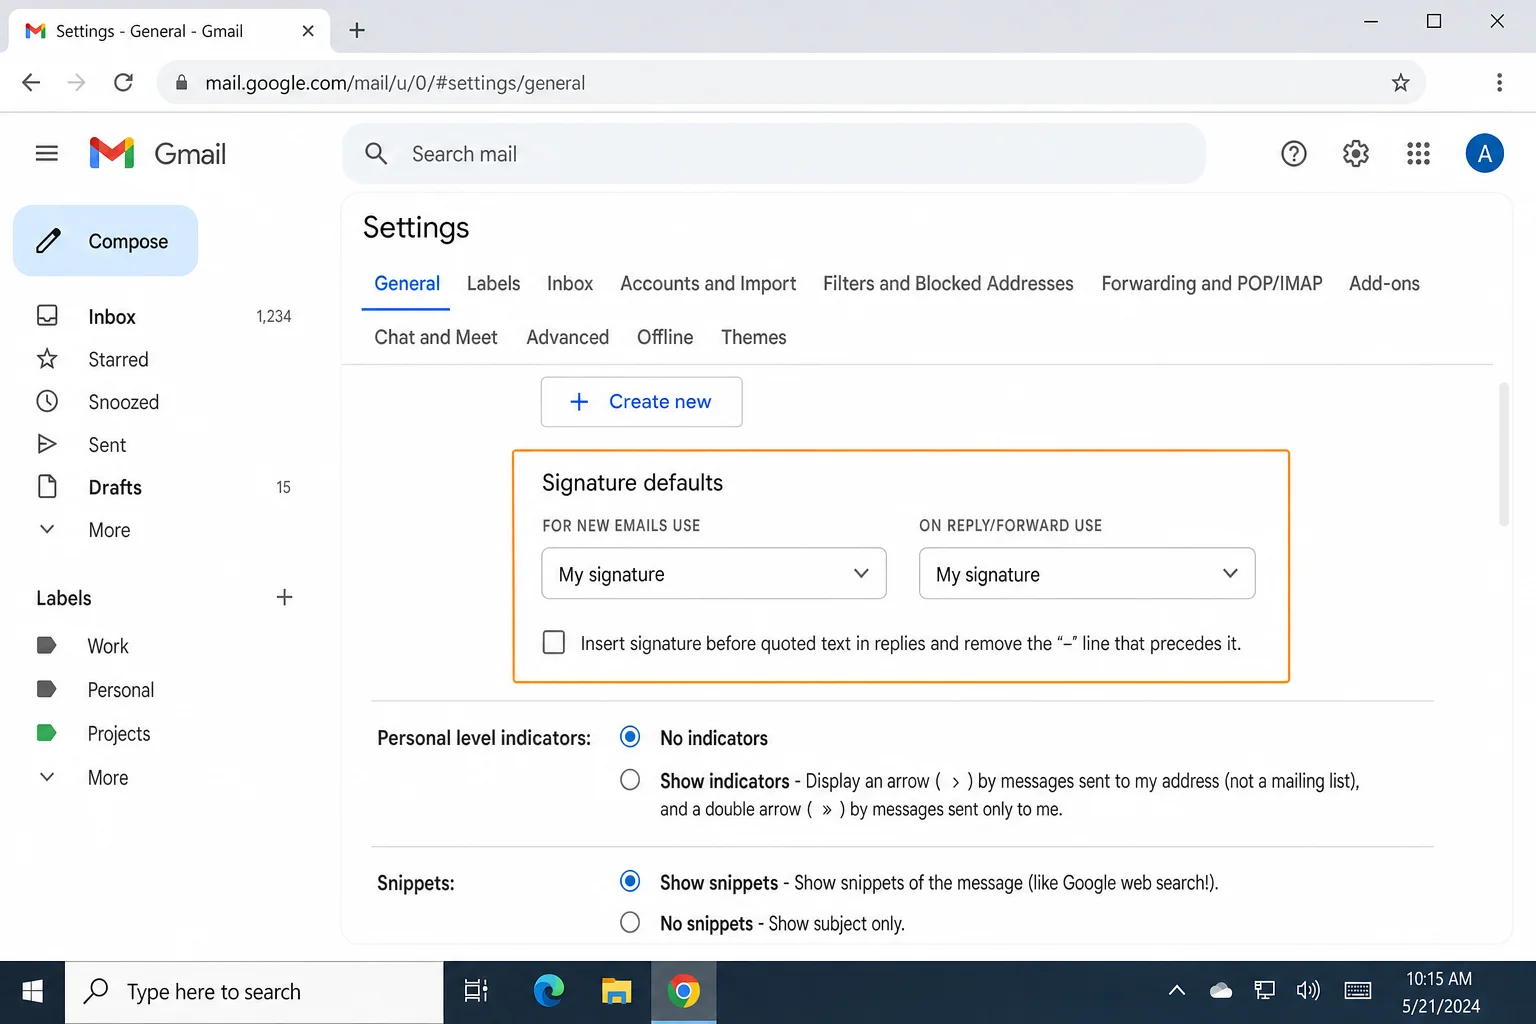
Just below the editor, you’ll see dropdowns for For new emails use and For replies/forwards use. Select your new signature from both dropdowns so it gets added automatically.
Step 6: Save Your Changes
Scroll all the way to the bottom of the Settings page and click Save Changes. Compose a new email to double-check that your signature appears correctly.
How to Add an HTML Signature in Yahoo Mail
Yahoo Mail supports formatted signatures through its settings. It’s the same general idea as Gmail: you paste the rendered version of your signature, not raw HTML code.
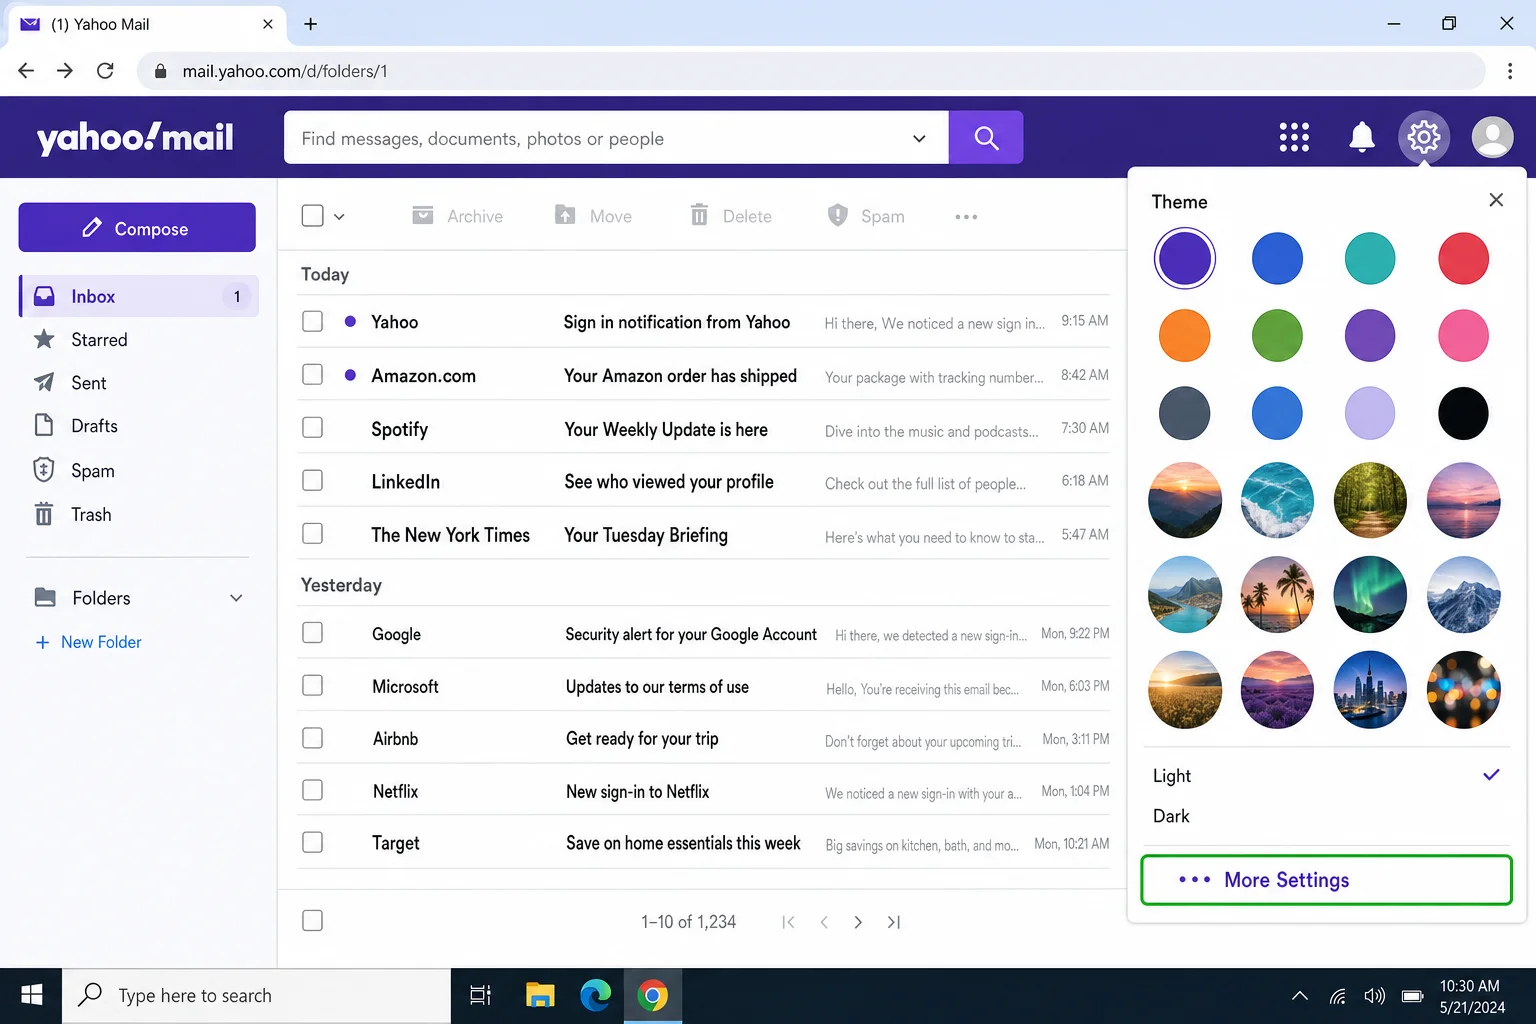
Step 1: Open Yahoo Mail Settings
Click the gear icon in the top-right corner of Yahoo Mail, then select More Settings.
Step 2: Go to Writing Email
In the left sidebar of the Settings page, click Writing email.
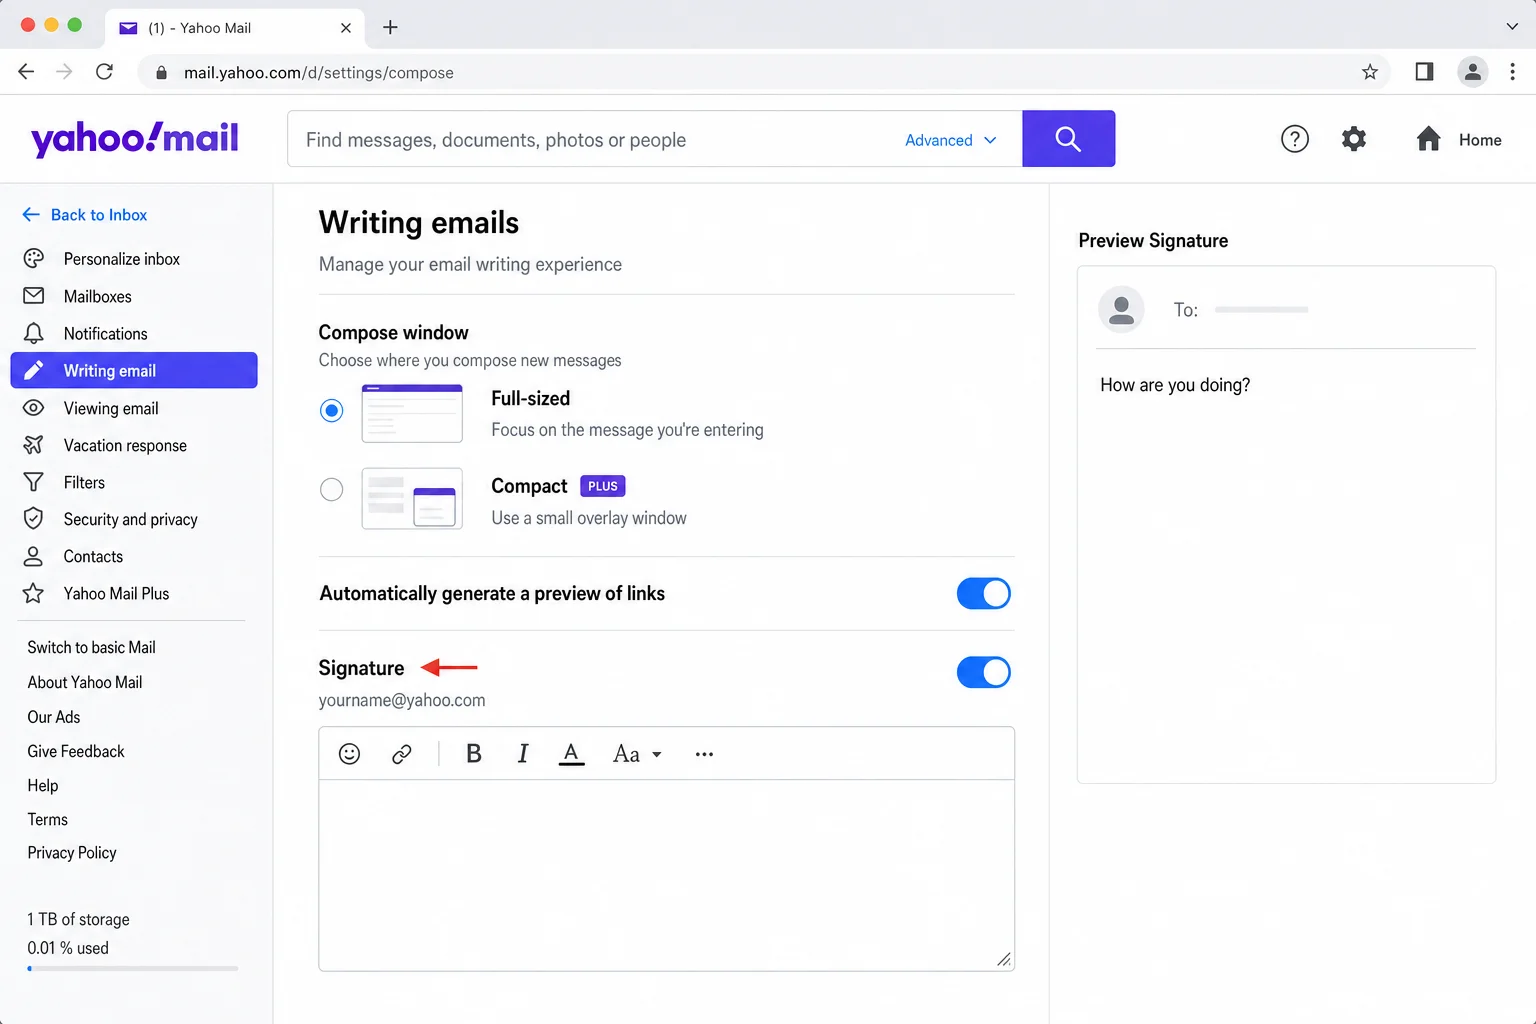
Step 3: Enable Your Signature
Find the Signature section and toggle it on for your email account. A text editor box will appear.
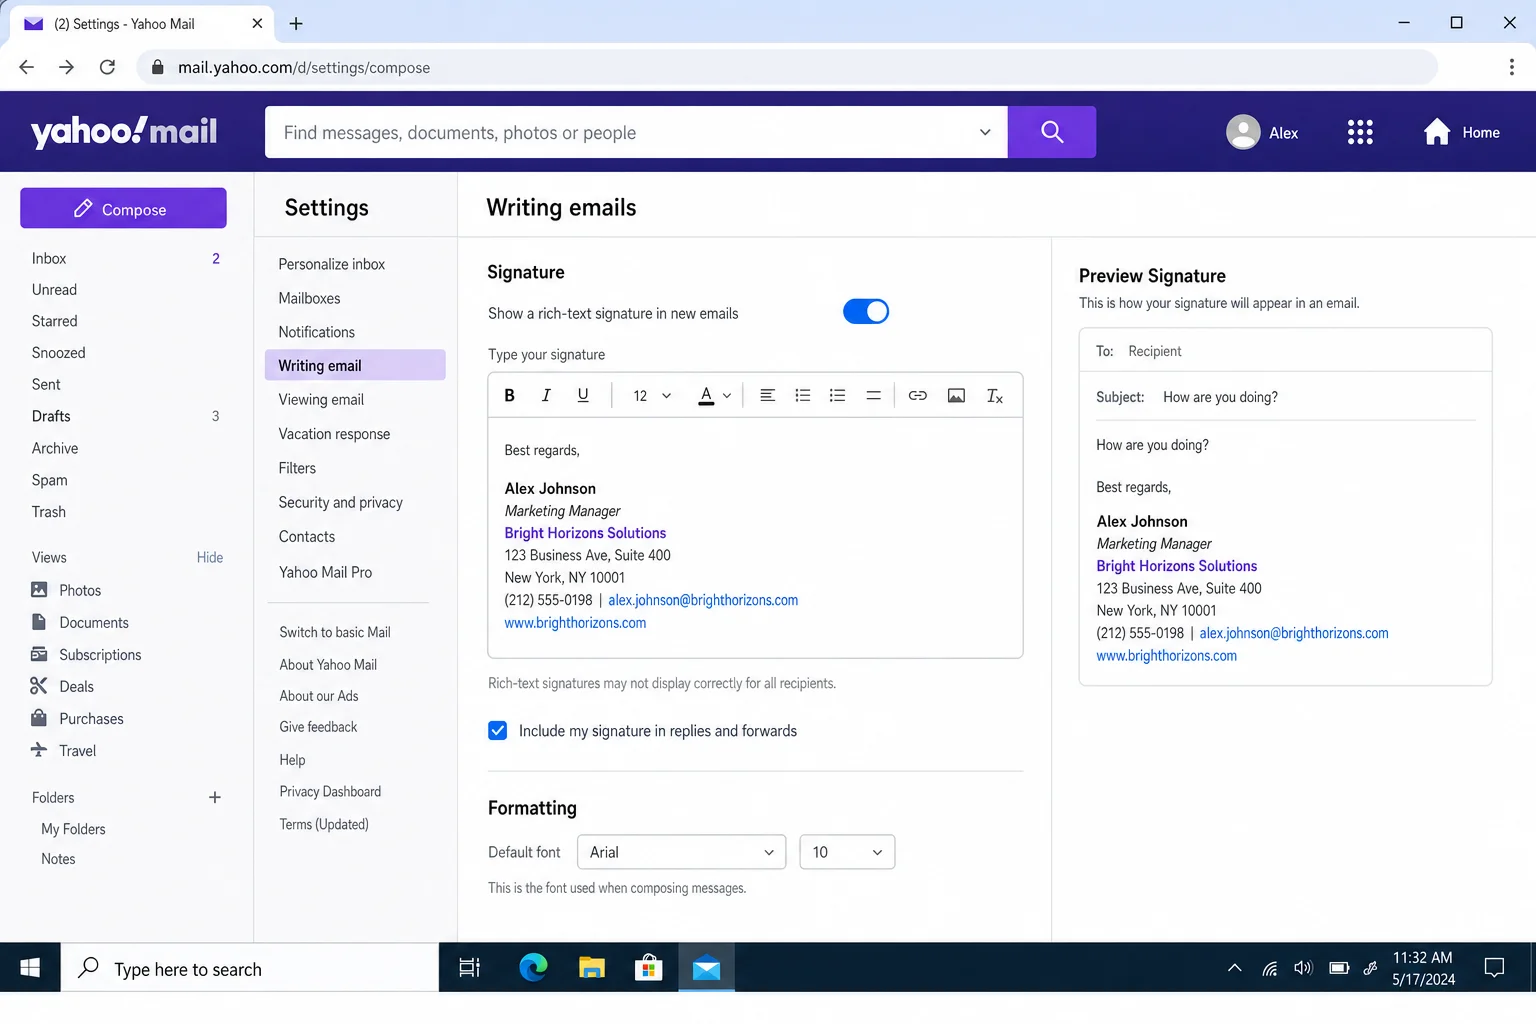
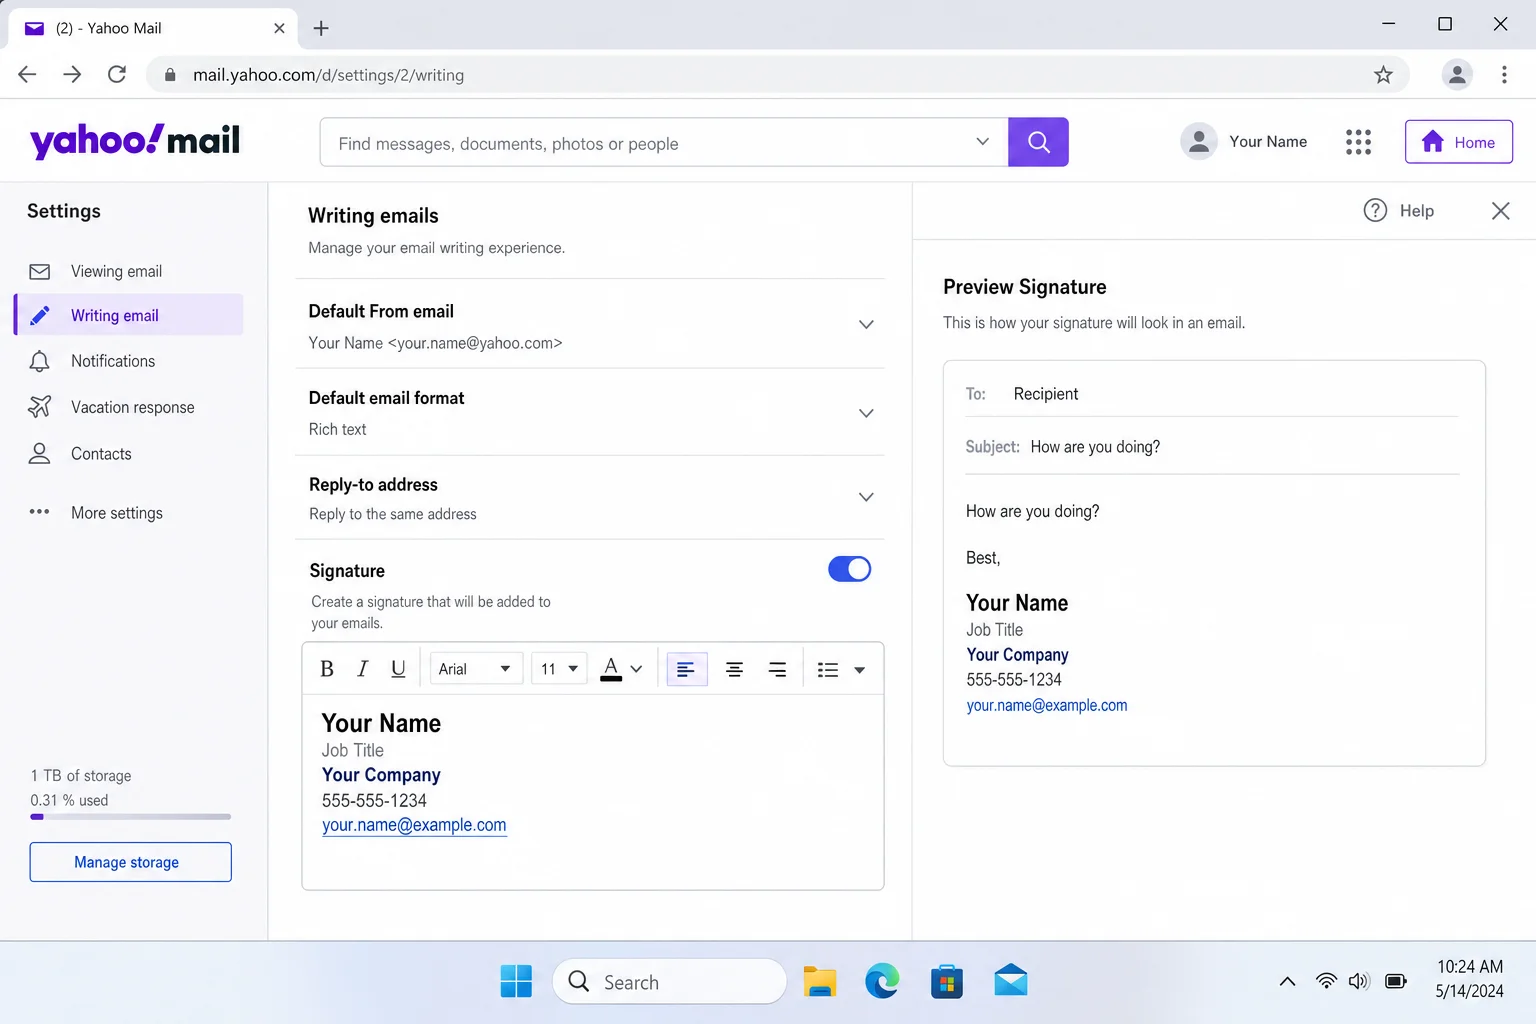
Step 4: Paste Your Formatted Signature
Just like with Gmail, open your HTML signature in a browser, select and copy the rendered output, then paste it into Yahoo’s signature editor box. Your formatting should carry over. Save your changes when done.
How to Add an HTML Signature in Outlook
A quick note on naming: “Hotmail” is now part of the Outlook.com ecosystem, so whether you’ve got a @hotmail.com, @live.com, or @outlook.com address, the steps below cover you. The process is slightly different depending on whether you’re using Outlook on the web or the Outlook desktop app.
Outlook on the Web (Outlook.com)
Step 1: Open Outlook Settings
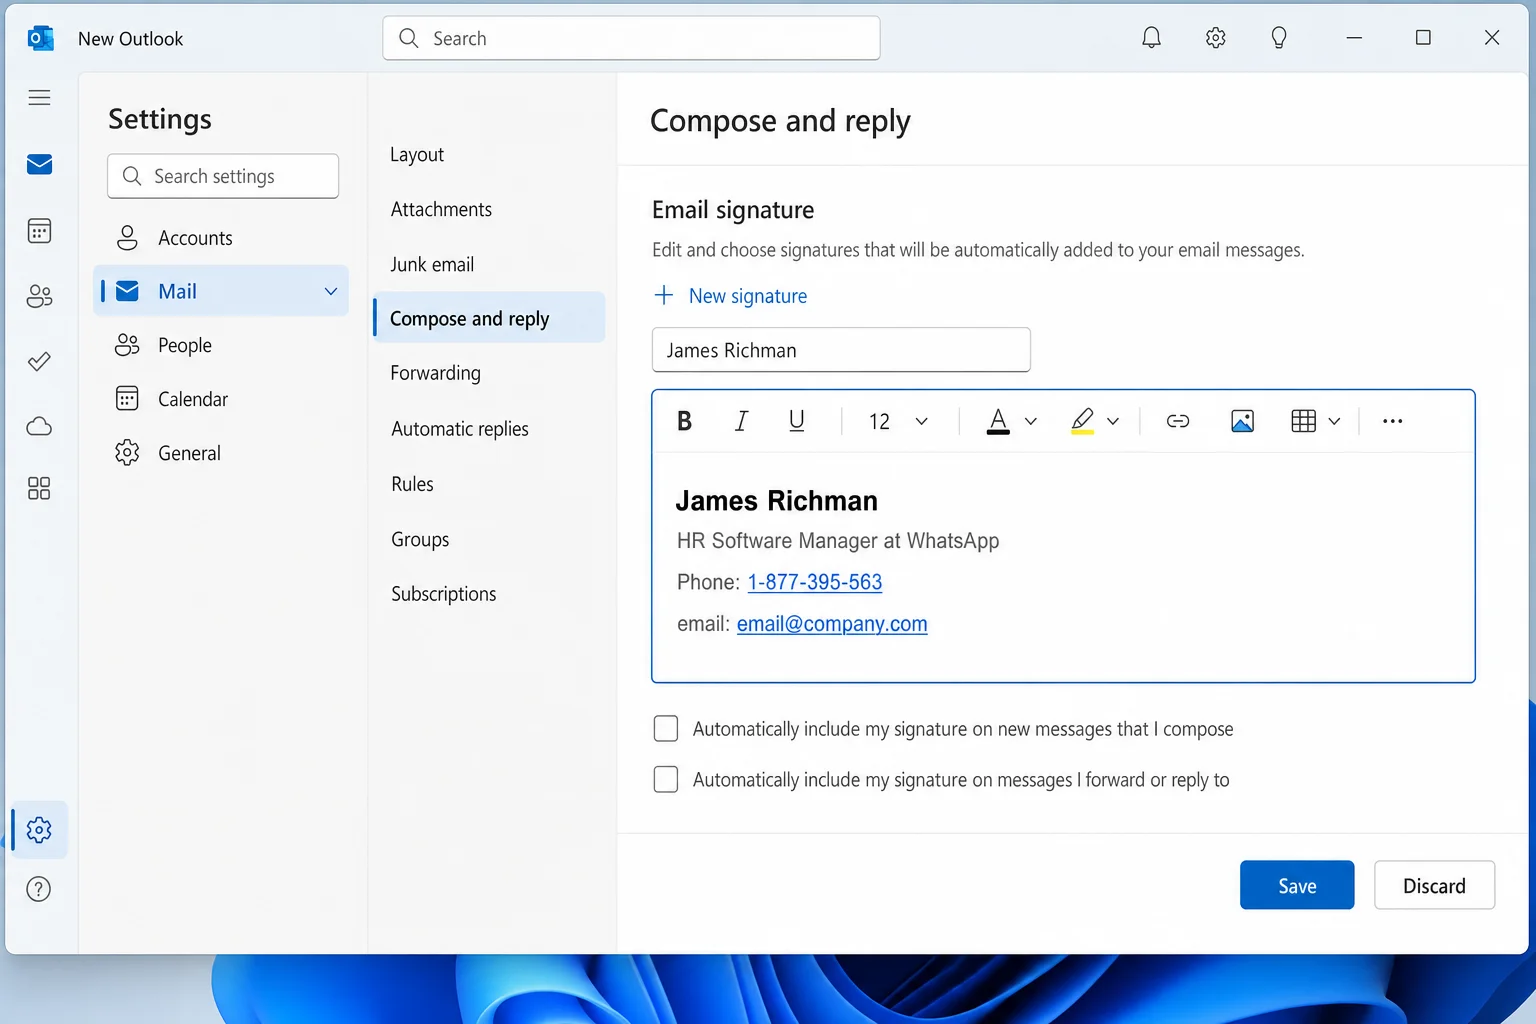
Click the gear icon in the top-right corner, then click Mail in the left panel, followed by Compose and reply.
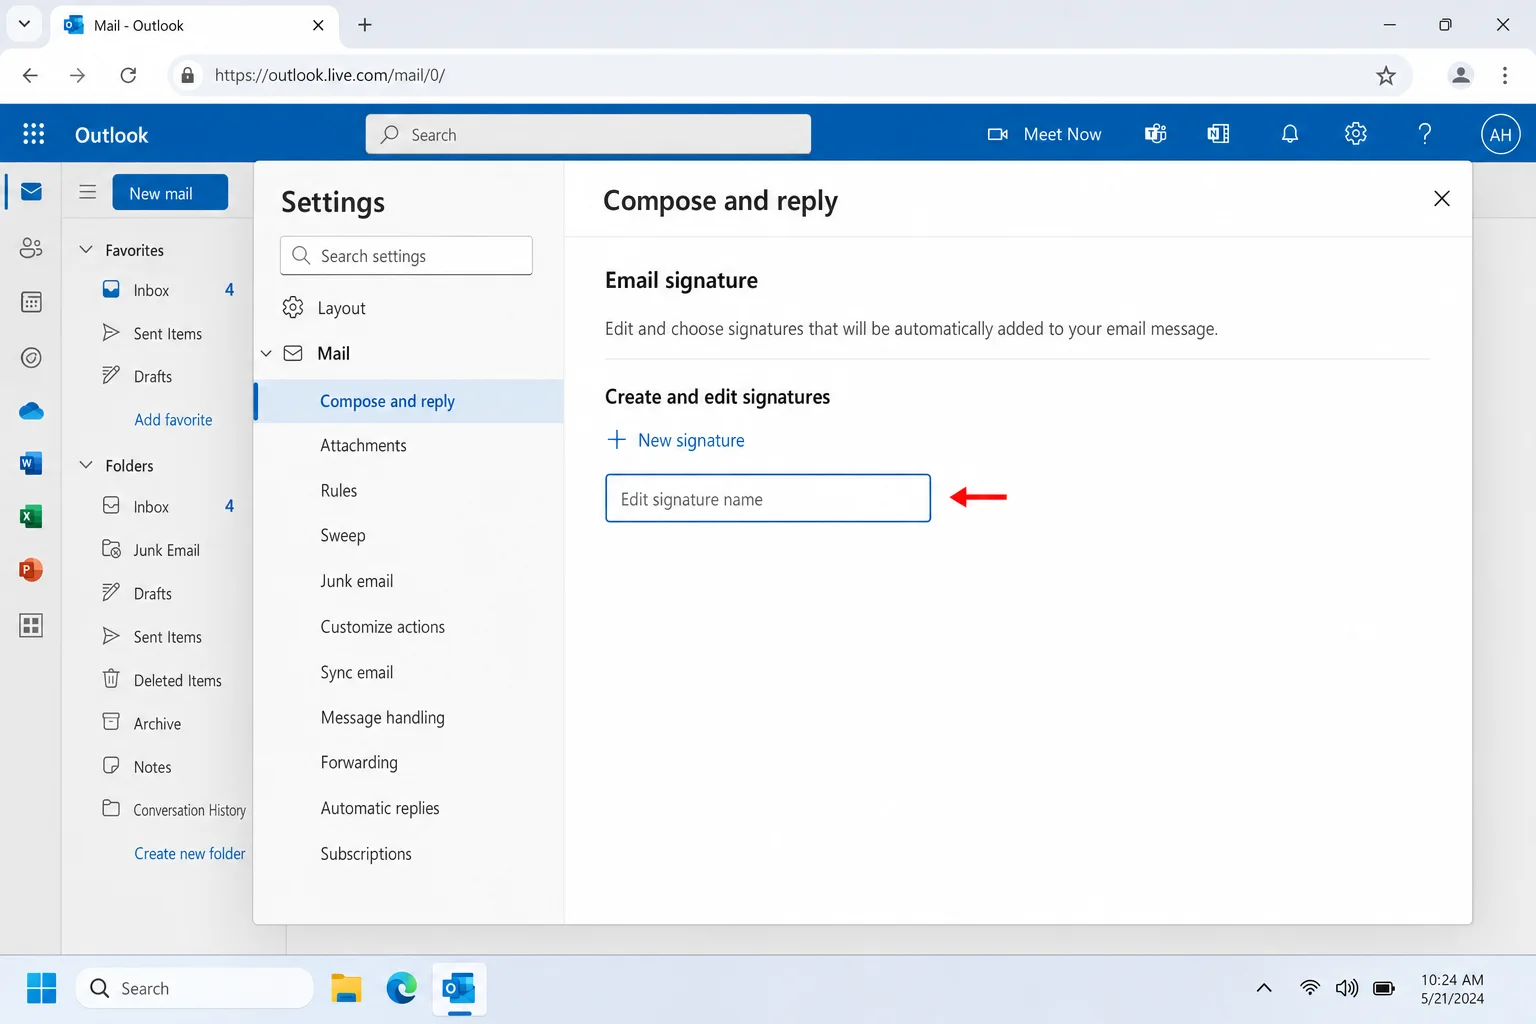
Step 2: Create Your Signature
In the Email signature section, type a name for your signature and paste your formatted HTML signature into the editor. Use the toolbar to tweak formatting if needed.
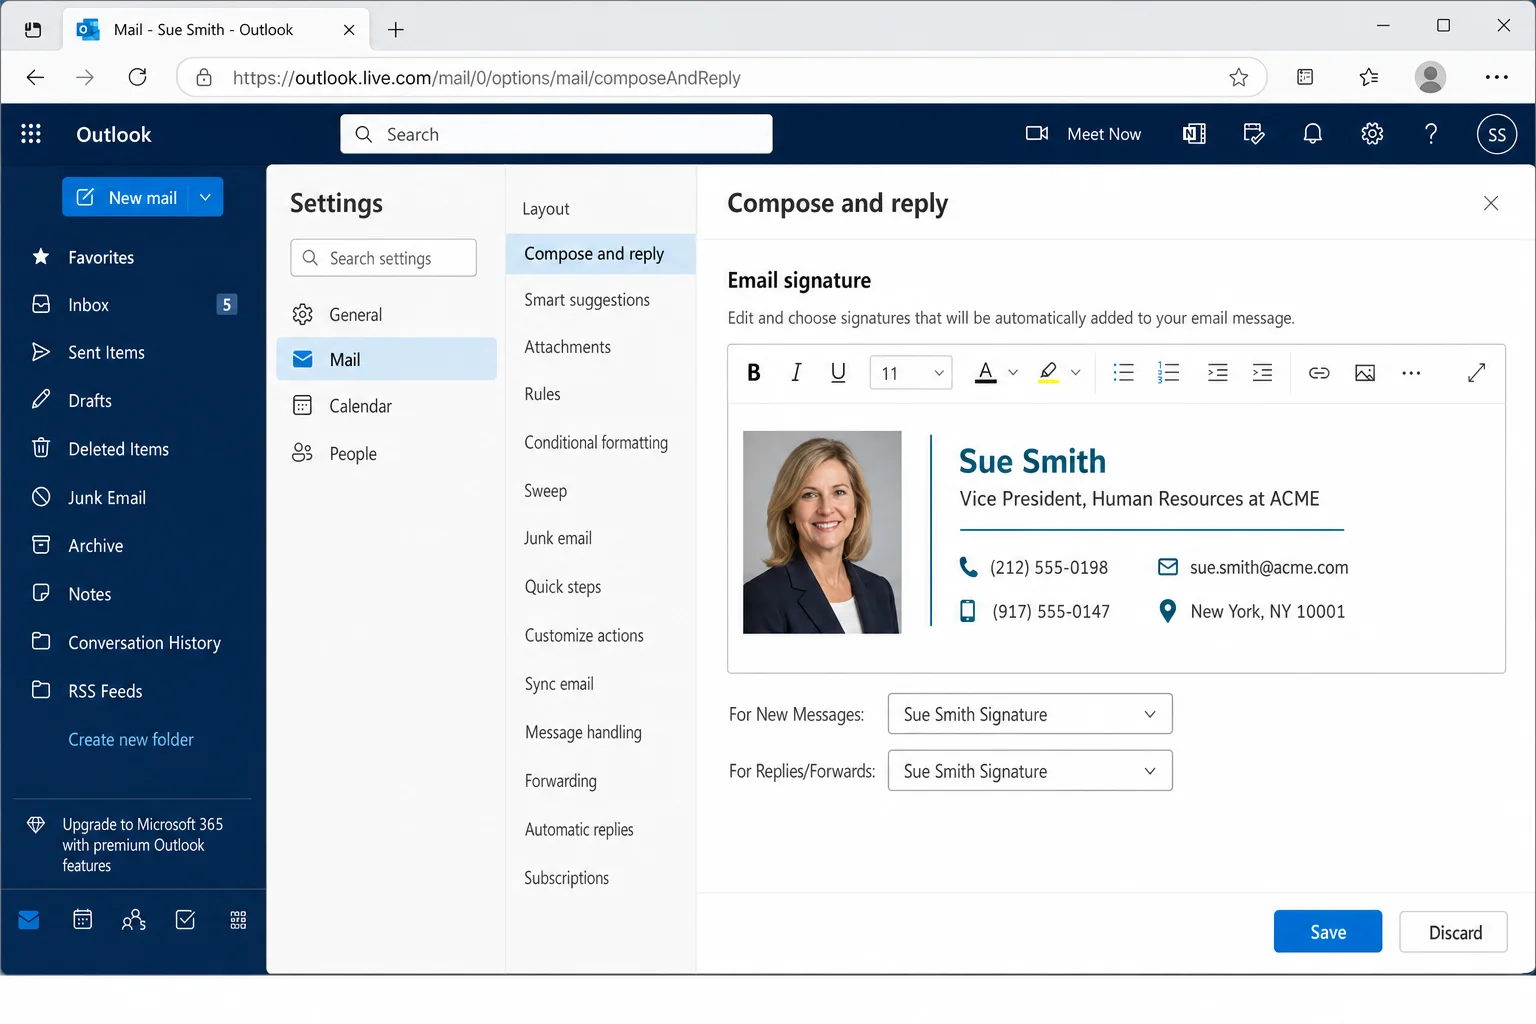
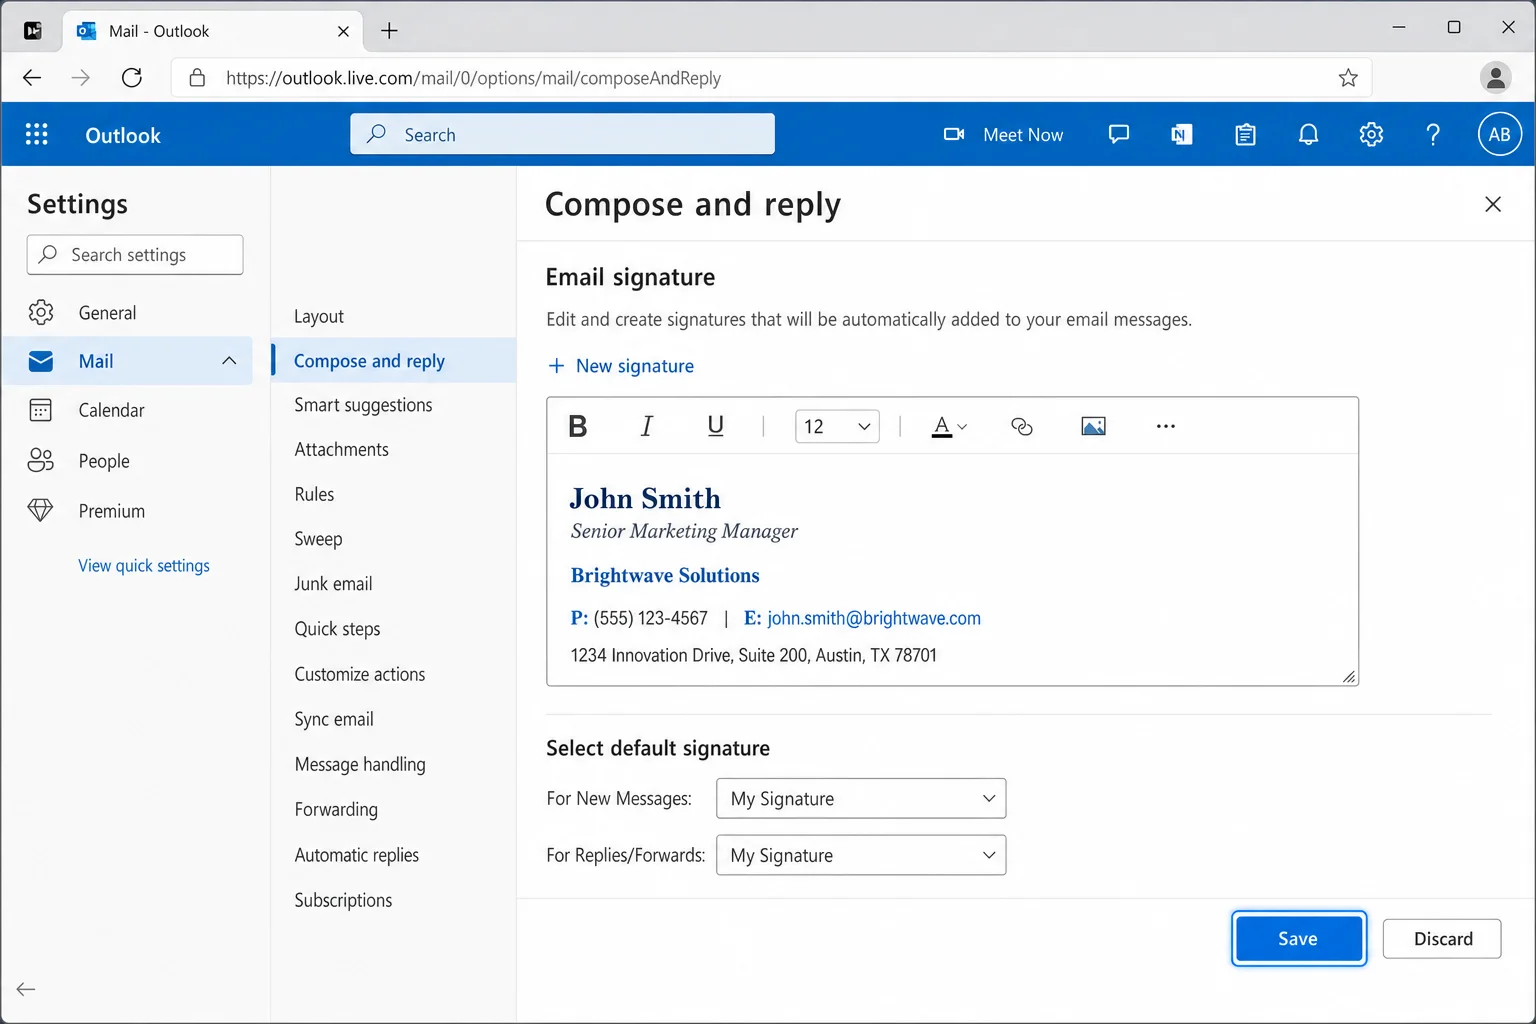
Step 3: Set as Default and Save
Check the boxes to automatically include your signature on new messages and replies and forwards. Click Save.
Outlook Desktop App (Windows)
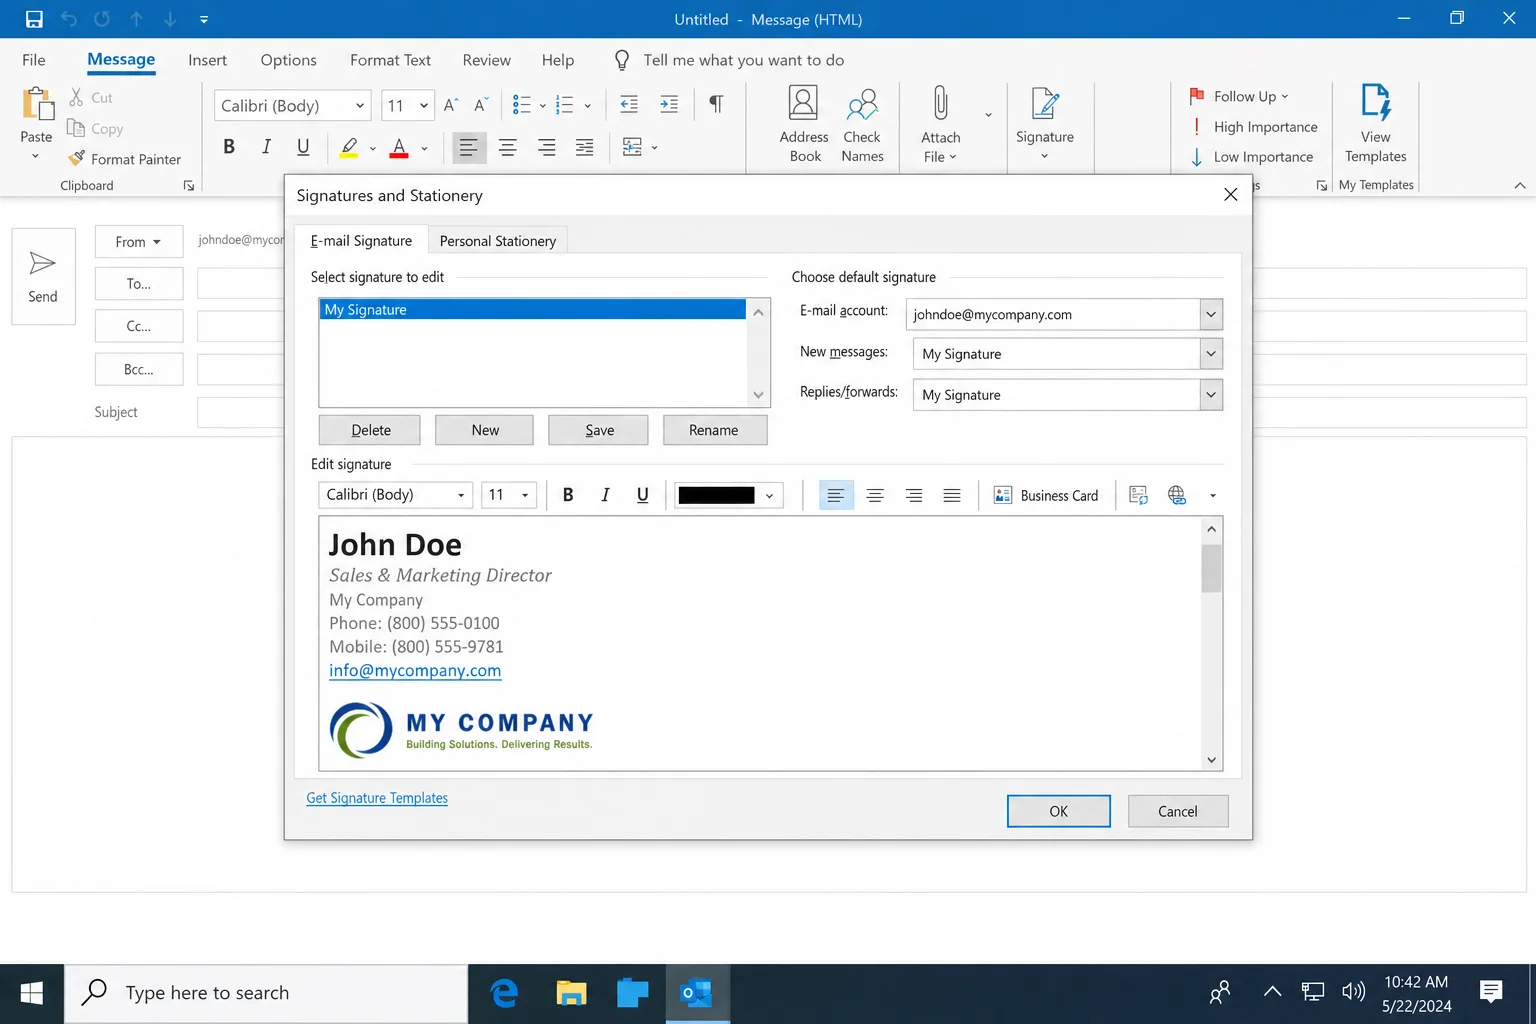
The desktop version of Outlook has its own signature manager, separate from the web version.
Classic Outlook for Windows
- Click File in the top menu, then go to Options.
- Click Mail in the left sidebar, then click the Signatures… button.
- Click New, give your signature a name, and paste your formatted signature into the editor.
- Under Default signature, set it for new messages and replies.
- Click OK to save.
New Outlook for Windows
- Click the gear icon (Settings) in the top-right corner.
- Go to Mail > Compose and reply.
- Click New signature, name it, and paste your formatted signature.
- Set it as default for new messages and replies.
- Click Save.
How to Find or Create an HTML Signature
Don’t want to code anything yourself? Good news, you don’t have to. There are some excellent free and low-cost tools that do all the heavy lifting for you.
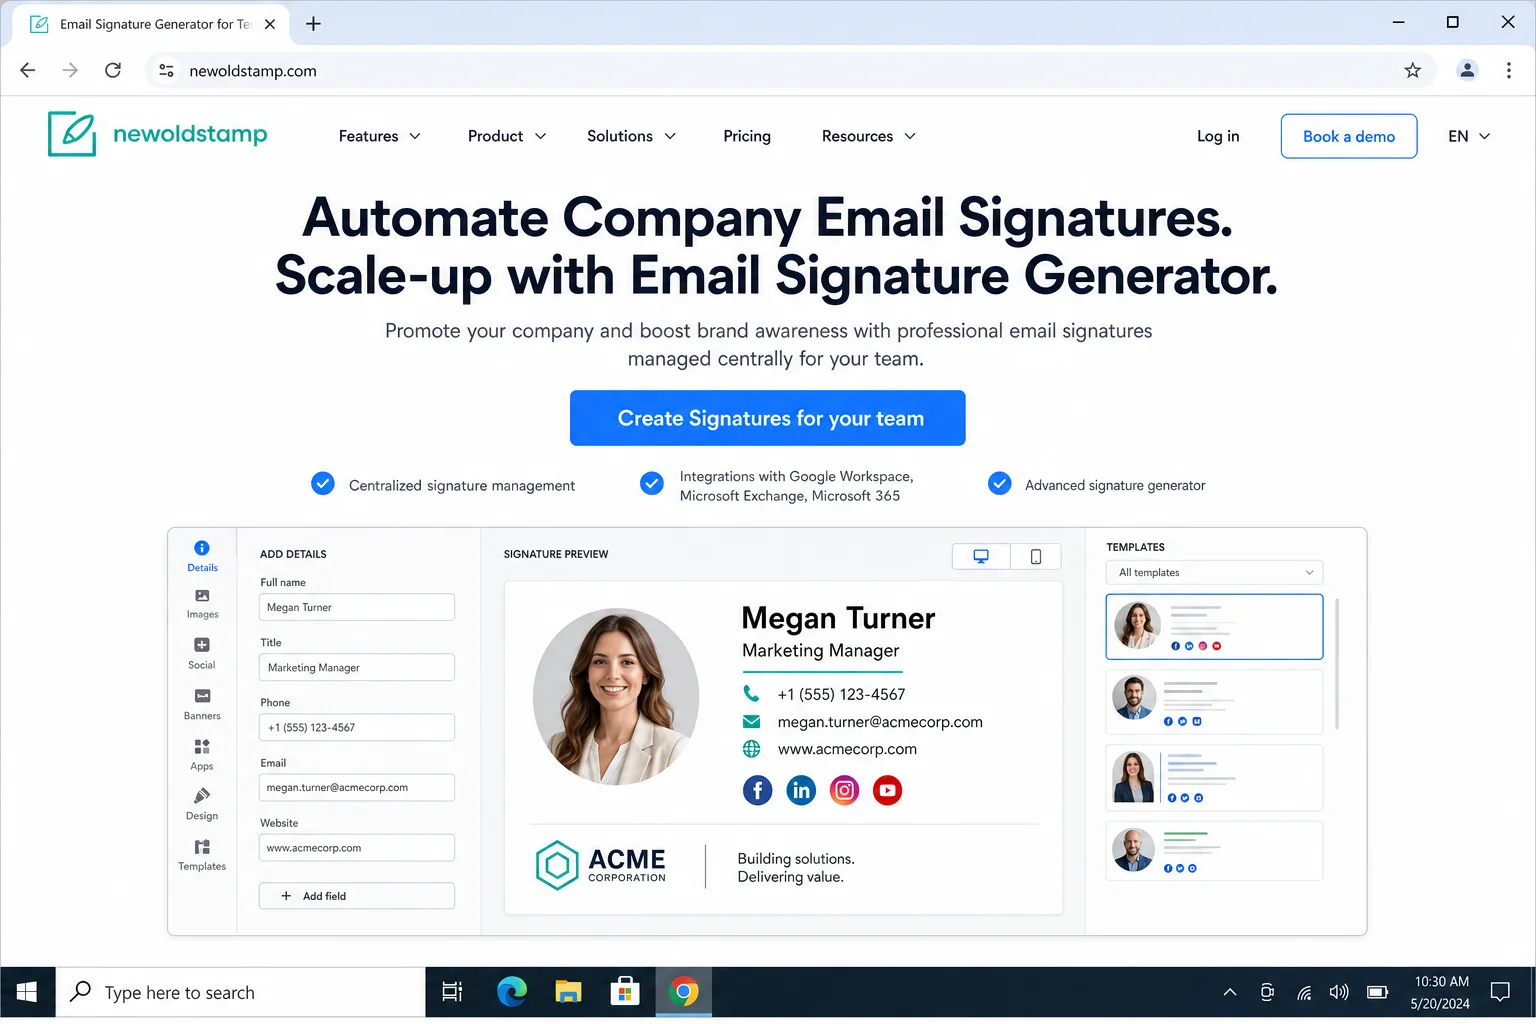
Use a Signature Generator (Easiest Option)
These tools let you fill in your details, pick a design, and export a ready-to-paste signature in minutes:
- Newoldstamp: One of the most popular options. Free tier available with clean, professional templates. Great for individuals and teams.
- WiseStamp: Easy to use with lots of design options. Free plan available, paid plans unlock more templates and features.
- Canva: If you’re already using Canva for design work, their email signature templates are a natural fit. Export and paste the result.
Build Your Own (For the DIY-Inclined)
If you want full control, you can write your own HTML signature. The golden rules for email-safe HTML are:
- Use table-based layouts: Tables are ugly to code but they’re the most reliable way to control layout across email clients.
- Use inline CSS only: Don’t link to external stylesheets. Put all your styles directly in the HTML tags (e.g.,
style="font-family: Arial; font-size: 14px;"). - Host all images on HTTPS: Upload your images to a reliable host (your website, Imgur, or a CDN) and use the full HTTPS URL in your
imgtags. - Keep it simple: The fancier the design, the more likely something breaks in Outlook or on mobile.
For Teams and Businesses
If you’re managing signatures for a whole company, doing it one person at a time is a nightmare. Centralized signature management tools like Exclaimer or CodeTwo let you push consistent, branded signatures to everyone at once, including legal disclaimers and campaign banners. Both work with Microsoft 365 and Google Workspace.
Tips and Troubleshooting
Common Issues
Problem: My images show up as broken or don’t appear at all
This is the most common issue. It almost always means your images aren’t publicly accessible online. To fix it:
- Upload your images to a public web host or image hosting service.
- Make sure the URL starts with
https://, nothttp://and definitely not a local file path. - Don’t link to images stored in Google Drive or Dropbox, as those aren’t reliably accessible to email recipients.
- Update the image URLs in your HTML signature before pasting.
Problem: My signature formatting looks fine in Gmail but breaks in Outlook desktop
Classic Outlook for Windows uses the Word rendering engine (yes, really), which handles HTML and CSS very differently from a browser. To minimize breakage:
- Stick to table-based layouts.
- Avoid padding, margin, and line-height tricks.
- Test your signature by sending a test email to an Outlook account before rolling it out.
Problem: Gmail stripped some of my formatting
Gmail sanitizes HTML it doesn’t like, including scripts, embedded forms, external fonts, and some unusual CSS. If your signature is losing styling, simplify it. Stick to basic fonts (Arial, Georgia, Verdana) and straightforward inline styles.
Problem: My signature looks different on my phone
Mobile email apps often simplify or ignore HTML formatting in signatures. This is expected behavior. There’s not much you can do about it other than keeping your signature design simple enough to still look decent when stripped down.
Pro Tips
- Always test before you go live: Send a test email to accounts on Gmail, Outlook, and if possible a mobile device. What looks perfect in one client can look broken in another.
- Keep image file sizes small: Large images slow down email loading and are more likely to be blocked by email clients. Aim for under 100KB per image.
- Add alt text to your images: If images are blocked, alt text means recipients still know what they’re looking at.
- Don’t go overboard: A signature with 10 social icons, an animated banner, and three different fonts is going to break somewhere. Pick the essentials and keep it clean.
- Update your signature periodically: Phone numbers change, job titles change, and promo banners go stale. Set a reminder to review your signature every few months.
Wrapping Up
Setting up a professional HTML email signature in Gmail, Yahoo Mail, or Outlook is genuinely straightforward once you know the key trick: render your signature first, then paste the formatted result, not raw HTML code. Use a generator like Newoldstamp or WiseStamp if you want something polished without any coding, and make sure your images are hosted on a public HTTPS server so they actually show up for your recipients.
If you’re setting this up for a whole team, skip the manual approach entirely and look at a centralized tool like Exclaimer or CodeTwo. It’ll save you a lot of headaches. Got questions or running into a specific issue? Drop a comment below and we’ll help you sort it out.