

Ever get that maddening moment where a webpage just won’t load, even though your internet connection seems fine? You click refresh, wait, nothing, then five seconds later it finally appears. That’s often a DNS problem, and it’s way more fixable than you might think.
DNS (short for Domain Name System) is basically the internet’s phonebook. Every time you type a web address, your device asks a DNS server to look up the actual IP address behind it. If that server is slow, overloaded, or just plain unreliable, like a lot of ISP-provided DNS servers, you feel it every time you browse. Switching to a better free public DNS server can mean faster lookups, fewer errors, and in some cases, built-in protection against malware and phishing sites. In this guide, we’ll walk you through the best options in 2026 and show you exactly how to switch on Windows, macOS, Android, and iPhone.
Why Switch From Your ISP’s DNS?
Your internet provider gives you a DNS server by default, and for a lot of people it works fine most of the time. But ISP DNS servers can be sluggish, go down during outages, and in some cases even redirect failed lookups to their own ad-filled search pages (yes, really). Public DNS servers from reputable companies tend to be faster, more reliable, and more transparent about what they do with your data.
That said, “public DNS is always better than ISP DNS” is a bit too simple for 2026. The best choice really depends on what you’re after:
- Speed: Some providers have servers closer to you, which means faster lookups.
- Privacy: Some log your queries; others promise not to. Look for providers that support encrypted DNS (more on that below).
- Security: Certain DNS servers automatically block known malware and phishing domains before your browser even loads them.
- Filtering: Want to block ads, trackers, or adult content? Some DNS providers do that at the network level, so no browser extension is needed.
A Quick Note on Encrypted DNS
One big thing that’s changed since the early days of public DNS: encryption. By default, DNS queries are sent in plain text, which means your ISP (or anyone on the same network) can see every website you look up. Two modern solutions fix this:
- DNS-over-HTTPS (DoH): Wraps your DNS queries inside regular HTTPS traffic, so they’re encrypted and harder to intercept.
- DNS-over-TLS (DoT): Also encrypts DNS queries, just using a slightly different method. Android’s “Private DNS” feature uses this.
All the providers on this list support at least one of these. If privacy is your main reason for switching, make sure you’re using an encrypted DNS option rather than just swapping one plain-text DNS server for another.
The Best Free Public DNS Servers in 2026
| Provider | Primary DNS | Secondary DNS | Best For | Encrypted DNS |
|---|---|---|---|---|
| Cloudflare | 1.1.1.1 | 1.0.0.1 | Speed + Privacy | DoH, DoT |
| Google Public DNS | 8.8.8.8 | 8.8.4.4 | Reliability | DoH, DoT |
| Quad9 | 9.9.9.9 | 149.112.112.112 | Security / Malware Blocking | DoH, DoT |
| OpenDNS | 208.67.222.222 | 208.67.220.220 | Filtering + Family Safety | DoH |
| AdGuard DNS | 94.140.14.14 | 94.140.15.15 | Ad + Tracker Blocking | DoH, DoT |
| CleanBrowsing | 185.228.168.9 | 185.228.169.9 | Family Filtering | DoH, DoT |
| Control D | Custom | Custom | Customizable Filtering | DoH, DoT |
1. Cloudflare DNS (1.1.1.1)
Cloudflare launched its public DNS resolver back in 2018 and quickly became one of the most popular options around, and for good reason. It’s consistently one of the fastest DNS resolvers in the world, with servers on every continent. Cloudflare also has a strong privacy stance: they commit to never selling your browsing data and delete query logs within 24 hours.
It supports both DoH and DoT, so you can use it with encrypted DNS on pretty much any modern device. There’s also a variant called 1.1.1.1 for Families that adds malware blocking (1.1.1.2) or malware + adult content blocking (1.1.1.3), handy if you want a bit of filtering without signing up for anything.
- IPv4:
1.1.1.1/1.0.0.1 - IPv6:
2606:4700:4700::1111/2606:4700:4700::1001 - DoT hostname:
one.one.one.one - Best for: Speed and privacy
2. Google Public DNS (8.8.8.8)
Google’s public DNS has been around since 2009 and remains one of the most reliable options out there. It has a massive global infrastructure with servers distributed worldwide, which means low latency for most people regardless of where they are. It also supports DNSSEC (a security layer that verifies DNS responses haven’t been tampered with), DoH, and DoT.
The main caveat: Google is Google. They do collect some query data, and if you’re already wary of how much Google knows about your browsing habits, this might not be your first choice. But if reliability and global reach are your priorities, it’s hard to argue with 8.8.8.8.
- IPv4:
8.8.8.8/8.8.4.4 - IPv6:
2001:4860:4860::8888/2001:4860:4860::8844 - Best for: Reliability and broad compatibility
3. Quad9 (9.9.9.9)
If security is your top priority, Quad9 is the one to look at. It’s a non-profit DNS resolver that automatically blocks known malicious domains, including phishing sites, malware distributors, and botnet command servers, using threat intelligence from over 20 cybersecurity partners. When you try to visit a flagged domain, Quad9 just doesn’t resolve it, so your browser never even connects.
Quad9 doesn’t log personally identifiable information and is based in Switzerland, which has strong privacy laws. It supports DoH and DoT, and is genuinely one of the best free options if you want a DNS server that actively protects you from online threats without any setup beyond entering the IP.
- IPv4:
9.9.9.9/149.112.112.112 - IPv6:
2620:fe::fe/2620:fe::9 - DoT hostname:
dns.quad9.net - Best for: Security and malware blocking
4. OpenDNS (208.67.222.222)
OpenDNS has been around longer than most of the others on this list and is now part of Cisco. It’s a solid, mature option, especially if you want content filtering and parental controls. The free tier blocks phishing and some malware by default, and you can create a free account to customize which categories of sites get blocked across your whole network.
It’s a particularly good fit for households with kids or small offices where you want a bit more control over what people can access. The setup is a little more involved if you want the full filtering features (you’ll need to create an account and point your router to it), but just using the IP addresses below gives you basic phishing protection out of the box.
- IPv4 (Home):
208.67.222.222/208.67.220.220 - IPv6:
2620:119:35::35/2620:119:53::53 - Best for: Filtering, parental controls, small networks
5. AdGuard DNS (94.140.14.14)
AdGuard is best known for its ad-blocking software, and its DNS service brings that same idea to your whole network. By routing your DNS through AdGuard, it blocks ads and trackers at the DNS level, before they even reach your device. That means fewer ads across every app and browser, not just the ones where you’ve installed an extension.
There’s a non-filtering version if you just want the privacy benefits without the blocking, and a family-protection version that also filters adult content. AdGuard DNS supports DoH and DoT, and it’s a genuinely useful option if you’re fed up with ads on devices where you can’t easily install an ad blocker (like a smart TV).
- IPv4 (Default, with ad blocking):
94.140.14.14/94.140.15.15 - IPv4 (Non-filtering):
94.140.14.140/94.140.14.141 - DoT hostname:
dns.adguard-dns.com - Best for: Ad and tracker blocking at the network level
6. CleanBrowsing (185.228.168.9)
CleanBrowsing is built specifically for families and schools. It offers three free filter levels: a Security Filter (blocks malware and phishing), an Adult Filter (blocks adult content on top of that), and a Family Filter (the most restrictive, also blocking mixed-content sites and proxies). You just pick the IP addresses for the level you want and you’re done. No account is needed for the free tier.
It’s not the fastest resolver out there, but if you’re setting up a safe browsing environment for kids, it’s one of the simplest ways to do it.
- Security Filter:
185.228.168.9/185.228.169.9 - Adult Filter:
185.228.168.10/185.228.169.11 - Family Filter:
185.228.168.168/185.228.169.168 - Best for: Family-safe filtering, schools
7. Control D
Control D is the most customizable option on this list. It’s a newer provider that lets you build a custom DNS profile, blocking specific categories of content, choosing which trackers to filter, and even redirecting traffic through different locations. The free tier is more limited than the paid plans, but it still gives you access to a capable, privacy-focused resolver that supports DoH and DoT.
It’s a bit more technical to set up than just entering an IP address, but if you want granular control over your DNS filtering, it’s worth a look. Head to controld.com to generate your custom DNS endpoint.
- Best for: Power users who want configurable filtering and privacy controls
How to Change Your DNS Server
Alright, you’ve picked a DNS server, so now let’s actually switch to it. The steps vary depending on your device, so jump to the section that applies to you.
On Windows 11
- Press
Windows + Ito open Settings. - Click Network & internet in the left sidebar.
- Click Wi-Fi or Ethernet, depending on how you’re connected.
- Click the name of your active connection (or click Hardware properties for Ethernet).
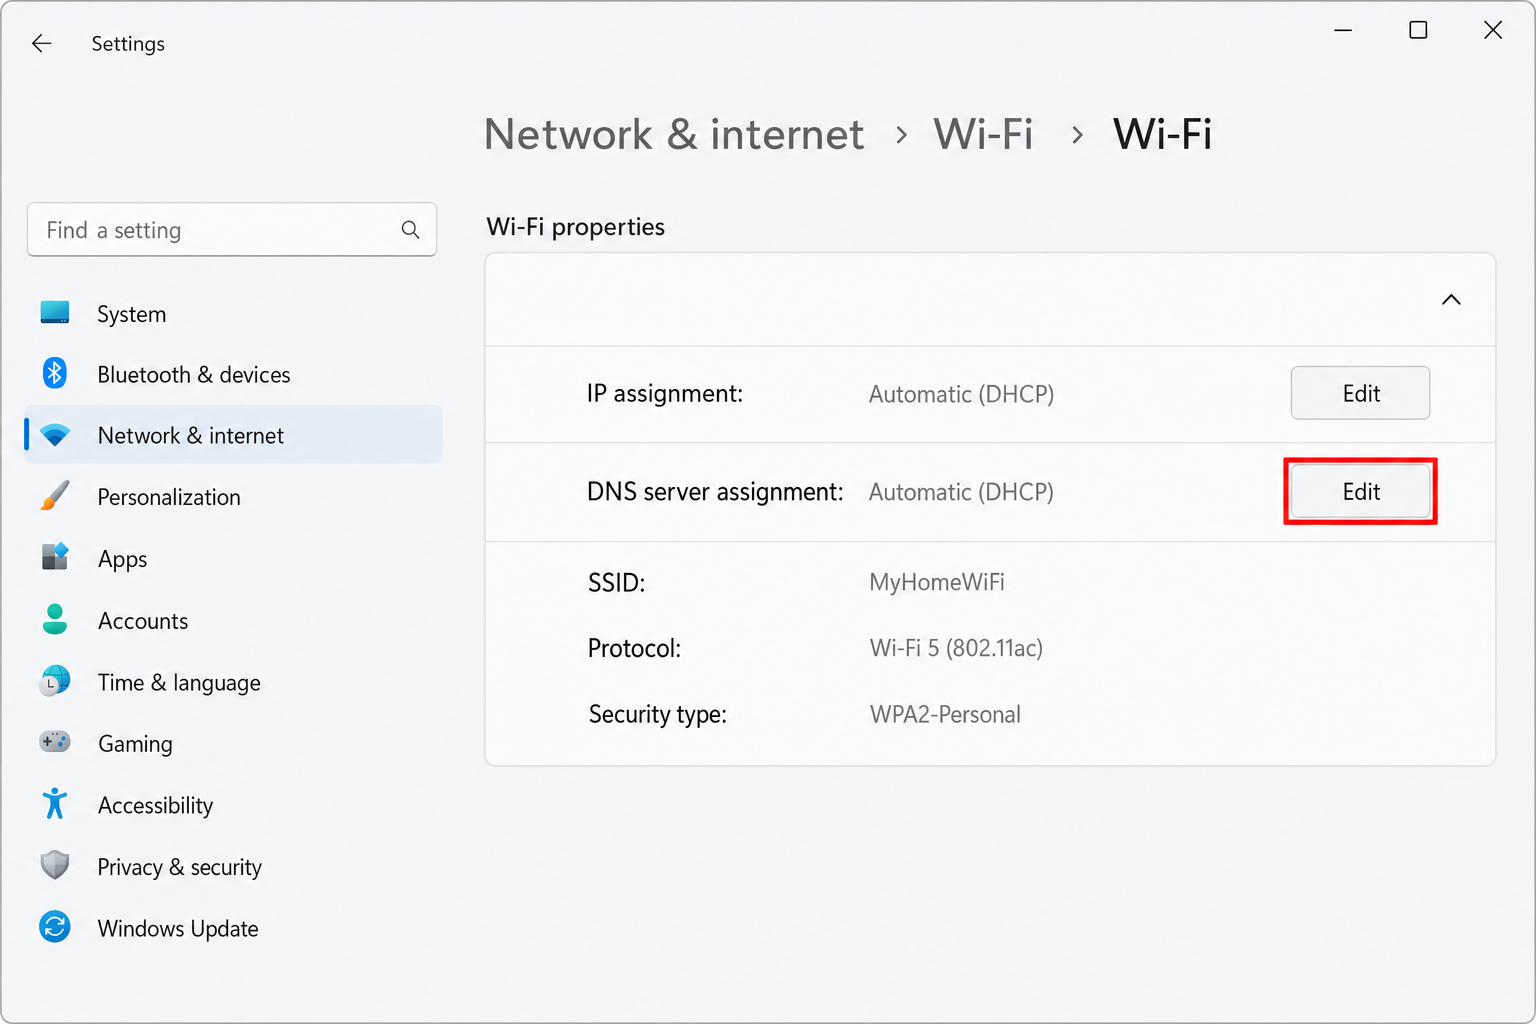
- Find DNS server assignment and click Edit.
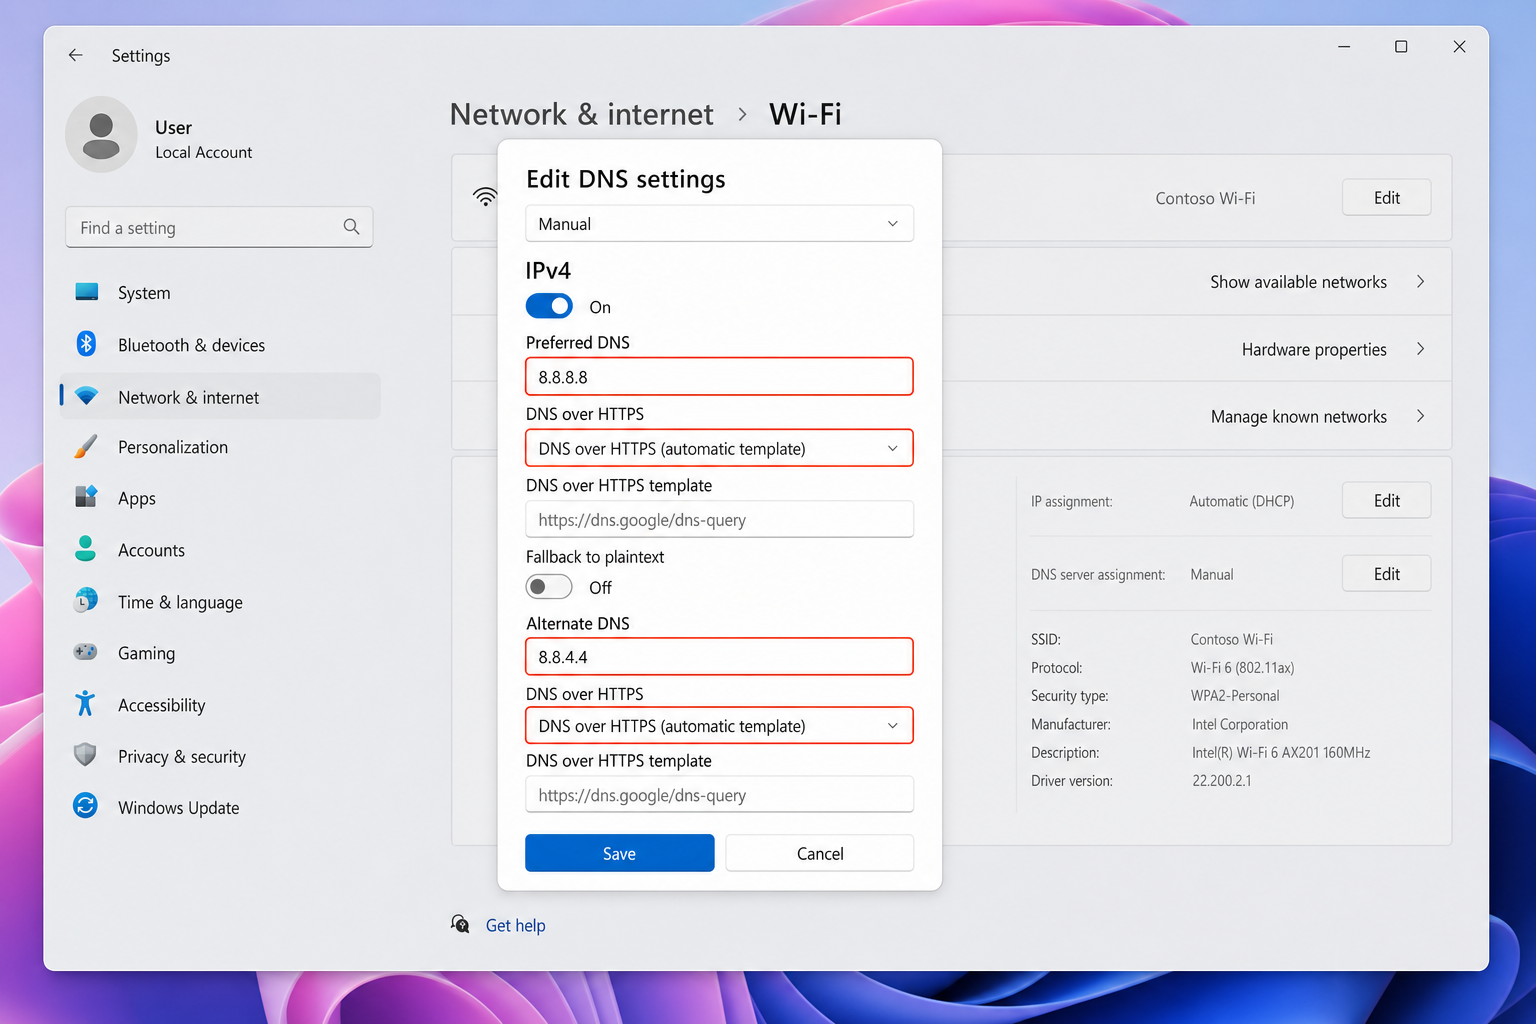
- Change the dropdown from Automatic (DHCP) to Manual.
- Toggle on IPv4.
- Enter your chosen DNS addresses in the Preferred DNS and Alternate DNS fields.
- Click Save.
Tip: Windows 11 also supports encrypted DNS natively. In the same DNS edit screen, you’ll see a DNS over HTTPS dropdown next to each server field. Set it to On (automatic template) for providers like Cloudflare, Google, or Quad9 to get encrypted DNS without any extra apps.
On macOS Sequoia
- Click the Apple menu and open System Settings.
- Click Network in the sidebar.
- Select your active connection, either Wi-Fi or Ethernet.
- Click Details… next to the connected network name.
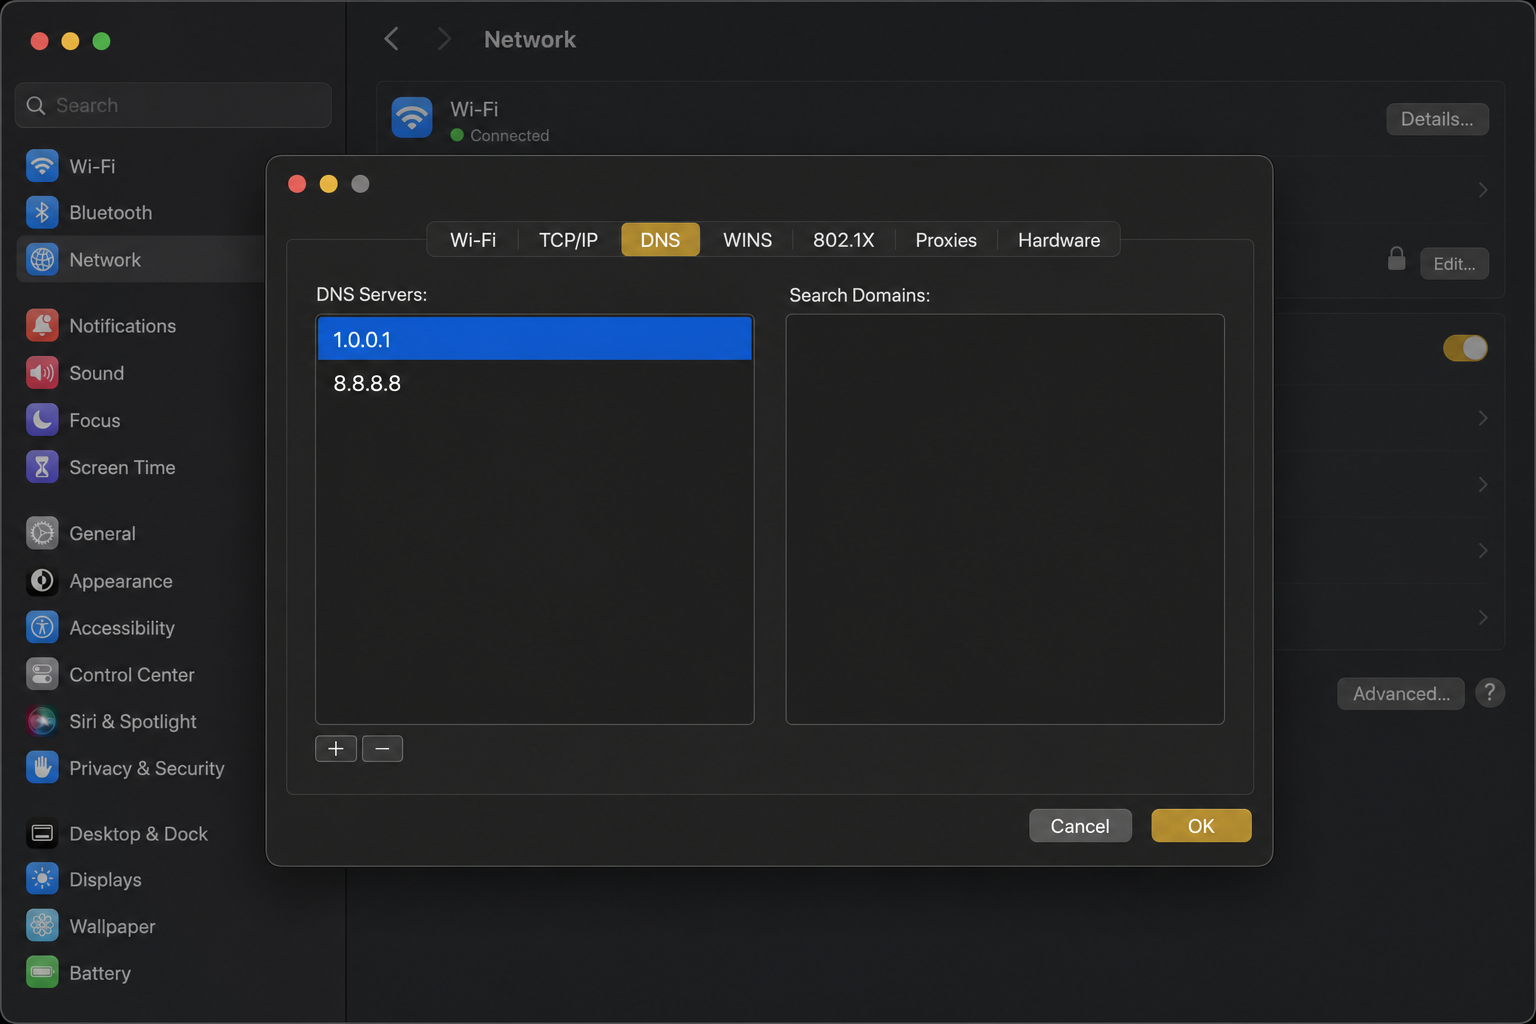
- Click the DNS tab.
- Click the + button to add a new DNS server address.
- Type in your preferred DNS IP, then add the secondary one the same way.
- Click OK, then Apply.
On iPhone or iPad (iOS 18 / iPadOS 18)
On iOS, you can change DNS for a specific Wi-Fi network, but it won’t apply to cellular data automatically. For broader coverage, consider using a DNS app from your provider of choice.
- Open Settings and tap Wi-Fi.
- Tap the (i) icon next to your connected network.
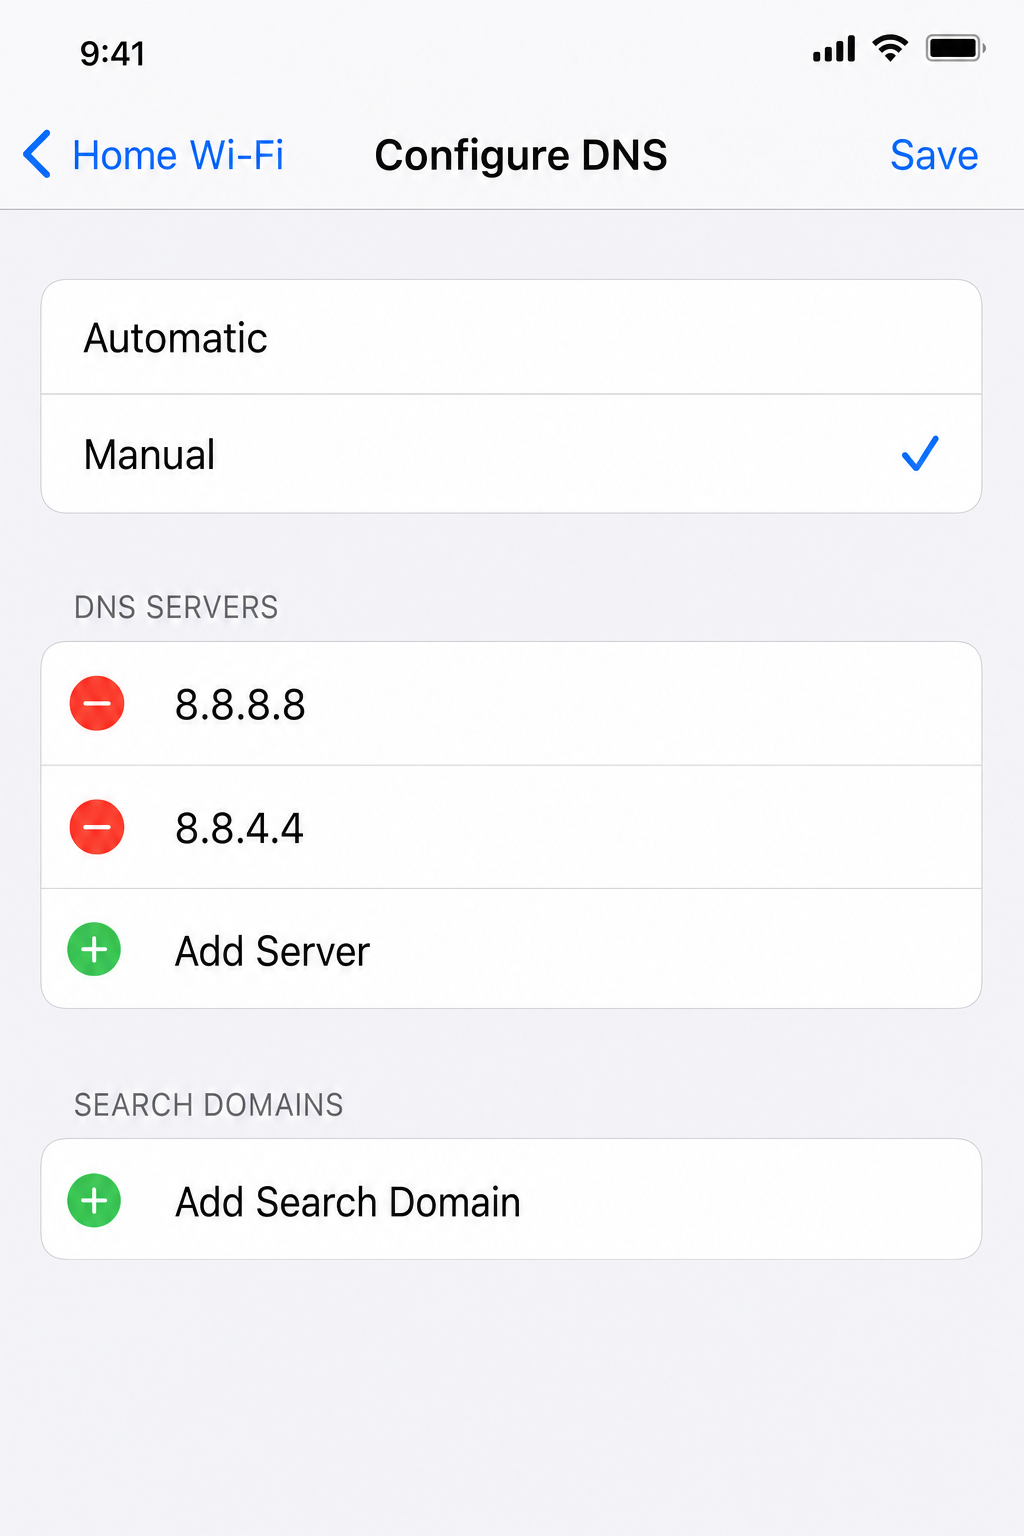
- Scroll down and tap Configure DNS.
- Switch from Automatic to Manual.
- Tap Add Server and enter your preferred DNS IP address.
- Add the secondary address the same way, then tap Save.
On Android (Private DNS, Recommended)
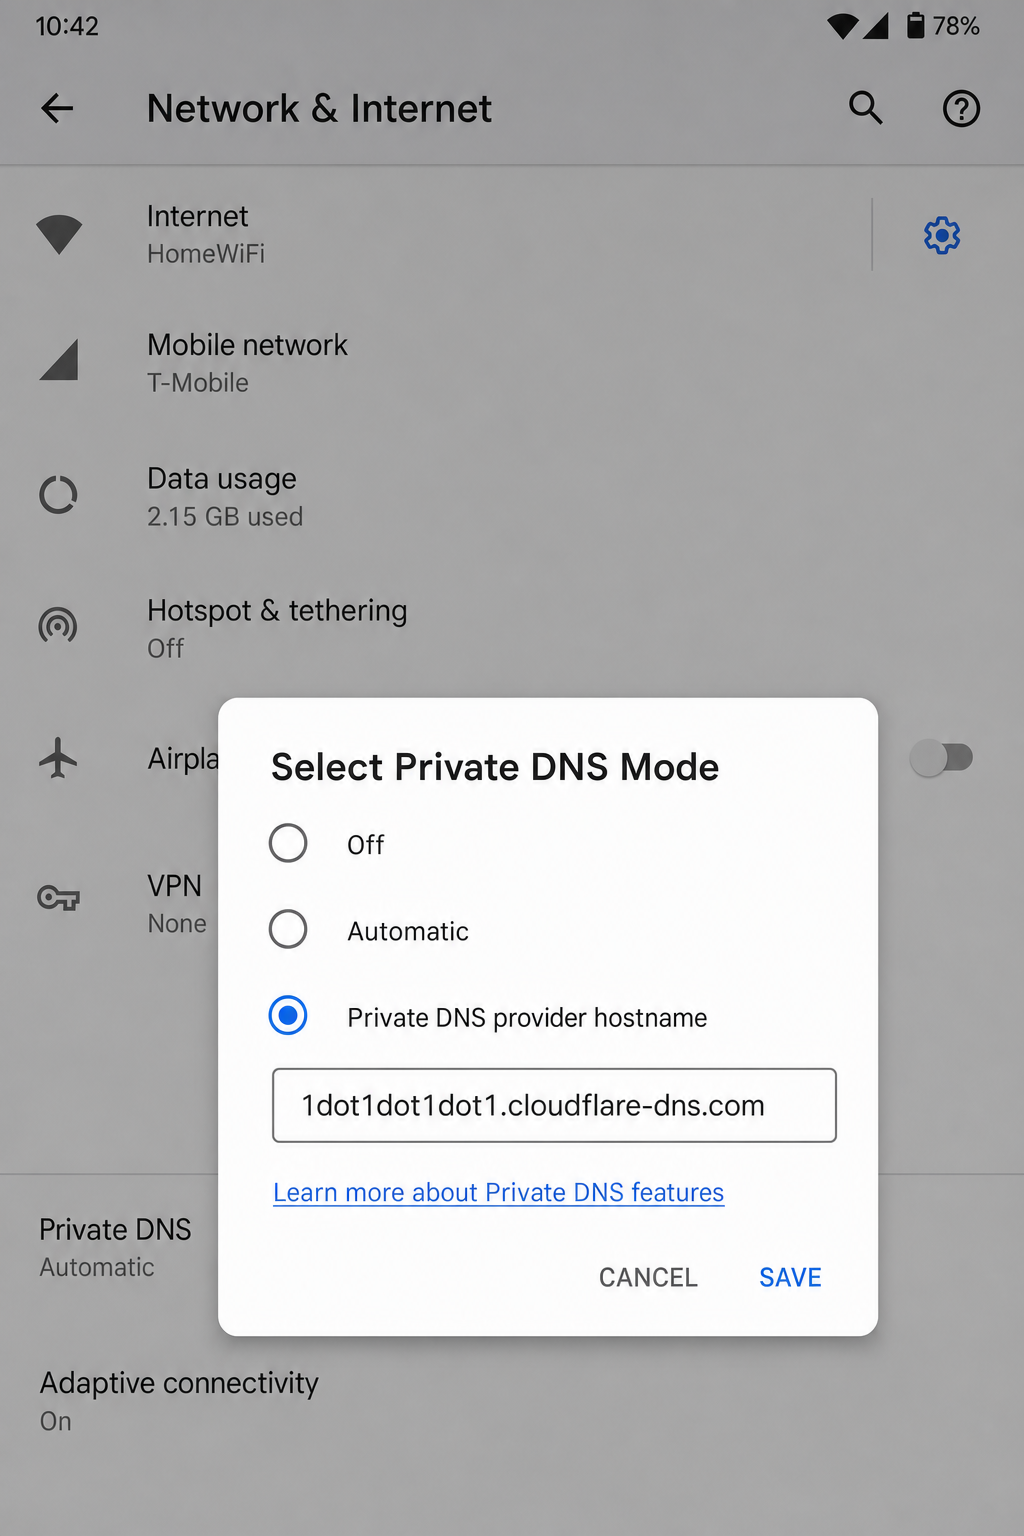
Modern Android has a much better option than manually entering DNS IPs for each Wi-Fi network. It’s called Private DNS, and it uses encrypted DoT across all your connections, including cellular data. This is the way to go if you’re on Android.
- Open Settings.
- Tap Network & internet (on some phones this may be under Connections or General Management).
- Tap Private DNS.
- Select Private DNS provider hostname.
- Enter the hostname for your chosen provider (see below).
- Tap Save.
Private DNS hostnames for popular providers:
- Cloudflare:
one.one.one.one - Quad9:
dns.quad9.net - AdGuard:
dns.adguard-dns.com - Google:
dns.google
On Your Router (The “Set It Once” Option)
If you want every device on your home network to use the same DNS server without touching each one individually, change the DNS on your router. The exact steps vary by router brand, but the general idea is the same:
- Log in to your router’s admin panel, usually by typing
192.168.1.1or192.168.0.1in your browser’s address bar. - Find the DNS settings, often under Internet, WAN, or Advanced settings.
- Enter your preferred and alternate DNS server addresses.
- Save and restart the router if prompted.
One heads-up: if devices on your network use encrypted DNS directly (like Android’s Private DNS or a browser’s built-in DoH), the router DNS won’t override those. They’ll use their own settings instead.
Tips and Troubleshooting
Common Issues
Problem: I changed DNS but browsing doesn’t feel any faster
DNS lookup time is just one piece of the puzzle. If your Wi-Fi signal is weak, your ISP’s routing is slow, or the website’s server is on the other side of the world, switching DNS won’t fix that. Also, your OS caches DNS results, so you might not see the difference immediately. Try flushing your DNS cache. On Windows, open Command Prompt and type ipconfig /flushdns. On macOS, open Terminal and run sudo dscacheutil -flushcache; sudo killall -HUP mDNSResponder.
Problem: DNS change works on Wi-Fi but not on mobile data
That’s expected if you only changed the DNS for a specific Wi-Fi network. Cellular traffic uses your carrier’s DNS unless you set up Private DNS on Android, use a DNS app, or connect through a VPN.
Problem: My router or ISP seems to be ignoring my DNS settings
Some ISPs use a technique called DNS hijacking, where they intercept DNS requests and route them through their own servers regardless of what you’ve set. Using encrypted DNS (DoH or DoT) gets around this, since the traffic is indistinguishable from regular HTTPS traffic.
Problem: Private DNS is breaking some websites or apps
This can happen on captive portal networks (like hotel or airport Wi-Fi) that need you to log in through a browser before you can access the internet. The captive portal relies on your device using the network’s DNS, so Private DNS can interfere. Temporarily switch Private DNS back to Automatic until you’ve logged in, then re-enable it.
Pro Tips
- Test your DNS speed before committing: DNS performance is location-dependent. What’s fastest in one city might not be fastest in another. Tools like DNS Benchmark (Windows) or namebench can test multiple providers against your actual connection and tell you which one is genuinely fastest for you.
- Use encrypted DNS for privacy: Just switching from ISP DNS to a public resolver in plain text doesn’t actually hide your queries from your ISP. Use DoH or DoT if privacy is the goal.
- Don’t forget IPv6: If your network uses IPv6, make sure you set both IPv4 and IPv6 DNS addresses, otherwise some traffic might still go through your ISP’s resolver.
- Browser-level DNS is an option too: Chrome, Edge, and Firefox all have built-in Secure DNS (DoH) settings. If you only care about browser privacy, you can set it there without touching your OS settings at all. Look under Settings > Privacy and security > Use secure DNS in Chrome or Edge.
Which DNS Server Should You Choose?
Still not sure which one to go with? Here’s the short version:
- Just want something fast and reliable? Go with Cloudflare (1.1.1.1) or Google (8.8.8.8).
- Worried about malware and phishing? Use Quad9 (9.9.9.9).
- Setting up a family-friendly network? Try CleanBrowsing or OpenDNS.
- Fed up with ads on every device? AdGuard DNS is your friend.
- Want full control over what gets filtered? Check out Control D.
Switching DNS takes about two minutes and costs nothing, so if your browsing has felt sluggish or you’ve been getting weird DNS errors, it’s absolutely worth trying. Cloudflare’s 1.1.1.1 is a great starting point for most people: it’s fast, private, and genuinely easy to set up. If you try it and something breaks, you can always switch back just as easily. Got questions or a provider you swear by? Drop a comment below!