

Have years of memories sitting in Google Photos with no local backup? That’s a nerve-wracking situation. One server hiccup or accidental deletion and those photos could be gone for good. Whether you want a local backup, you’re switching to a different service, or you just need your files for a video project, getting everything out of Google Photos is totally doable. It just takes a few more steps than you might expect.
The good news: Google actually makes this pretty straightforward once you know where to look. In this guide, you’ll learn three ways to download your Google Photos, from grabbing a single album to exporting your entire library using Google Takeout. We’ll also cover what to do on your phone, since the mobile app doesn’t have a “download everything” button (frustrating, but true).
Three Ways to Download from Google Photos
Before diving in, here’s a quick overview of your options so you can pick the right one for your situation:
- Google Takeout (recommended for full library exports): The official way to export everything, including all photos, videos, and metadata, in one go. Best for backups or moving away from Google Photos entirely.
- Bulk selection on the Google Photos website: Good for downloading a few hundred photos or a specific date range without running a full export.
- Album download: The quickest option if your photos are already organized into albums. One click downloads the whole album as a ZIP file.
Method 1: Download Your Entire Library with Google Takeout
Google Takeout is Google’s built-in export tool. Think of it as a “pack up everything and hand it to me” button for your Google account. It’s the only reliable way to get your complete Google Photos library, including photos that aren’t in any album and all the original files with their metadata (timestamps, locations, etc.) intact.
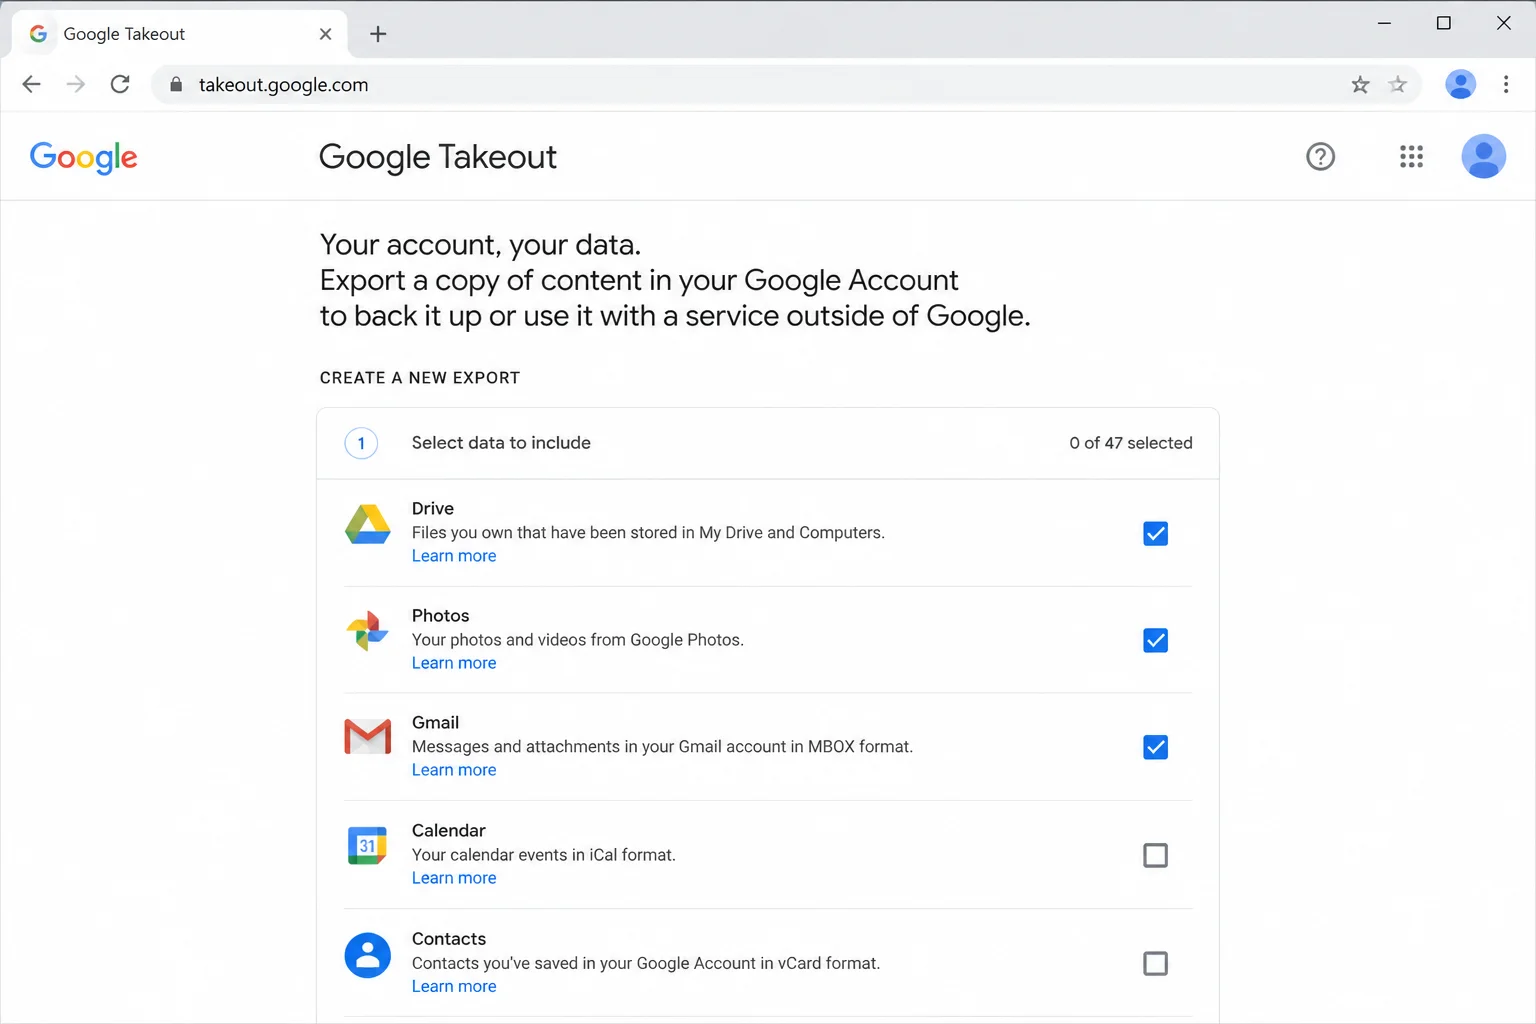
Step 1: Open Google Takeout
Open a browser on your computer and go to takeout.google.com. Sign in with the Google account that holds your photos if you aren’t already logged in.
Step 2: Select Only Google Photos
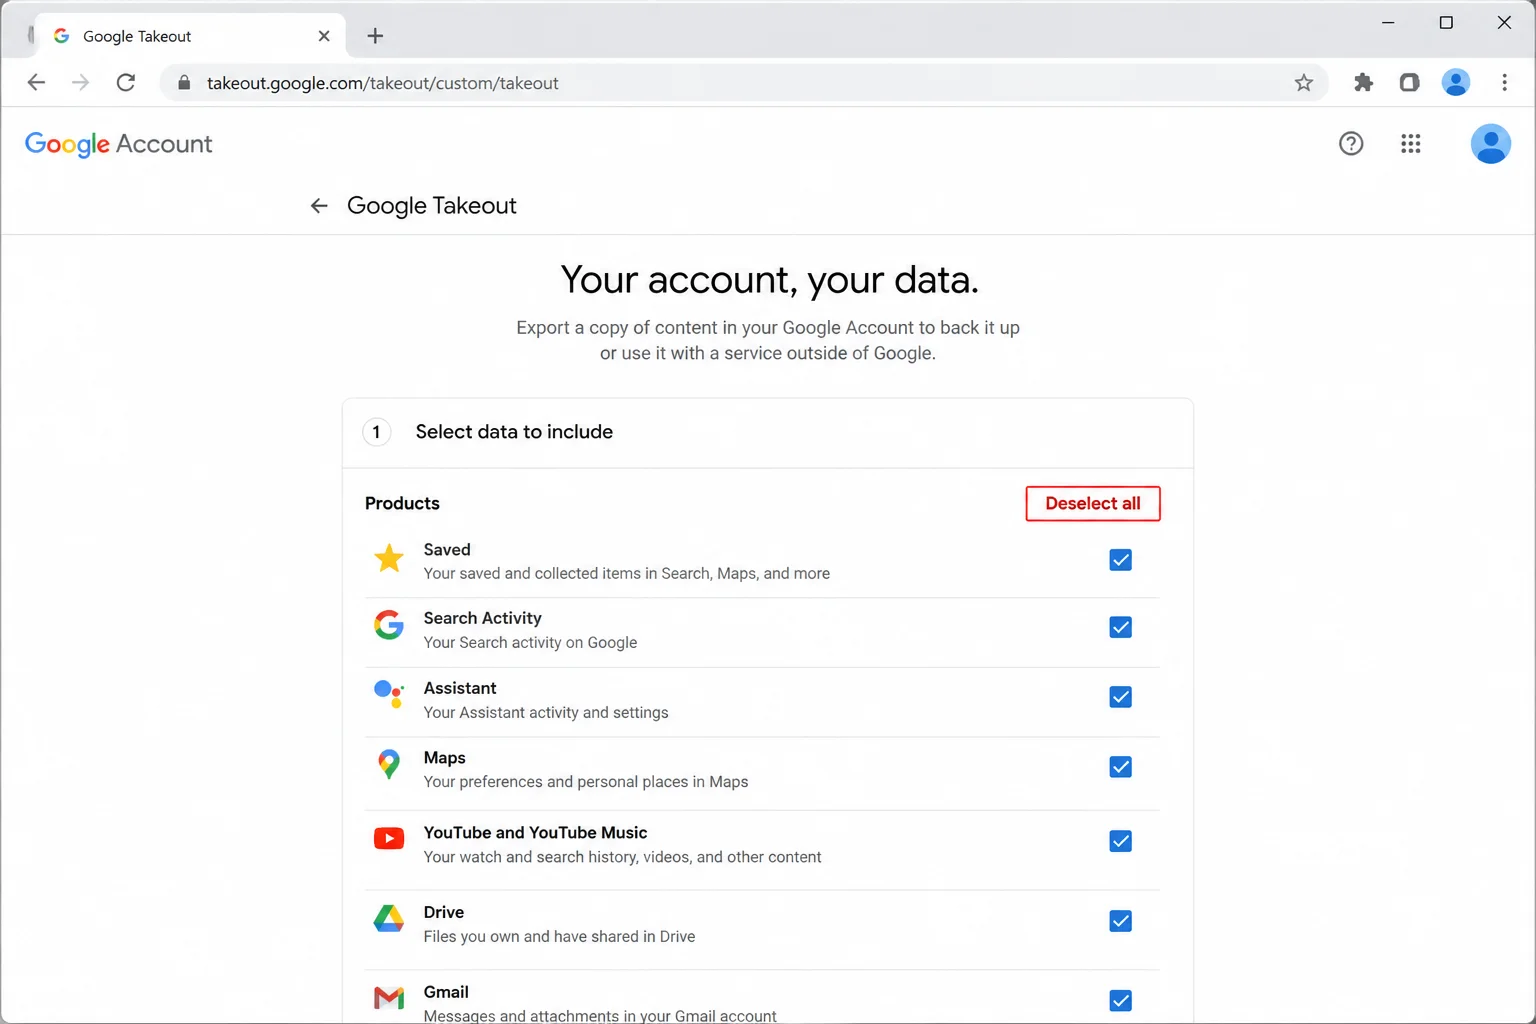
By default, Takeout wants to export data from every Google service you use, Gmail, Drive, Calendar, the works. You probably don’t need all of that, so click Deselect all at the top of the list to start fresh.
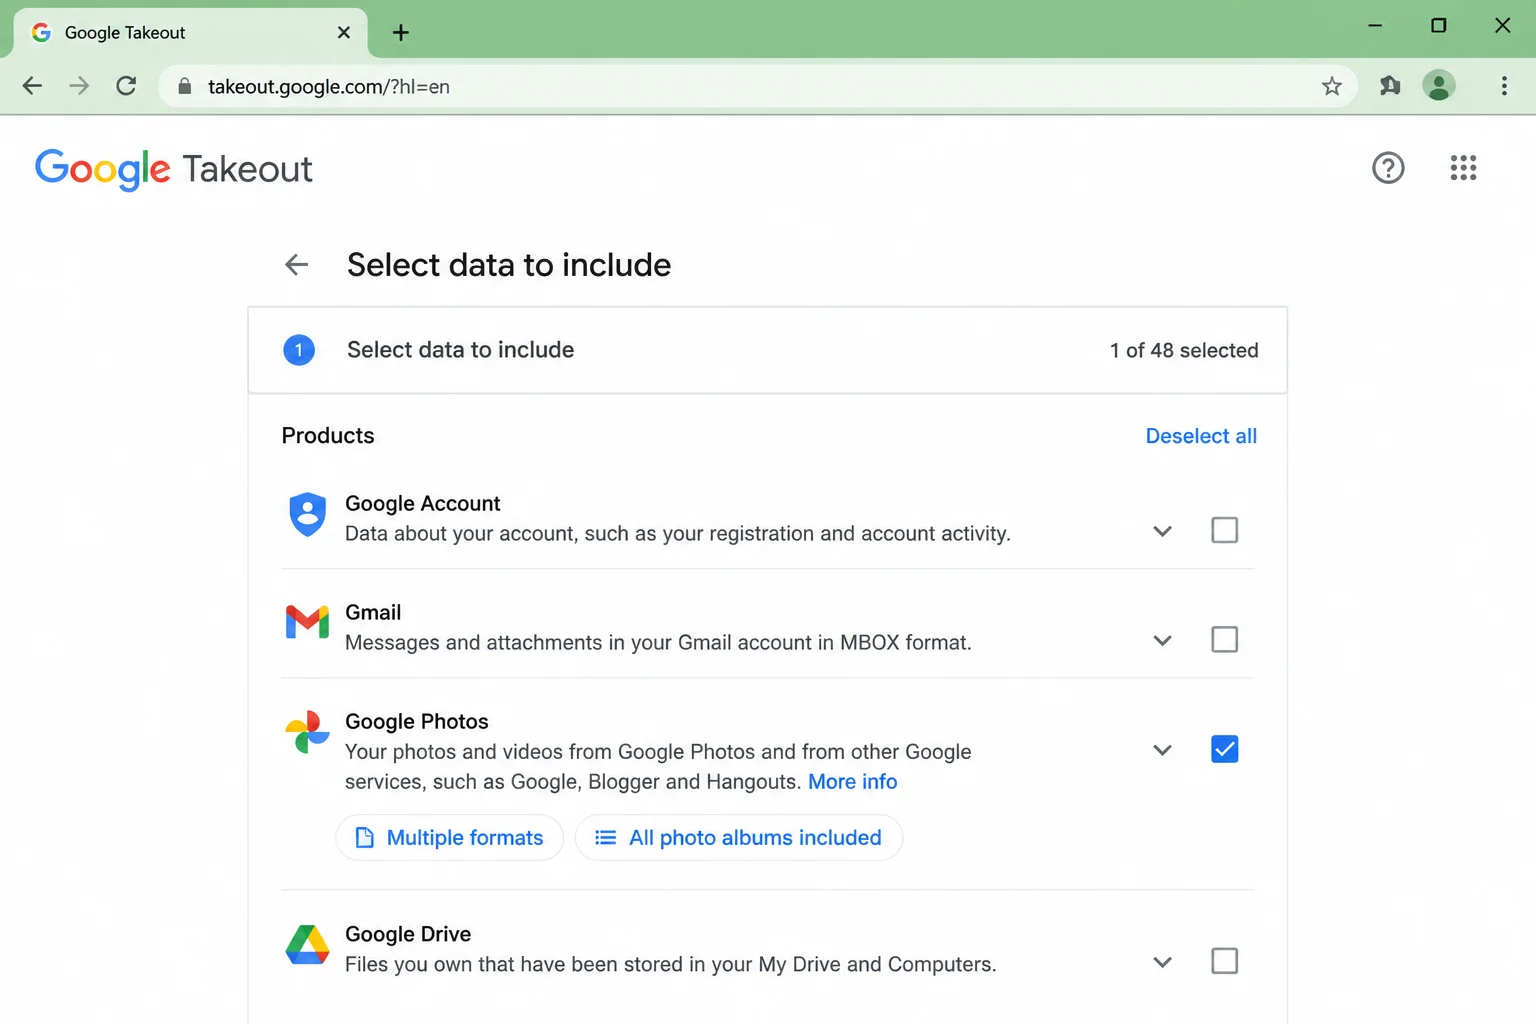
Now scroll down the list until you find Google Photos and check the box next to it.
Step 3: Choose Which Albums to Include
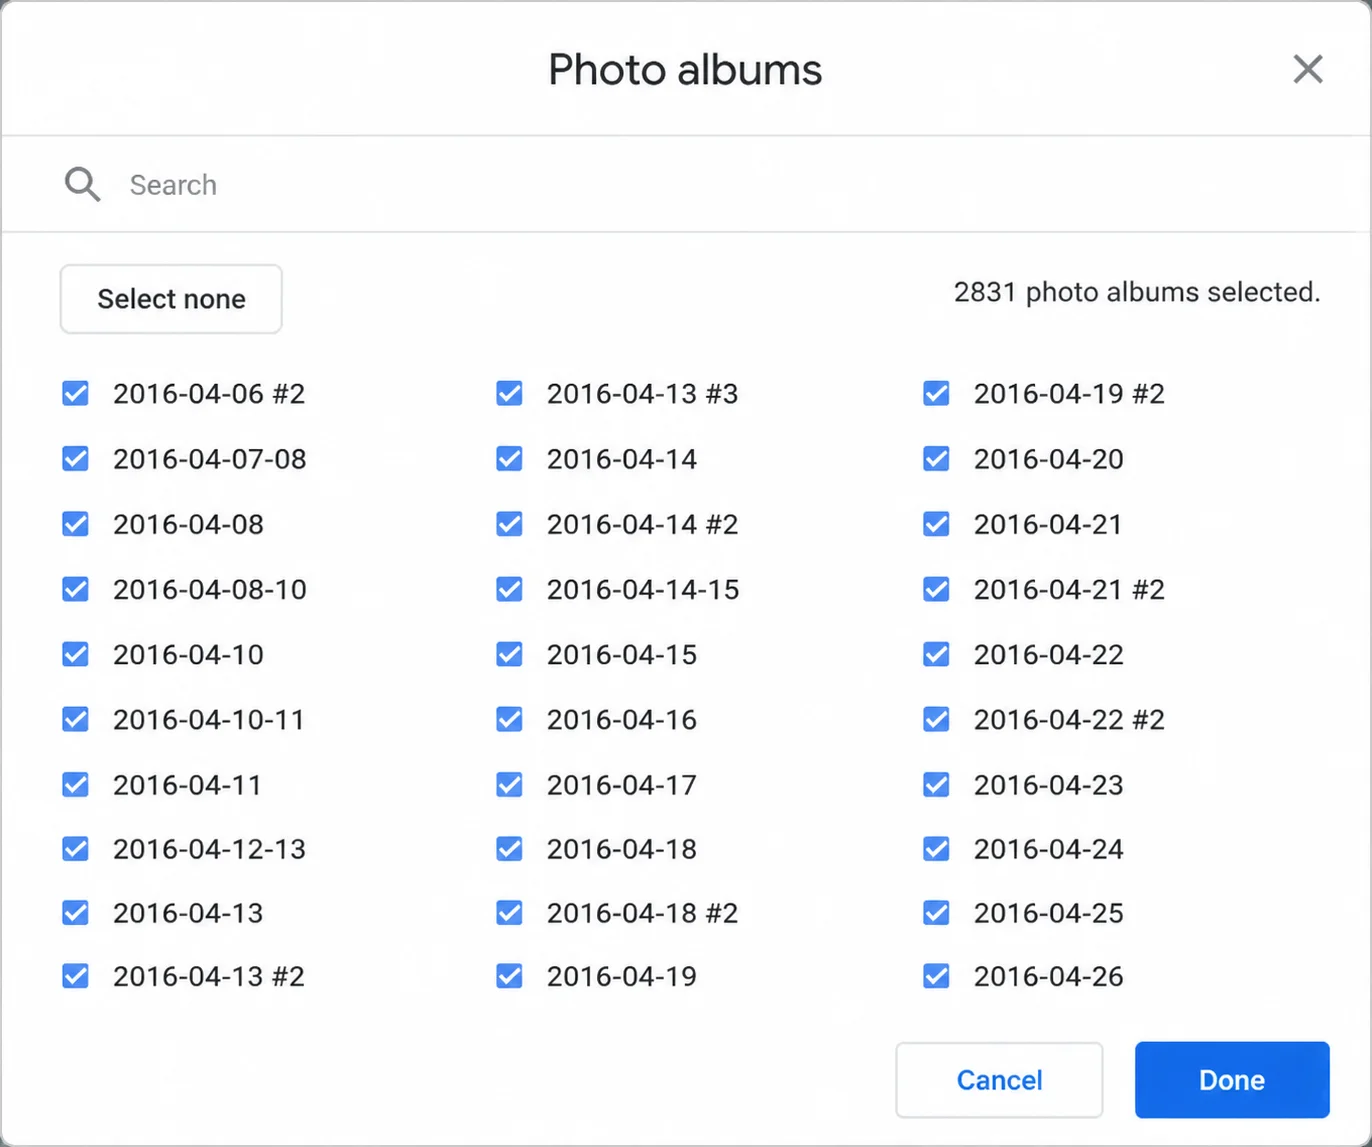
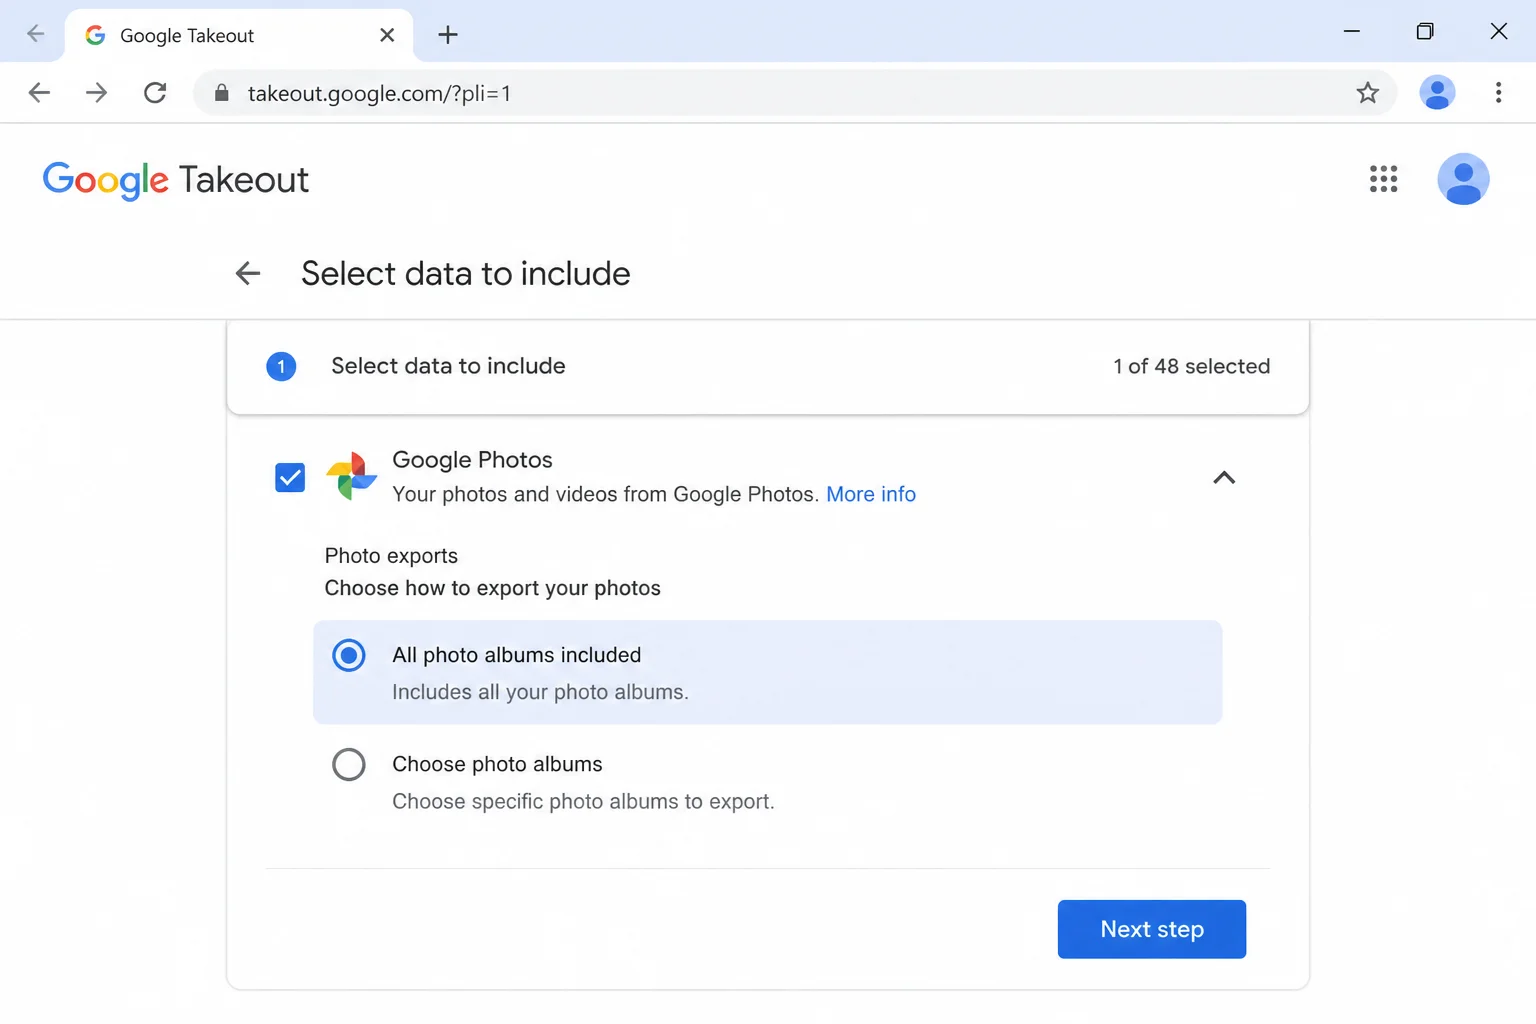
Once you’ve checked Google Photos, you’ll see a button that says All photo albums included. If you want everything, leave it as is. If you only want specific albums, click that button, then click Deselect all inside it and check only the albums you want.
Worth knowing: if you’ve been using the Google Photos app on your phone to back up pictures, Google automatically creates date-based albums for those uploads. You might have way more albums than you realize. I had over 2,500 in mine, mostly from years of phone camera backups!
Leave it set to include all photo albums if you want to download everything, then scroll to the bottom and click Next step.
Step 4: Configure Your Export Settings
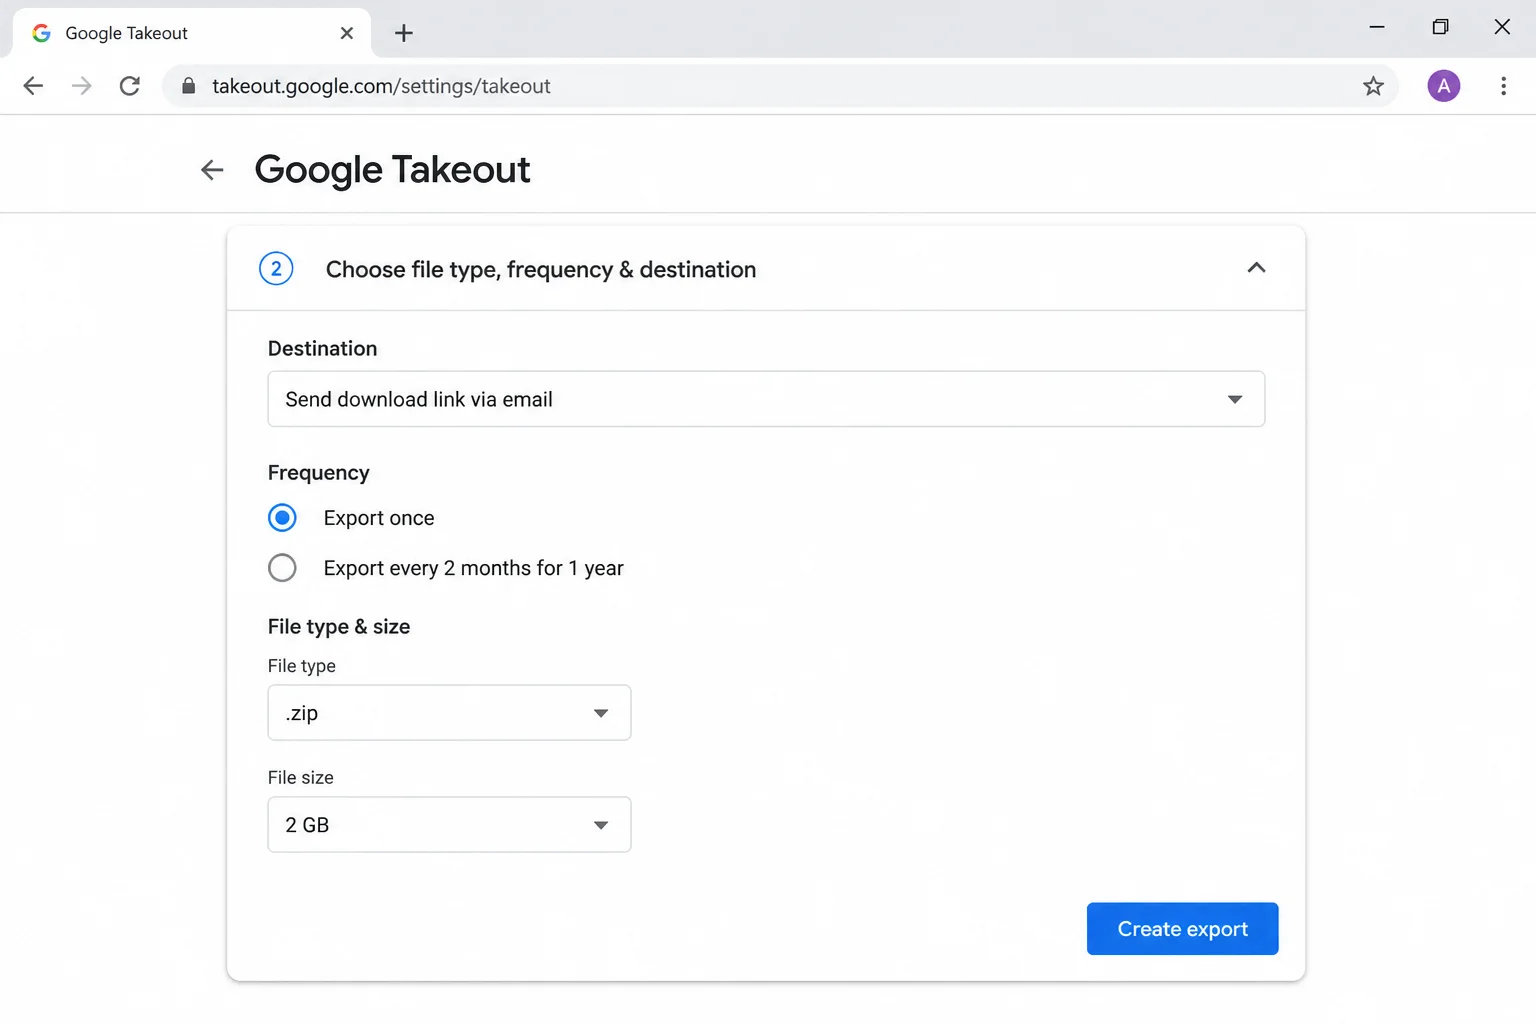
This screen is where you decide how you want your files delivered. Here’s what each option means:
- Delivery method: Choose Send download link via email for the simplest experience. Google will email you a link when your export is ready. Alternatively, you can have it sent directly to Google Drive, Dropbox, OneDrive, or Box if you’d rather skip the download step.
- Export type: Stick with One-time export unless you want Google to automatically create a fresh export every two months (handy for ongoing backups).
- File type: .zip is the easiest option since Windows and macOS can both open ZIP files without any extra software.
- Archive size: This controls how big each file is. If your library is large, Google will split it into multiple archives. Choose 10 GB or 50 GB to keep the number of files manageable. Smaller sizes (like 2 GB) mean more files to download, which gets tedious fast.
Step 5: Create Your Export
Click Create export. Google will start packaging up your photos and videos. You can close the browser tab and walk away, as the process runs in the background.
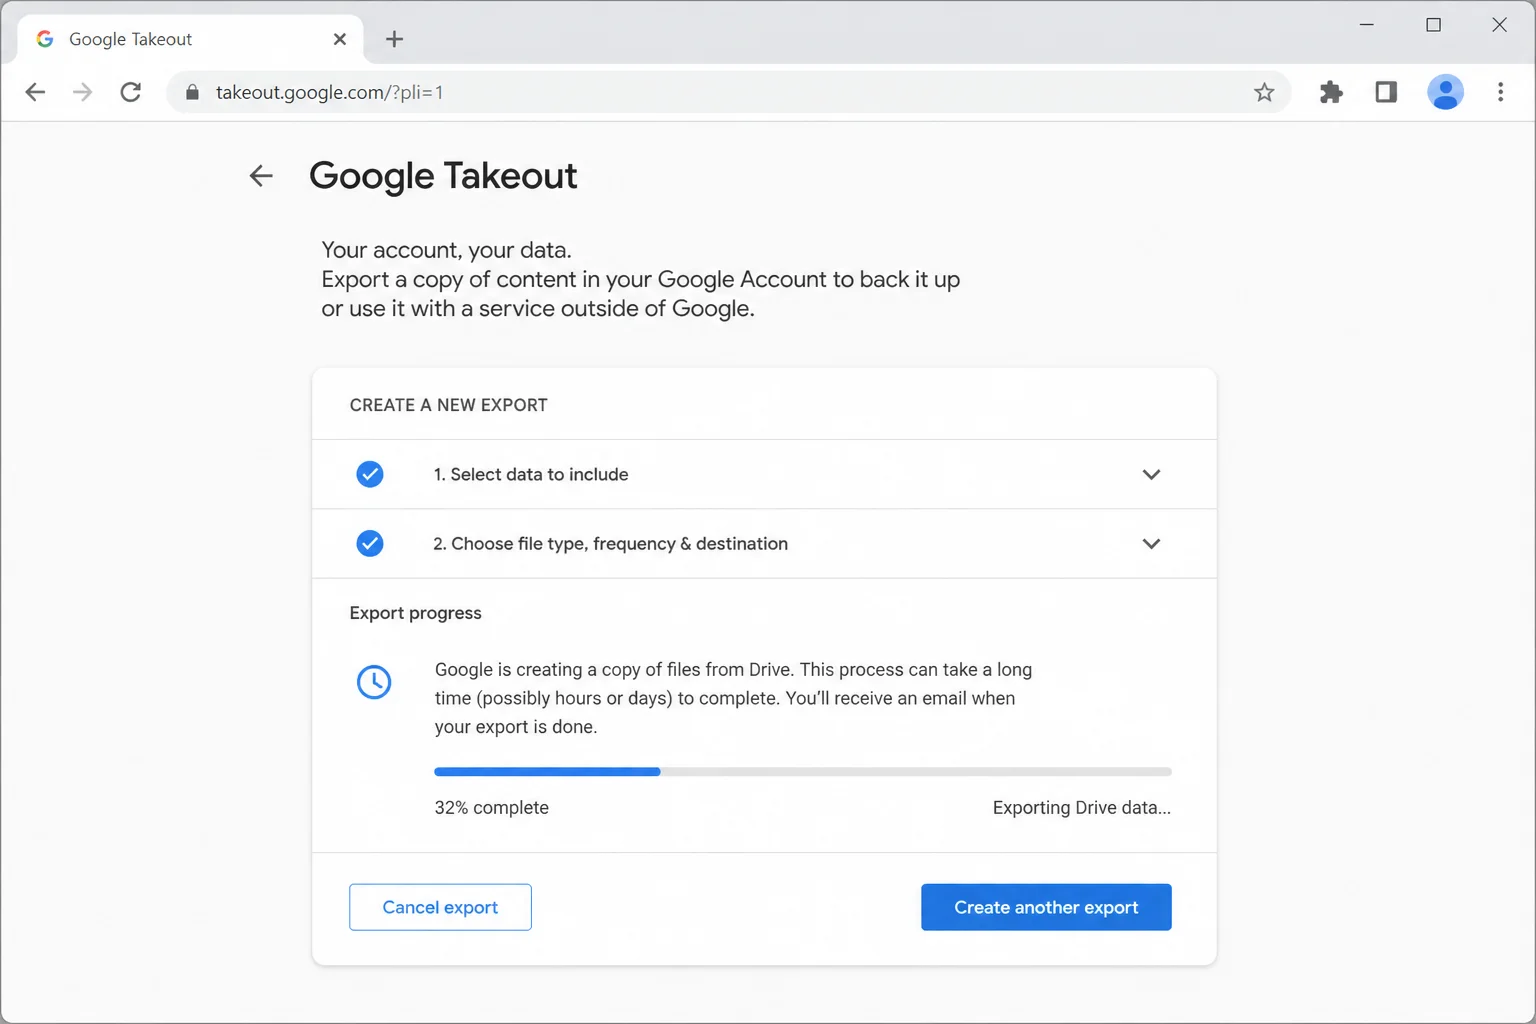
How long does it take? It depends on how much you have stored. A small library might be ready in minutes. A large one (think hundreds of gigabytes) can take several hours or even a day or two. You’ll get an email notification when it’s done, so there’s no need to sit and stare at the screen.
Step 6: Download and Extract Your Files
When the email arrives, click the download link(s) inside it to save your ZIP archives to your computer. The links do expire after a few days, so don’t let them sit in your inbox too long.
Once downloaded, extract the ZIP files using your operating system’s built-in tools:
- On Windows: Right-click the ZIP file in File Explorer and select Extract All.
- On macOS: Double-click the ZIP file in Finder and it’ll extract automatically.
Inside, you’ll find folders organized by album name and date, along with some .json files. Those JSON files contain metadata like timestamps and GPS locations. Most people can safely ignore them, but they’re useful if you’re importing into another photo management app that supports them.
Method 2: Download a Specific Album from Google Photos
If your photos are already organized into albums and you just need one or two of them, this is by far the quickest approach. No Takeout needed.
Step 1: Open Google Photos and Go to Albums
Head to photos.google.com in a desktop browser and click Albums in the left sidebar.
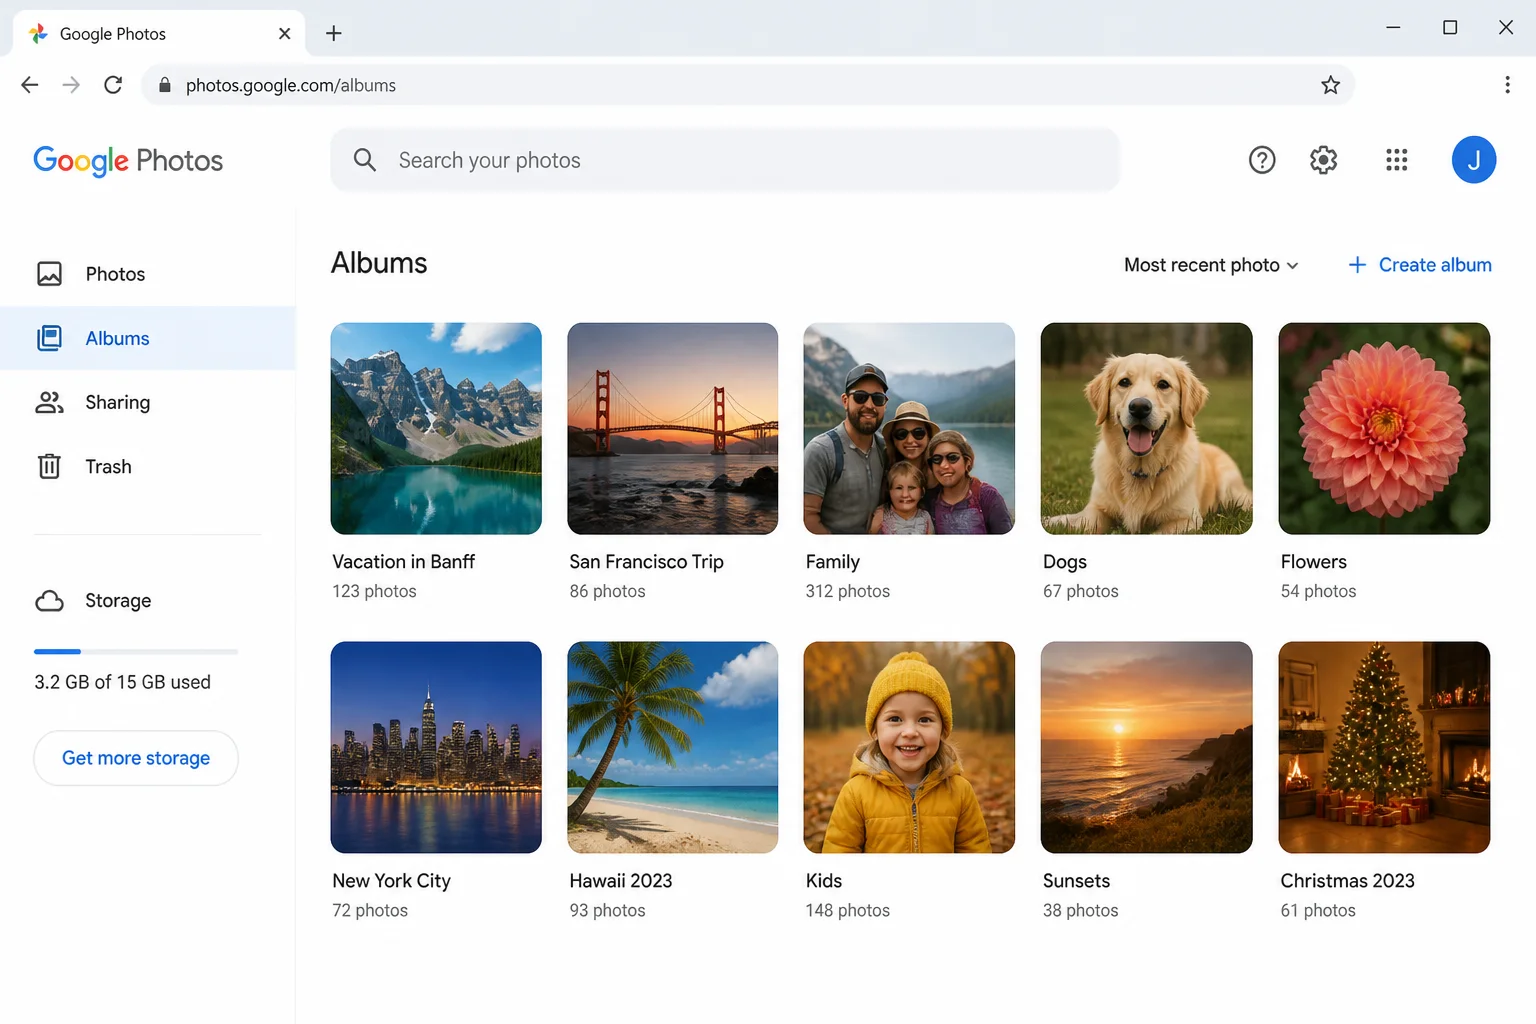
Step 2: Open the Album You Want
Click on the album you want to download to open it.
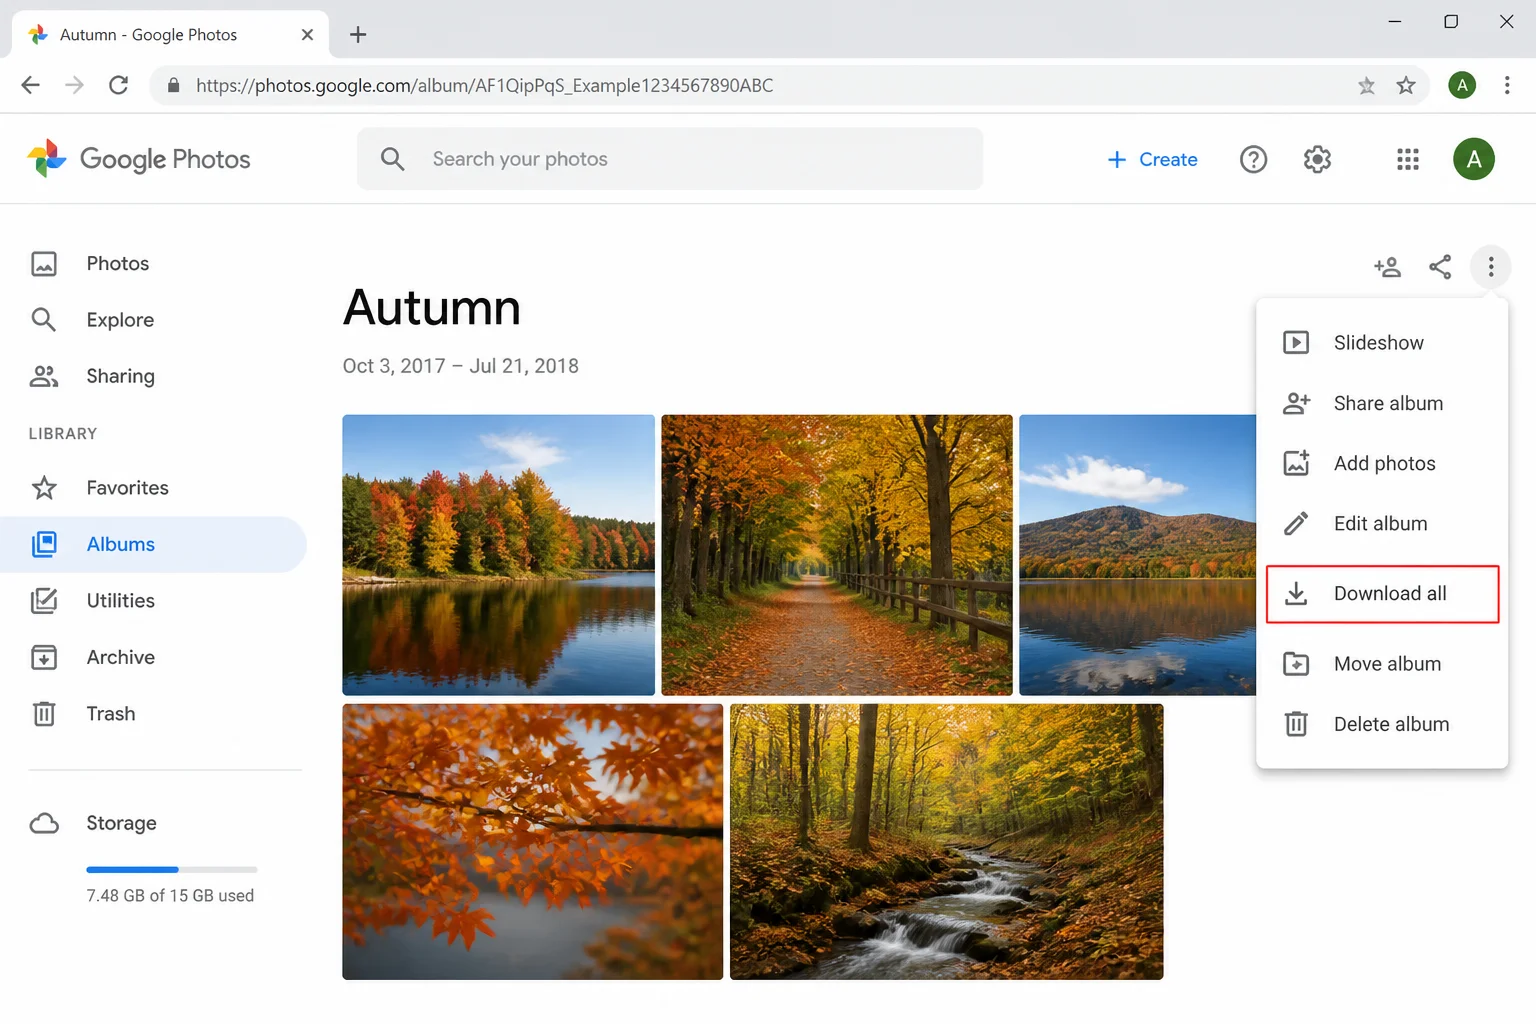
Step 3: Download the Entire Album
Click the three-dot menu (⋮) in the top-right corner of the album view, then select Download all. Google Photos will package everything into a ZIP file and download it to your computer.
Pro tip: If you have a large, unorganized library and want to avoid running a full Takeout export, you can create large albums by month or year (e.g., “2024 Q1”), move photos into them, and then use Download all for each album. It’s a bit more manual work upfront, but it gives you nicely organized folders at the end.
Method 3: Bulk-Select and Download Photos from the Google Photos Website
This method is great when you need photos from a specific date range or just a few hundred items, but you don’t want to bother setting up a full Takeout export.
Step 1: Open Google Photos in a Desktop Browser
Go to photos.google.com and make sure you’re signed in.
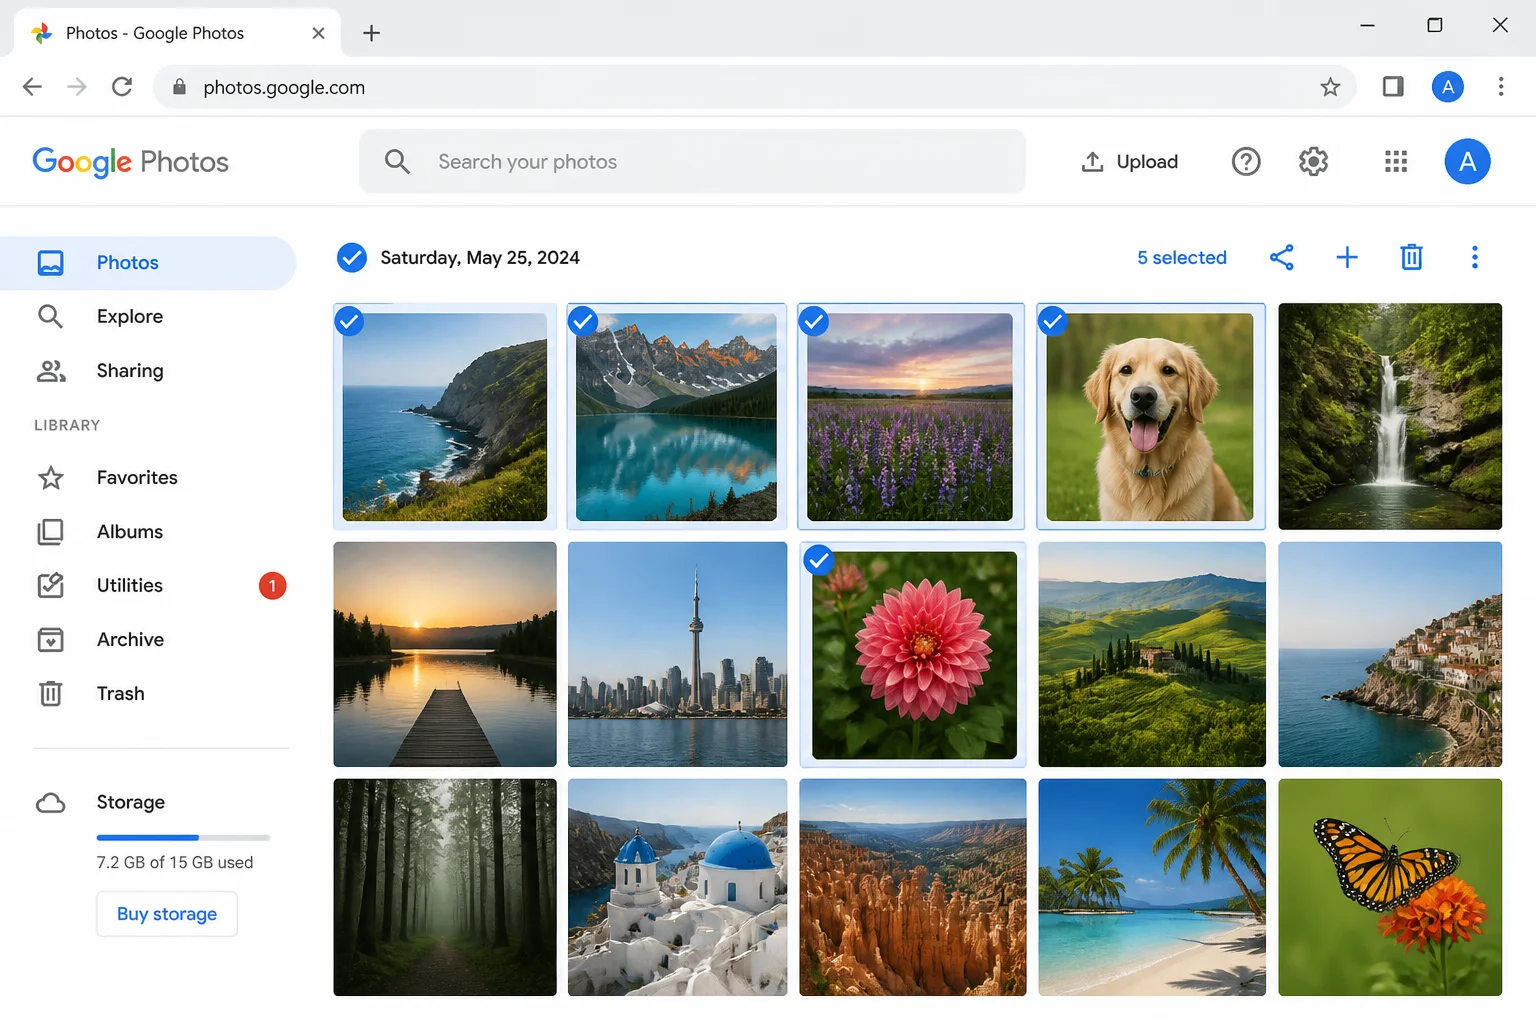
Step 2: Select the Photos You Want
Hover over a photo and a circle checkmark will appear in the top-left corner. Click it to select that photo. To select a range of photos quickly, click the first one, then hold Shift and click the last one. Everything in between gets selected automatically.
Want to grab all the photos from a specific day? Hover over the date heading above that day’s photos. A checkmark will appear next to the date. Click it to select every photo from that day at once.
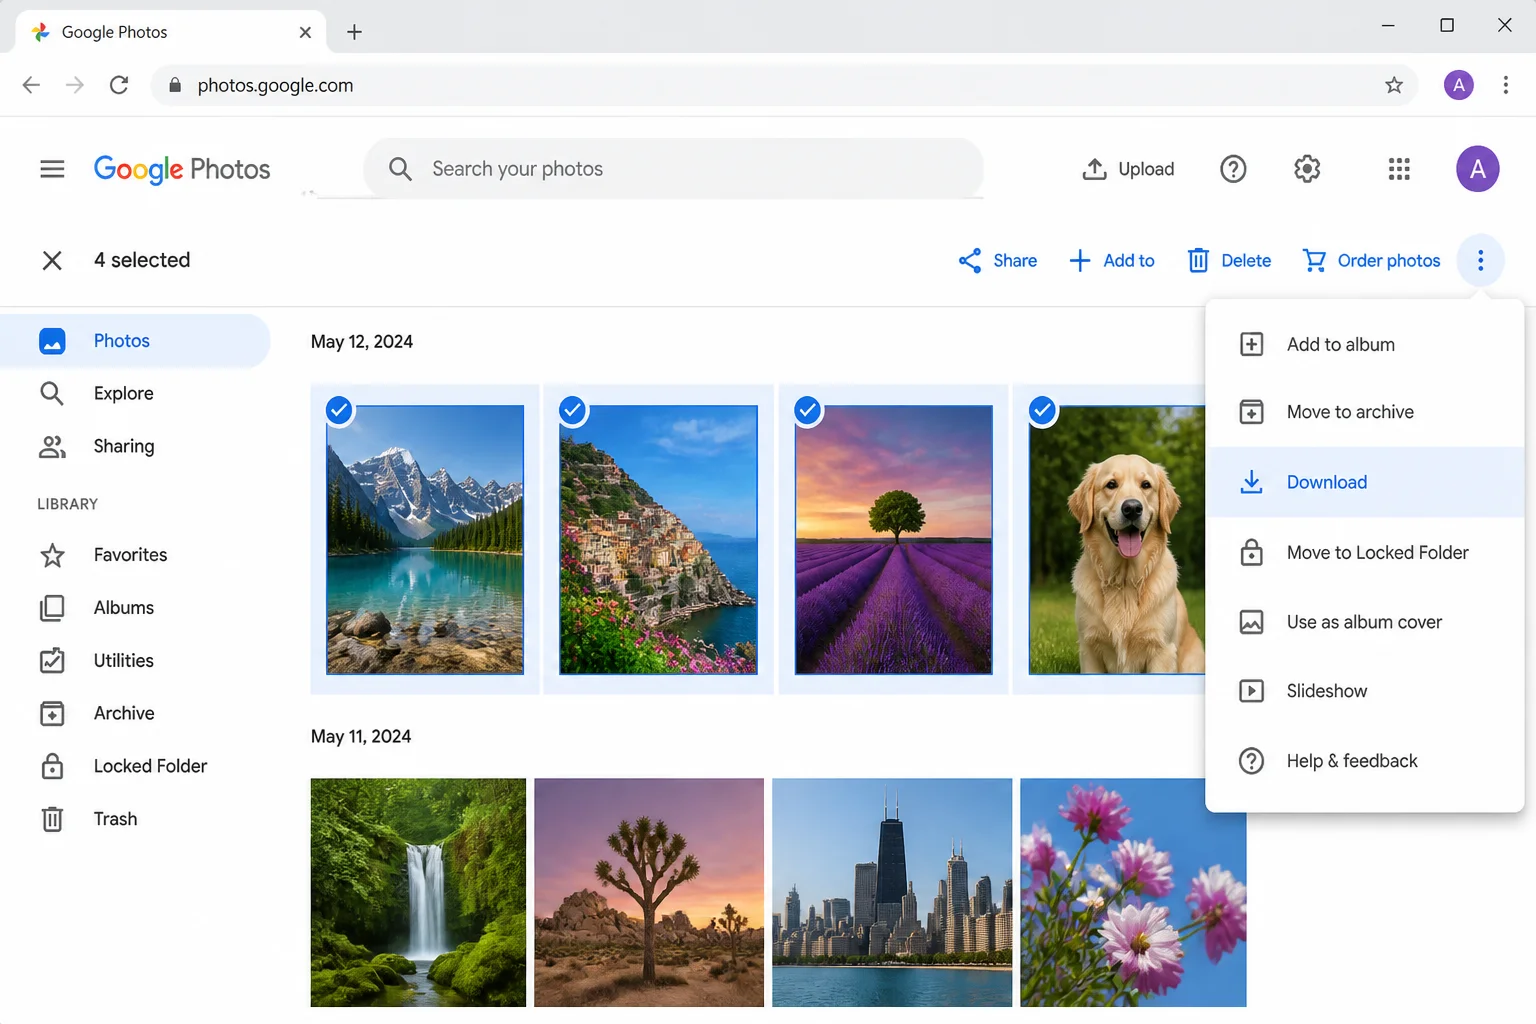
Step 3: Download Your Selection
With your photos selected, click the three-dot menu (⋮) at the top-right of the page and choose Download. You can also press Shift + D as a shortcut. Google Photos will bundle everything into a ZIP file and download it.
Important heads-up: There’s no “Select All” button in Google Photos for your entire library. If you try to select everything by scrolling and shift-clicking, it’s going to take forever, and you’ll probably miss things. For a complete library download, Google Takeout (Method 1) is the way to go.
How to Download Google Photos on Android or iOS
Here’s the thing about the Google Photos mobile app: it doesn’t have a “download everything” button. You can save individual photos or small selections to your phone, but for a full library export, you’ll need to use Google Takeout through a browser, even on mobile.
Step 1: Open Takeout in Your Mobile Browser
Open Chrome (Android) or Safari (iOS) on your phone and navigate to takeout.google.com. Sign in if needed.
Step 2: Follow the Same Takeout Steps
Follow the same steps as Method 1 above, deselect all services, check Google Photos, configure your export settings, and tap Create export.
Step 3: Download and Extract on Your Phone
When the export email arrives, tap the download link(s) on your phone. On Android, use Files by Google (or your built-in file manager) to find the downloaded ZIP files and extract them. On iOS, the Files app can handle ZIP extraction.
Fair warning: this is bandwidth-heavy. Do it over Wi-Fi, not mobile data, and make sure you have enough free storage on your device before you start.
Tips and Troubleshooting
Common Issues
Problem: My download is split into tons of separate files
This is normal. Takeout splits your export based on the archive size you chose. You’ll need to download each ZIP file separately and extract them all. If you end up with too many files, try running a new export with a larger archive size (50 GB instead of 2 GB).
Problem: The photos look lower quality than expected
This happens if your photos were originally stored in Storage saver mode (Google’s compressed format, previously called “High quality”). Takeout exports whatever version Google has stored, so if it was compressed when it went in, it’ll be compressed when it comes out. If you stored photos in Original quality, you’ll get your full-resolution files back.
Problem: The download keeps failing or timing out
Try these fixes:
- Use a wired (Ethernet) connection instead of Wi-Fi for more stability.
- Choose a smaller archive size (2–10 GB) so each individual file is less likely to fail mid-download.
- Download one archive at a time rather than kicking them all off at once.
- Use a desktop or laptop. Phones are less reliable for large downloads.
Problem: There are weird .json files mixed in with my photos
Those are metadata sidecar files. They store information like the original date the photo was taken, GPS location, and any captions you added. Most people can ignore them. If you’re importing your photos into another app (like Apple Photos or Lightroom), check whether that app can read the JSON files to restore your metadata.
Problem: I want a backup that stays updated automatically
When setting up your Takeout export, choose the scheduled export option instead of one-time export. Google will automatically create a fresh export of your photos every two months and send you a download link. It’s not real-time sync, but it’s a solid safety net for keeping a reasonably up-to-date local backup.
Pro Tips
- Save directly to cloud storage: Instead of downloading ZIPs to your computer, you can have Takeout send your export directly to Google Drive, Dropbox, OneDrive, or Box. This is great if you’re migrating to a different service.
- Download to an external drive: Before you start downloading, set your browser’s default download folder to an external hard drive. That way your archives land directly on the drive without taking up space on your main computer.
- Organize first, download second: If your library is a mess, consider creating large albums by year or quarter in Google Photos before running your export. You’ll end up with much cleaner, more organized folders on your computer.
- Check your storage quality setting: Before exporting, go to photos.google.com > Settings and check whether your photos are stored in Original quality or Storage saver. This tells you what quality to expect in your export.
Wrapping Up
Getting all your photos and videos out of Google Photos is genuinely pretty painless once you know which tool to use. For a complete library backup, Google Takeout is your best bet. It’s the only method that guarantees you get everything, including photos not in any album. For smaller downloads, the bulk-select and album download options on the Google Photos website are quick and convenient. Google’s made this whole process fairly user-friendly, which is more than you can say for a lot of other platforms (looking at you, pretty much every social network ever).
If you’re just cautiously dipping your toes in and want to test the process before committing to a full export, start with a single album download. It’s a solid way to see how everything works before you kick off a multi-gigabyte Takeout export. Once you’ve got your local backup sorted, you’ll sleep a lot better knowing your memories aren’t living in just one place.