
So you have a bunch of old audio cassettes that you want to copy or transfer to your computer? There are many gadgets and programs out there that you can buy which will make the process as simple as possible, however, since I’m a techie and my blog is all about easy to understand computer tips, I’m going to try and teach you how you can transfer audio cassettes to your computer for free!
I’ll also mention a couple of those gadgets at the end for those of you who don’t have the time or patience do follow the instructions below.
Using Audacity to for Audio Transfer
What you’ll need before you can copy cassettes to your computer or PC:
1. Audacity – Free recording and editing software
2. Cassette Tape Deck with RCA output jacks or tape player with 3.5mm mini-plug (hopefully you already have this if you own a lot of cassettes)

3. Stereo RCA cable with mini-jack connector or mini-male to stereo mini-male cable


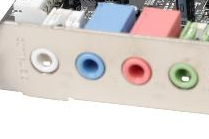
4. Sound card with line-in jack (usually in blue)
Step 1: Connect tape deck to computer
The first thing you’ll need to do in order to record the audio from a cassette tape is to connect the tape deck or tap player to the computer itself. You’re going to need the Stereo RCA cable with mini-jack or the mini-male to mini-male cable for this step.
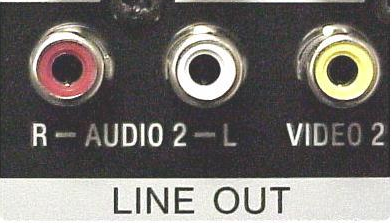
Go ahead and connect the male RCA side of the cable (red and white) into the female RCA connectors on the tape deck. Make sure that the RCA jacks on the tape deck say “Line Out” or “Audio Out“.
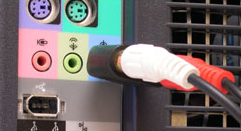
Now it’s time to connect the other end of the cable to your computer. If you’re using the RCA cable with mini-jack connector on the other end, then simply plug it into the female Line-In jack on the back of your computer (the blue one out of the three). However, if you have an RCA cable that has red and white RCA connectors on both ends, you’ll need to buy a mini-male to 2 RCA female adapter as shown below.

However, if you’re going to be buying this, you may as well buy a cable with the mini-jack already on the other end! Using an adapter may cause a loss of audio quality.
If you’re using a desktop PC, it should be color coded, which makes it much easier to figure out where to connect it to. Basically, it’s the blue colored jack that is your Line In.
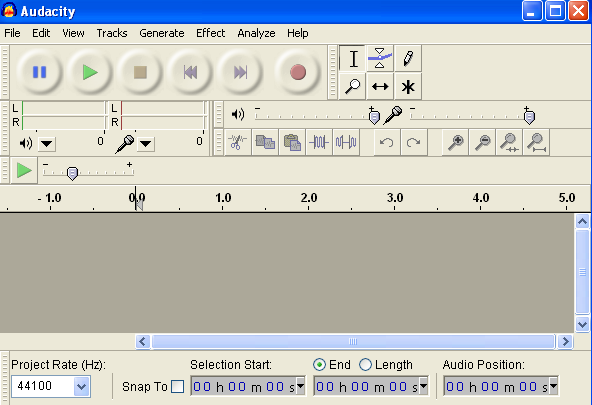
Step 2: Record audio from cassette tape using Audacity
Now that you have your cassette tape deck connected to the computer, we can use the open-source audio recording and editing software Audacity to capture the audio.
Firstly, open Audacity and click on Edit and then Preferences way at the bottom. If it’s not already there, click on Audio I/O in the left hand menu. This is where you can select the Input Source that you want to record sound from. You should see a section heading called Recording and under that a drop down menu called Device.

Make sure that you do NOT pick Microsoft SoundMapper if you’re on a Windows machine. It should be something similar to what you see above or something like “Line-In:Realtek HD Device“, etc. You can try all of the options in the drop down until you actually get the sound to record, one of them will work.
Now you simply need to adjust the volume for your recording by clicking on the downward pointing arrow on the right hand (red) VU recording level meters.
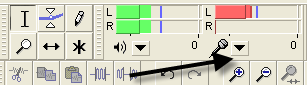
Now click on Monitor Input or Start Monitoring. Now when you begin recording by clicking the Record button, if you see the sound is going too far to the right (red bars), then you can adjust the input volume level by dragging the slider to the left in the Mixer Toolbar (which is slightly lower and to the left of the recording levels meters.
![input volume[6]](https://www.online-tech-tips.com/wp-content/uploads/2008/03/input-volume6.png)
When you are finished recording, go ahead and click the Stop button (yellow color) and go to File and choose Save Project As. This is will save it as a Audacity project so that you can come back and edit it later.
To export the final edited version of your recording to MP3 or WAV format, click on File and choose Export As. You can then take these MP3s and burn them to CD or import then into iTunes. You can choose between WAV, AIFF, OGG, FLAC, and MP2 format for exporting.
Remember you can always pause the recording at any time if there are parts of the cassette tape you don’t want transferred to your computer. Otherwise, you should now a digital version of your audio cassettes!
Other Methods to Transfer Audio Cassettes
If you don’t mind throwing down some cash, there are a couple of handy gadgets you can purchase to make the transfer process a lot easier.
USB Cassette Player
My favorite and your cheapest option is the USB Cassette Player like the one from Amazon shown below for $22. You just plug the thing into your computer’s USB port and use the accompanying software to record the audio into MP3 format.

Tape Deck with CD Recorder
The more expensive option is to purchase a tape deck like I have shown in the tutorial above, but instead buy one that includes a built-in CD recorder. A normal tape deck will cost you anywhere from $50 to $150 whereas the tape deck with CD recorder option will set you back anywhere from $200 to $350.

Teac is a popular brand and has one model that lets you play and record directory on the device itself. It’s a bit expensive at $335, but possibly worth it if you have hundreds of cassettes you want to convert to digital format.
Hopefully, this is enough information to get your cassettes into digital format without a lot of trouble. If you have a question, post a comment! Enjoy!