
Wouldn’t it be neat if you could create your own TrueType fonts, name them whatever you want, and actually use them in programs like Word, Photoshop, etc? Luckily, there are some really cool software apps out there that you can use to not only create your own Windows fonts, but also to edit the fonts that are currently on your system!
In this post, I’ll mention a couple of programs, some free and some paid, that you can use to create custom fonts. Obviously, the paid programs tend to have more features and better interfaces for working with the fonts, but there are some good free ones too.
Free Font Editors
Let’s start with the free ones since most people will be creating fonts not as a business, but just for fun. There are literally millions of fonts you could download or buy online, so if you’re reading this post, you’re probably interested in being creative and unique!
One of the easiest ways to create new fonts is to use an online font editor. You can create your fonts right in the browser and download them onto your computer when finished.
FontStruct
FontStruct is probably my favorite online font editor because it has nice interface and the best tools for manipulating the fonts. In order to use the service, you have to create an account and login. After that, click on the Create New Fontstruction button. Give your font a name and you’ll see the font editor screen.

Here you use “bricks” to create your font block by block. They have a lot of bricks to choose from and you can switch to Expert Mode, which will give you even more tools for creating the fonts. It will take some time, practice and creativity before you can create anything very unique, but it’s definitely a lot of fun.
PaintFont
FontStruct requires you to create your font using digital tools, but what if you would rather draw your fonts by hand and then have them digitally converted to vector fonts? Well, that’s where PaintFont can help!
PaintFont is a neat little online service that first makes you select the characters you want in your font, then prints out a template for you, which you fill out, and then makes you upload it so that it can convert your handwriting into an actual font. It also has templates for other languages besides English like Spanish, German, French, Italian, etc.

Once you click Create template, a PDF file will be downloaded that you should print and fill out. Each block will contain a single character from the ones you chose above. You obviously don’t have to write the letter as displayed in the box, but as you would like it to appear in your new font. The character is just for reference so that the program knows which block represents which letter.

Then you upload the font template and download your newly created font. Obviously, the process won’t be perfect, so you’ll need to make sure you get a good scan of the template before uploading and the characters are written clearly in black ink. The nice thing is that if a couple of fonts are not recognized properly, you don’t have to start from scratch.
You can create a new template with the faulty characters only and then when you go to upload, click on the advanced options, you can use the original font as a base font. The newly recognized characters will replace the ones in the base font. Overall, a neat concept and something fun you can do with your kids!
BirdFont
Moving from online tools to desktop tools, one nice font editor is BirdFont. It’s got quite a bit of tools for manipulating fonts and will be really easy to use for anyone who already has experience with software like Adobe Illustrator or Corel Draw.

If you are completely new to any of these tools, it will take some time to learn them as it’s hard to create anything decent looking by just playing around with various tools you don’t know how to use. You can check out their online tutorials for help on getting started.
FontForge
Another free program for editing fonts and converting between font types is FontForge. It’s an open source project and it works ok, but not as well as I would have liked. Firstly, it seems to not have been updated since 2012. Secondly, instead of being in one big window, it has separate windows for tools, the fonts list, etc kind of like how GIMP used to be.

It works well, but it’s not very user friendly. Also, it doesn’t have as many tools as BirdFont. Now let’s talk about some of the paid apps for editing fonts.
Commercial Font Editors
FontCreator
High Logic has a very cool program called FontCreator starting at $79 that allows you to create and edit either TrueType or OpenType fonts. It also has some very powerful drawing and editing tools built for typographers and designers, as well as an intuitive interface for beginners!

This program is well suited for designers and graphic artists, not so much for playing around unless you have lots of money to throw around. Here are some of the programs key features:
- Create and edit TrueType and OpenType fonts
- Redesign existing characters
- Add missing characters to a font set
- Convert images (e.g. a signature, logo or handwriting) to character outlines
- Edit and recreate font names
- Fix character mappings
- Correct fonts that do not display correctly
- Generate, modify, import, export, and clean up kerning pairs
- Add/correct over two thousand composite glyphs
- Transform individual glyphs or an entire font (i.e. to make a bold version)
- Extract TrueType fonts from TrueType collections
- Preview all fonts before installing
- Install your fonts into Windows for use with Windows programs
To become familiar with FontCreator, you may as well go ahead and create your own font. First, you click File from the menu and then New.

Give your new font a unique name otherwise it will not install properly in Windows later on. This name is not the name of the file; it’s the font name that will be shown inside programs, etc. For example, Times New Roman is the font family name and the file name is actually timesbd.ttf.
You’ll now see the glyph overview window, which is where you can actually draw in your letters. Double click on the cell with the caption “A” and you’ll now be brought to the glyph edit window. Choose Contour from the Insert menu to start creating your letters.
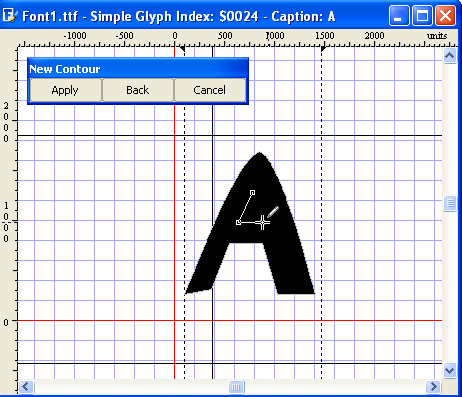
You can read the entire in-detail manual for using FontCreator here. If you still feel this is simply too hard or you want to create a font from your own handwriting, you will need to have some kind of drawing tablet and a graphical program such as Photoshop that can save each letter you draw out as a GIF. There are also lots of free drawing programs out there also.
If you have each letter saved in GIF format, then you can import the letters into the glyph edit window by going to Tools and then Import Image. This way you don’t have to actually draw your letters using tools, but can just write them out.
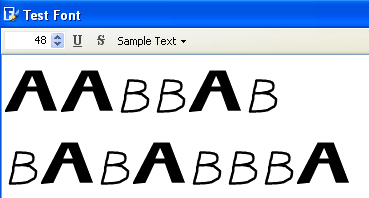
After you have created a few fonts, you can test out your new customized font by going to Test in the Font menu. Start typing the letters and you should now see how your letters look in combination:
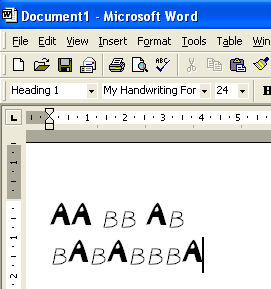
Now you can click Install from the Font menu to install the font into Windows. It is recommended to not simply copy the fonts to the Windows Fonts folder. Once installed, your font will be available in all of your favorite applications!
FontLab Studio
FontLab Studio is the gold standard in terms of font creation tools and it has a price to match that title: $673.95! That’s a lot of money for just creating fonts! Font foundry companies that only create typefaces that they then sell online mostly use this program.

The process for creating your own fonts is not necessarily easy, but it’s definitely possible for most people with a little time and effort (and maybe a little cash too). Overall, though, it’s really cool to make your own fonts for sending cards, emails, etc! Enjoy!