

Ever needed to check your BIOS version and had no idea where to look? Maybe you’re troubleshooting a hardware issue, thinking about upgrading your CPU, or just want to make sure your firmware is up to date for security reasons. Whatever the reason, finding your BIOS version is easier than you’d think, and you don’t even need to restart your computer to do it.
In this guide, we’ll walk through five different ways to find your BIOS (or UEFI firmware) version on a Windows 10 or Windows 11 PC. We’ll start with the quickest methods and work our way through some more advanced options. We’ll also cover what to do once you’ve actually found the version number.
What Is BIOS (and Why Does the Version Matter)?
Your BIOS, which stands for Basic Input/Output System, is the low-level firmware that lives on your motherboard. It’s the first thing that runs when you turn on your PC, and it handles the basics: detecting your hard drives, memory, CPU, and other hardware before handing things off to Windows.
Most modern PCs actually use UEFI (Unified Extensible Firmware Interface), which is the updated replacement for the old BIOS. But here’s the thing: Windows, manufacturers, and even the tools on your PC still call it “BIOS” half the time. So when you see “BIOS version” in System Information, it’s almost certainly referring to your UEFI firmware. For our purposes, treat the two terms as the same thing.
So why would you need to know your BIOS version? A few good reasons:
- You’re troubleshooting a hardware compatibility issue
- You want to check if a security-related firmware update is available
- You’re upgrading your CPU or RAM and need a specific BIOS version for support
- A tech support rep asked you for it
- You’re just curious (totally valid!)
Method 1: System Information (Easiest)
This is the fastest and most reliable way to find your BIOS version without touching anything else. No reboot, no command lines, just a built-in Windows tool.
Step 1: Open the Run Dialog
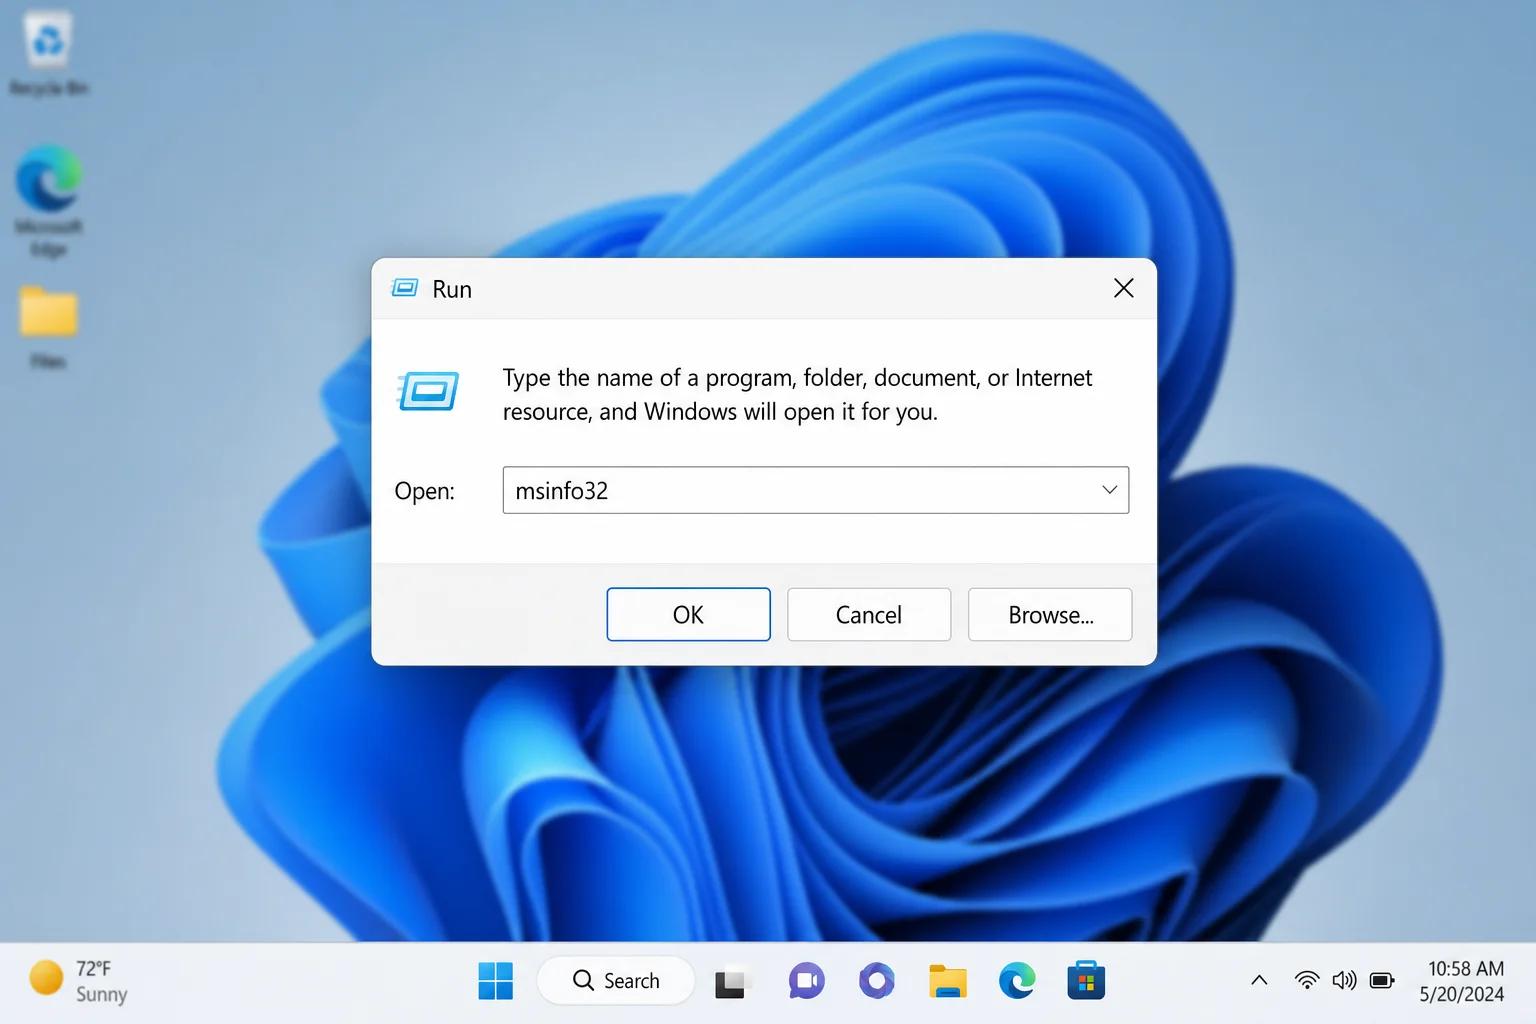
Press Windows + R on your keyboard to open the Run dialog box.
Step 2: Launch System Information
Type msinfo32 and press Enter (or click OK).
Step 3: Find Your BIOS Version
The System Information window will open with System Summary selected by default. Look for the BIOS Version/Date entry in the right panel. It’ll show you the manufacturer name, version number, and the date the firmware was released.
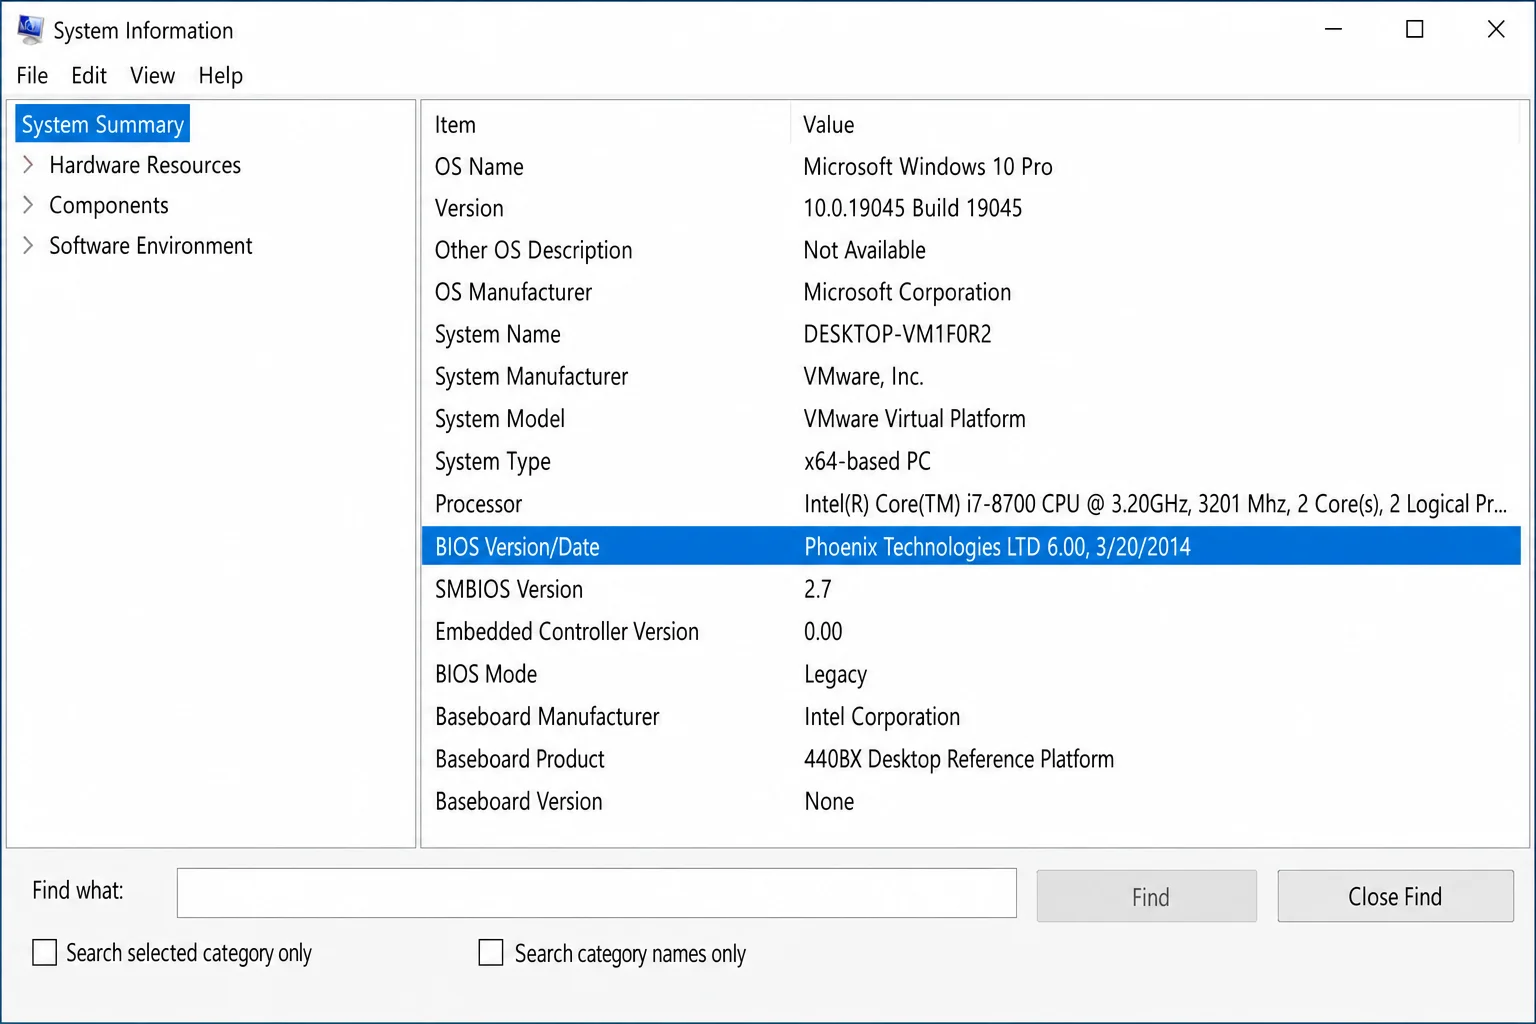
You’ll also see BaseBoard Manufacturer and BaseBoard Product nearby, which can be handy if you need to look up your specific motherboard model on the manufacturer’s website.
Method 2: Command Prompt or PowerShell
If you’re comfortable typing a quick command, this method gives you the version number in seconds. It’s also great if you need to check BIOS versions across multiple machines or run it as part of a script.
Using Command Prompt
Step 1: Open Command Prompt
Click the Start menu, type cmd, and press Enter.
Step 2: Run the BIOS Command
Type the following and press Enter:
wmic bios get smbiosbiosversionYou’ll get a short version string back, something like F.41, 1.22.1, or 310 depending on your manufacturer.
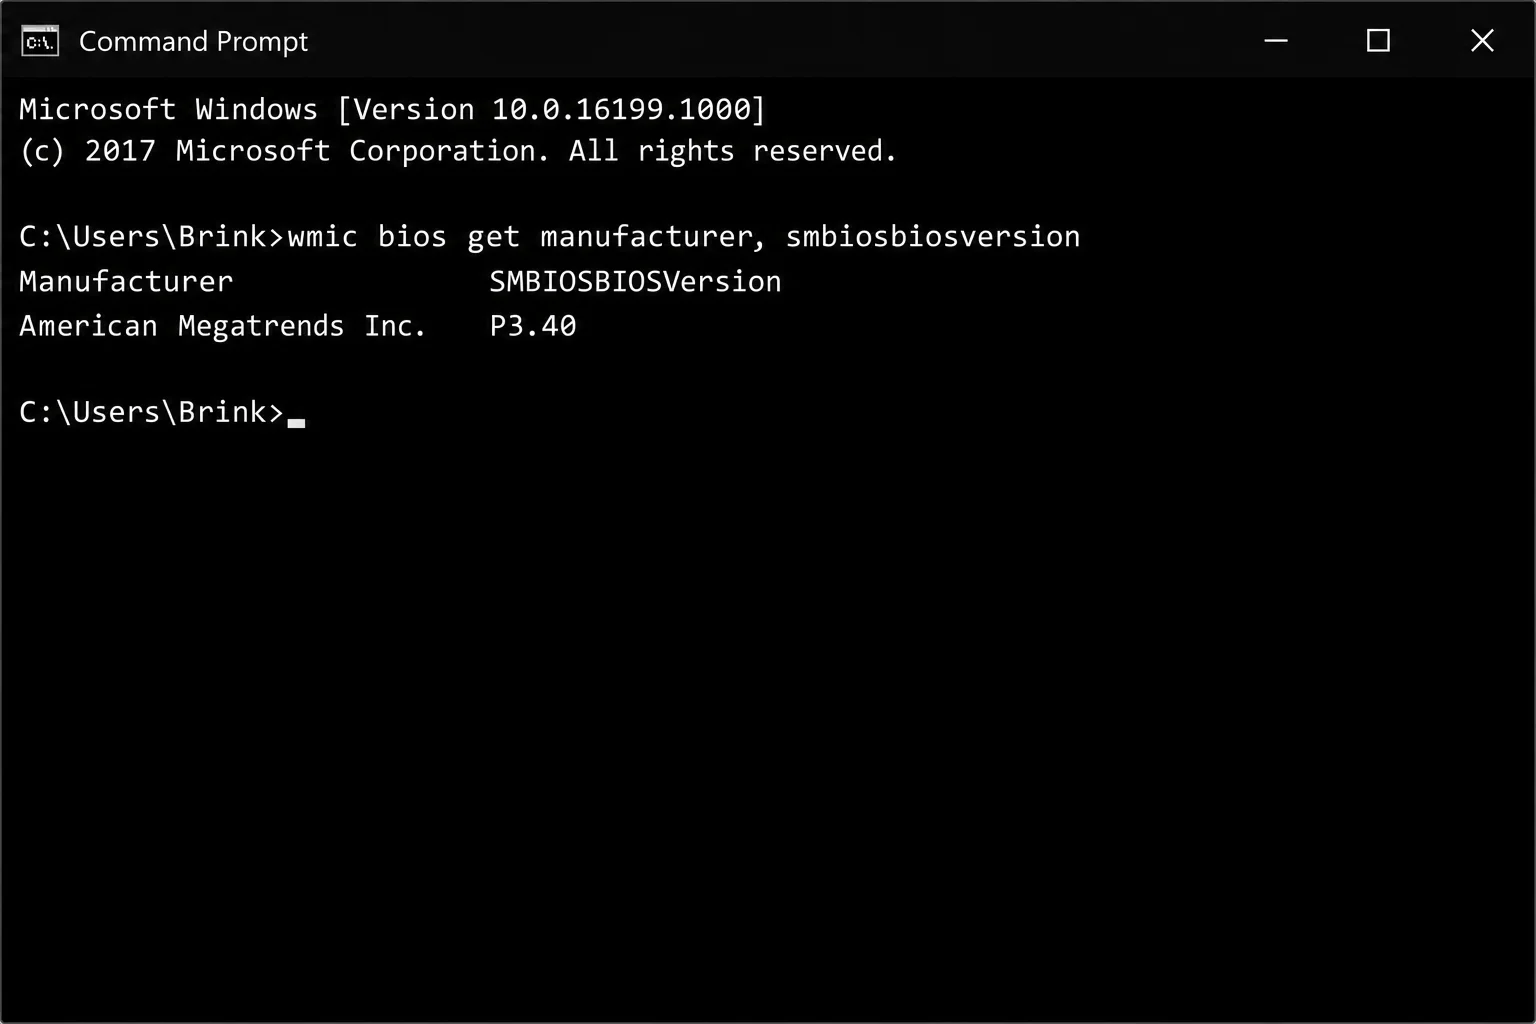
Heads up: The
wmiccommand still works in Windows 10 and 11 as of 2026, but Microsoft has marked it as deprecated (meaning they plan to remove it eventually). For a more future-proof option, use PowerShell instead.
Using PowerShell (Better for the Long Run)
Step 1: Open PowerShell or Windows Terminal
Right-click the Start button and select Windows Terminal or Windows PowerShell.
Step 2: Run the BIOS Query
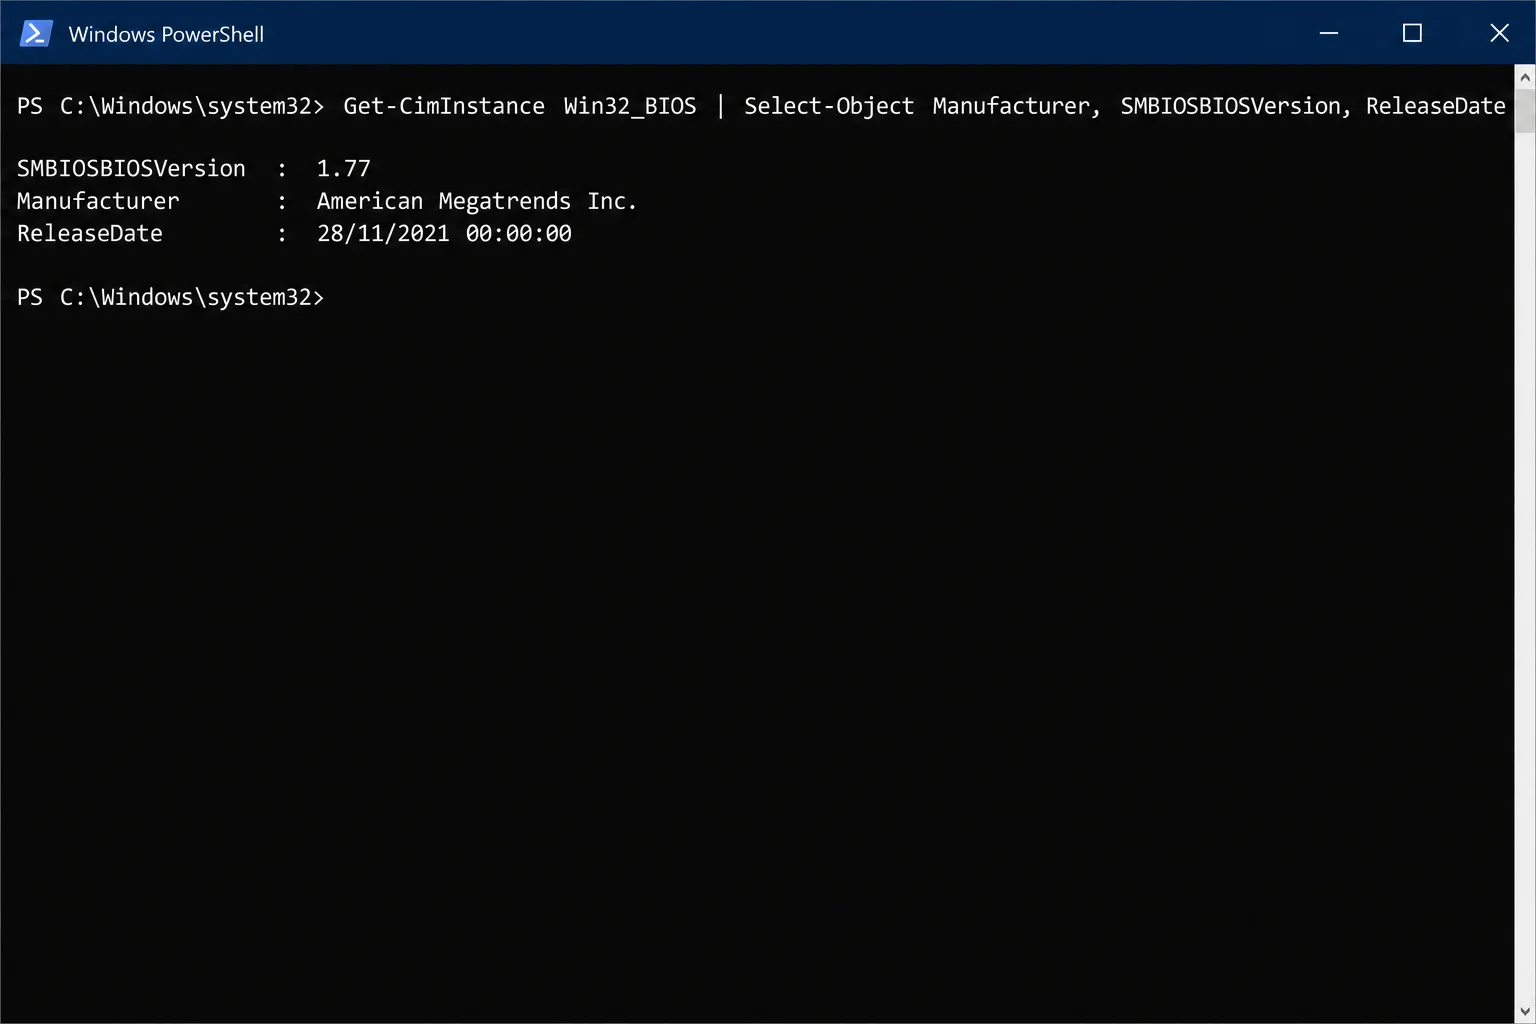
Type the following and press Enter:
Get-CimInstance Win32_BIOS | Select-Object SMBIOSBIOSVersion, Manufacturer, ReleaseDateThis gives you the version number, the manufacturer (like AMI, Phoenix, or your PC brand), and the release date, all in one shot.
Method 3: DirectX Diagnostic Tool (dxdiag)
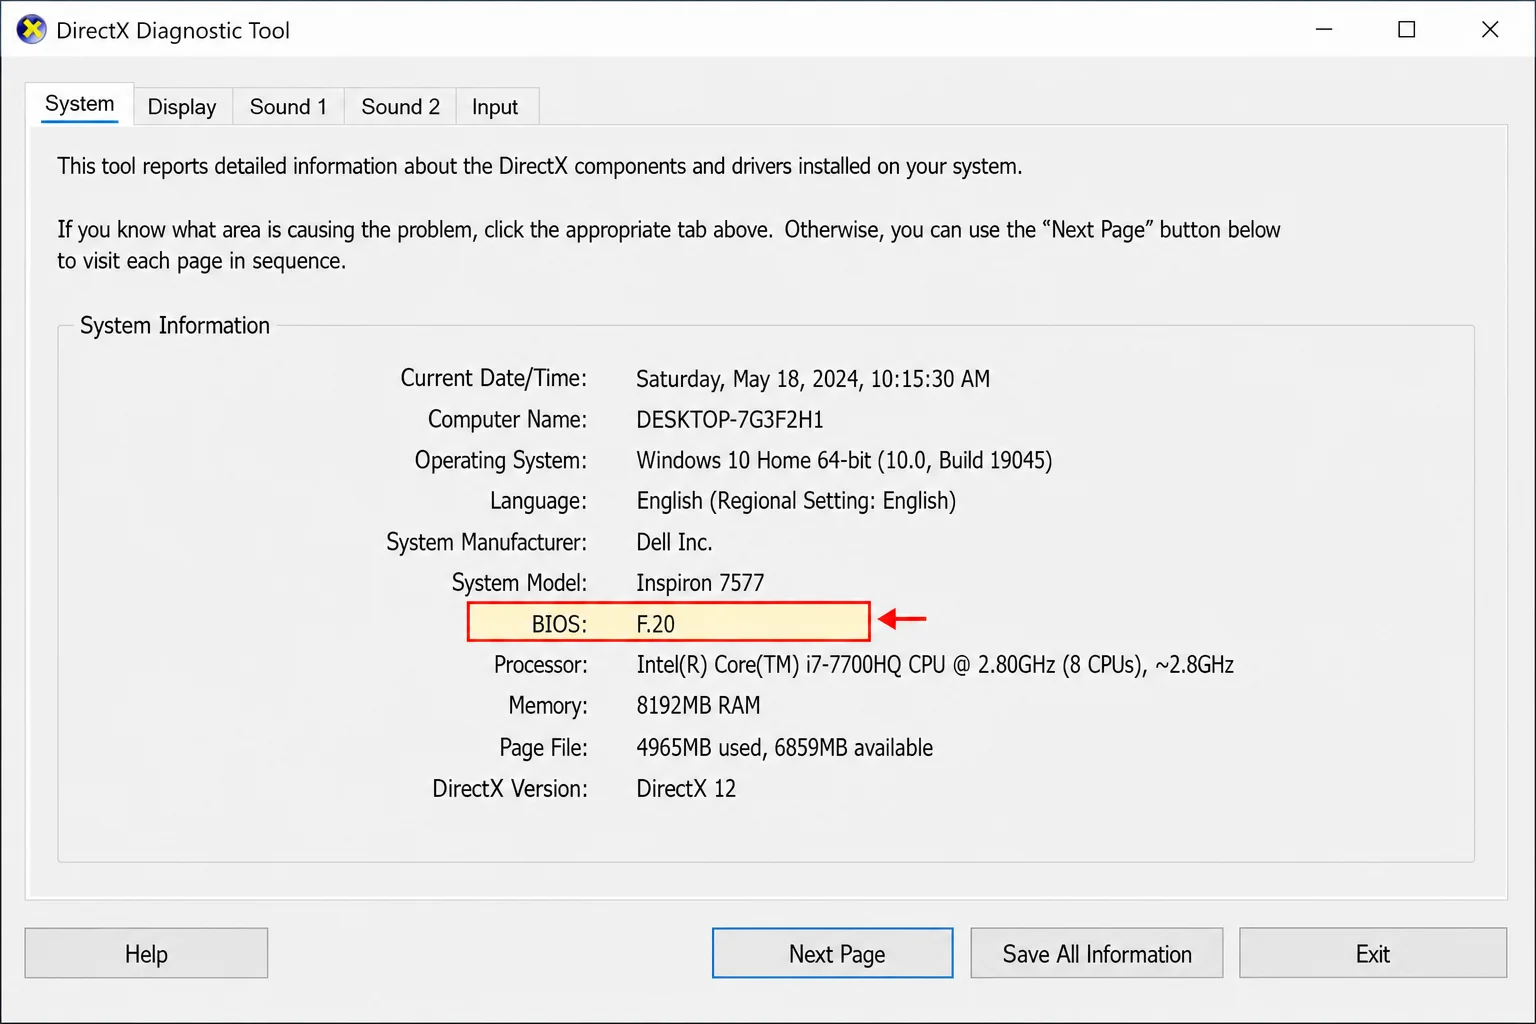
Most people only know dxdiag as a graphics troubleshooting tool, but it also shows your BIOS version right on the main System tab. Handy if you’ve already got it open for another reason!
Step 1: Open dxdiag
Press Windows + R, type dxdiag, and press Enter. If it asks whether you want to check for WHQL digital signatures, click Yes.
Step 2: Check the System Tab
On the System tab, scroll down to find the BIOS field. It’ll show the vendor name and version number.
Method 4: Your Manufacturer’s App
If you’re on a brand-name laptop or desktop from Dell, HP, Lenovo, or ASUS, there’s a good chance you already have an app installed that shows your BIOS version and can even check for updates. This is honestly one of the most convenient options because it does the comparison work for you.
- ASUS (MyASUS): Open MyASUS from the Start menu, go to System Info, and look under Firmware for the BIOS version.
- Dell (SupportAssist or Dell Command | Update): Open the app and check the system information section. It’ll show your current BIOS version and flag any available updates.
- Lenovo (Lenovo Vantage): Go to Device → My Device Settings → System Update to see your current firmware version and check for updates.
- HP (HP Support Assistant): Open the app, navigate to your device, and look in the system information or updates section for BIOS/firmware details.
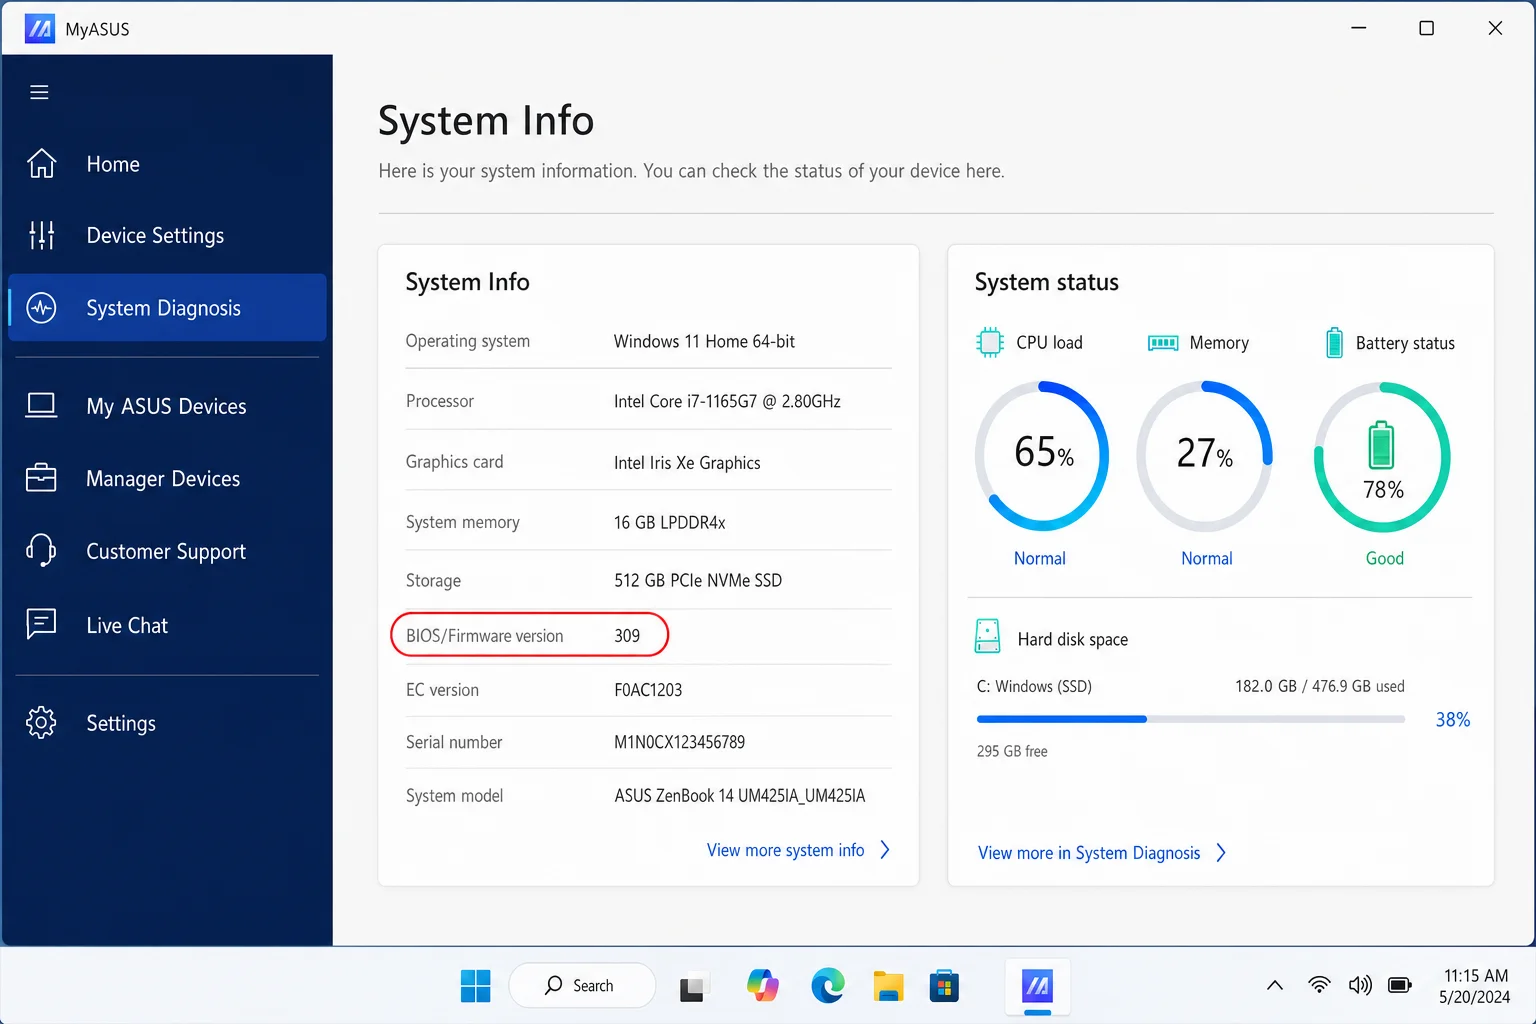
These apps are worth checking even if you just want to see whether a newer BIOS version is available. They’ll tell you right there without any manual version comparison needed.
Method 5: Enter the BIOS/UEFI Setup at Boot
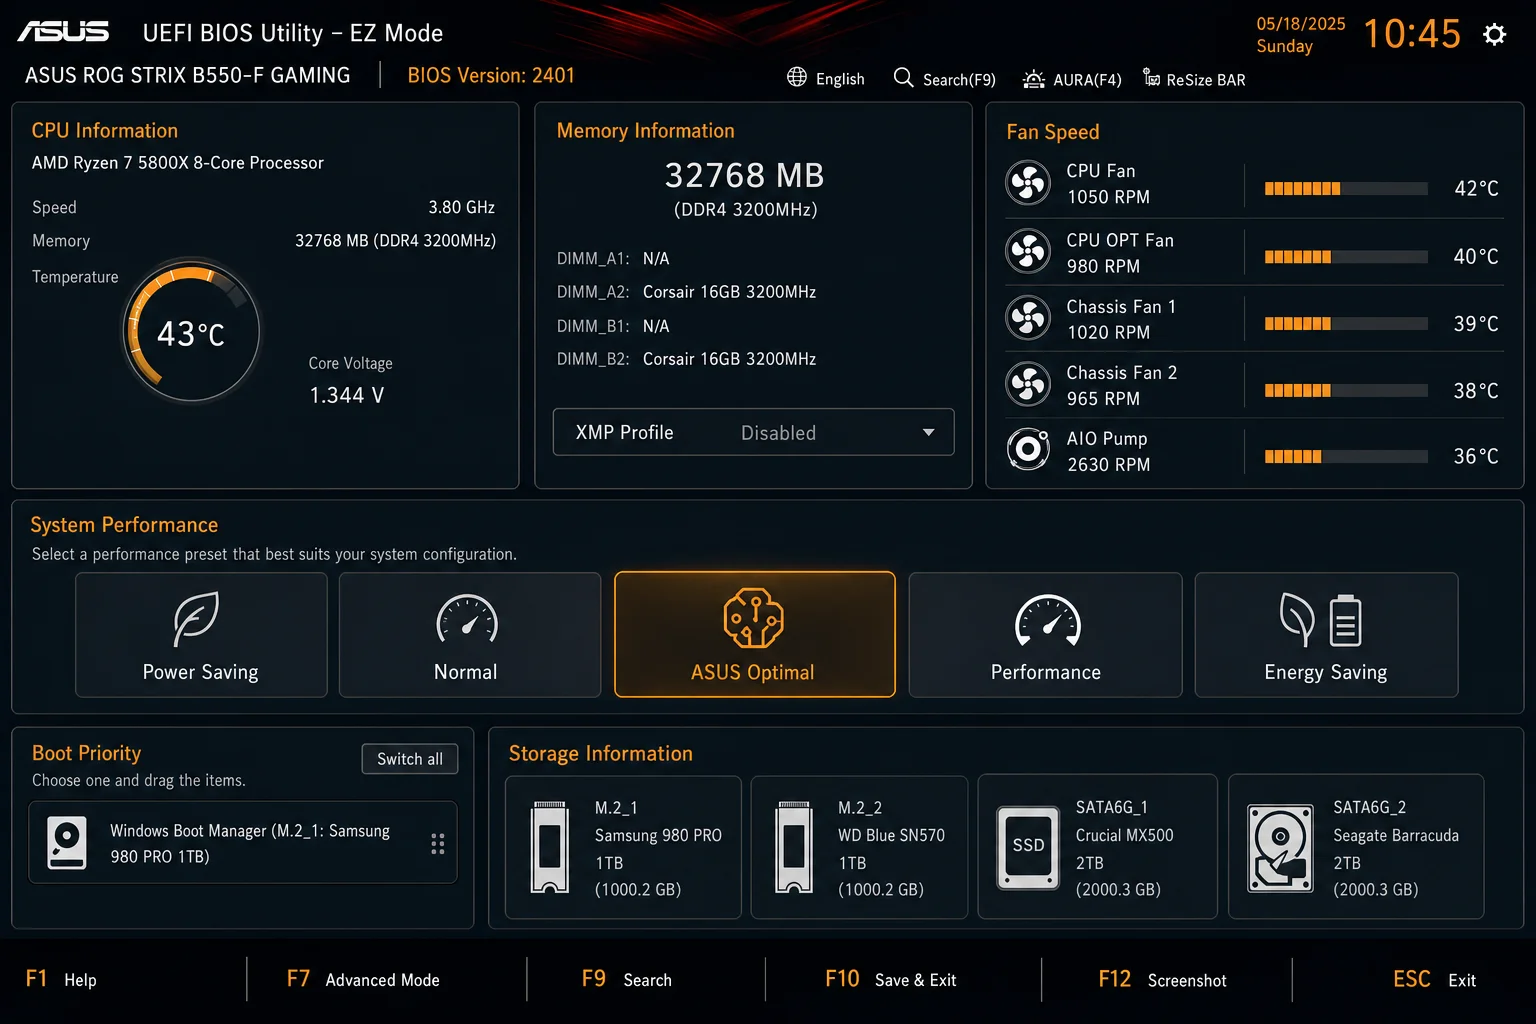
This one requires a restart, but it’s useful if Windows isn’t booting or you just want to poke around in the firmware settings. The BIOS/UEFI version is almost always displayed right on the main screen when you enter setup.
Option A: Press the BIOS Key at Startup
Step 1: Restart Your PC
Click Start > Power > Restart.
Step 2: Press the BIOS Key Repeatedly
As soon as the screen goes black, start tapping the BIOS entry key. Common keys by manufacturer:
- ASUS:
DelorF2 - Dell:
F2orF12 - HP:
F10orEsc - Lenovo:
F1,F2, orFn + F2 - MSI / Gigabyte / ASRock:
Del
Your PC will usually flash a message like “Press DEL to enter Setup” for a second or two, so keep an eye out for it.
Step 3: Find the Version on the Main Screen
On most modern UEFI interfaces, the version number is displayed right on the home/EZ Mode screen. On older text-mode BIOS screens, check the Main or Information tab.
Option B: Boot into UEFI from Windows (If Your PC Boots Too Fast)
Modern PCs with fast boot enabled can be nearly impossible to interrupt with a keypress. By the time you blink, Windows is already loading. Here’s how to get into UEFI firmware settings without the timing gymnastics:
Step 1: Open Windows Settings
Press Windows + I to open Settings.
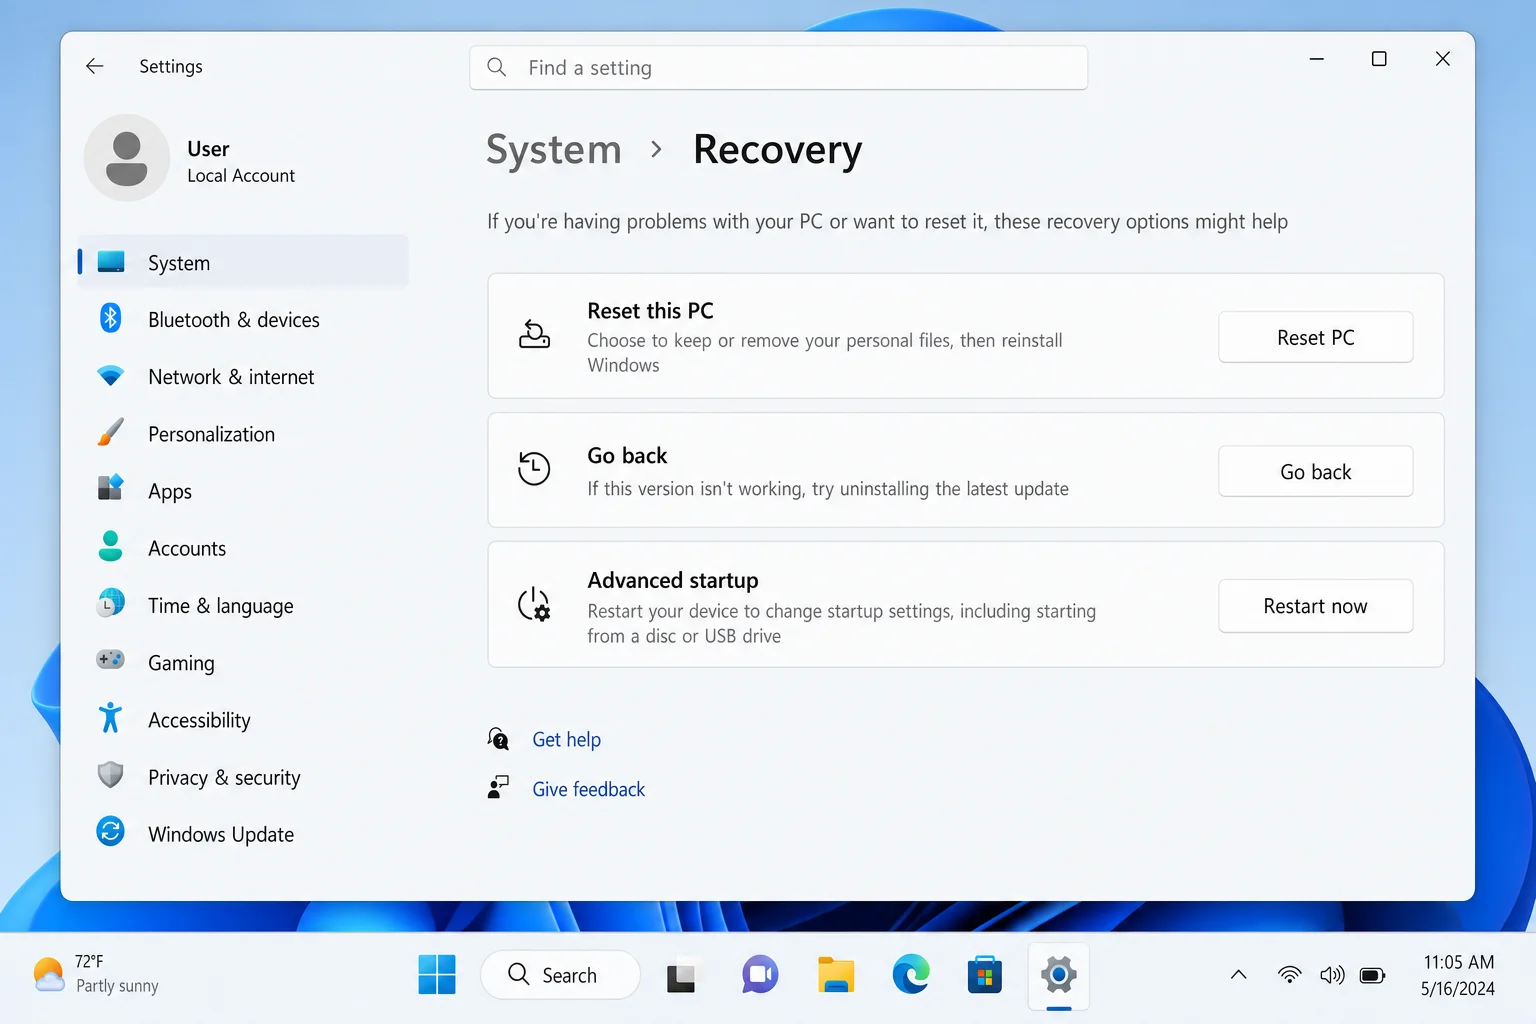
Step 2: Go to Recovery Settings
Click System > Recovery.
Step 3: Restart into Advanced Startup
Under Advanced startup, click Restart now. Your PC will reboot to a blue menu screen.
Step 4: Navigate to UEFI Firmware Settings
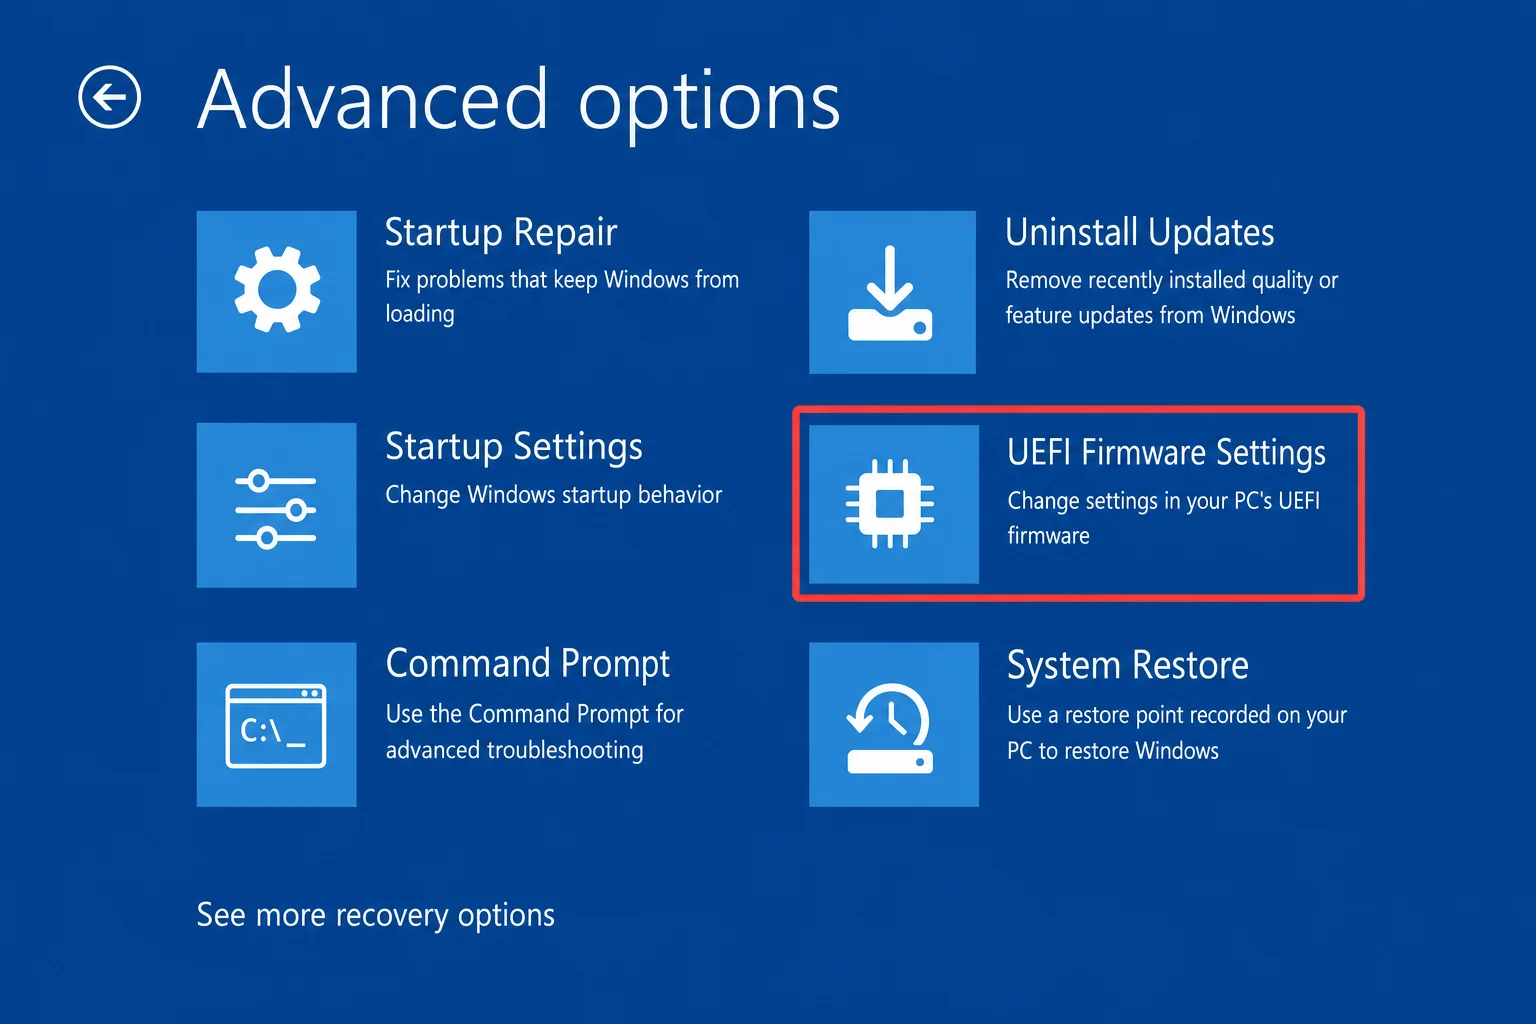
From the blue menu, choose Troubleshoot > Advanced options > UEFI Firmware Settings, then click Restart. Your PC will boot directly into the UEFI setup, no key-mashing required.
Once You Have the Version, Now What?
Now that you know your BIOS version, here’s what to do with it:
- Find your model: In System Information, note the BaseBoard Manufacturer and BaseBoard Product (for custom-built PCs) or your laptop/desktop model name.
- Visit the manufacturer’s support page: Head to your motherboard or PC brand’s website (ASUS, MSI, Dell, HP, Lenovo, etc.) and look up your model’s BIOS/firmware downloads.
- Compare versions: Check the latest available BIOS version against what you have. If yours is older, read the release notes to see what changed.
Should You Actually Update Your BIOS?
This is where things get a little nuanced. The old rule of thumb was “don’t update your BIOS unless you have a specific reason to,” and that’s still mostly good advice. A failed BIOS update can leave your PC completely unbootable, so it’s not something to do casually.
That said, the calculus has shifted a bit in 2026. Here’s when updating actually makes sense:
- Security fixes: Firmware vulnerabilities are real, and manufacturers now regularly patch them. If your vendor releases a BIOS update with security fixes, it’s worth taking seriously, especially on business or internet-connected machines.
- Hardware compatibility: Upgrading to a new CPU or adding RAM that isn’t being recognized? A BIOS update might be required.
- Stability fixes: If the release notes mention a bug that matches something you’re experiencing, go for it.
- No specific reason: If everything is working fine and the update is just a minor revision, you can safely skip it.
Tips and Troubleshooting
Common Issues
Problem: Windows updated my BIOS and now it’s asking for a BitLocker recovery key
This one catches a lot of people off guard. Some OEMs push BIOS updates through Windows Update, and when the firmware changes, BitLocker (Windows’ built-in drive encryption) can detect the change and ask for your recovery key before letting you in. To avoid getting locked out:
- Make sure your BitLocker recovery key is saved somewhere safe before any BIOS update, such as your Microsoft account, a printout, or a USB drive.
- After entering the recovery key once, your PC should go back to normal on the next boot.
- If you’re an IT admin managing multiple machines, Microsoft recommends suspending BitLocker before planned BIOS updates.
Problem: The version number on the manufacturer’s website doesn’t match what I see in Windows
BIOS version numbering is notoriously inconsistent. You might see F.41 on your PC and F41 on the website, or 1.3.4 vs 1.3.40. Don’t try to math it out. Just rely on the release date to compare, or use your manufacturer’s own update tool (like Dell Command | Update or Lenovo Vantage), which understands its own versioning scheme.
Problem: I can’t press F2 fast enough, Windows boots before I can get in
Use the Windows method instead: Settings > System > Recovery > Advanced startup > Restart now, then go to Troubleshoot > Advanced options > UEFI Firmware Settings. No timing required.
Problem: I have a custom-built PC and don’t know which manufacturer to check
Use System Information (msinfo32) and look at BaseBoard Manufacturer and BaseBoard Product. That’ll tell you the exact motherboard brand (ASUS, MSI, Gigabyte, ASRock, etc.) and model, so you know exactly where to go for BIOS updates.
Pro Tips
- For IT admins managing many PCs: You can query BIOS versions across your entire fleet using PowerShell with
Get-CimInstance Win32_BIOSvia remote management tools like Intune or Action1, so there’s no need to check each machine manually. - Lansweeper users: Lansweeper has a built-in BIOS Version Audit report that lists every device’s firmware version and flags outdated systems, which is great for compliance and inventory tracking.
- Mac users: Macs don’t have a user-accessible BIOS. Apple controls firmware updates entirely through macOS system updates (like macOS Sequoia), so there’s nothing to check or update manually on your end.
Wrapping Up
Finding your BIOS version is one of those things that sounds intimidating until you actually do it, and then you realize it takes about 30 seconds. The quickest route is msinfo32 (press Windows + R, type it in, done), but any of the five methods above will get you there. Once you’ve got the version number, you can check your manufacturer’s site or use their support app to see if an update is worth considering.
Just remember: updating your BIOS isn’t something to do on a whim, but it’s also not something to be scared of if there’s a legitimate reason, especially if there’s a security fix involved. When in doubt, read the release notes and let your manufacturer’s update tool do the heavy lifting.
| Method | Tool Used | Requires Reboot? | Best For |
|---|---|---|---|
| System Information | msinfo32 | No | Quickest all-around option |
| Command Prompt | wmic / PowerShell | No | Scripts and quick checks |
| DirectX Diagnostic | dxdiag | No | If you already have it open |
| Manufacturer App | MyASUS, Vantage, etc. | No | Also checks for updates |
| BIOS/UEFI Setup | Firmware screen | Yes | When Windows won’t boot |