

Got a paper due and your professor wants it in MLA format? You’re in the right place. MLA formatting has a reputation for being fussy. The margins, the running header, the hanging indents can all feel overwhelming, but once you know where everything lives in Microsoft Word, it actually comes together pretty quickly.
This guide walks you through every MLA requirement step by step, based on the current MLA Handbook, 9th edition. Whether you’re using Word for Microsoft 365 on Windows or Mac, or working in Word for the web, we’ve got you covered. By the end, you’ll have a properly formatted document ready to go, no formatting panic required.
What Is MLA Format?
MLA format is a set of formatting and citation rules published by the Modern Language Association, a professional organization for language and literature scholars. It’s the standard style used in English, humanities, and liberal arts courses at most colleges and universities.
The current version is the MLA Handbook, 9th edition, which hasn’t changed since 2021, so everything here is fully up to date. Here’s a quick summary of what MLA requires:
- 1-inch margins on all sides
- Readable font at 11–12 pt (Times New Roman 12 pt is the classic choice)
- Double spacing throughout, no extra gaps between paragraphs
- 0.5-inch first-line indent for every paragraph
- Running header with your last name and page number, top-right on every page
- First-page heading with your name, instructor’s name, course, and date (no separate title page needed)
- Centered title in plain text, no bold, no underline, no quotation marks
- Works Cited page at the end, on its own page, with hanging indents
Before You Begin
These steps work with:
- Word for Microsoft 365 (Windows or macOS), recommended
- Word 2019 or Word 2021 (Windows or macOS)
- Word for the web (browser-based, via Office.com)
The desktop versions of Word (Windows and Mac) have nearly identical ribbon menus, so the steps are the same for both unless noted. Word for the web works similarly but has a slightly different layout. We’ll flag any differences as we go.
How to Set Up MLA Format in Word
Work through these steps in order on a fresh, blank document. Each one tackles a specific MLA requirement.
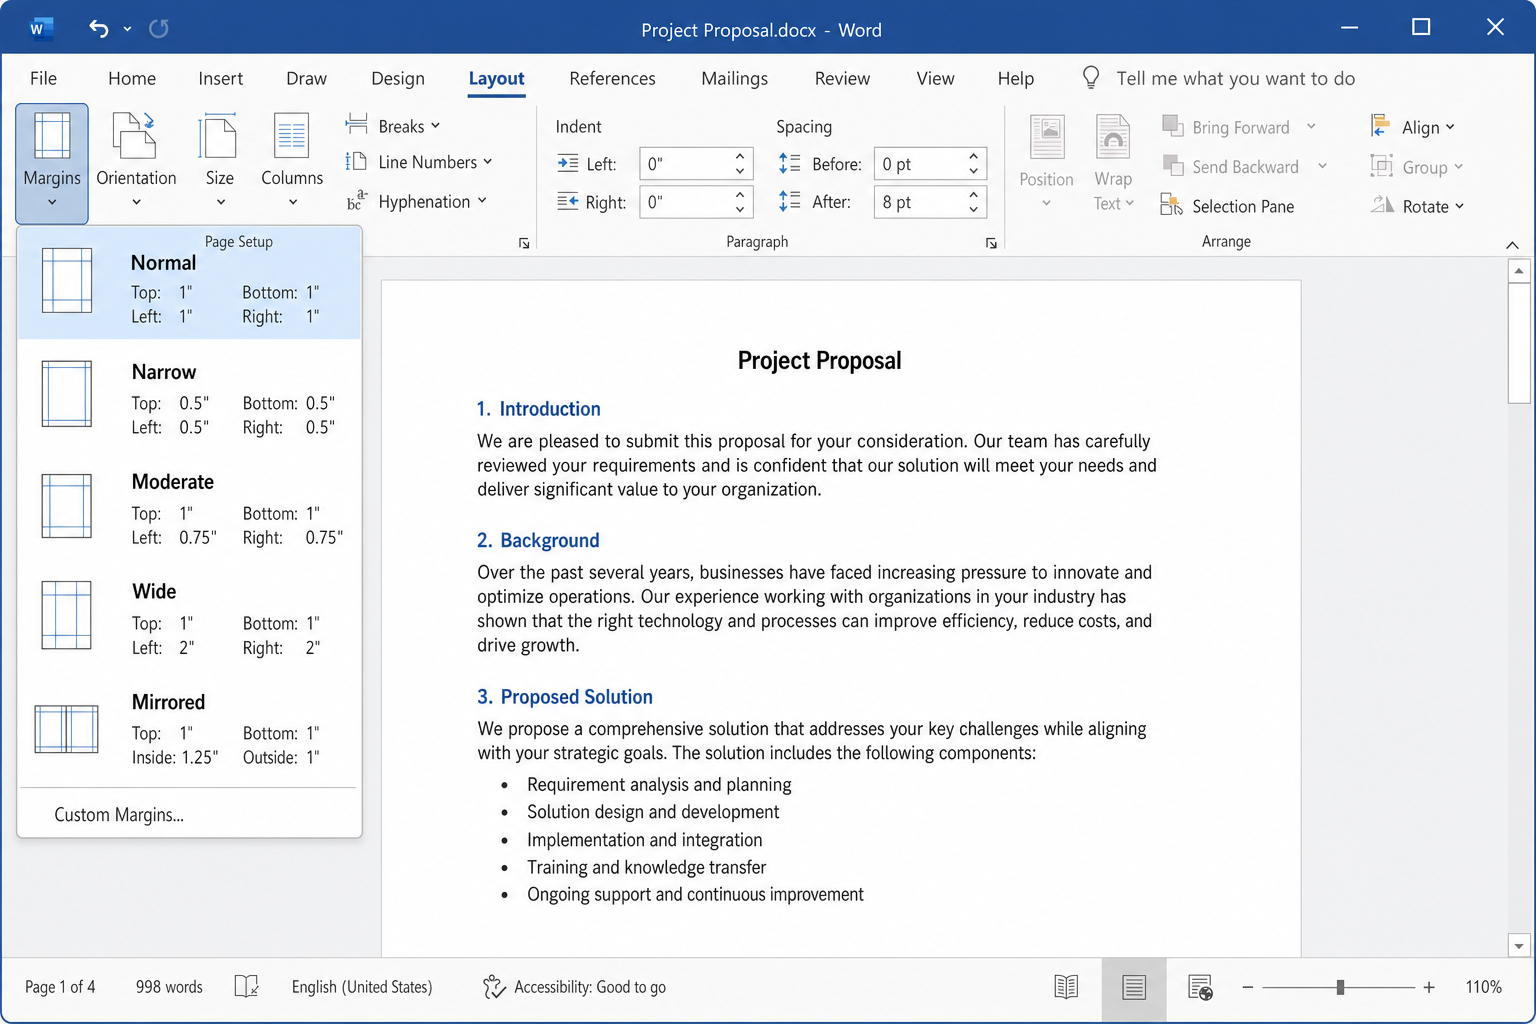
Step 1: Set Your Margins to 1 Inch
Word’s default margins are already 1 inch, but it’s worth double-checking, especially if you’re working from an existing document.
- Click the Layout tab in the ribbon at the top.
- Click Margins.
- Select Normal from the dropdown, that’s the 1-inch-on-all-sides preset.
If you want to be extra sure, click Custom Margins instead and manually set Top, Bottom, Left, and Right all to 1″, then click OK.
Step 2: Choose Your Font and Size
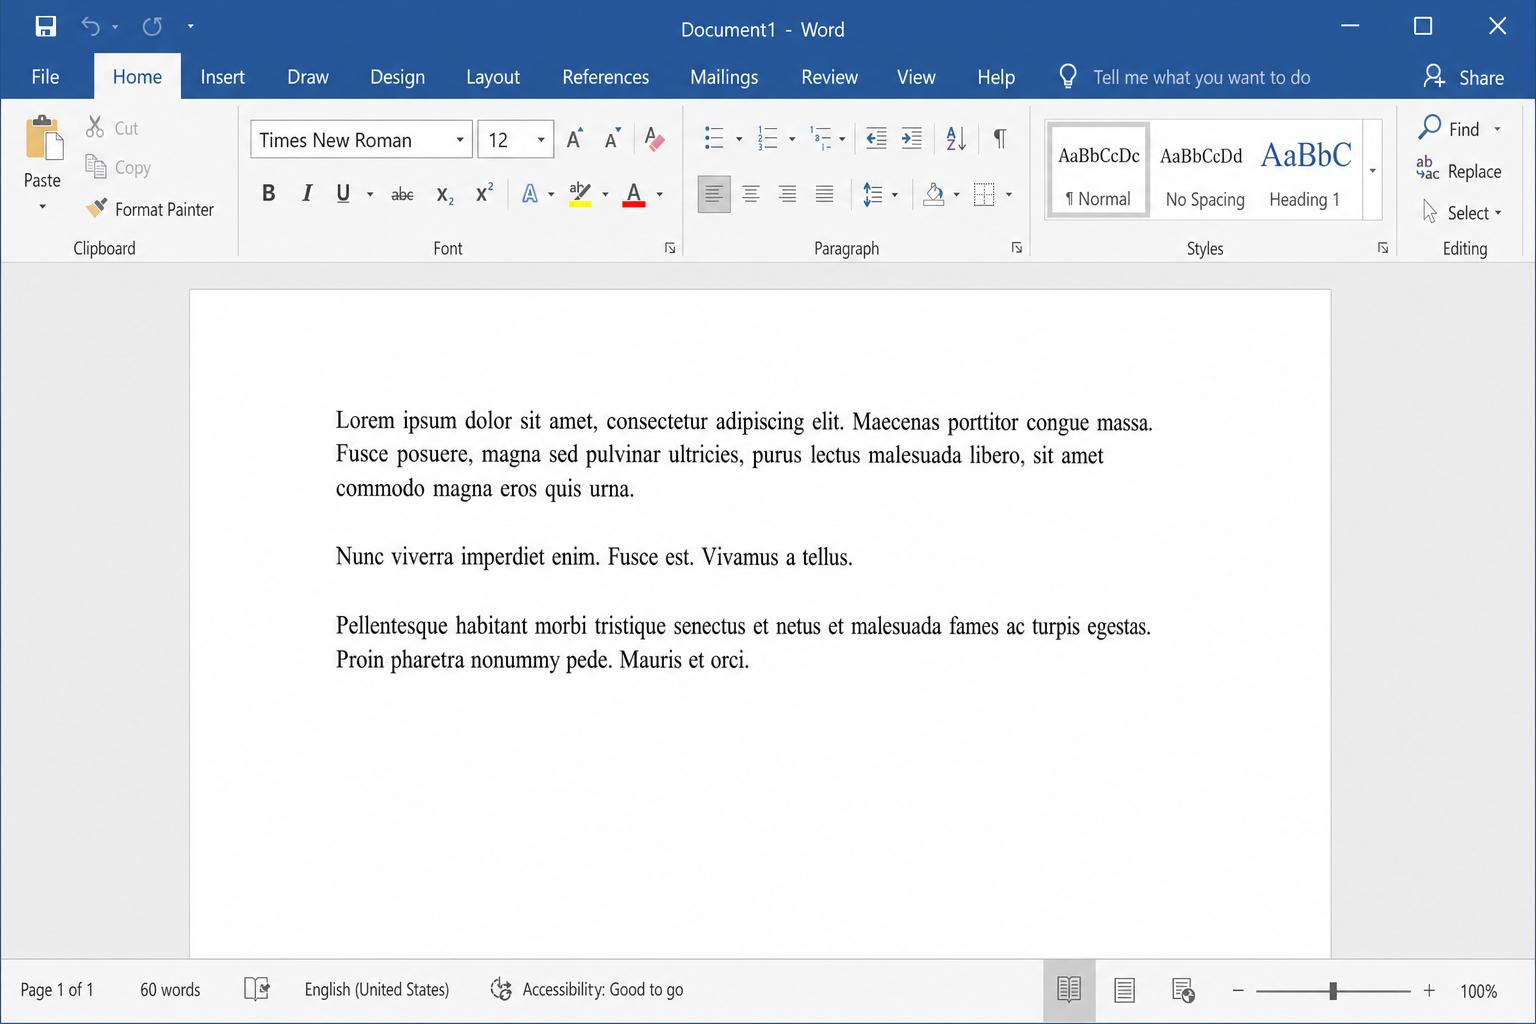
MLA 9 doesn’t lock you into Times New Roman specifically. It just asks for a “legible, standard font.” That said, Times New Roman 12 pt is what most instructors expect, so it’s the safest bet. Arial 12 pt and Aptos 11–12 pt are also acceptable if your assignment allows it.
- Click the Home tab.
- In the Font group, click the font name dropdown and select Times New Roman (or your preferred MLA-appropriate font).
- Click the font size dropdown next to it and select 12.
Do this before you start typing so the whole document uses the right font from the start.
Step 3: Set Double Spacing (and Remove Extra Gaps)
This is where a lot of people trip up. Just clicking “2.0” for line spacing isn’t enough. Word often adds extra space after each paragraph by default, which messes up your MLA formatting. You need to kill that extra spacing too.
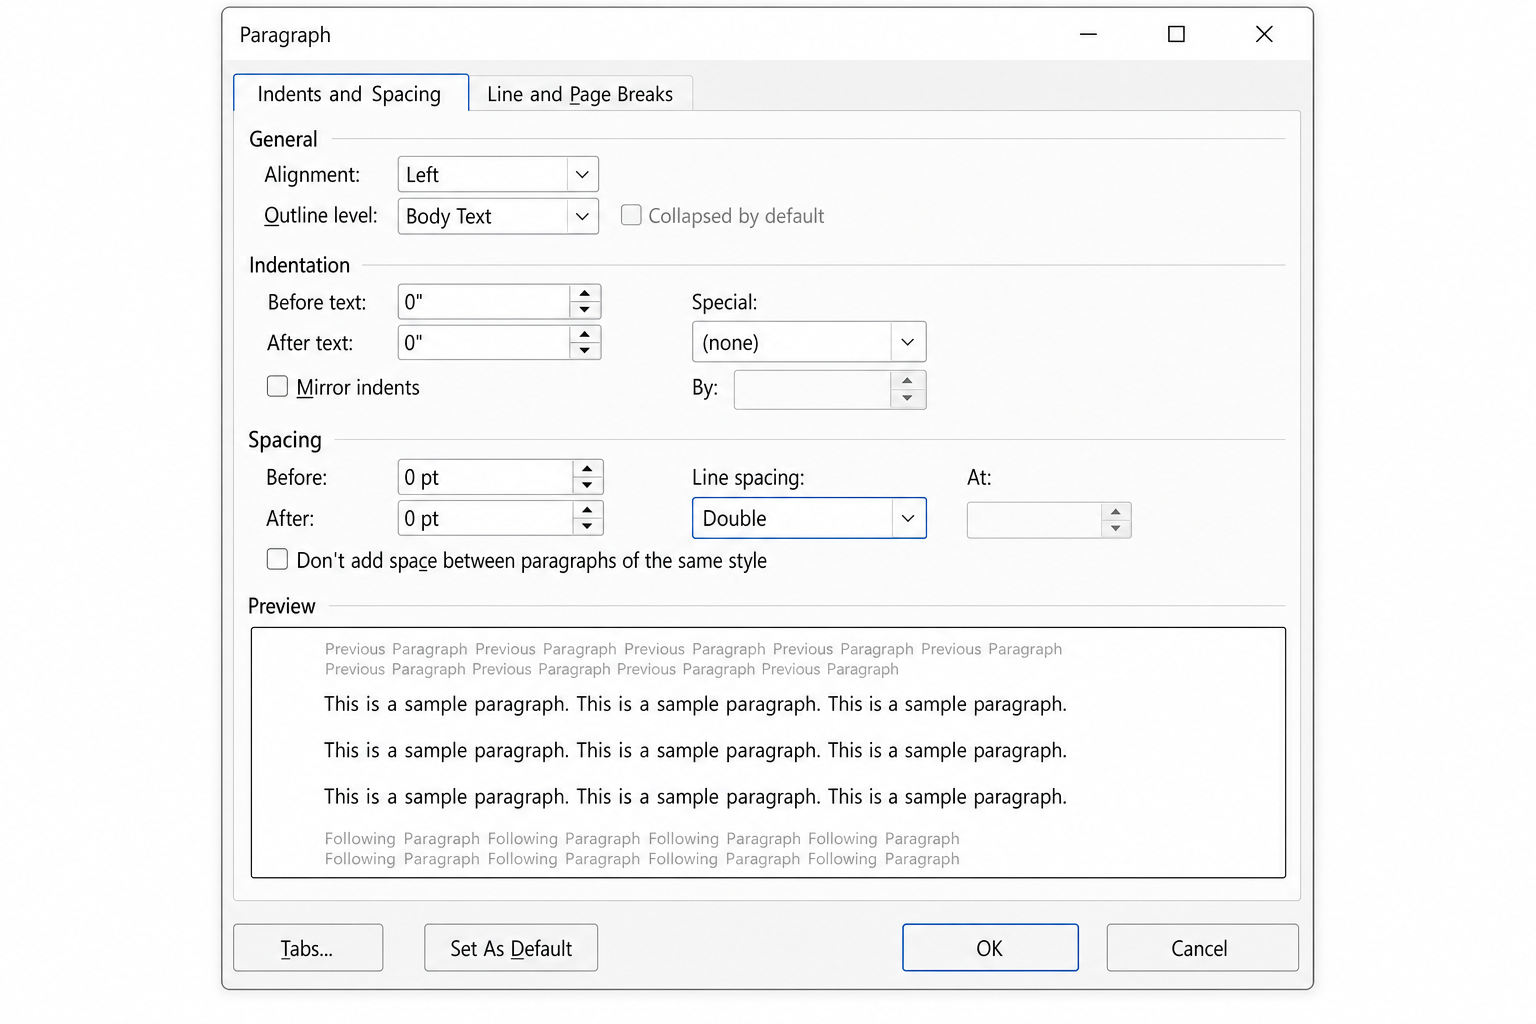
- On the Home tab, find the Paragraph group and click the small arrow in the bottom-right corner to open the Paragraph dialog box.
- Under Spacing, set Before to 0 pt and After to 0 pt.
- Set Line spacing to Double using the dropdown.
- Click OK.
Word for the web: On the Home tab, click the line spacing icon (or the … overflow menu if you don’t see it), select 2 for double spacing, then click Remove Space After Paragraph to clear the extra gap.
Step 4: Set the First-Line Indent
Every paragraph in your paper needs a 0.5-inch indent on the first line. (Quick note: skip this for your heading block and title. Just apply it when you start the body of your paper.)
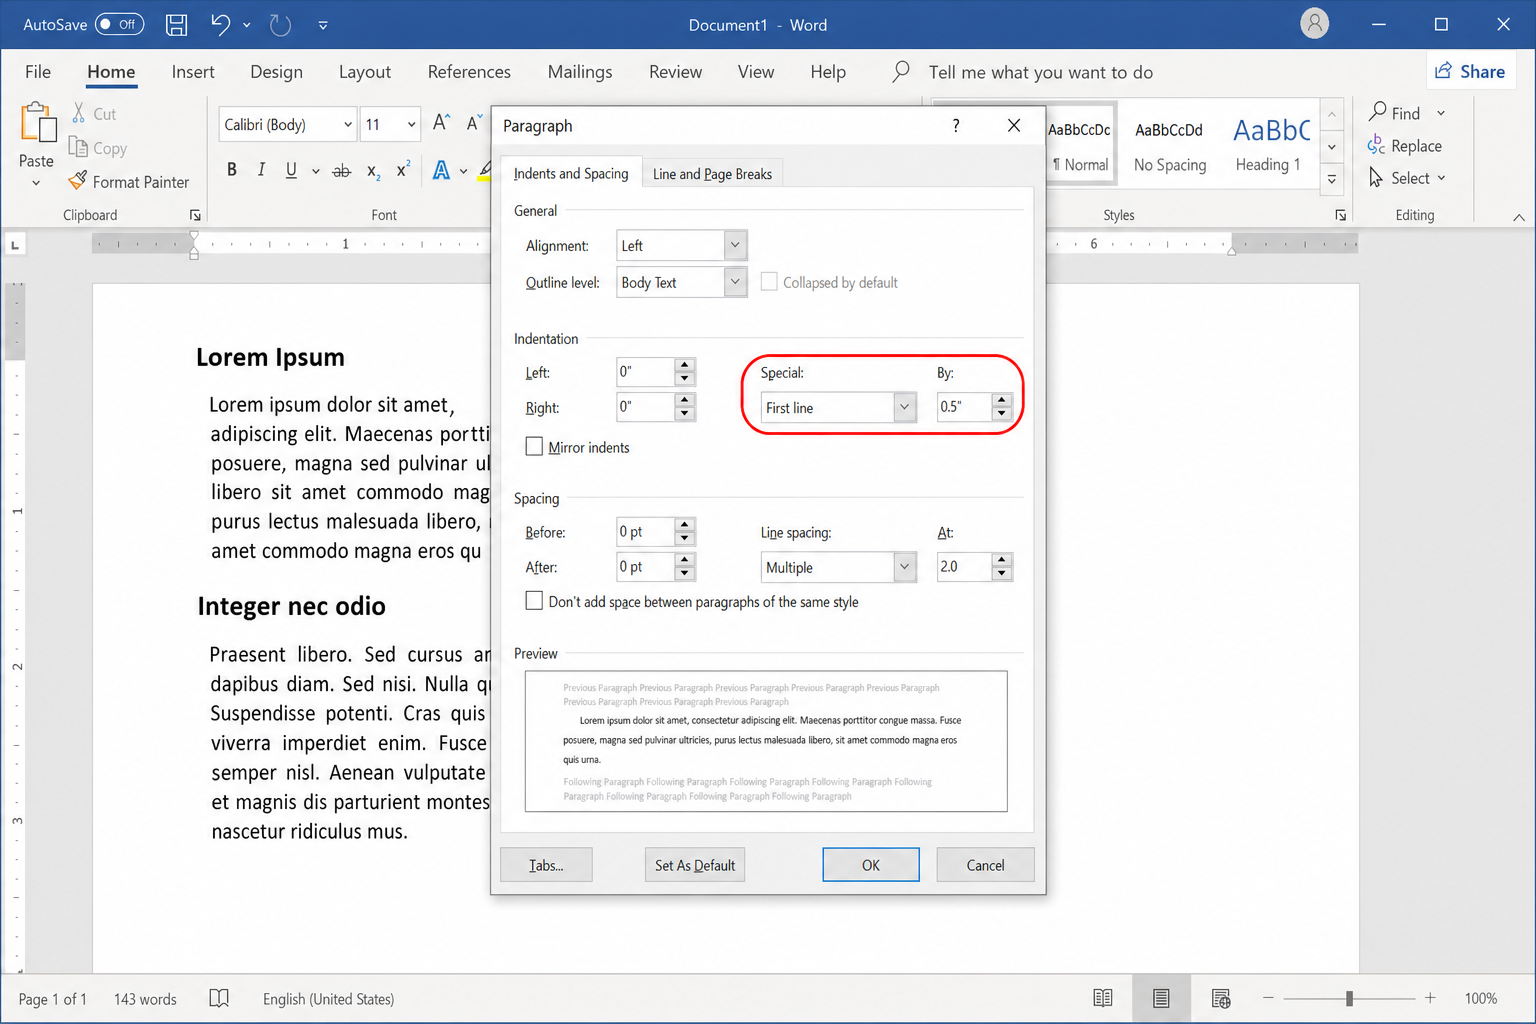
- Open the Paragraph dialog again (click the small arrow in the Paragraph group on the Home tab).
- Under Indentation, find the Special drop-down menu and select First line.
- Make sure the By field shows 0.5″, that’s the MLA-standard indent.
- Click OK.
Step 5: Add the Running Header (Last Name + Page Number)
MLA requires your last name and the page number to appear in the top-right corner of every page, like “Smith 2” on page 2. The trick is to let Word handle the page numbers automatically so you never have to update them manually.
- Double-click in the top margin of your document to open the header area. (Alternatively, go to Insert > Header > Blank.)
- Make sure the font in the header matches your document (Times New Roman, 12 pt).
- Type your last name, then press the spacebar once.
- With your cursor right after the space, go to the Header & Footer tab (it appears when you’re in the header area) and click Page Number > Current Position > Plain Number. Word will insert an auto-updating page number right there.
- Select all the text in the header and click the Align Right button on the Home tab so it sits in the top-right corner.
- Double-click back in the body of your document to close the header.
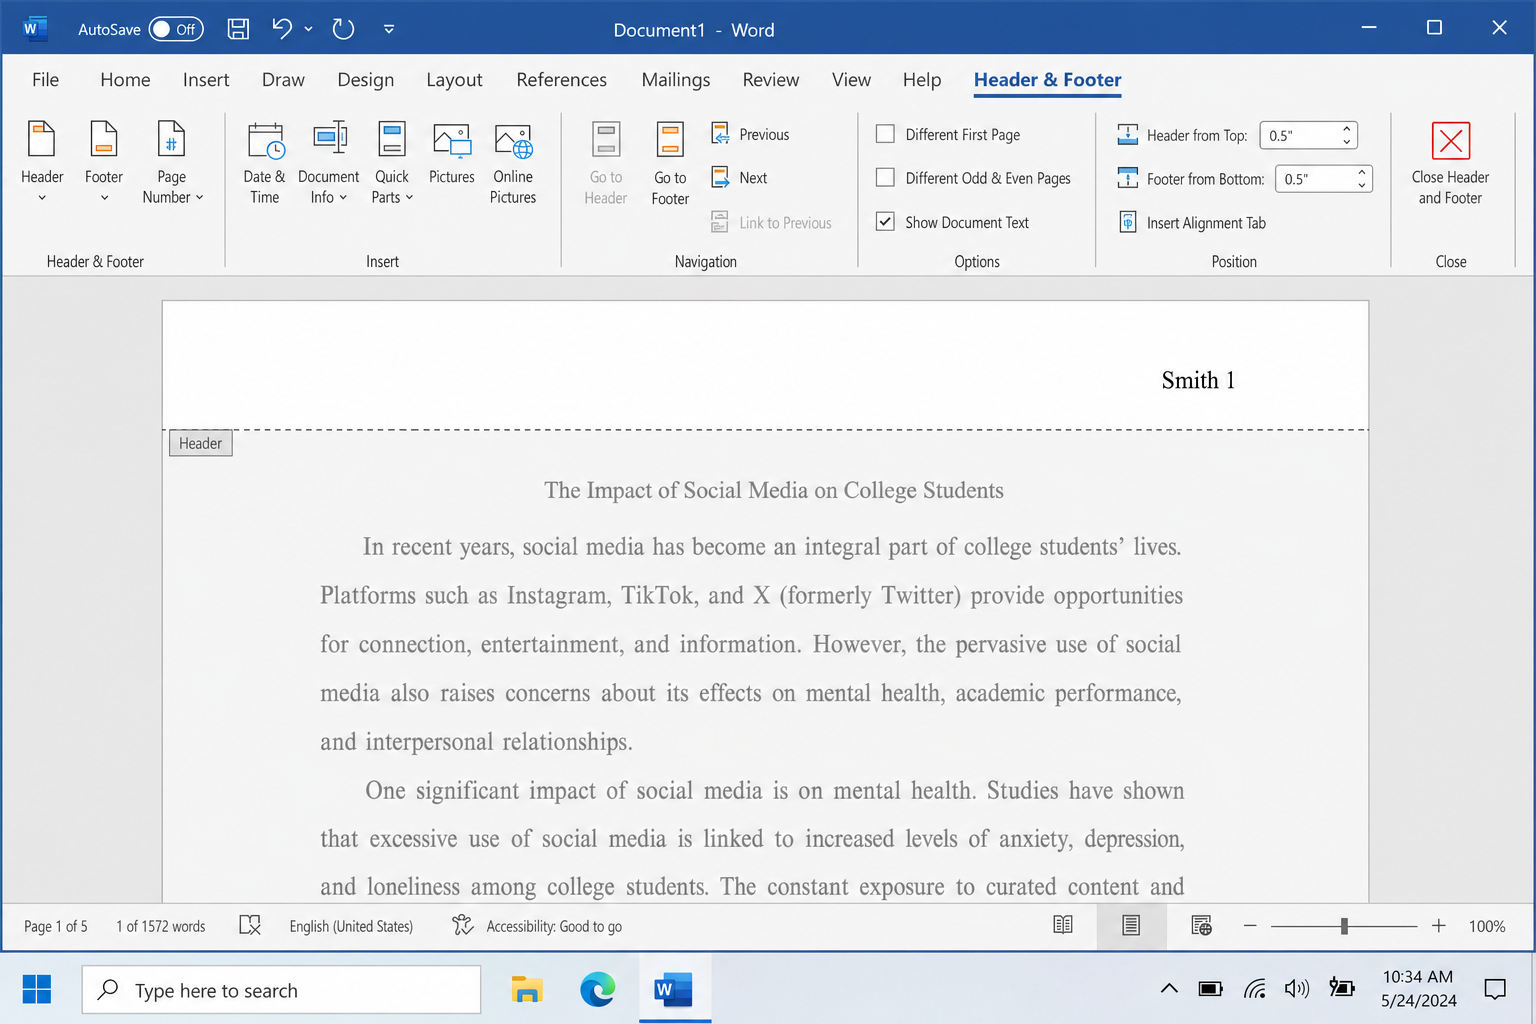
Word for the web: Go to Insert > Page Numbers and choose the top-right position. Then click into the header area, click before the page number placeholder, and type your last name followed by a space.
Step 6: Add the First-Page Heading
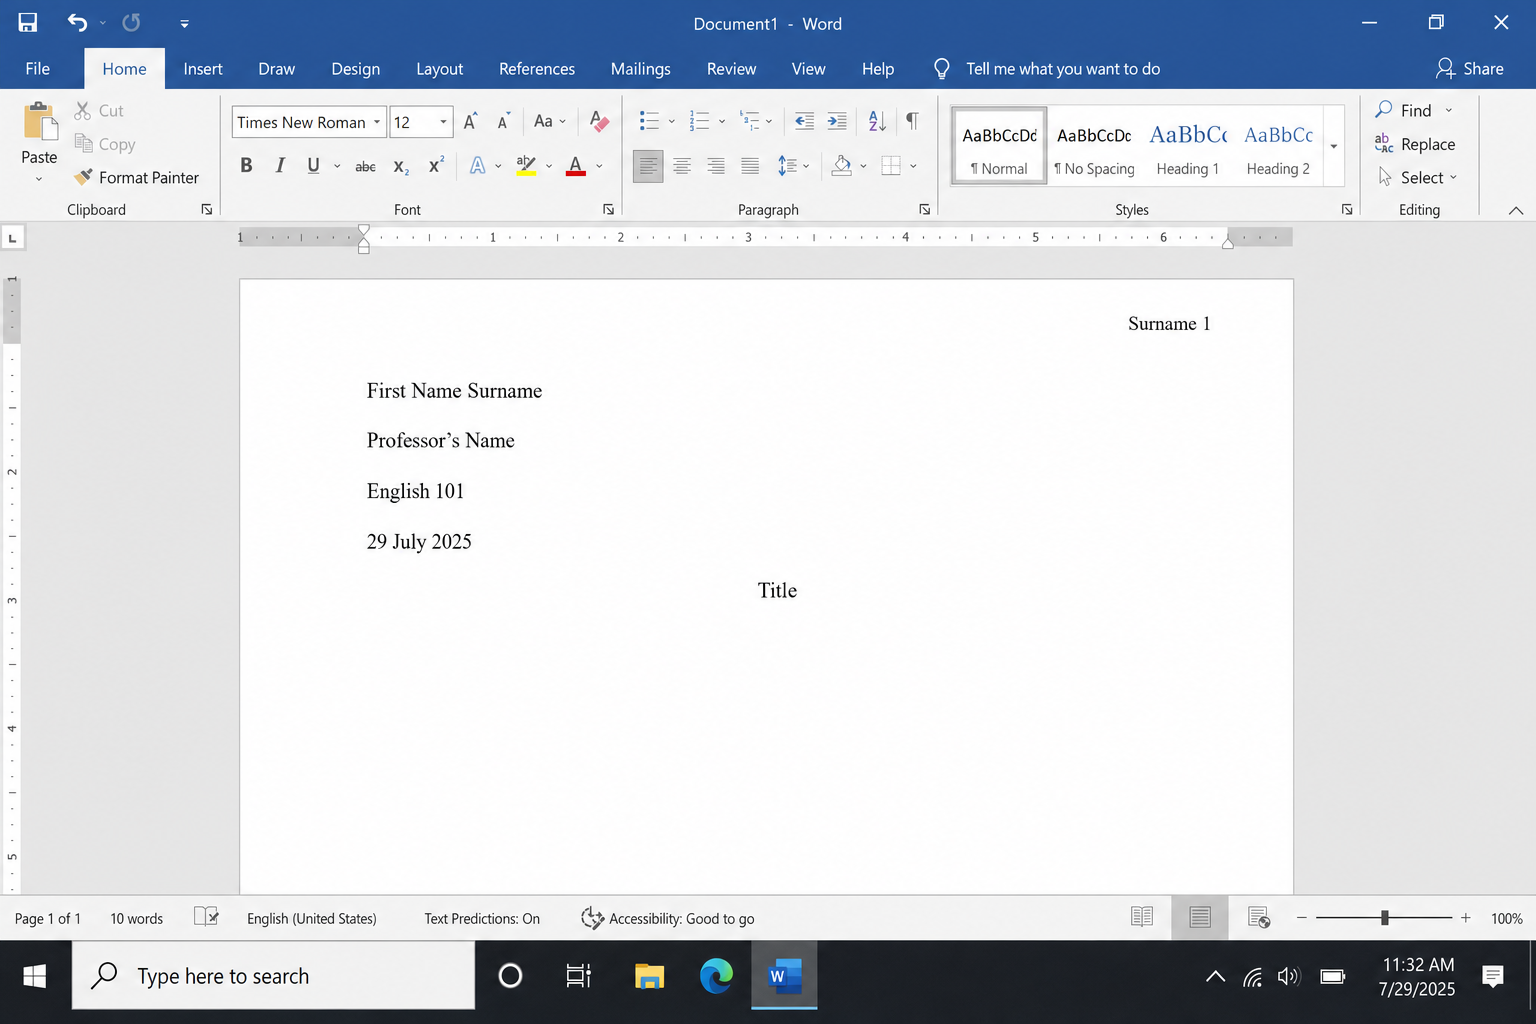
MLA doesn’t use a separate cover page for student papers. Instead, you put your identifying info directly at the top of page one, left-aligned, double-spaced, with no extra blank lines.
On line 1 of your document, type the following, pressing Enter after each line:
- Your full name
- Your instructor’s name
- Your course name and number (e.g., ENG 101)
- The date in MLA format, day, then month written out, then year (e.g.,
15 March 2026)
Don’t add any extra blank lines between these. Just let the double spacing do its thing.
Step 7: Add Your Title
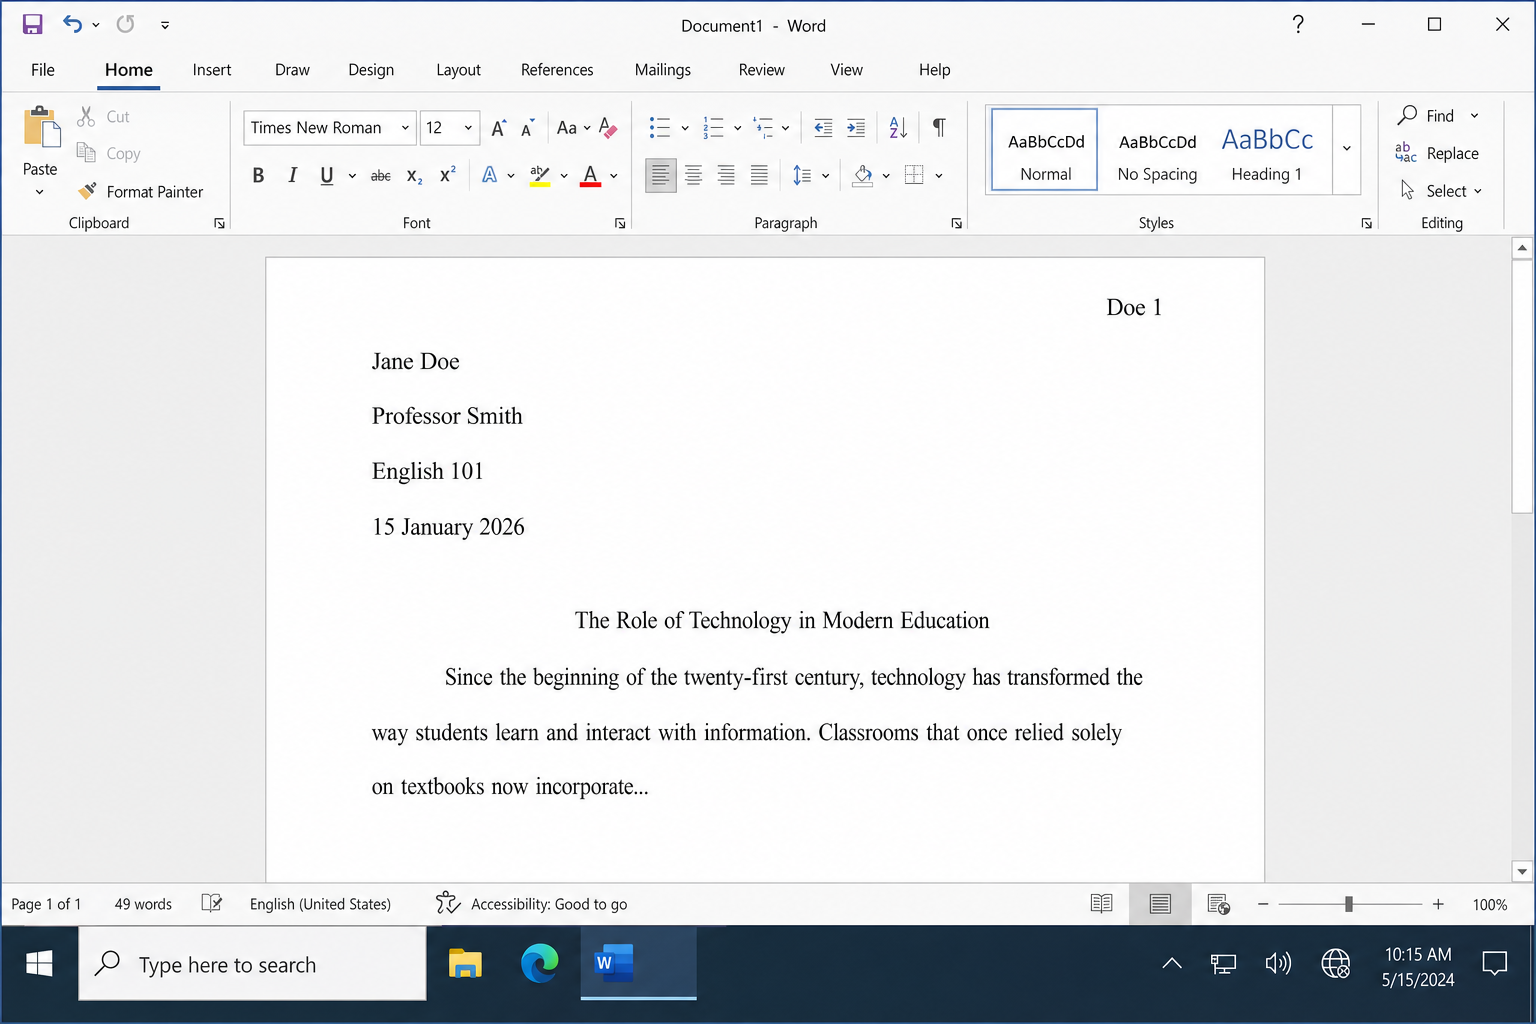
After the date, press Enter once and type your paper’s title. A few rules to remember here:
- Center it using the Center alignment button on the Home tab
- Use title case, capitalize the principal words
- Don’t bold it, underline it, italicize it, or put it in quotation marks
- Use the same font and size as the rest of your paper
After the title, press Enter, switch back to left alignment, and you’re ready to start writing your paper.
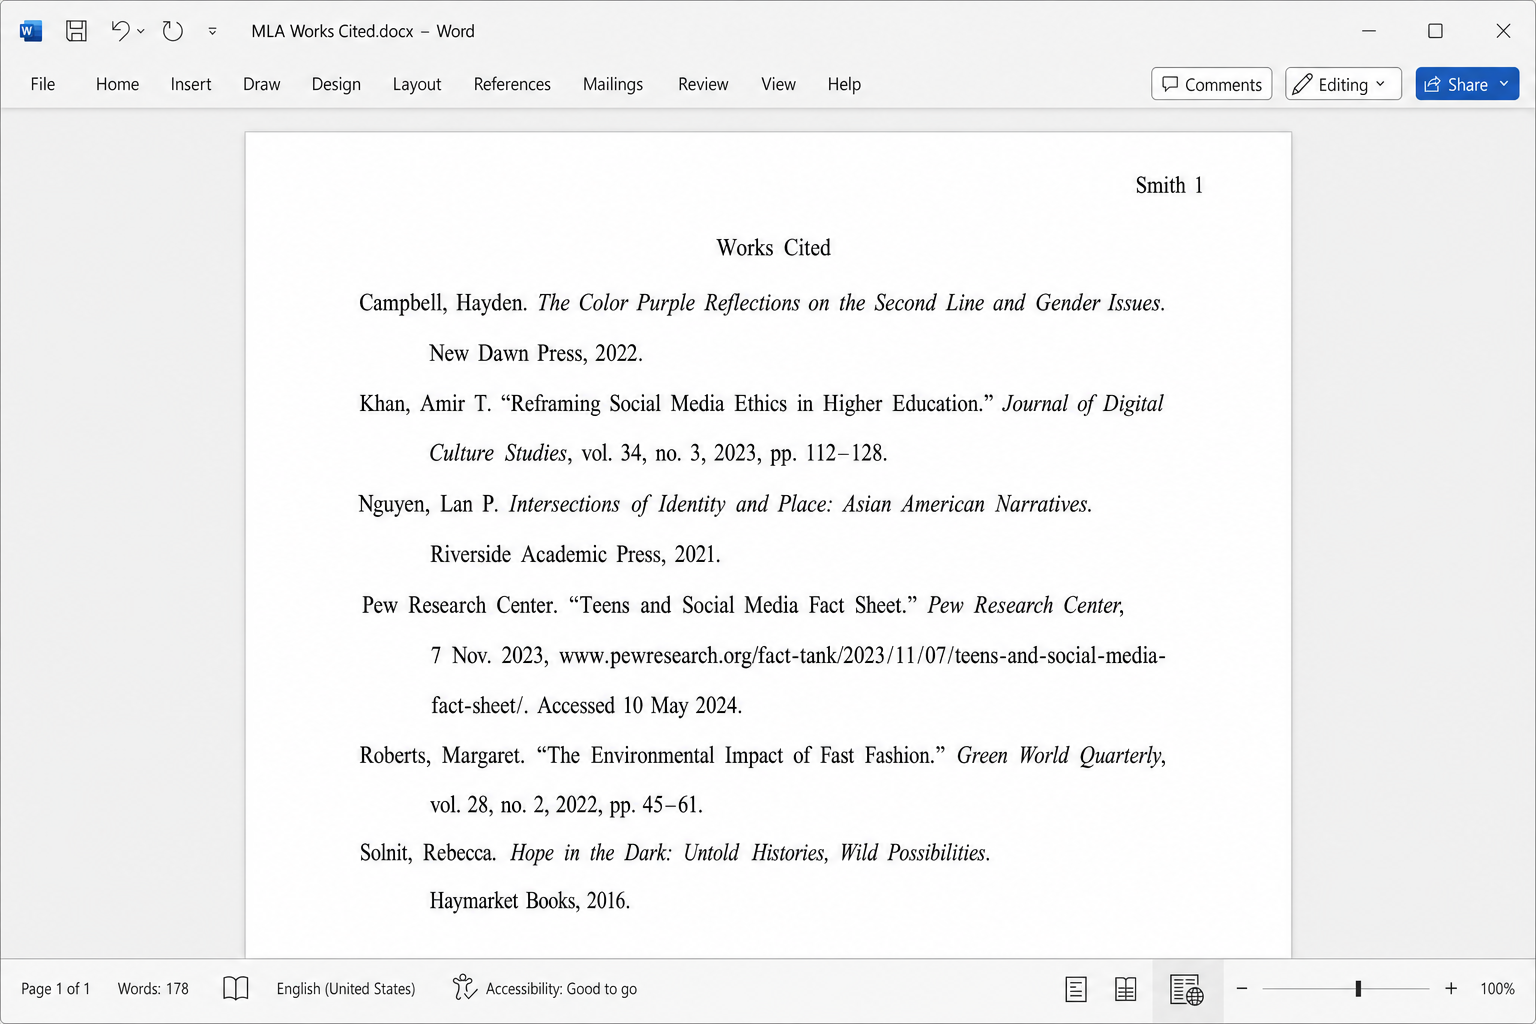
Step 8: Set Up the Works Cited Page
Your Works Cited page goes at the very end of your paper, on its own separate page. Here’s how to set it up correctly:
- At the end of your last paragraph, press
Ctrl + Enter(Windows) orCmd + Enter(Mac) to insert a page break. This pushes your Works Cited to a fresh page without a bunch of empty lines. - Click the Center alignment button and type Works Cited, no bold, no underline, no quotation marks.
- Press Enter, then switch back to Left alignment.
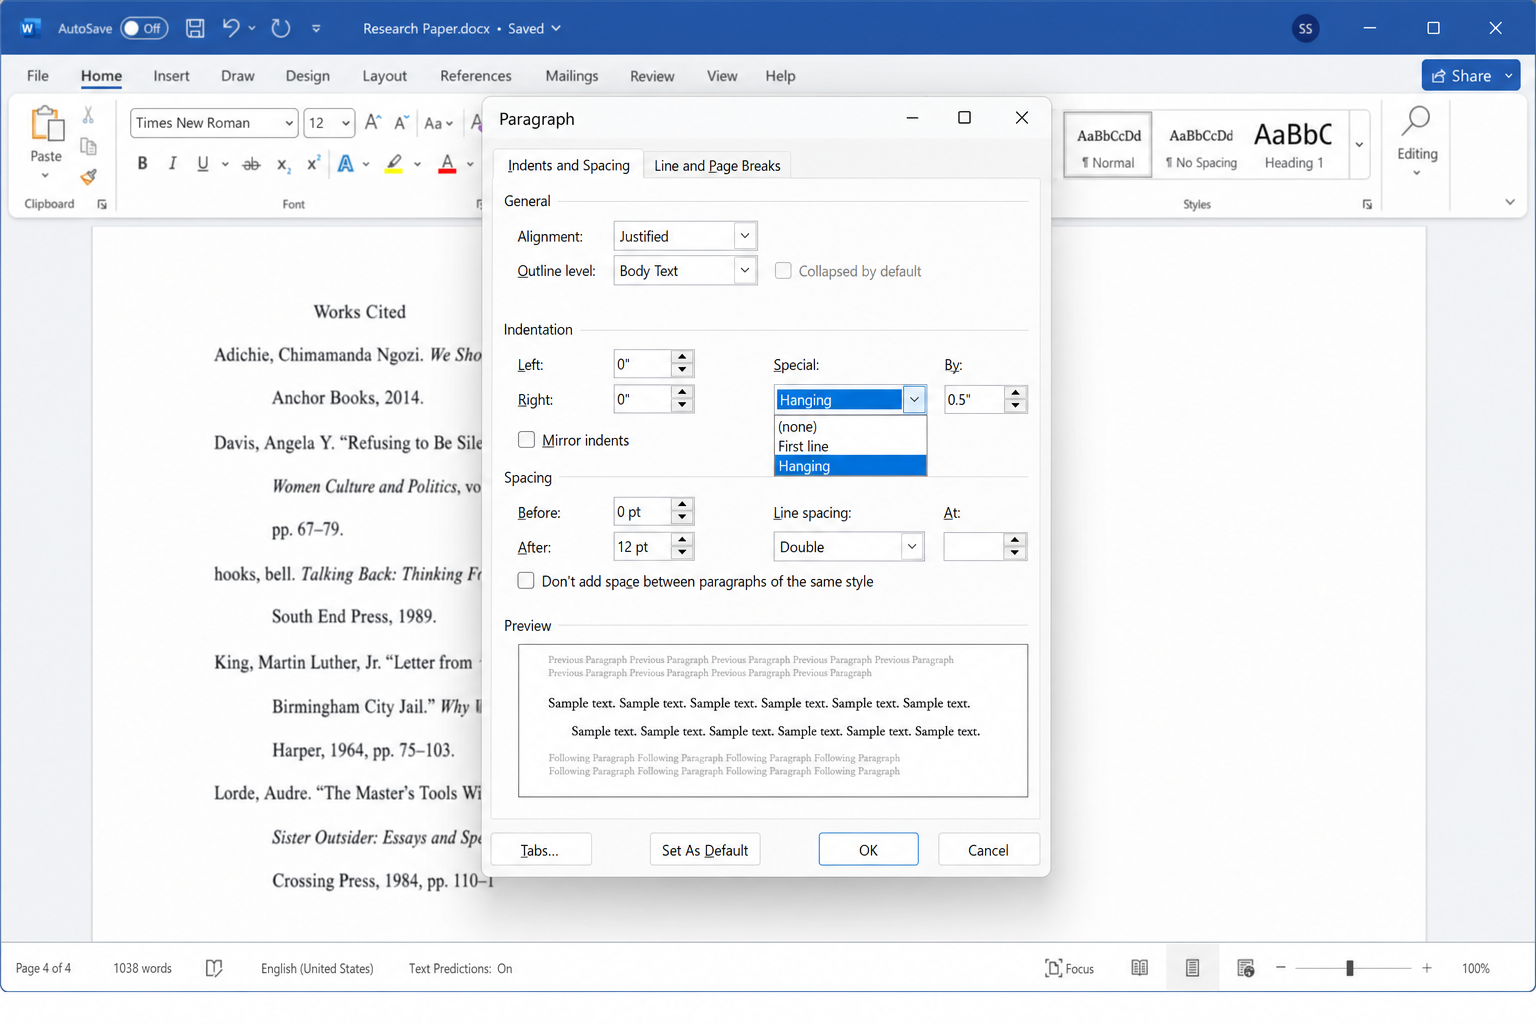
- Now set up the hanging indent for your citations: select your citations (or set this up before typing them), open the Paragraph dialog, go to Indentation > Special > Hanging, and make sure By is set to 0.5″. Click OK.
- Type or paste your citations in alphabetical order, double-spaced, with no extra spacing between entries.
Shortcut: Use Microsoft’s MLA Template
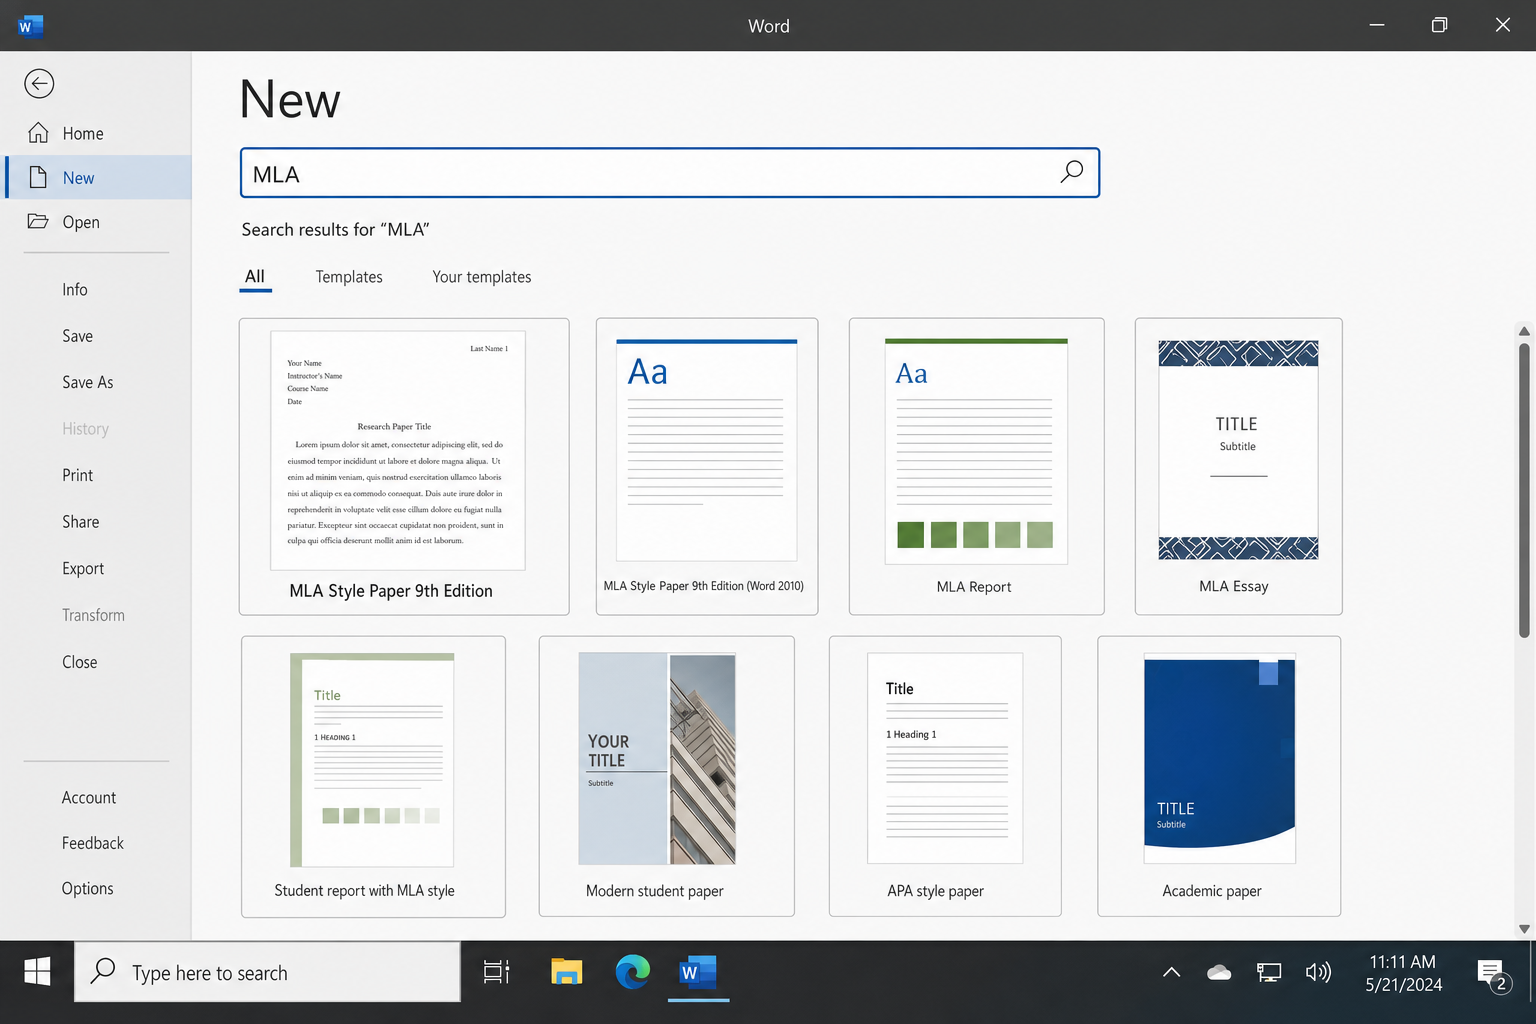
If you’d rather skip the manual setup, Microsoft actually has a pre-built MLA template formatted for the 9th edition. It’s a nice shortcut, though worth noting that it doesn’t always show up automatically in every version of Word, so you may need to search for it.
In Word for the Web (Office.com)
- Go to Office.com and open Word for the web.
- Click New, then select Browse templates or Explore all templates.
- In the search box, type MLA.
- Look for “MLA style paper (9th edition)” and click it.
- Click Open in Word or Customize in Word to start editing.
Once it opens, just replace the placeholder text with your own information and double-check the running header has your last name in it.
In Word Desktop (Windows or Mac)
- Open Word and go to File > New.
- In the search bar, type MLA and press Enter.
- If the MLA template appears, click it and select Create.
- If nothing shows up, head to templates.office.com in your browser, search for MLA, and either open it directly in Word for the web or download the file to use locally.
Using Word’s Built-In MLA Citation Tool
Here’s a genuinely useful feature that a lot of students don’t know about: Word has a built-in citation manager that supports MLA format. You can use it to add in-text citations and automatically generate a Works Cited list, which is a real time-saver when you’re juggling a lot of sources.
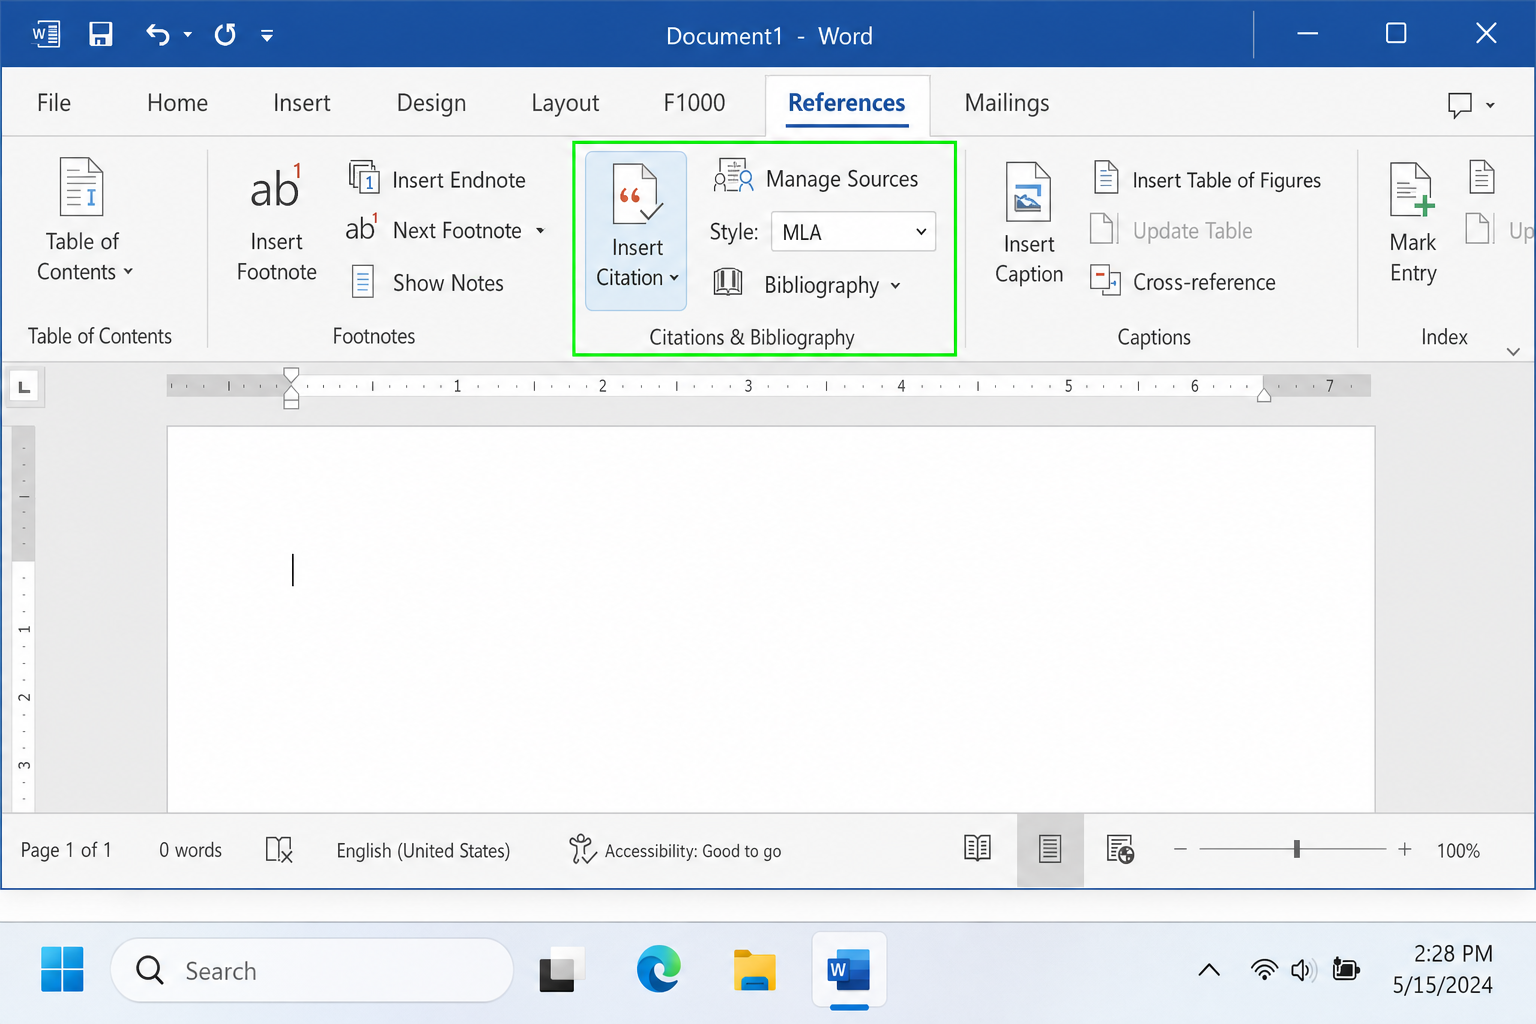
- Click the References tab in the ribbon.
- In the Citations & Bibliography group, click the Style dropdown and select MLA.
- To add a source, click Insert Citation > Add New Source. Fill in the source details (author, title, year, etc.) and click OK.
- Word will insert a formatted in-text citation at your cursor.
- When you’re ready to generate your Works Cited page, click Bibliography > Works Cited and Word will build the list automatically from all the sources you’ve added.
One caveat: always double-check Word’s auto-generated citations against the official MLA guidelines or Purdue OWL. The tool is good, but it occasionally gets punctuation or formatting details slightly wrong.
Tips and Troubleshooting
Common Issues
Problem: My spacing looks double but my teacher says it’s wrong
This is almost always caused by extra space after paragraphs. Word adds 8–10 pt of space after each paragraph by default. To fix it, open the Paragraph dialog (Home tab > small arrow in the Paragraph group), and set both Before and After spacing to 0 pt. Then set Line spacing to Double. That’s the combination MLA needs.
Problem: I can’t find the MLA template in Word
This is a known issue. Word for the web and some desktop builds only show APA in the default template panel, not MLA. The fix: go to templates.office.com in your browser and search for “MLA” there. You’ll find the 9th edition template and can open it directly from the site.
Problem: My page numbers are updating but the first page shows “1” in the header
That’s actually correct. MLA wants the page number on every page including the first. If your instructor specifically asks you to suppress the header on page one, go to Header & Footer tab and check Different First Page, then leave the first-page header blank.
Problem: Do I need a separate title page?
Nope. MLA 9 doesn’t require a separate title page for student papers. The first-page heading (your name, instructor, course, date) plus your centered title is all you need. Some instructors ask for a title page anyway, so check your assignment instructions first.
Problem: Can I use a font other than Times New Roman?
Officially, MLA 9 just asks for a “legible” font. It doesn’t mandate Times New Roman. Arial 12 pt, Aptos 11–12 pt, and Calibri 11 pt are all fine by the standard. That said, your instructor may have a preference, so when in doubt, stick with Times New Roman 12 pt and you’ll never go wrong.
Pro Tips
- Set it as your default: Once you’ve got everything configured, go to the Paragraph dialog and click Set As Default so every new document starts with MLA-friendly settings.
- Use Styles for accessibility: Applying Word’s built-in Normal style (with your MLA settings baked in) makes your document more accessible for screen readers, which is a nice bonus on top of good formatting.
- Verify with Purdue OWL: Purdue OWL’s MLA guide is the gold standard for double-checking anything you’re unsure about, especially citation formats.
- Citation managers save time: Tools like Zotero and Mendeley both support MLA 9 and can export properly formatted Works Cited entries. Way easier than building each citation by hand.
MLA Format Quick Reference
| Setting | MLA Requirement | Where to Set It in Word |
|---|---|---|
| Margins | 1 inch on all sides | Layout > Margins > Normal |
| Font | Legible font (Times New Roman 12 pt recommended) | Home > Font group |
| Line Spacing | Double throughout, 0 pt before/after | Home > Paragraph dialog |
| Paragraph Indent | 0.5-inch first-line indent | Home > Paragraph dialog > Special: First line |
| Running Header | Last name + page number, right-aligned | Insert > Header, then Page Number > Current Position |
| First-Page Heading | Name, instructor, course, date, left-aligned | Body text, top of page 1 |
| Title | Centered, title case, no formatting | Home > Center alignment |
| Works Cited | New page, centered title, hanging indent (0.5″) | Ctrl/Cmd + Enter for page break; Paragraph dialog > Hanging |
You’re All Set
Honestly, MLA formatting is one of those things that seems more intimidating than it actually is. Once you’ve done it once in Word, the whole process takes maybe five minutes on your next paper. The steps here follow the current MLA 9th edition standard, so you’re good to go for 2026 and beyond.
Bookmark this page for the next time a paper comes around. And if you’re also working in Google Docs, the same MLA rules apply there too. The menus are a little different, but the formatting requirements are identical.