

Ever installed a dodgy driver or tweaked a registry setting and immediately regretted it? That sinking feeling is exactly why System Restore Points exist. Think of a restore point as a snapshot of your PC’s system settings, drivers, and installed apps. It’s a safety net you can fall back on when something goes wrong. And the good news is, creating one takes about two minutes.
In this guide, you’ll learn how to enable System Restore, manually create a restore point (two different ways), use one to roll back your PC, and even run a System Restore when Windows won’t boot. These steps work on both Windows 10 and Windows 11, the process is essentially identical on both.
What Is a System Restore Point?
A System Restore Point is a saved snapshot of your Windows system files, drivers, registry settings, and installed programs. When something goes sideways, such as a bad update, a misbehaving app, or an accidental registry edit, you can use it to roll your system back to when things were working fine.
A few important things to know before we dive in:
- It does NOT back up your personal files. Documents, photos, videos, none of that is touched by System Restore. It only affects system-level stuff.
- It’s not a full backup solution. For that, you’ll want a System Image Backup or a tool like File History (more on that at the end).
- Windows creates restore points automatically, once a week and before major events like Windows updates or driver installs. But manually creating one before you make changes is always a smart move.
Step 1: Enable System Protection (Don’t Skip This)
Here’s something a lot of people don’t realize: System Restore is disabled by default on many PCs, especially ones that came pre-installed with Windows from a manufacturer. If System Protection is off, you can’t create restore points at all. So let’s check that first.
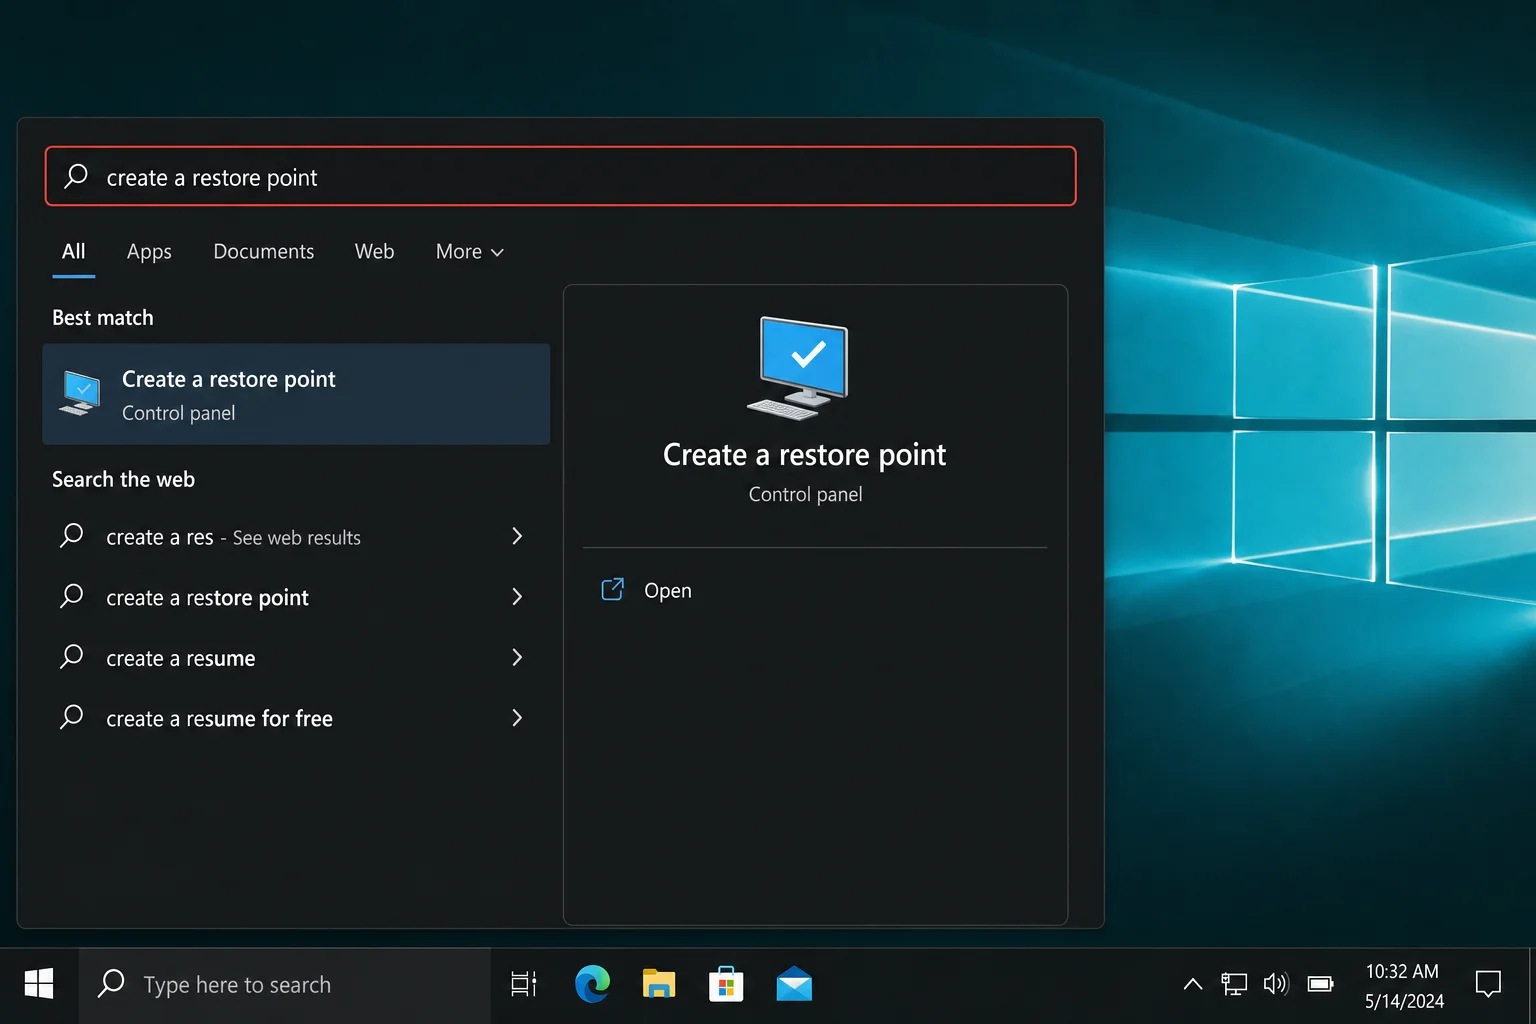
- Click the Start button and type create a restore point in the search bar.
- Click the Create a restore point result that appears at the top.
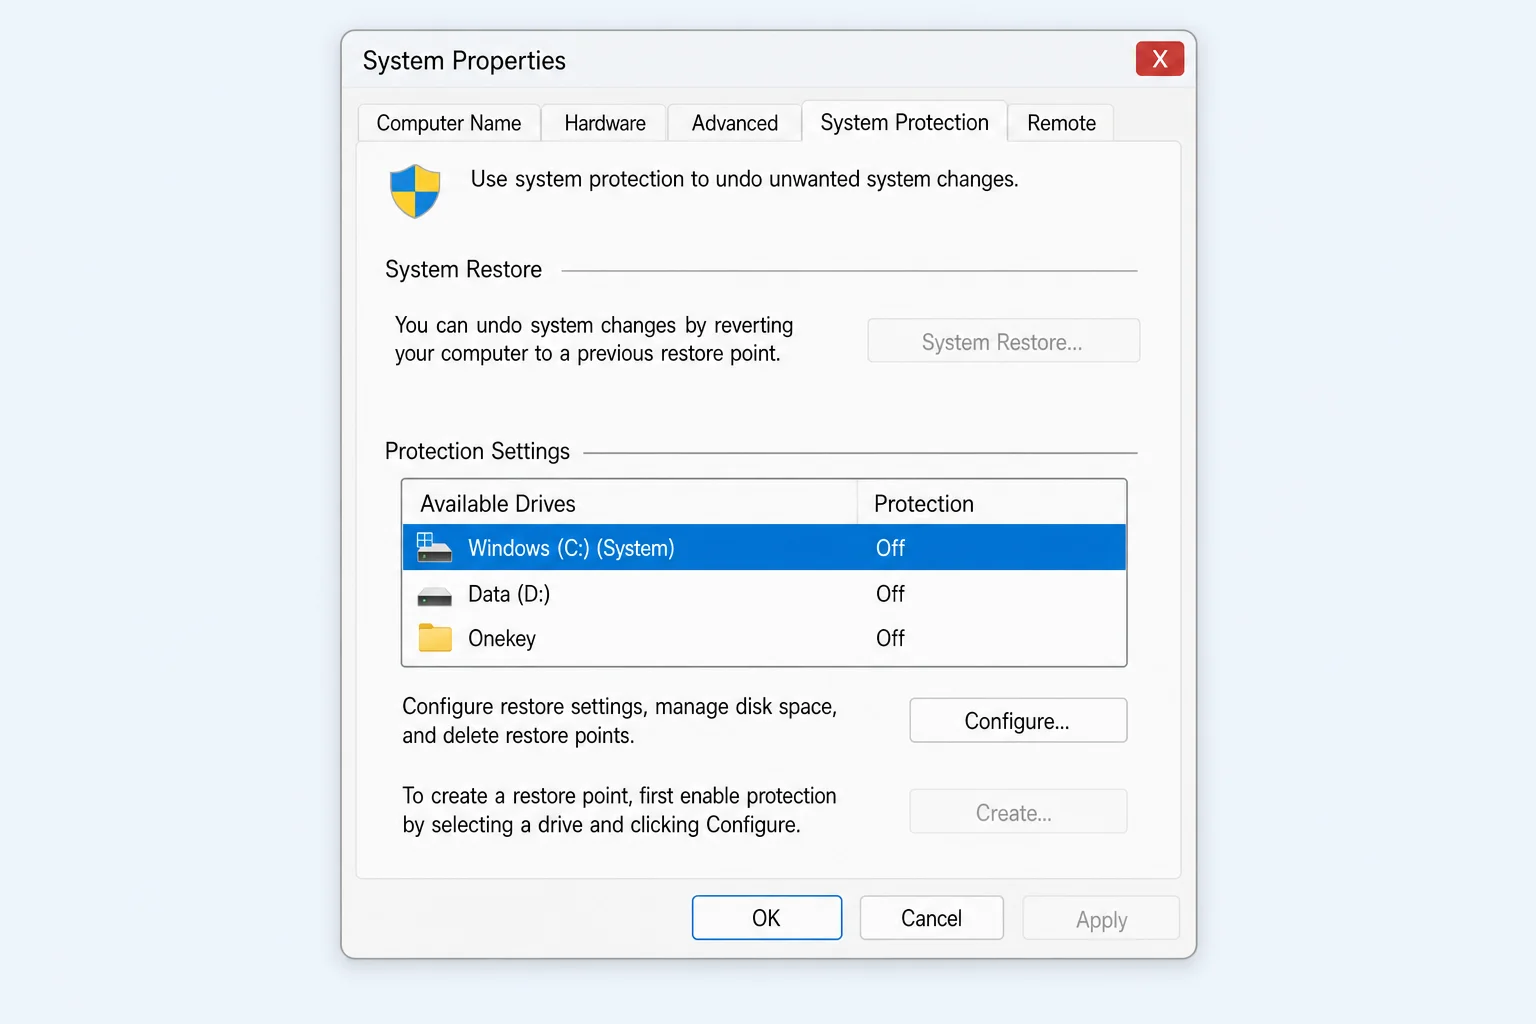
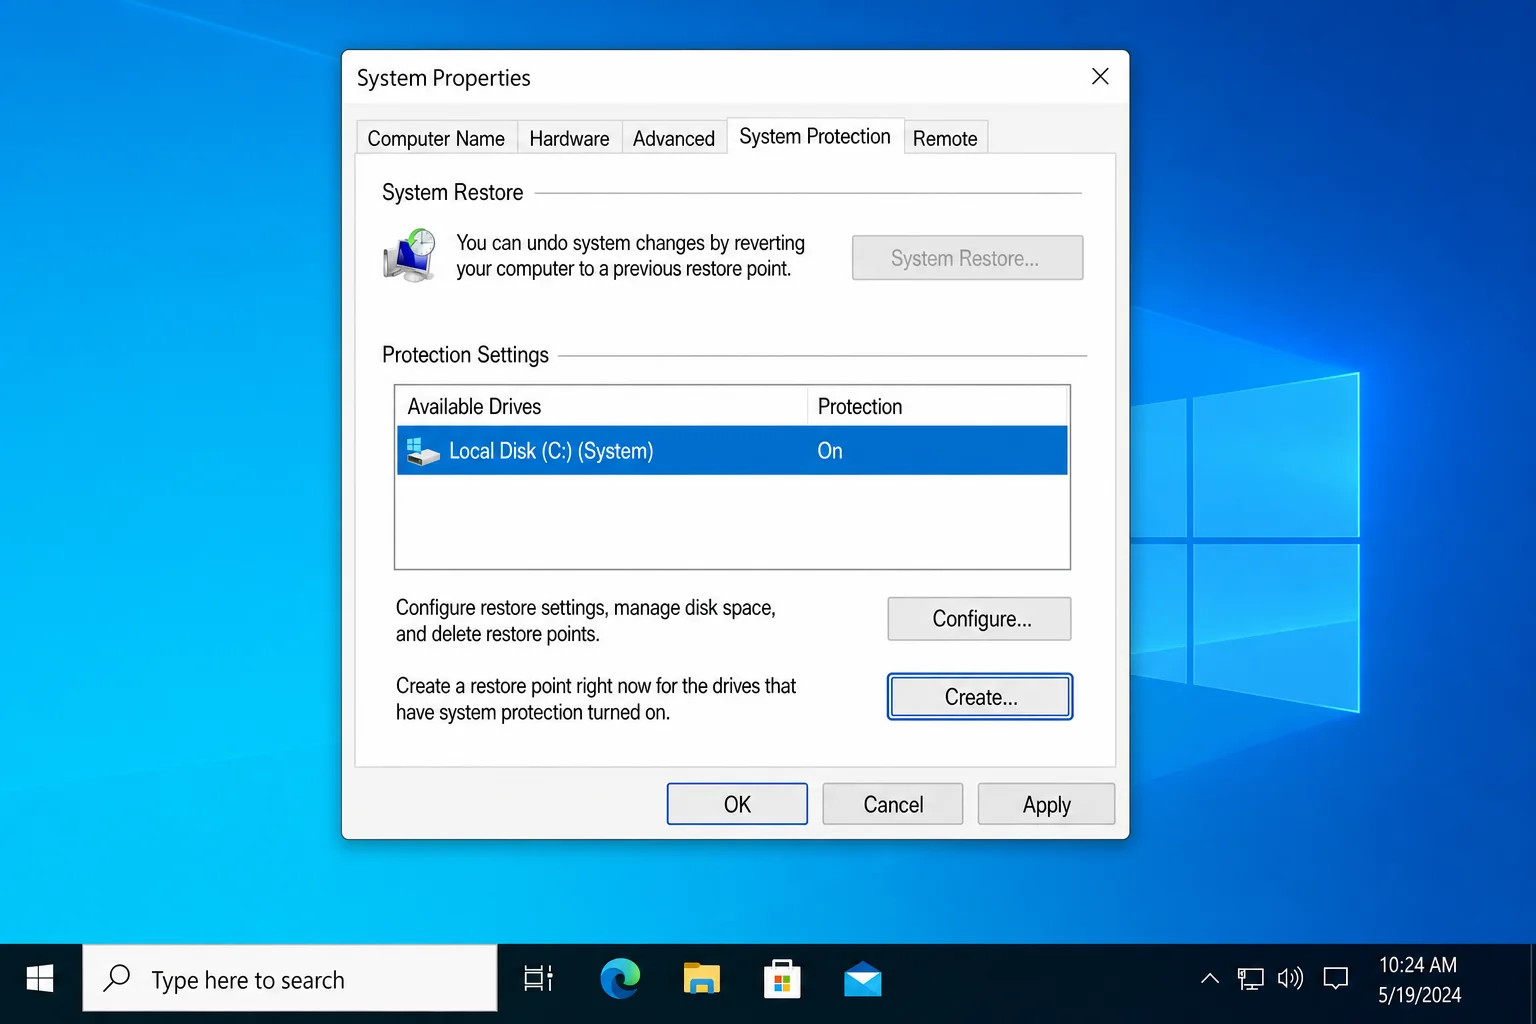
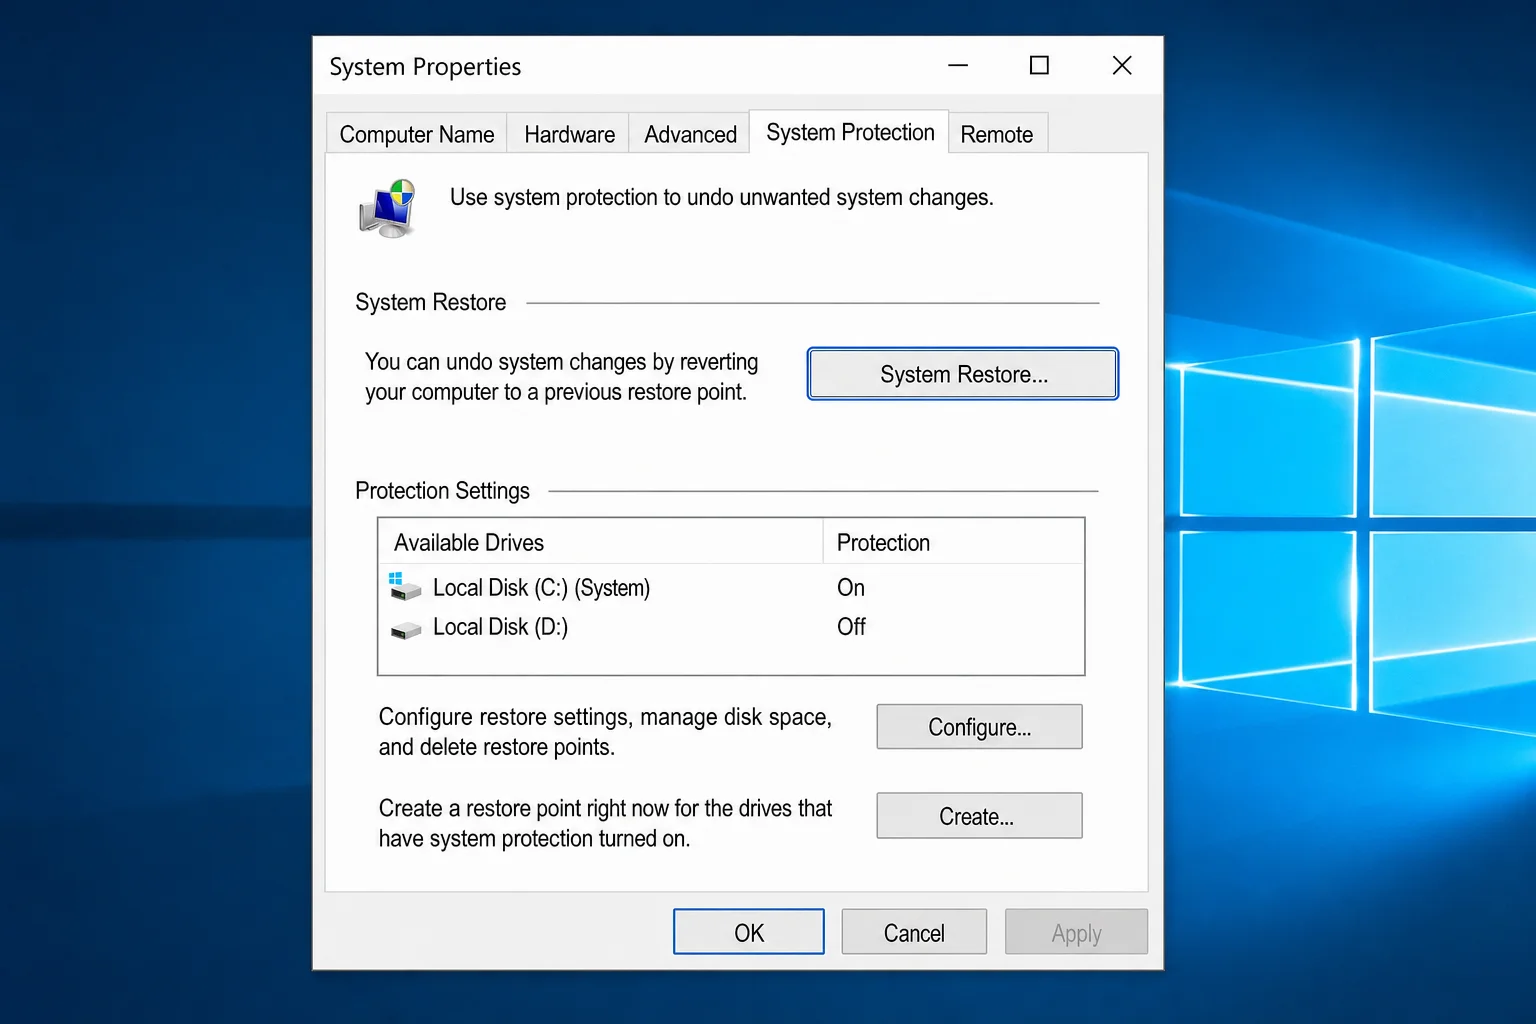
This opens the System Properties window on the System Protection tab. Look at the Protection Settings list and find your system drive, it’s usually labeled C: (System).
- If it says On next to your C: drive, you’re good to go, skip ahead to Step 2.
- If it says Off, keep reading.
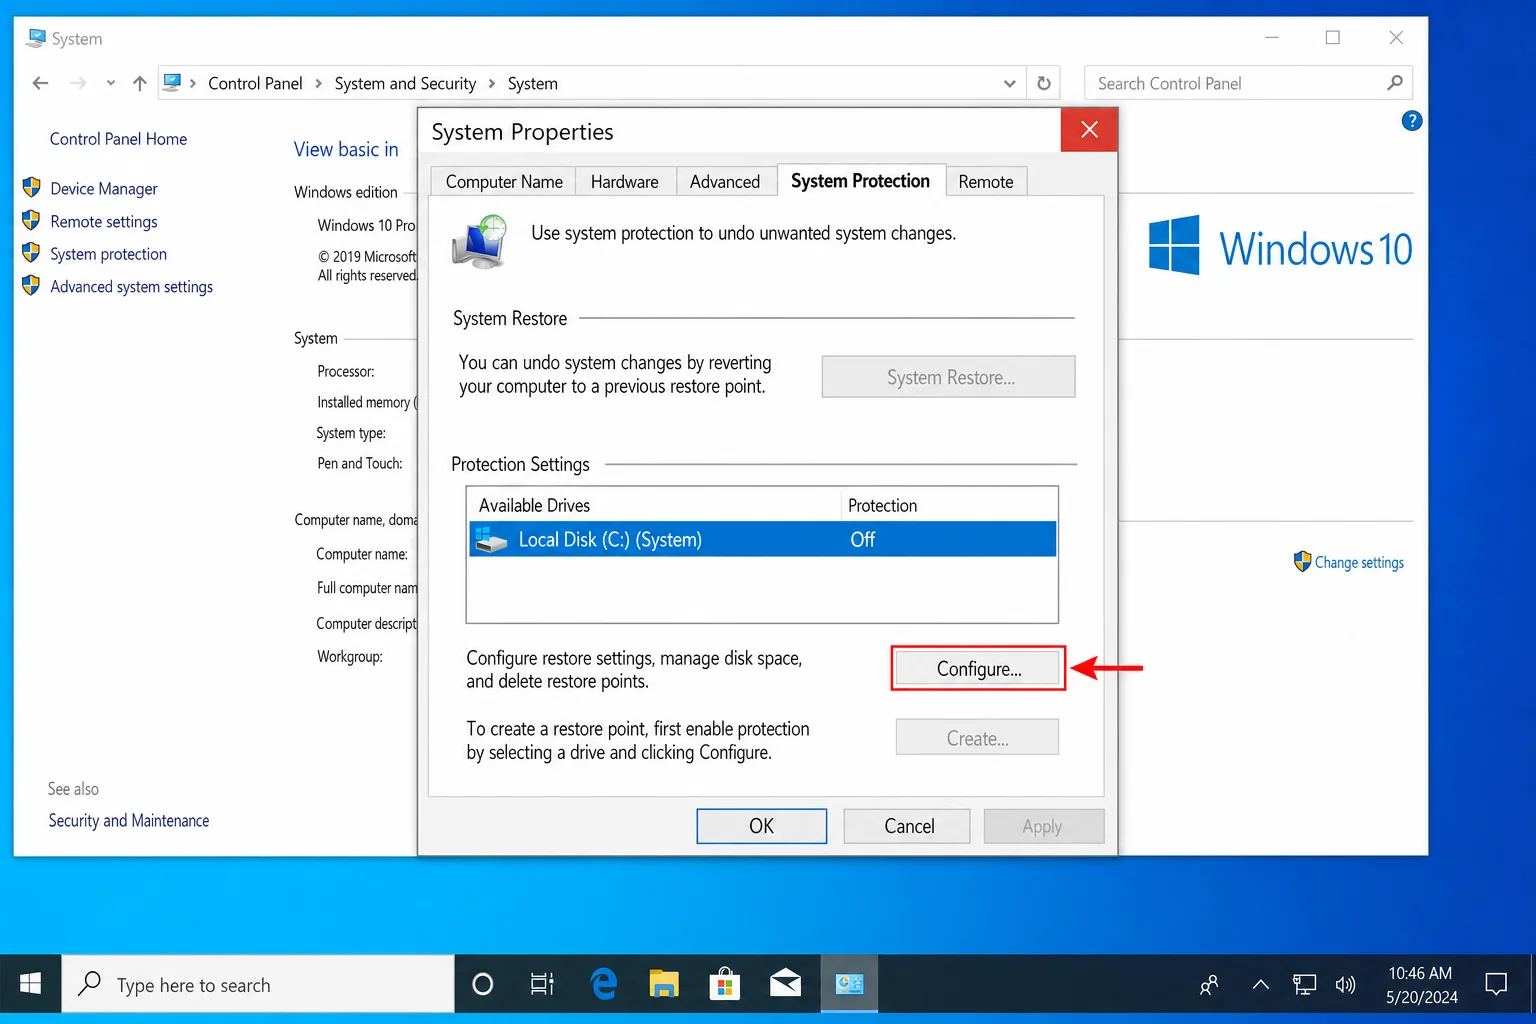
To turn it on, select your C: drive in the list and click Configure.
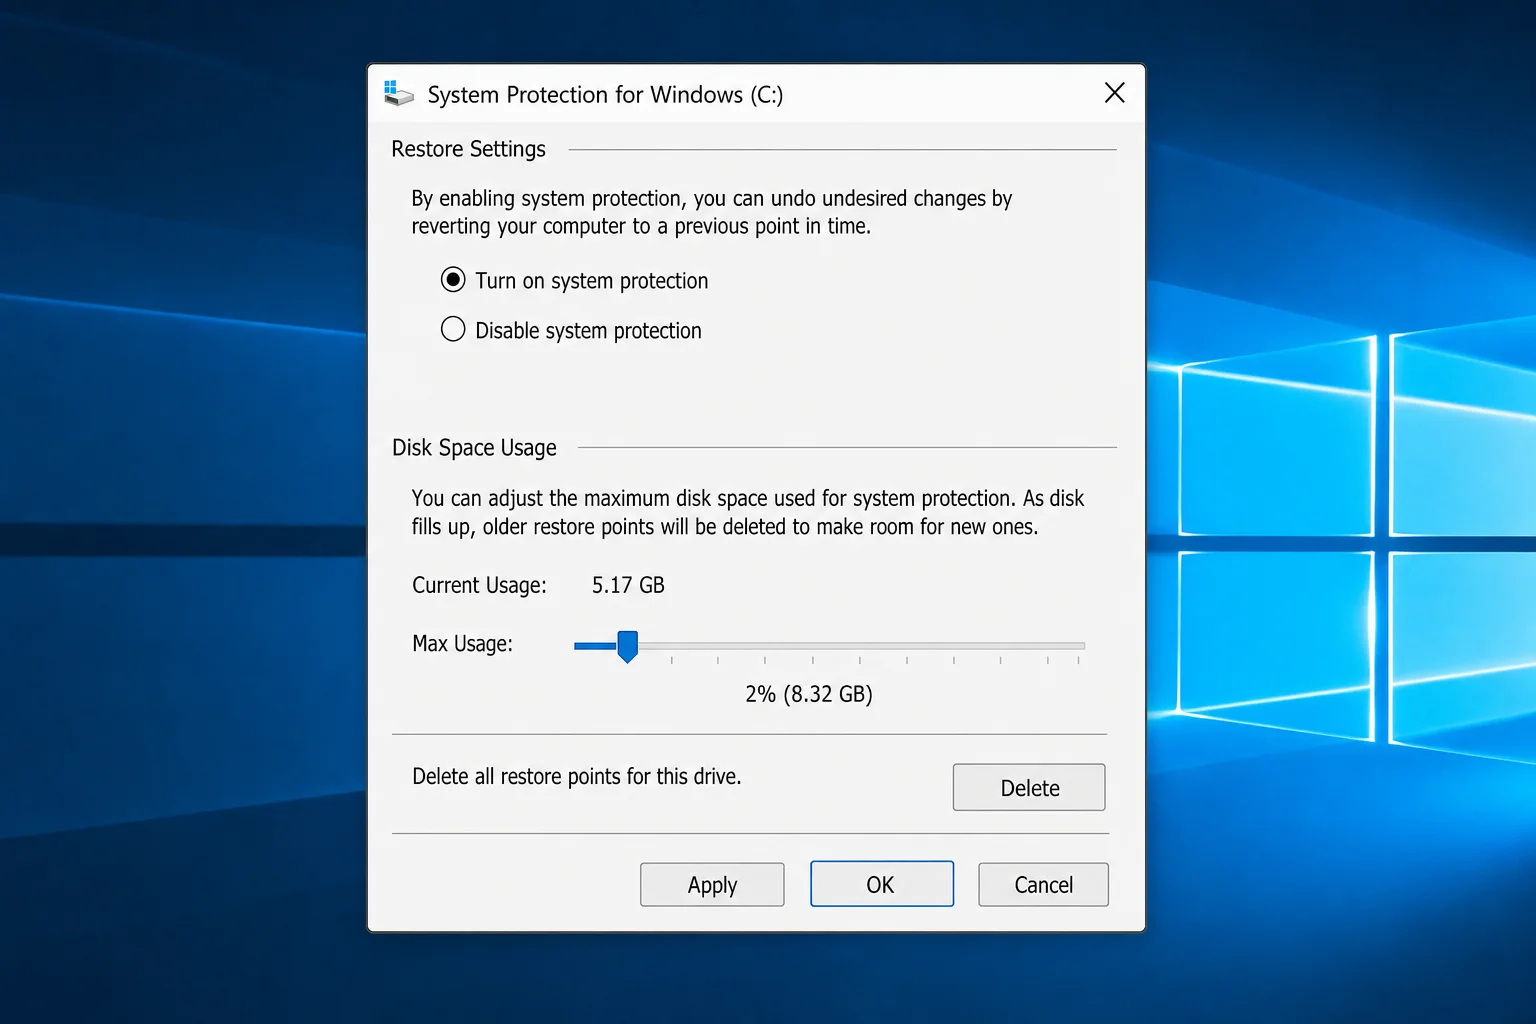
In the configuration window, select Turn on system protection. Then, under Disk Space Usage, drag the slider to allocate some space. Somewhere between 5% and 10% of your drive is a solid starting point. More space means Windows can keep more restore points before it starts deleting older ones.
Click Apply, then OK.
Now your C: drive should show Protection: On in the list. You’re ready to create your first restore point.
Step 2: Manually Create a System Restore Point
Windows creates restore points on its own schedule, but you should always create one manually before doing anything risky, like editing the registry, installing a new driver, or making major software changes. Here’s how.
- In the System Protection tab (the same window from Step 1), click Create.
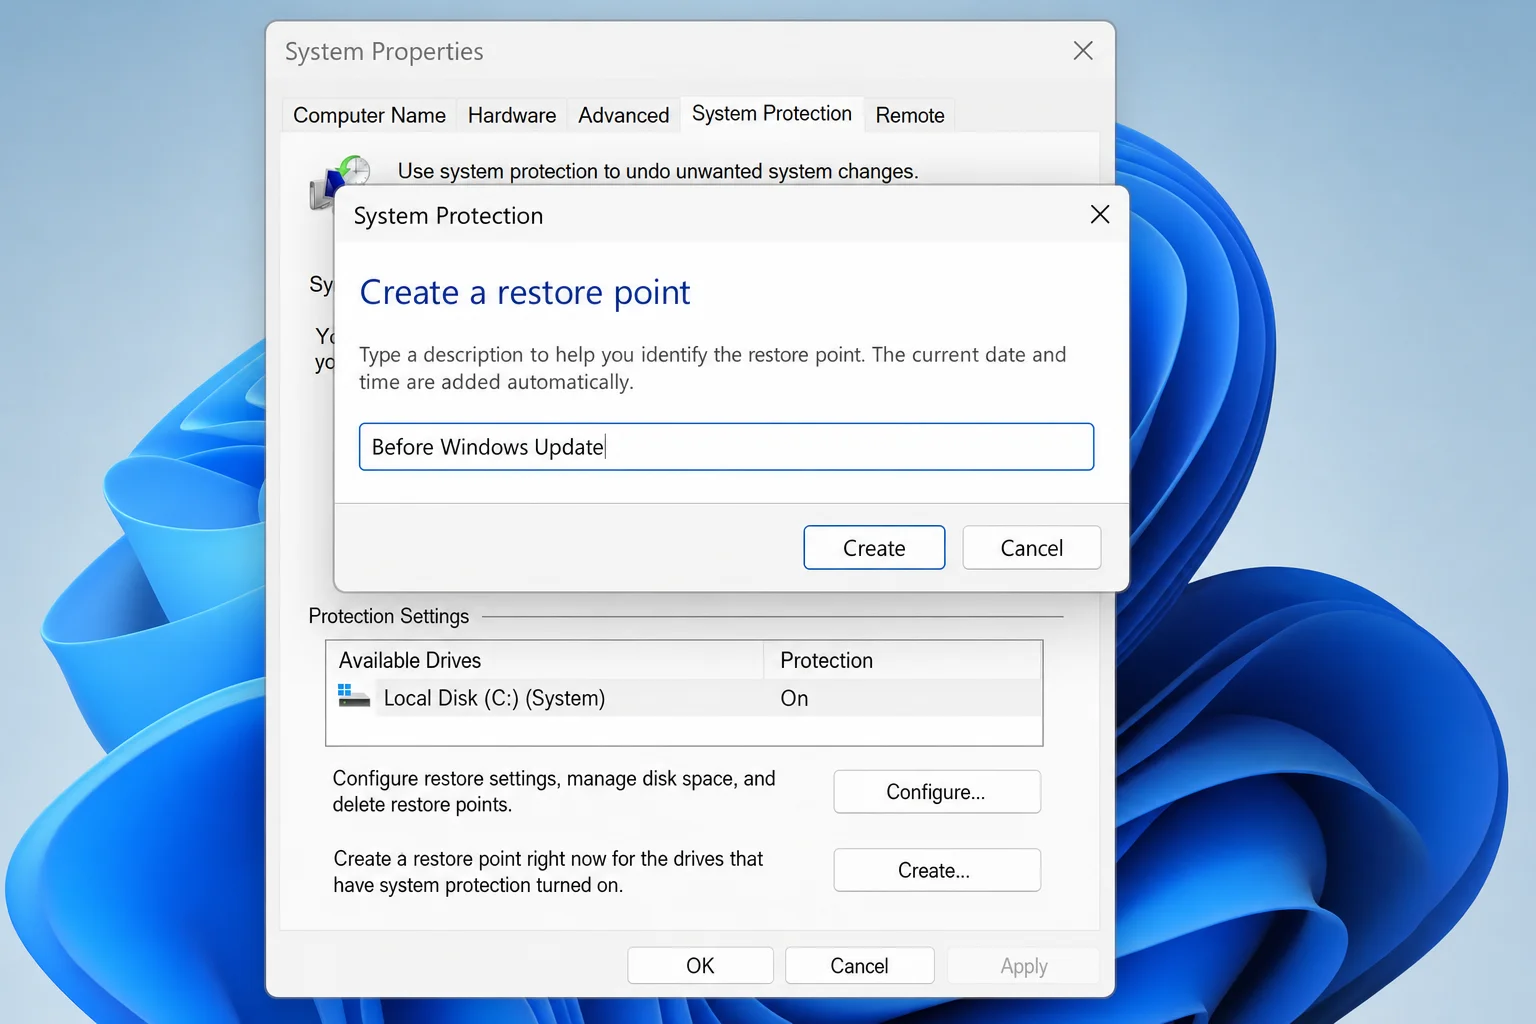
- Type a descriptive name for your restore point, something like “Before registry edit” or “Before driver install.” Windows automatically adds the date and time, so you don’t need to include those.
- Click Create.
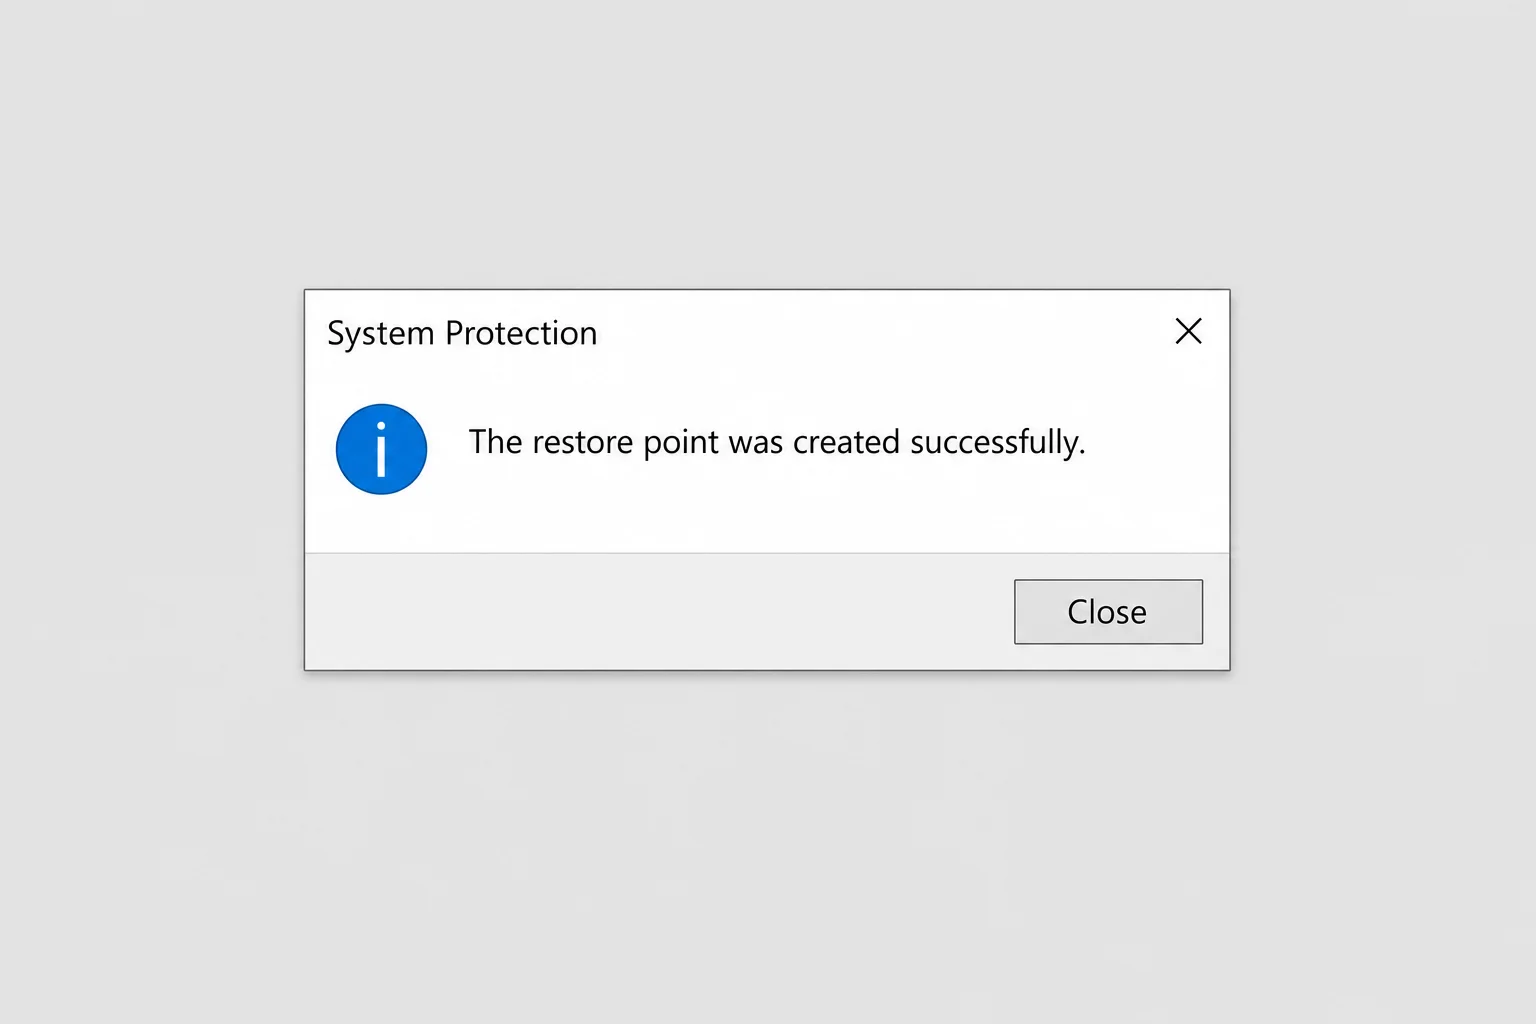
Windows will chug away for a moment (usually less than a minute) and then show a confirmation message: “The restore point was created successfully.” Click Close, then OK.
That’s it, you’ve got your safety net. Now let’s look at a faster way to do this if you’re comfortable with PowerShell.
Alternative: Create a Restore Point Using PowerShell
If you’d rather skip the clicking around, you can create a restore point with a single command in PowerShell. This is handy if you want to automate the process or just get it done quickly.
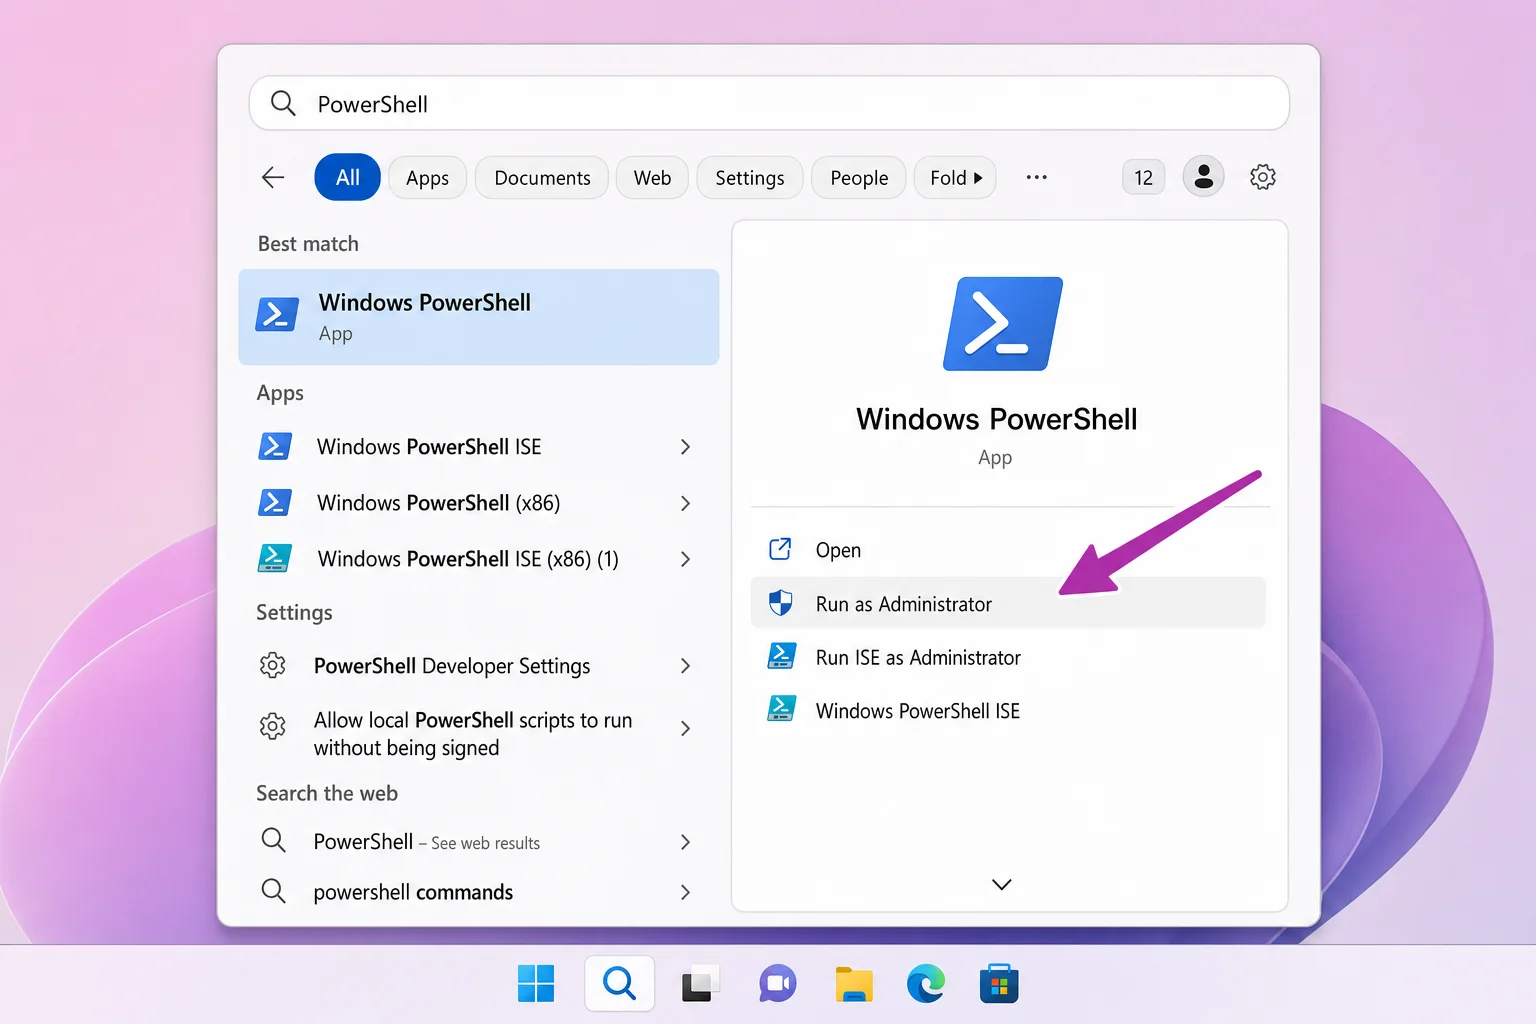
- Type PowerShell in the Start menu search bar.
- Right-click Windows PowerShell and select Run as administrator. (You need admin rights for this to work.)
- Copy and paste the following command into the PowerShell window, then press Enter:
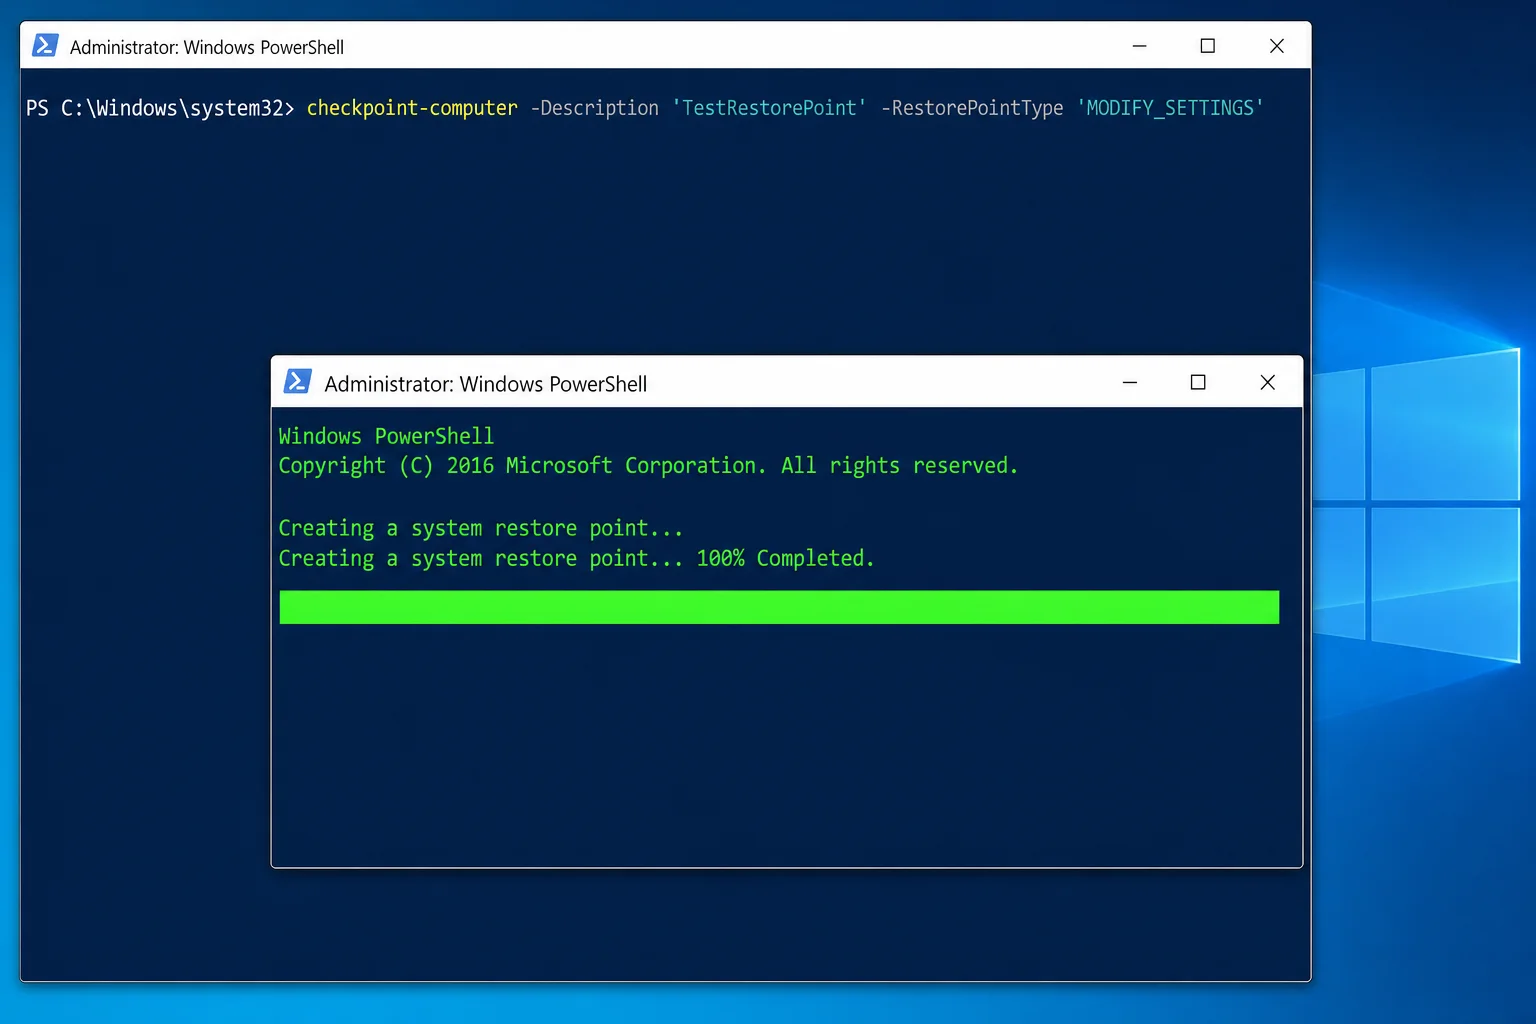
Checkpoint-Computer -Description "Before driver install" -RestorePointType "MODIFY_SETTINGS"Replace "Before driver install" with whatever description you want for your restore point.
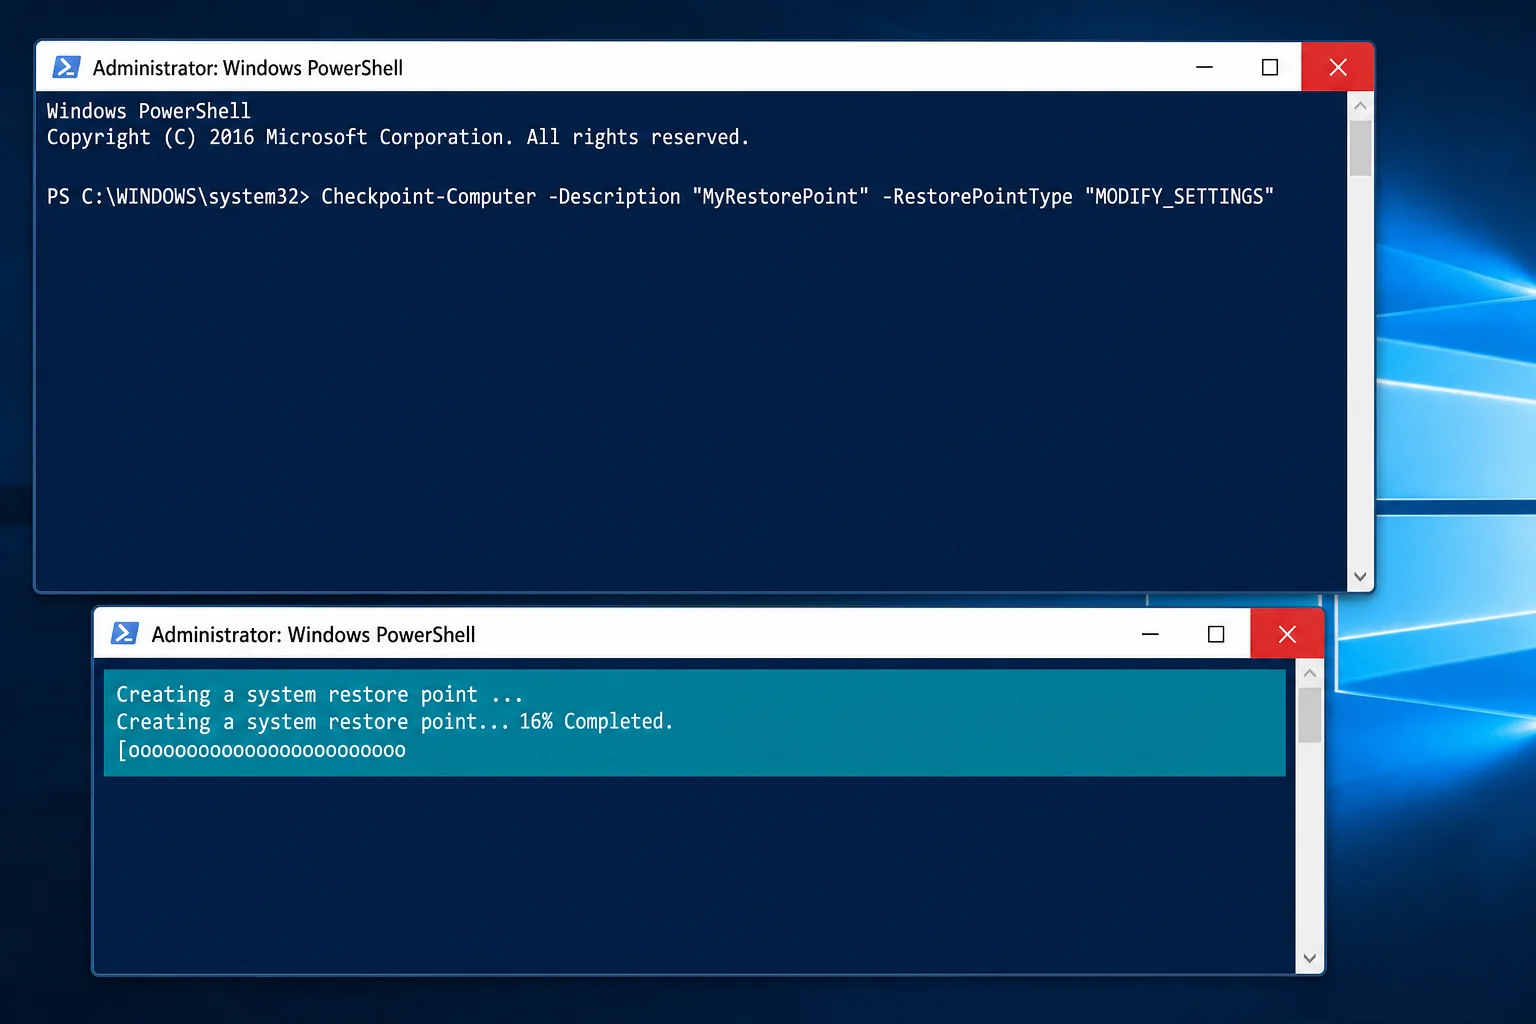
You’ll see a progress bar appear. When it hits 100%, the restore point is created. No confirmation dialog, no extra clicks.
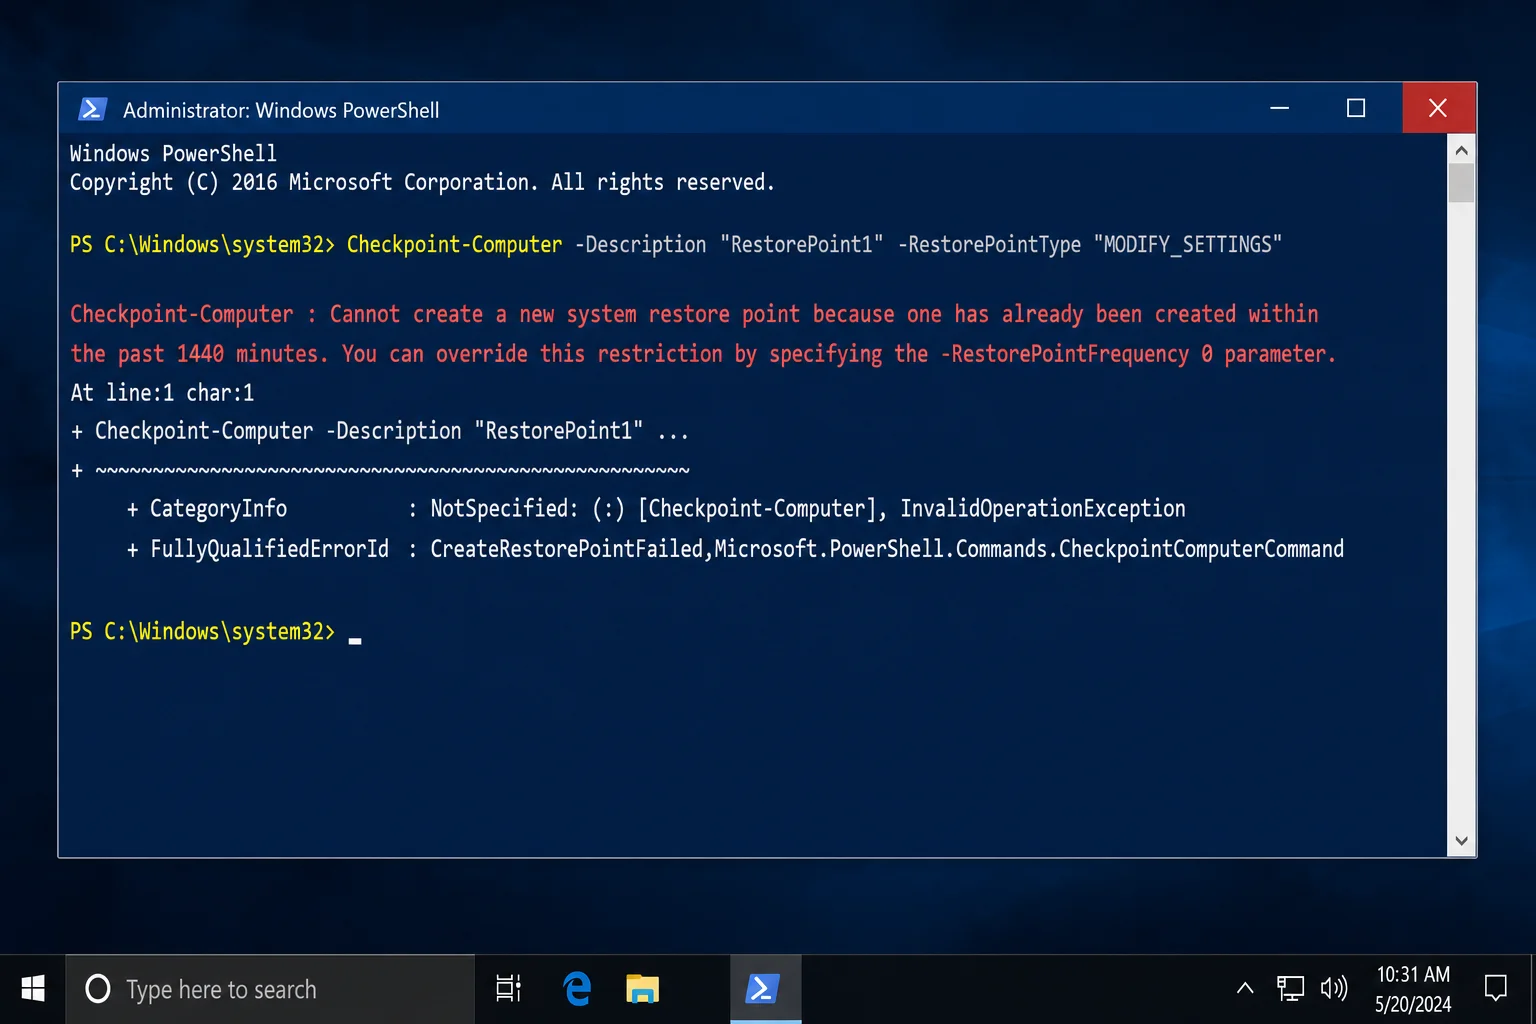
Heads up: Windows limits manual restore point creation to once every 24 hours through this method. If you see an error saying “A new system restore point cannot be created because one has already been created within the past 1440 minutes,” it just means Windows already created one automatically in the last 24 hours. You’re covered, so no need to worry.
How to Use a Restore Point to Roll Back Your PC
Okay, so something went wrong and you need to actually use one of those restore points. Here’s how to do it while Windows is still running.
- Open the System Protection window again (search for create a restore point in the Start menu and click the result).
- Click System Restore… near the top of the window.
- Click Next on the intro screen.
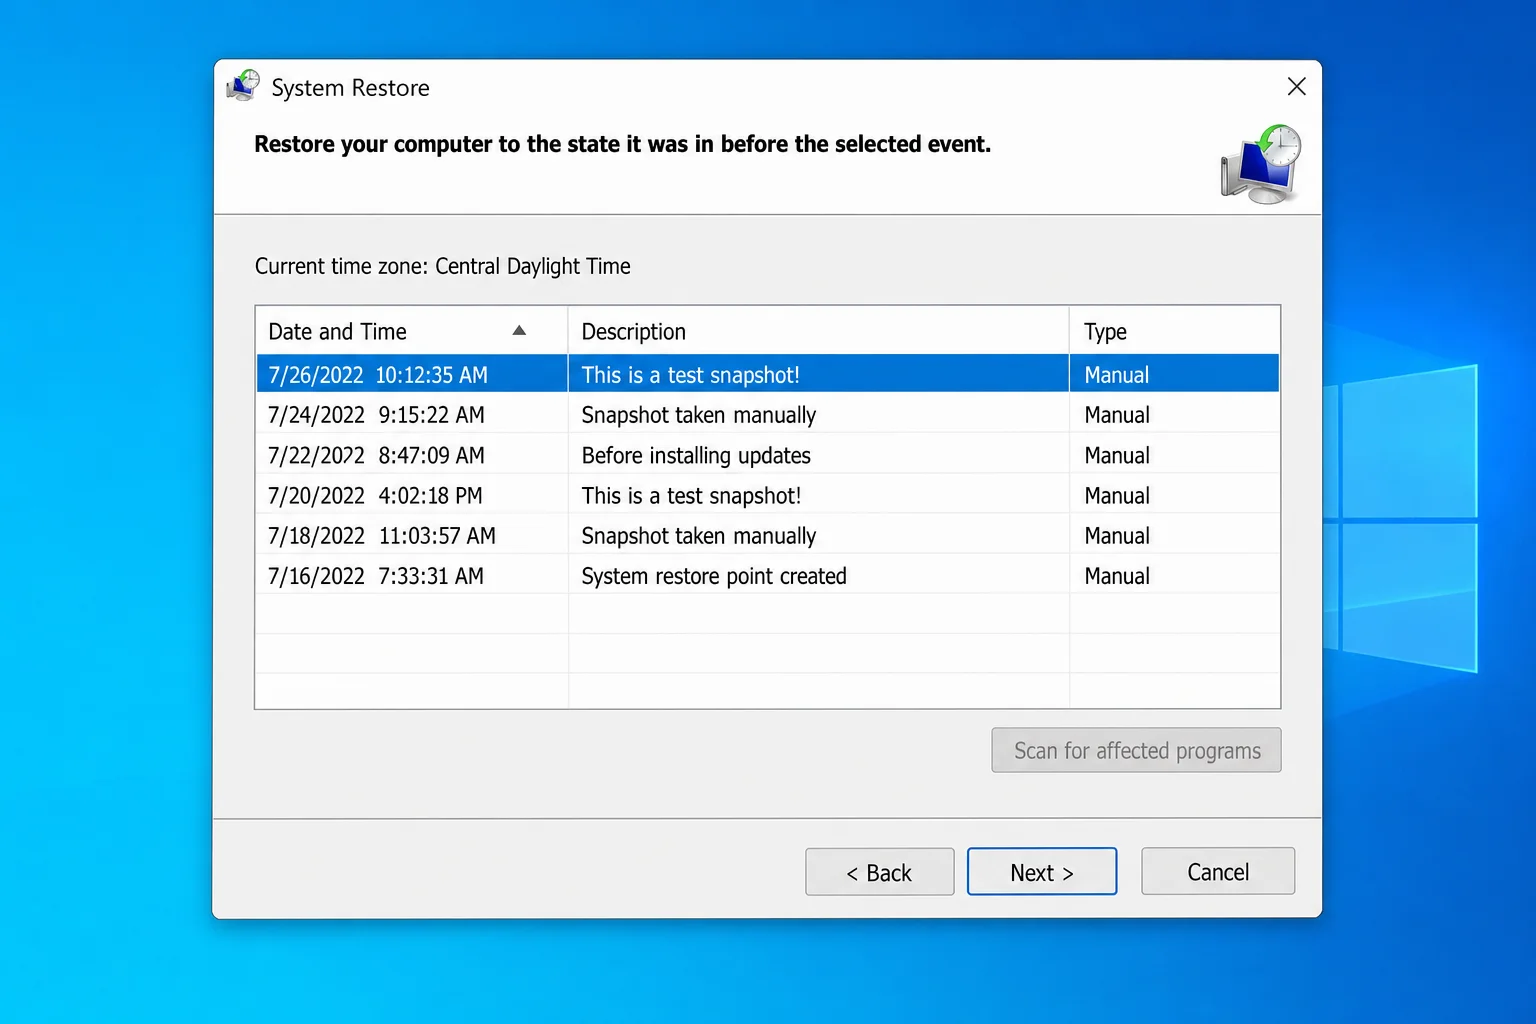
- You’ll see a list of available restore points with their name, date, and type. The Type column tells you whether it was created manually (labeled Manual) or automatically by Windows (labeled System).
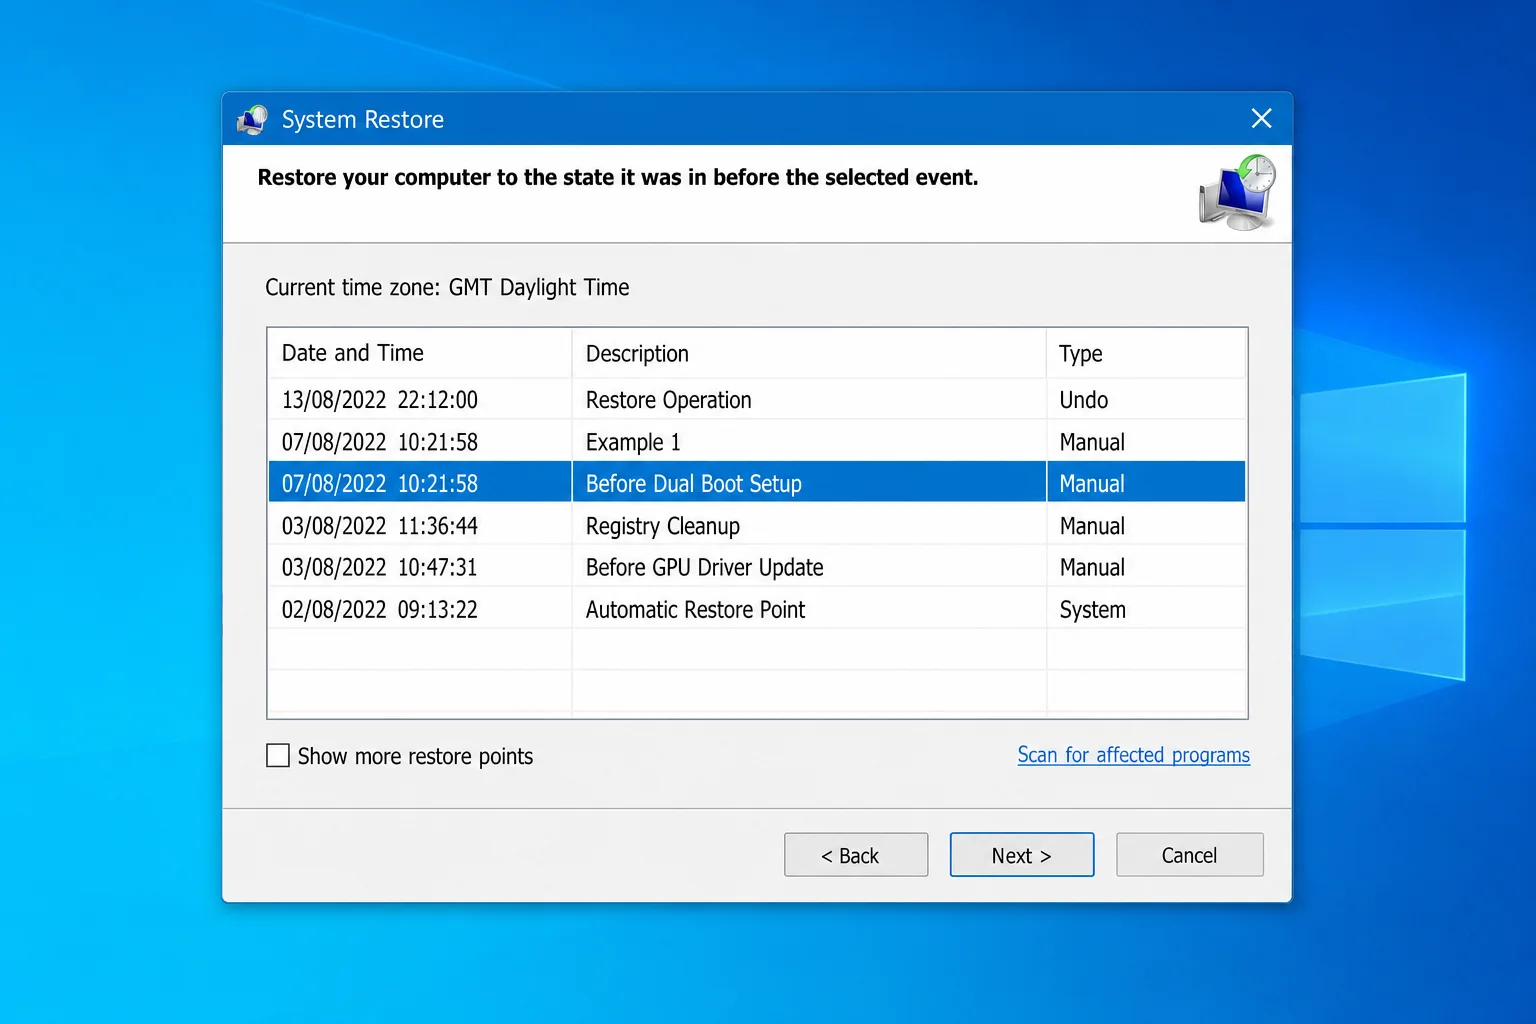
- If you don’t see the restore point you’re looking for, check the Show more restore points box to see older ones.
- Select the restore point you want, pick the one created just before the problem started.
- Click Scan for affected programs if you want to see which apps will be removed or reverted. It’s worth checking so you’re not caught off guard.
- Click Next, then Finish, and confirm when prompted.
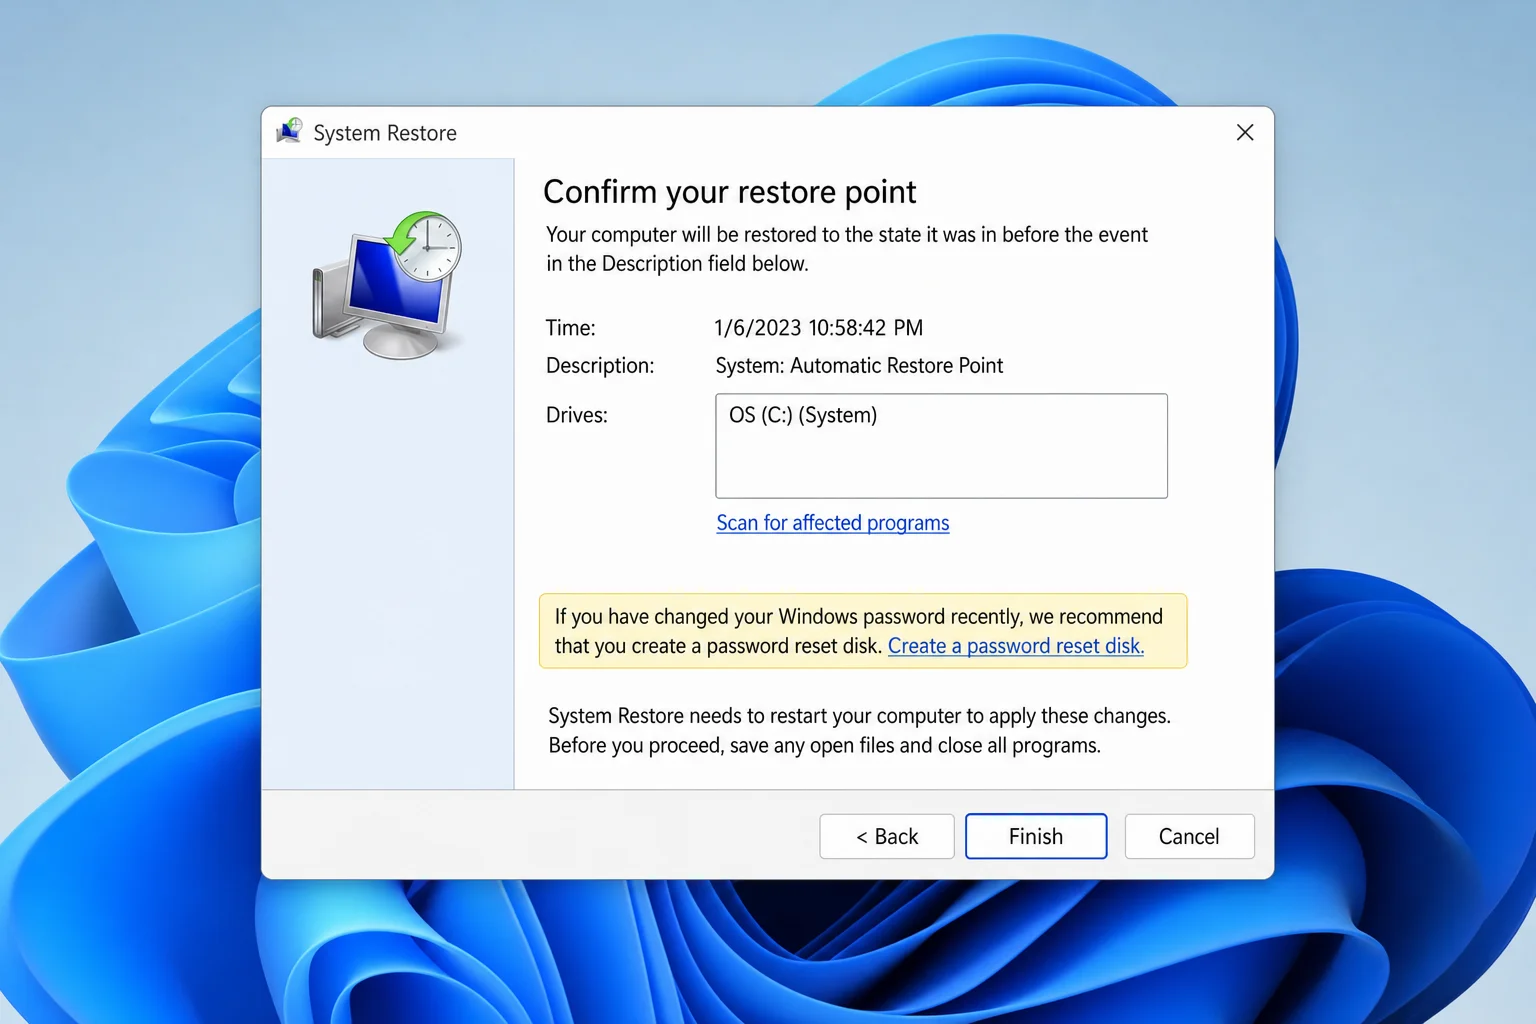
Windows will restart your computer and apply the restore. Make sure you save any open files first, as everything will close when it reboots. The process usually takes a few minutes, and when it’s done, your PC will be back to how it was at the restore point.
Windows Won’t Boot? Here’s How to Run System Restore Anyway
What if things are so broken that Windows won’t even start up properly? Don’t panic, you can still run System Restore from the Windows Recovery Environment (WinRE), which is a separate recovery system built into your PC.
Here’s how to get there:
- Power on your PC. As soon as the Windows logo appears, hold down the power button until the PC shuts off.
- Repeat this two more times (power on, see the logo, force shut down). After the third time, Windows will automatically boot into the Recovery Environment instead of trying to load normally.
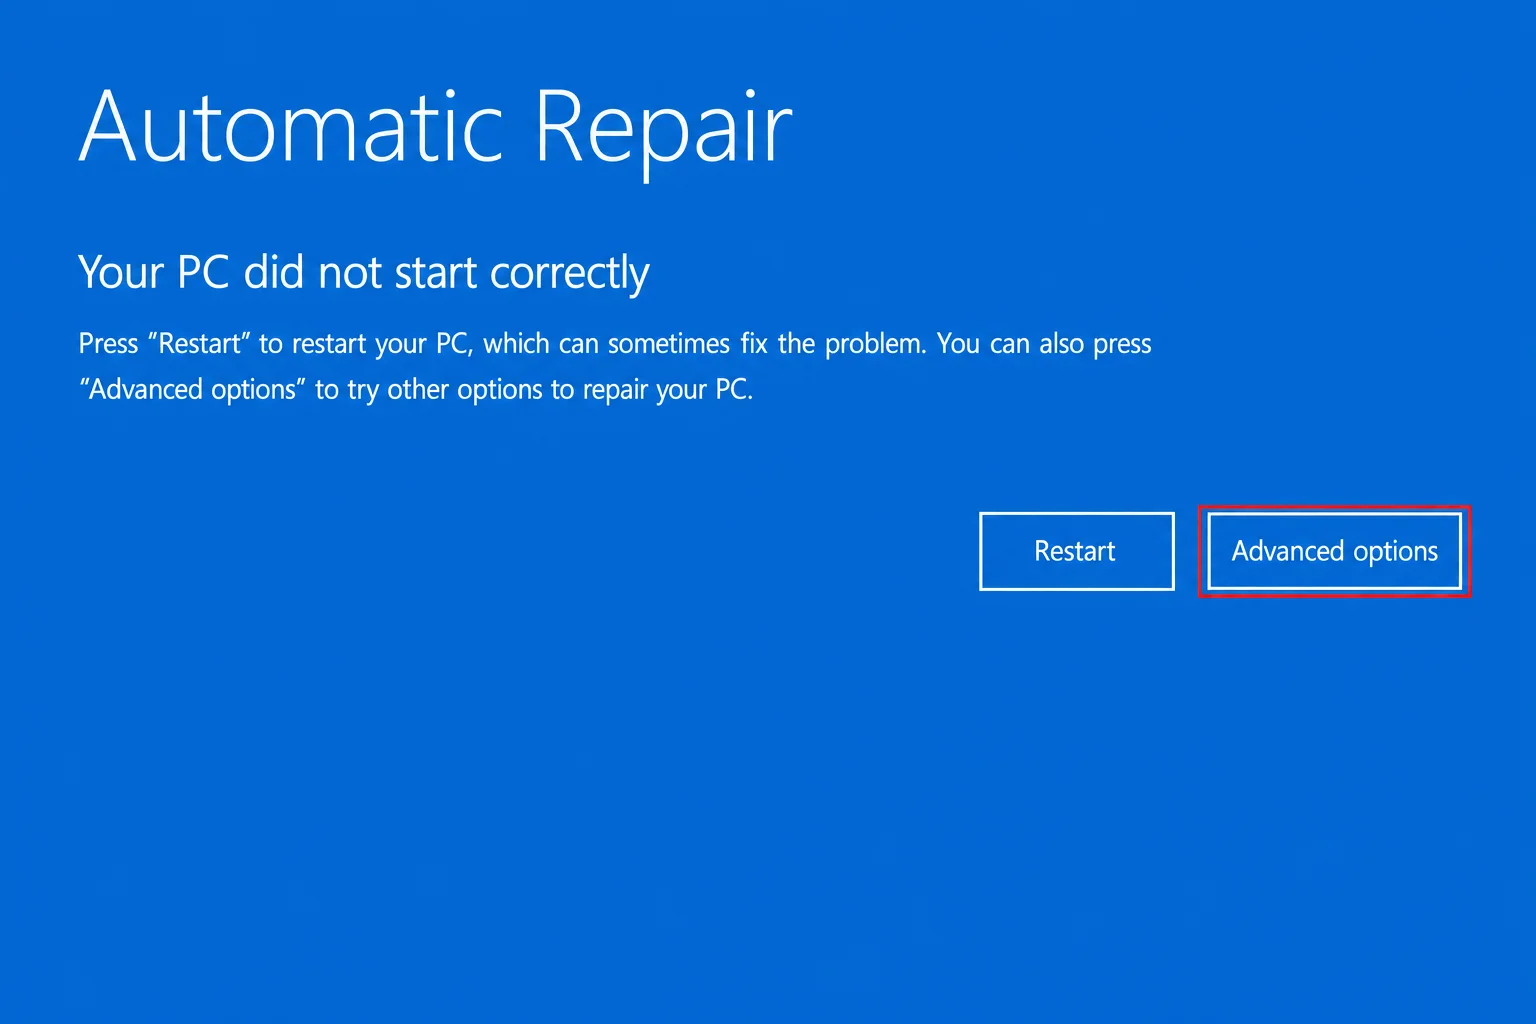
- You’ll see an error screen, something like “Automatic Repair couldn’t repair your PC” or “Your PC did not start correctly.” That’s fine. Click Advanced options.
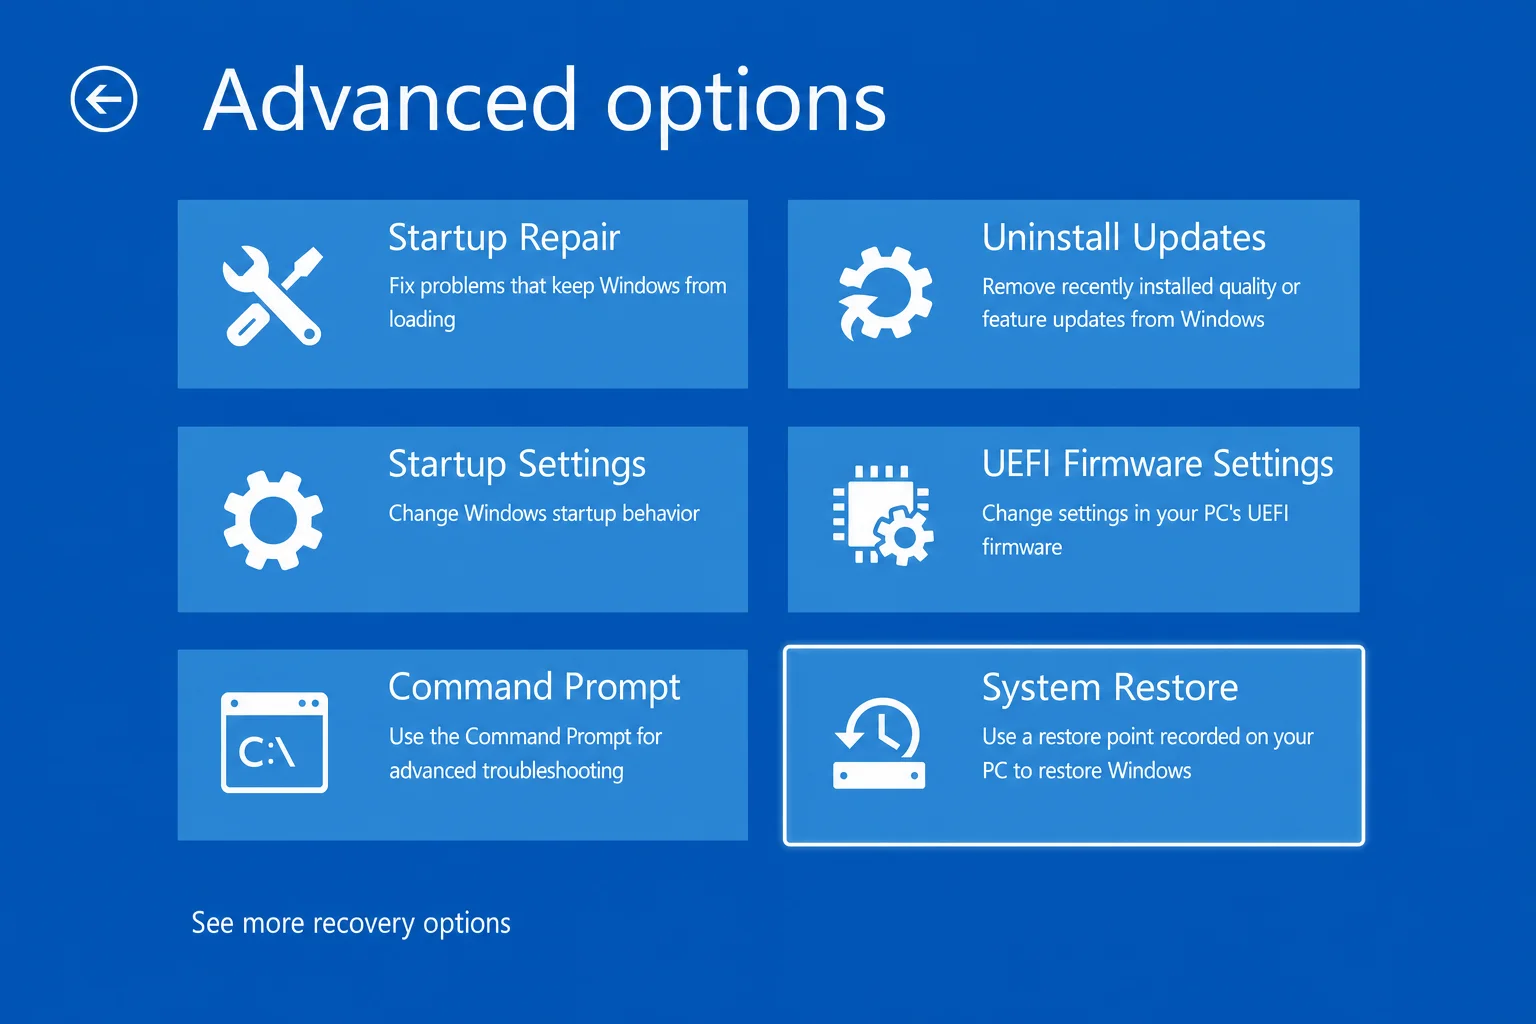
- Click Troubleshoot > Advanced options > System Restore.
- Select your username and enter your account password when prompted. If you don’t have a password set, just leave it blank and click Continue.
- Select a restore point from the list and click Next, then Finish to confirm.
Windows will apply the restore and restart. Fingers crossed, you should be back in business.
Pro tip: You can also launch System Restore directly by pressing Windows + R and typing rstrui.exe, then pressing Enter, as long as Windows is actually running.
Tips and Troubleshooting
Common Issues
Problem: The Create button is greyed out
This almost always means System Protection is turned off for your C: drive. Go back to Step 1 and enable it. Also make sure the disk space slider isn’t set to zero. If no space is allocated, Windows can’t save any restore points.
Problem: My restore points have disappeared
A few things can wipe out existing restore points:
- The disk space allocated for System Restore filled up, so Windows deleted older points to make room for newer ones.
- Someone turned System Protection off and back on, which deletes all existing restore points for that drive.
- Major Windows updates sometimes clear out old restore points.
The fix: allocate more disk space for System Restore (10% is a good target) and make a habit of creating a new restore point after any big changes.
Problem: System Restore failed with an error
If the restore process fails partway through, try these:
- Temporarily disable your antivirus before running System Restore. Security software can interfere with the process.
- Run System Restore from WinRE (the recovery environment) instead of from within Windows. It’s more reliable when system files might be locked.
- Run System File Checker: open PowerShell as administrator and type
sfc /scannow, then press Enter. This checks for and repairs corrupted system files.
Problem: “Does System Restore back up my photos and documents?”
Nope, this is probably the biggest misconception about System Restore. It only touches system files, drivers, the registry, and installed apps. Your personal files (documents, photos, videos) are completely unaffected, whether you’re creating a restore point or rolling one back.
Pro Tips
- Create a restore point before risky changes: Any time you’re about to edit the registry, install an unfamiliar driver, or make big software changes, create a restore point first. It takes two minutes and can save you hours of headaches.
- Automate it with Task Scheduler: If you want restore points created on a regular schedule, you can set up a Task Scheduler job that runs the
Checkpoint-ComputerPowerShell command daily or weekly. It’s a bit of a power-user move, but worth it if you rely on this feature.
- Check what’s in a restore point before using it: Always click Scan for affected programs in the System Restore wizard before confirming. It’ll show you exactly which apps and drivers will be removed or reverted, so there are no surprises.
- Windows 11 users: The steps in this guide are essentially identical on Windows 11. The search result looks slightly different, but everything else, including System Protection, the Create button, and the restore process, works exactly the same way.
System Restore vs. Other Backup Options
System Restore is great for quick, lightweight rollbacks, but it’s not a replacement for a proper backup. Here’s how it stacks up against the other built-in options:
| Option | What It Backs Up | Best For |
|---|---|---|
| System Restore | System files, drivers, registry, apps | Undoing a bad update or software change |
| File History | Personal files (Documents, Pictures, etc.) | Recovering accidentally deleted files |
| System Image Backup | Everything, the entire drive | Full disaster recovery |
| Reset This PC | Reinstalls Windows (can keep personal files) | When nothing else works |
For the best protection, use System Restore alongside File History (for your personal files) and occasional System Image Backups for the full picture. Think of restore points as your first line of defense, fast and easy, with those other options as your backup backup plan.
You’re All Set
Creating a System Restore Point is one of those things that takes two minutes to do and can save you hours of frustration down the road. Now that you know how to enable System Protection, create restore points manually (both through the UI and PowerShell), and actually use them when things go sideways, you’ve got a solid safety net in place. It’s a good habit to create one before any major system change, and future you will be grateful.
Just remember: restore points protect your system settings and apps, but not your personal files. For complete peace of mind, pair System Restore with a proper backup strategy; it’s worth it.