So you can get back to work
Issues with Gmail not working can play out in many forms. Sometimes, the Gmail app won’t deliver emails to your inbox. Other times, your Gmail inbox repeatedly fails to load in your web browser. Email notification problems are also quite common with Gmail.
This article covers troubleshooting fixes for several Gmail issues on mobile devices (Android and iOS) and desktop computers.
1. Is Your Internet Connection Working?
Your device won’t lose the Gmail app or inbox if there’s a problem with your internet connection. If you’re accessing Gmail in a web browser, open other websites in a new tab and ensure they load correctly.
Do the same on your smartphone or tablet. Alternatively, open other internet-dependent apps on your device and check if they work without issues. If the problem is persistent across all apps or web pages, your internet connection likely is the culprit.
If you’re using mobile or cellular data, make sure you have an active data plan. Putting your phone in and out of airplane mode could also help refresh your internet connection.
To troubleshoot a Wi-Fi connection, move your device closer to the router, update the router’s firmware, or reboot the router if you still can’t access the internet. Likewise, inspect the network’s admin dashboard and confirm that your device isn’t blacklisted.
Refer to our tutorials on fixing slow mobile data connections and getting high-speed internet over Wi-Fi for more troubleshooting solutions.
Related: Learn what to do when Gmail is not sending your emails.
2. Check Gmail Service Status
If your internet connection isn’t the problem with Gmail not working, check that the Gmail servers aren’t experiencing a temporary downtime or outage. Head to the Google Workspace Status Dashboard and confirm that Gmail is available.
A green checkmark next to Gmail means the email service is available and working smoothly. A yellow exclamation or red “X” icon indicates that Gmail is down due to service disruption or service outage, respectively.
You can also check for service disruption on website monitoring platforms like DownDetector. Head to Gmail’s status page on DownDetector and check if any Gmail problems are reported.
3. Use a Supported Browser
Gmail may not work correctly on web browsers that aren’t optimized for the email service. For optimum user experience, Google recommends accessing Gmail on the latest versions of Google Chrome, Mozilla Firefox, Safari, or Microsoft Edge.
Additionally, you must have cookies and Javascript enabled on whatever browser you’re using. Otherwise, Gmail may not load, and you may be unable to use some Gmail features. The recommended browsers mentioned above have both cookies and Javascript enabled by default. So, unless you previously disabled cookies or Javascript, you don’t have to turn them on manually.
If Gmail still isn’t working in your browser, close and reopen the browser and try again. You should also ensure the browser is up-to-date.
4. Try Gmail in Incognito Mode
Buggy browser extensions or add-ons can interfere with some Gmail functionalities and prevent the email service from working correctly. Accessing Gmail in incognito mode can help diagnose if the problem is caused by harmful extensions or applications.
Incognito Mode (or Private Browsing) disables all browser extensions, preventing any bad extension from affecting Gmail performance. If Gmail and other websites work correctly in incognito mode, disable your browser extensions one at a time to detect the problematic extension or add-on.
We recommend reading this guide on installing only safe browser extensions to learn more about low, medium, and high-risk browser extensions.
5. Adjust Date and Time Settings
Your device might be unable to establish a connection with Gmail’s servers if its date or time is incorrect. Head to your device’s settings menu and ensure the date and time settings are set to update automatically.
In Android, go to Settings > System > Date & time and toggle on both Use network-provided time and Use network-provided time zone.
To update your iPhone and iPad’s date & time, go to Settings > General > Date & Time and toggle on Set Automatically.
6. Enable IMAP in Gmail
IMAP (Internet Message Access Protocol) is an email program that lets you access your Gmail inbox from other email clients/apps. If you aren’t getting Gmail messages in the Apple Mail, Yahoo Mail, Outlook, or other apps that use IMAP to access Gmail, check that IMAP is enabled in your Gmail account settings.
- Open your Gmail inbox in a web browser, select the gear icon, and select See all settings.
- Go to the Forwarding and POP/IMAP tab, scroll to the “IMAP access” section, and choose Enabled IMAP.
- Select the Save Changes button at the bottom of the page.
7. Check Gmail Notification Settings
If Gmail won’t deliver notifications for new emails on your device, check your account settings and select the type of emails you want to be notified about. Likewise, make sure Gmail notification is enabled at the system level.
Change Gmail Notification Settings in Android
Open the Gmail app on your device and follow the steps to check and change email notification settings.
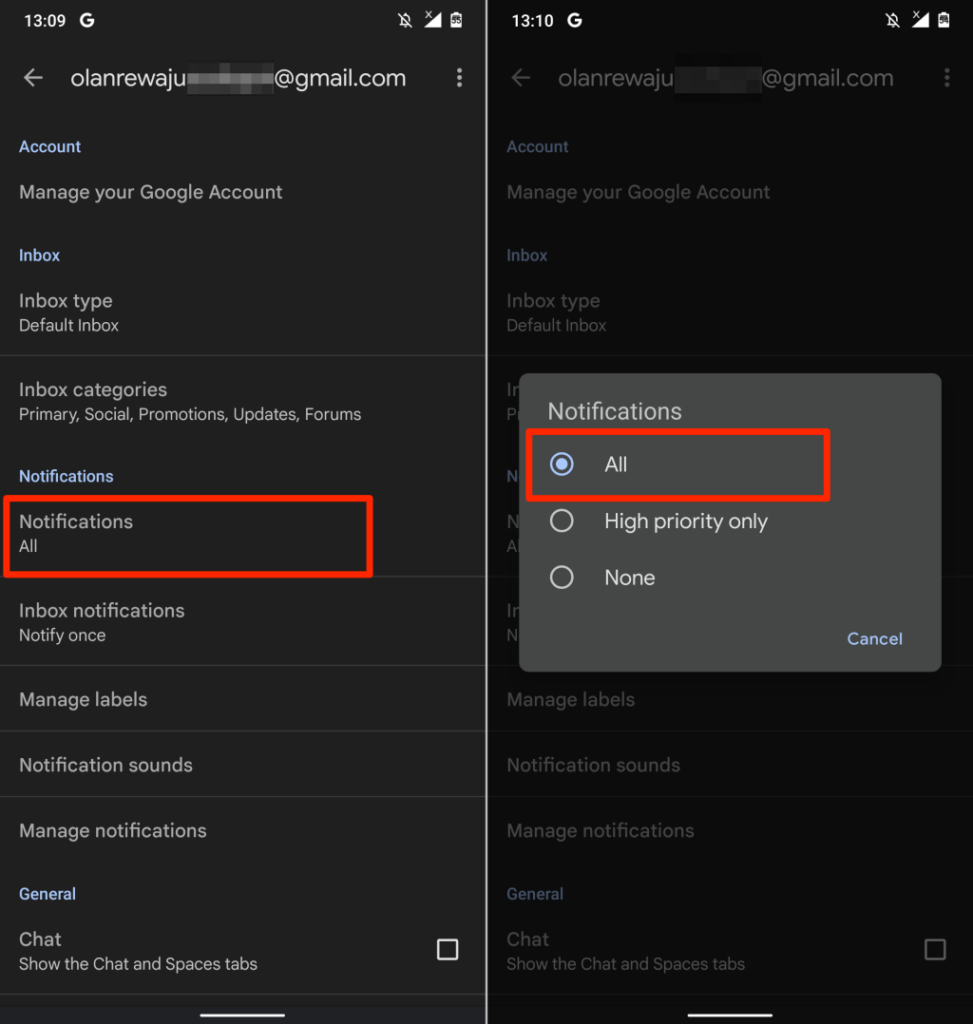
- Tap the hamburger menu icon in the top-left corner and select Settings.
- Select the account whose notification settings you want to change.
- Select Notifications in the “Notifications” section and tap All.
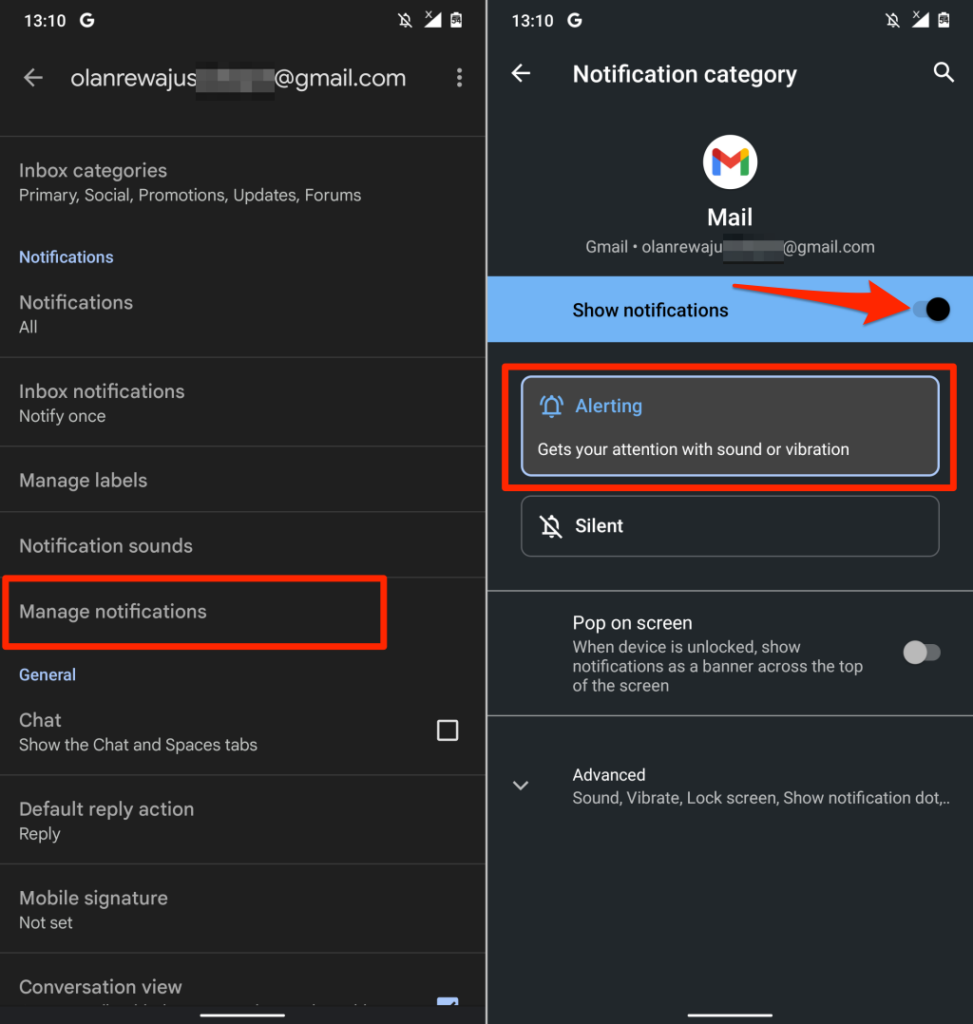
- Return to the “Notifications” section, tap Manage notifications, toggle on Show notifications, and select the Alerting notification delivery.
Change Gmail Notification Settings in iOS
First, you need to ensure Gmail notification is allowed in your iPhone’s Settings menu. Afterward, open the Gmail app and configure your inbox notification preferences.
- Go to Settings, select Gmail, select Notifications, and toggle on Allow Notifications.
Make sure you also toggle on Sounds, Badges, Lock Screen, Notification Center, and Banners in the “Alerts” section.
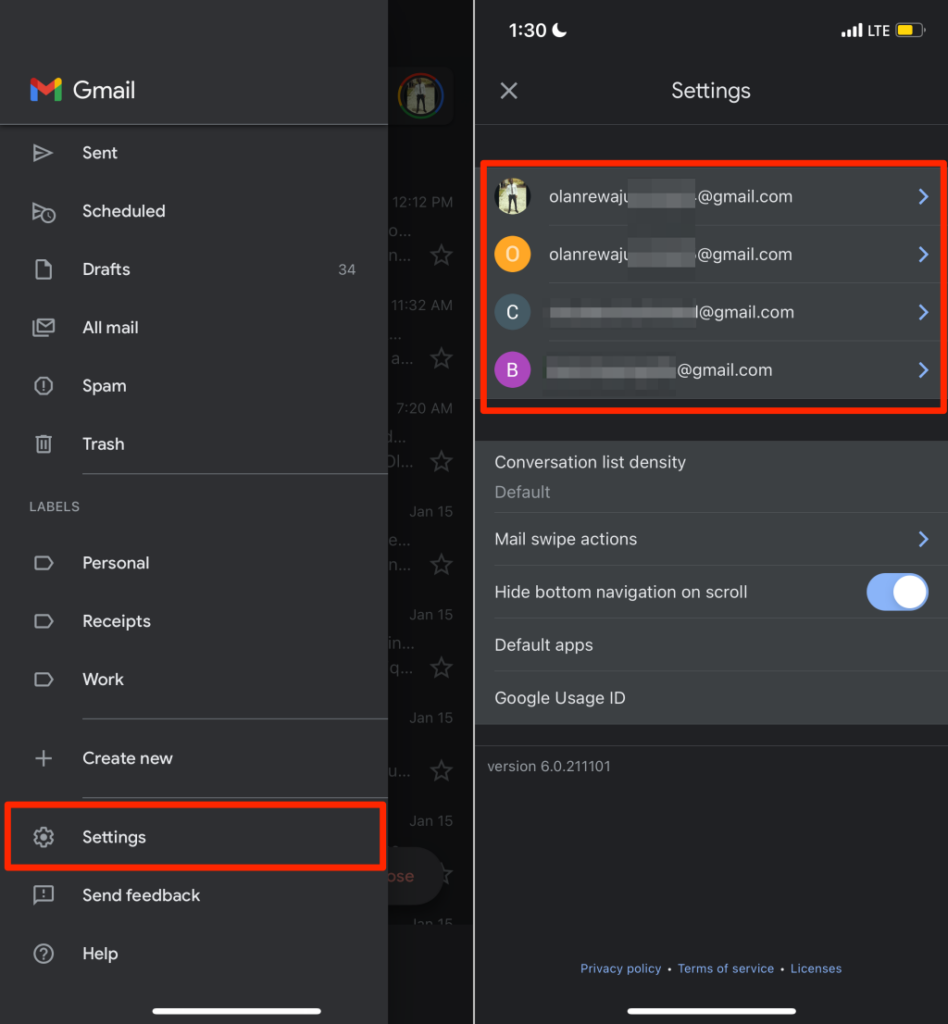
- Open Gmail, tap the hamburger menu icon in the top-left corner, and select Settings.
- Select the email account whose notification settings you want to change.
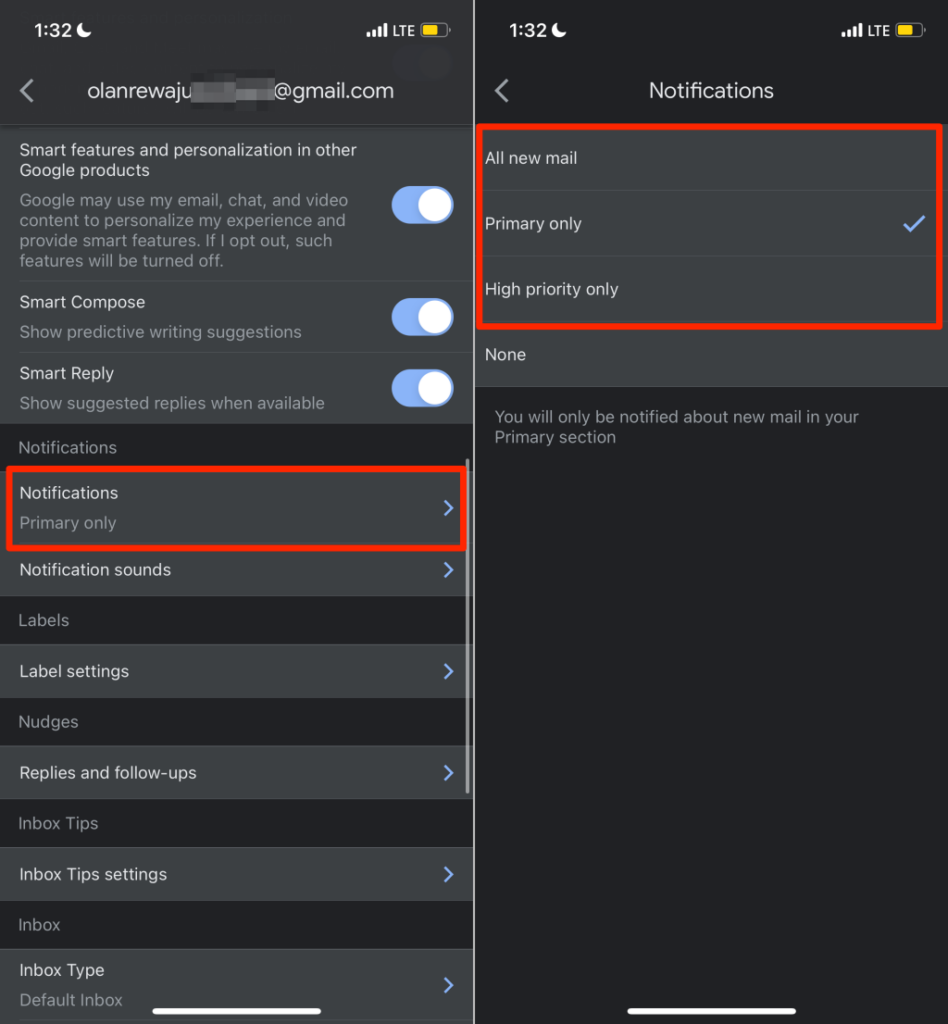
- Scroll to the “Notifications” section and select the type of emails you want to be notified about.
The All new mail option will send notifications for all new emails in your inbox, while “Primary only” will only notify you about new emails in the Primary section of your inbox. Select High priority only if you want notifications for emails that Gmail identifies as high priority.
Change Gmail Notification Settings on Web
Open your Gmail inbox on a web browser and follow the steps below.
- Select the gear icon next to the search bar, and select See all settings.
- In the General tab, scroll to the “Desktop notifications” section, and select Click here to enable desktop notifications for Gmail.
- Select Allow on the “Show notifications” prompt that pops up below the address bar.
- Next, choose either New mail notifications on or Important mail notifications on and then select a preferred notification alert in the Mail notification sounds drop-down menu.
8. Force Close and Reopen Gmail
Force closing Gmail on your mobile device can resolve temporary system glitches causing the app to freeze, crash, or go unresponsive.
Force Close Gmail on iPhone or iPad
The steps to force close an app depend on the model of your iPhone or iPad.
- Open the iOS or iPadOS App Switcher—swipe up from the bottom to the middle of your device’s screen.
If your iPhone or iPad has a Home button, double-click the button to open the App Switcher.
- Locate Gmail and swipe up on the app preview. That’ll force-close Gmail on your iPhone or iPad.
- Head to your device’s Home Screen or App Library, reopen Gmail and check if it now works as expected.
Force Close Gmail in Android
Follow the steps below to force-close Gmail on an Android device.
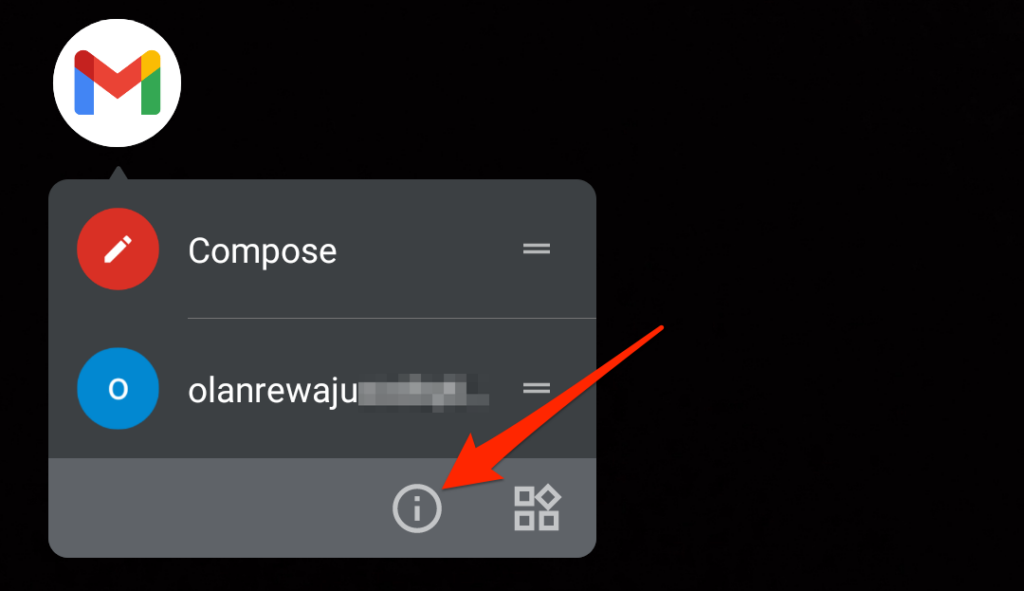
- Go to your device’s Home Screen or app launcher, press and hold the Gmail app icon, and select the info icon.
Alternatively, open the Settings app, go to App & notifications > See All Apps (or App info), and select Gmail.
- Tap Force Stop, select OK on the confirmation prompt and tap Open to relaunch Gmail.
If the problem persists, clear the app’s cache file and storage data and try again. Jump to the next section for detailed instructions.
9. Clear Gmail Cache & App Data
Accumulation of corrupt cache files and app data could cause the Gmail app to crash and exhibit other forms of malfunction.
Force close Gmail and follow the steps below to clear the app’s cache and storage data.
- Go to Settings > Apps & notifications > See All Apps (or App info) > Gmail and select Storage & cache.
- Tap the Clear Cache option.
Open Gmail and check if it now works correctly. Otherwise, delete Gmail’s data from your device if clearing its cache storage doesn’t resolve the problem.
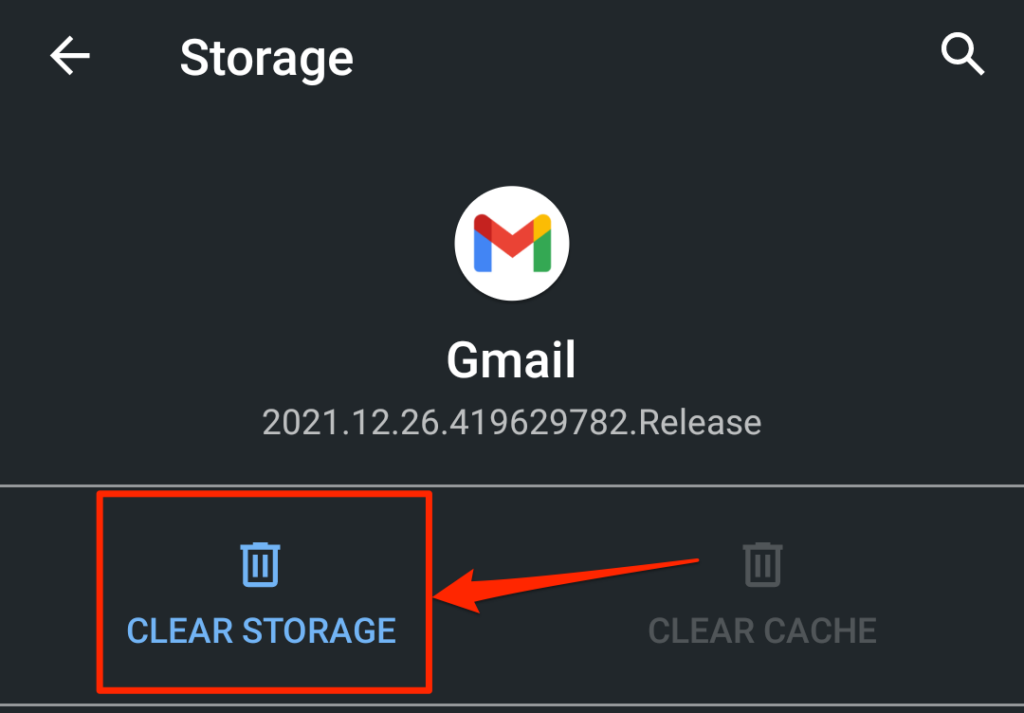
- Tap Clear Storage (or Clear Data) and select OK on the confirmation prompt.
Note that you’ll have to re-do all customizations made to Gmail (e.g., notification settings, theme, swipe actions, etc.) after clearing the app’s data.
10. Update Gmail
Software bugs or device incompatibility are noteworthy causes for failure. You might encounter issues using Gmail if the app version installed on your device is outdated or incompatible with your device.
Head to your device’s app store (Google Play Store or Apple App Store) and update Gmail to the latest version. If the problem continues, uninstall and reinstall Gmail from your device. That could also help resolve minor performance issues.
11. Restart Your Device
Do you have the latest Gmail version on your device? Does Gmail still fail to work correctly after updating the app? Rebooting your device could fix the problem. Shut down your device, turn it back on, and try using Gmail again.
Contact Google Support
If none of these troubleshooting fixes resolve the problem, visit the Gmail Help Center for more potential solutions to Gmail issues.


