
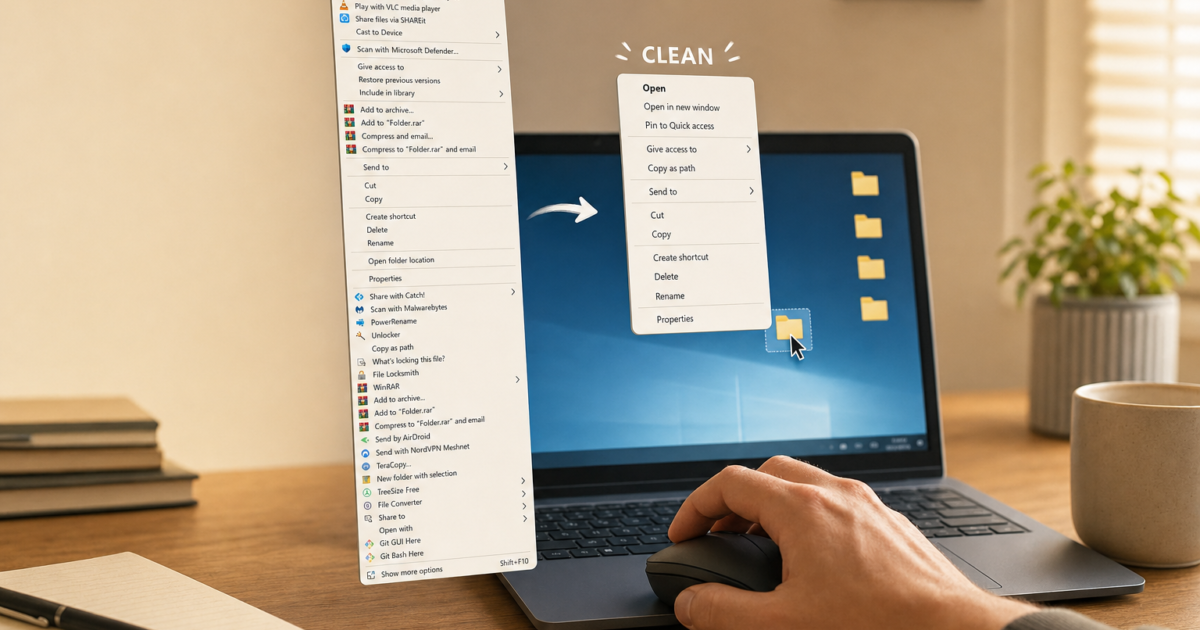
You right-click a file and wait… and wait… and finally, a massive wall of menu options appears. Sound familiar? If you’ve installed a bunch of apps over the years, there’s a good chance half of them quietly added themselves to your right-click context menu, and now every right-click feels like a chore.
The good news: you can clean all of that up. In this guide, you’ll learn how to remove unwanted items from your right-click menu, add your own custom shortcuts, and deal with the new Windows 11 context menu that hides half your options. We’ll cover both the safe tool-based approach (recommended for most people) and the manual registry method for those who want full control.
Before You Begin
- A PC running Windows 10 (22H2) or Windows 11 (23H2 or later)
- Administrator access on your account
- A few minutes to back up your registry before making any changes
Speaking of backups, seriously, don’t skip that step. The registry is basically the brain of Windows, and editing it without a backup is like performing surgery without a safety net. We’ll show you how to back it up in the manual section below.
Windows 10 vs. Windows 11: What’s Different?
Before diving in, it helps to know what you’re actually working with, because Microsoft changed things up quite a bit in Windows 11.
Windows 10 uses a single “classic” context menu. Everything shows up in one list when you right-click, and all the editing methods below apply directly.
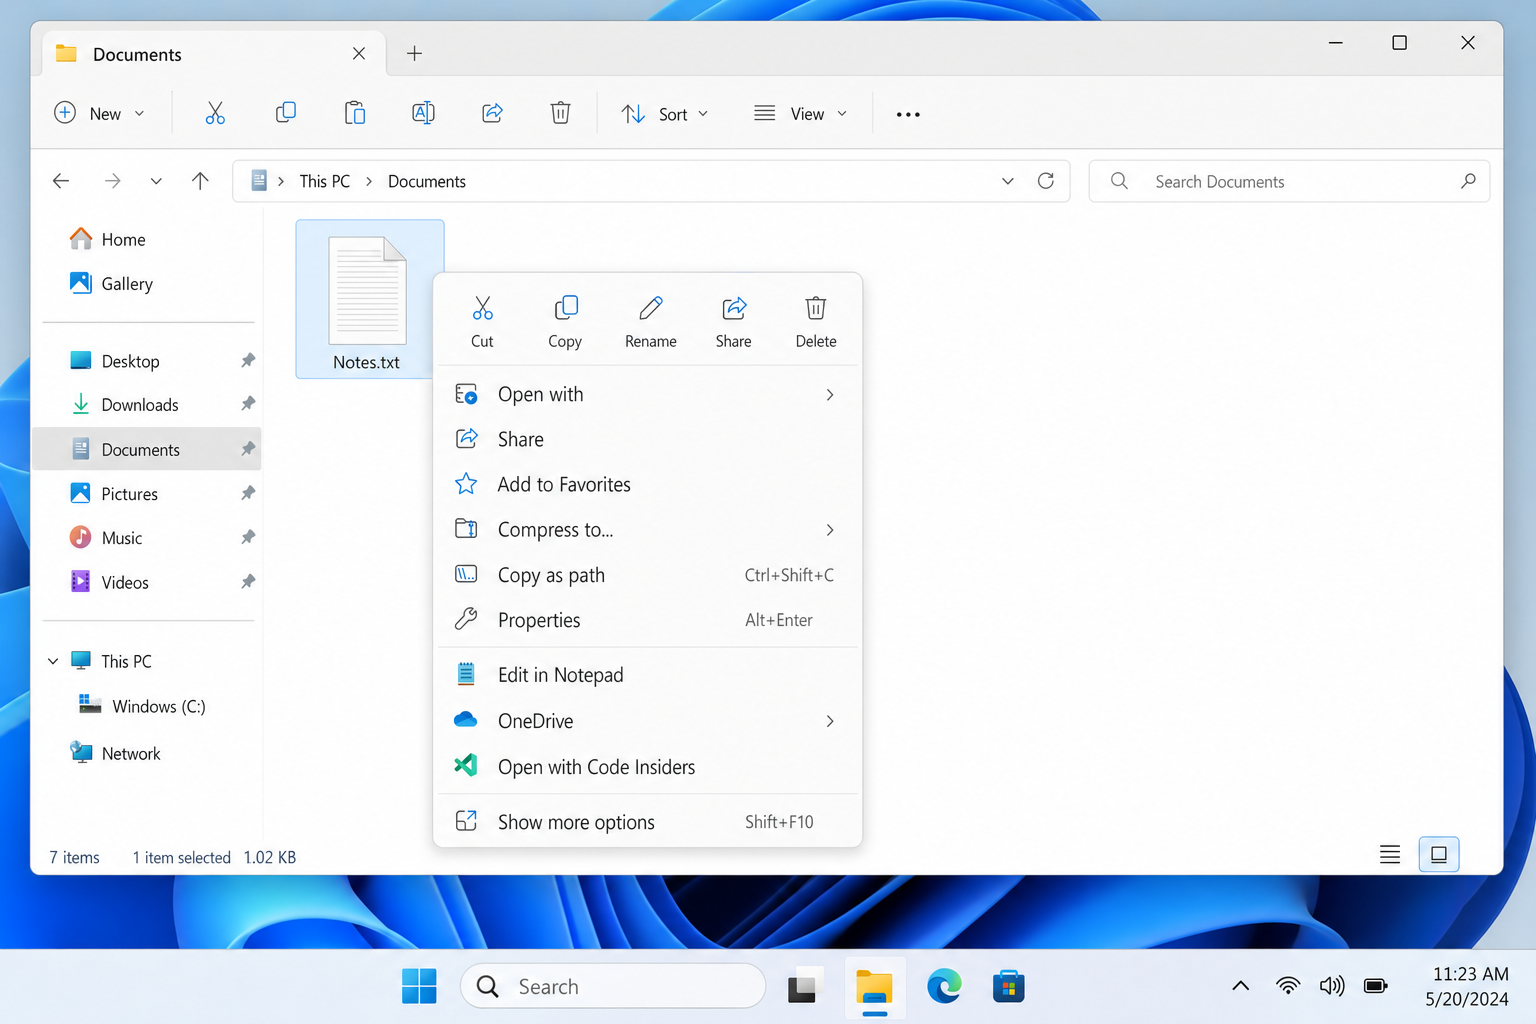
Windows 11 introduced a new compact context menu that only shows a handful of common actions. Third-party items (like “Open with 7-Zip” or “Scan with Antivirus”) are hidden behind a Show more options link at the bottom. That second click opens the classic menu, which works the same way as Windows 10.
To skip straight to the classic menu on Windows 11 without clicking “Show more options,” hold Shift and right-click, or select a file and press Shift + F10. Quick tip worth memorizing!
The Easiest Way: Use a Free Tool Instead of the Registry
If the word “registry” makes you nervous, you’re not alone, and the good news is you don’t have to go anywhere near it to clean up your context menu. NirSoft makes a pair of free, lightweight tools that handle this beautifully.
- ShellExView: Lists every shell extension installed on your PC (including context menu handlers) and lets you disable them with a single click. This is the best tool for tracking down what’s slowing your right-click menu down.
- ShellMenuView: Specifically targets the static items registered under the
shellkey, things like “Open with Notepad” or custom commands added by apps.
Both tools are free, portable (no installation needed), and work on Windows 10 and 11. Download them from the NirSoft ShellExView page and NirSoft ShellMenuView page.
How to Use ShellExView to Disable Context Menu Items
- Download and open ShellExView (no installation needed, just run the .exe).
- Click the Type column header to sort by extension type. Look for entries labeled Context Menu.
- Items highlighted in pink are third-party extensions (non-Microsoft). These are your prime suspects for a slow or cluttered menu.
- Click an item you want to disable, then press
F7or right-click it and choose Disable Selected Items. - Right-click a file to test your menu. Repeat until it’s cleaned up to your liking.
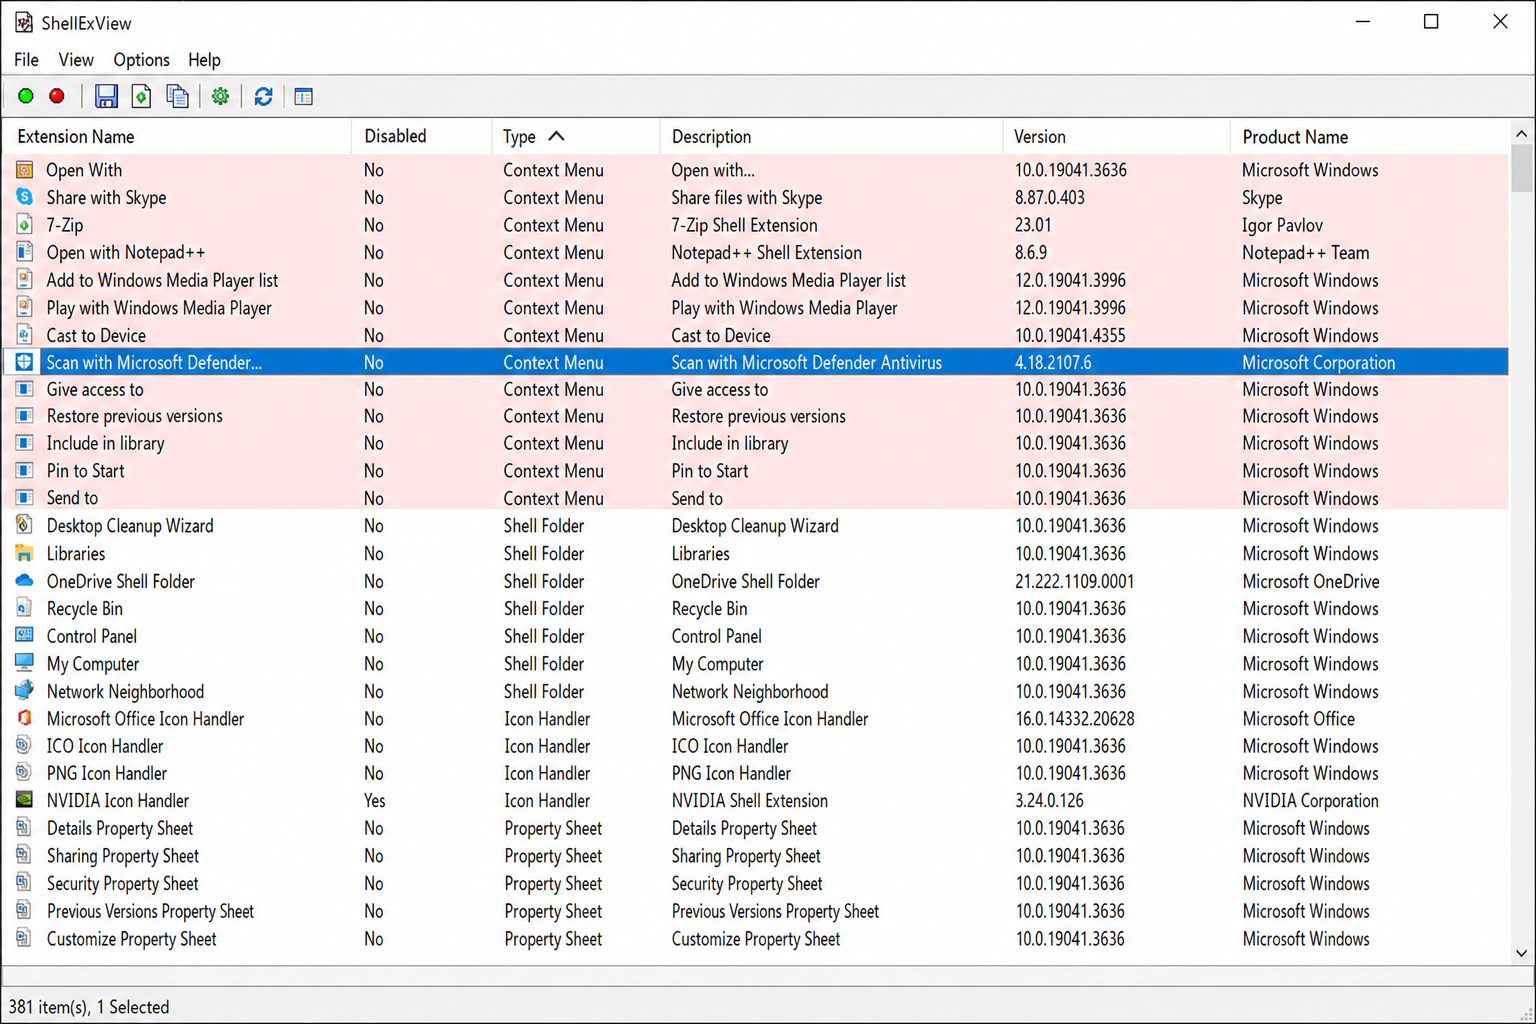
If you go too far and something stops working, just reopen ShellExView and re-enable the item by pressing F8. It’s completely reversible, which is why this method is so much friendlier than editing the registry directly.
Manual Method: Edit the Right-Click Menu in the Registry
Want full control? The registry method lets you remove items, add your own custom commands, and tweak things that tools can’t always reach. Just make sure you back up first.
Step 1: Back Up the Registry
- Press
Windows + R, typeregedit, and press Enter. Click Yes if prompted by User Account Control. - In the Registry Editor, click File > Export.
- Under Export range, select All.
- Choose a save location, give the file a name like
registry-backup-today, and click Save.
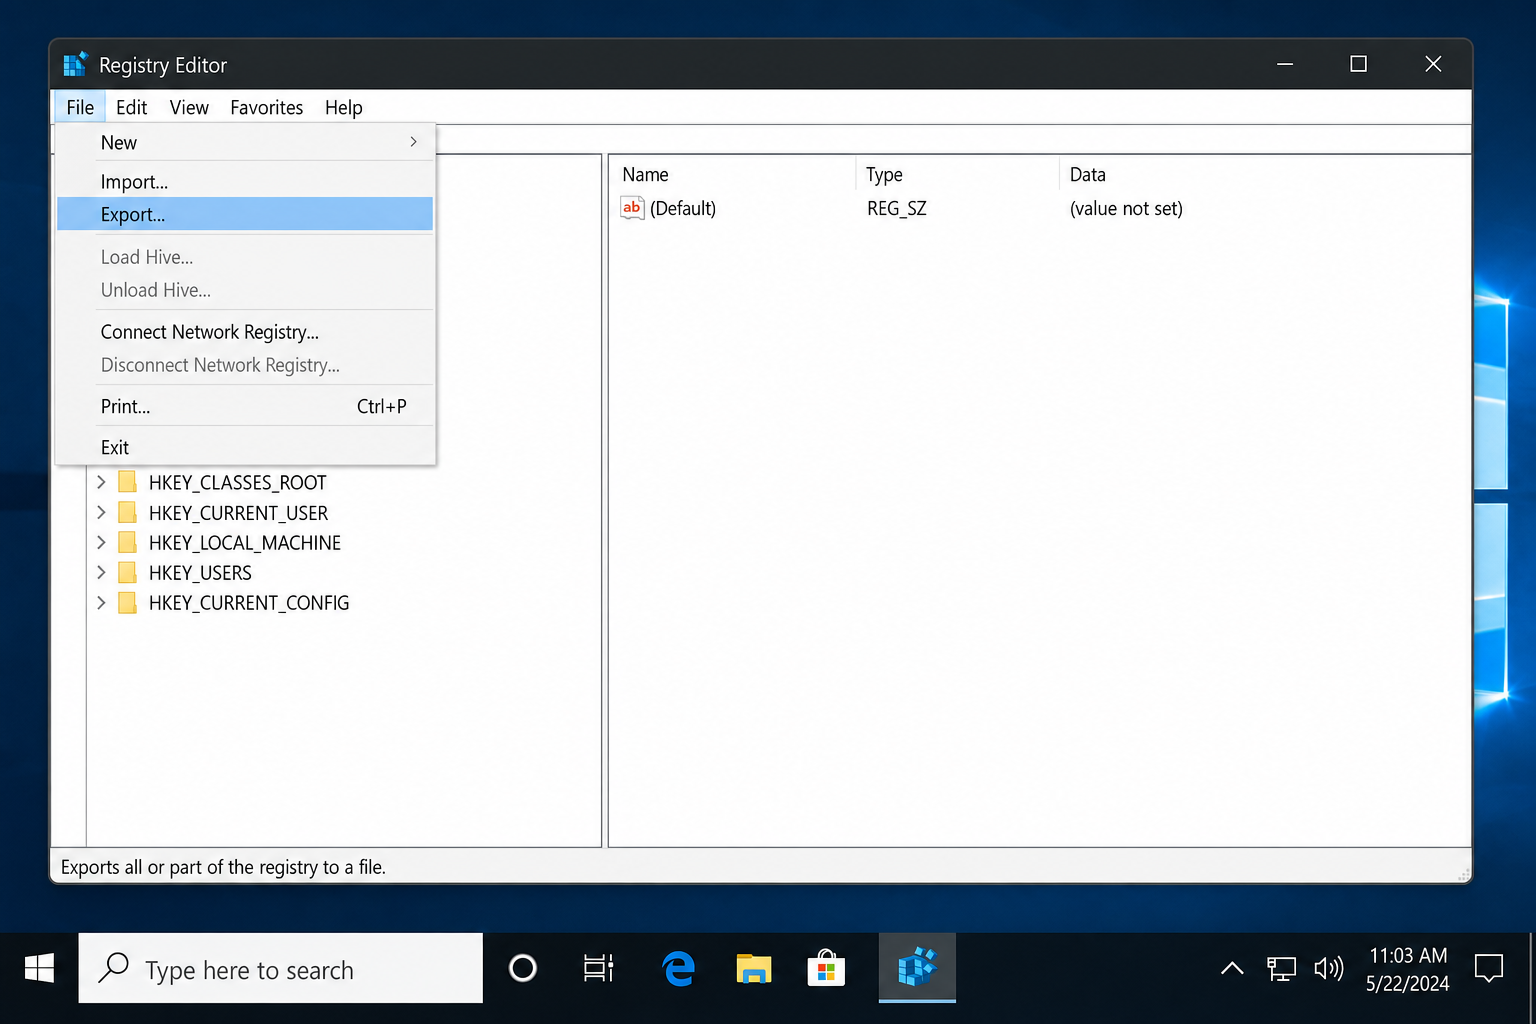
If anything goes wrong after your edits, you can restore this backup by double-clicking the .reg file you just saved. Keep it somewhere easy to find.
Step 2: Know Where Context Menu Items Live
Context menu entries aren’t all stored in one place. They’re scattered across several registry locations depending on what you right-clicked. Here’s the map:
| What You Right-Clicked | Registry Location |
|---|---|
| Any file | HKEY_CLASSES_ROOT\\shellHKEY_CLASSES_ROOT\\shellex\ContextMenuHandlers |
| All file system objects | HKEY_CLASSES_ROOT\AllFilesystemObjects\shellex\ContextMenuHandlers |
| Folders | HKEY_CLASSES_ROOT\Directory\shellHKEY_CLASSES_ROOT\Directory\shellex\ContextMenuHandlers |
| Desktop / folder background | HKEY_CLASSES_ROOT\Directory\Background\shellHKEY_CLASSES_ROOT\Directory\Background\shellex\ContextMenuHandlers |
| Drives (like C:\) | HKEY_CLASSES_ROOT\Drive\shellHKEY_CLASSES_ROOT\Drive\shellex\ContextMenuHandlers |
| Specific file types (e.g., .txt) | HKEY_CLASSES_ROOT\.txt → find the ProgID → HKEY_CLASSES_ROOT\[ProgID]\shell |
The difference between shell and shellex\ContextMenuHandlers: shell holds simple static commands (like “Open with Notepad”), while shellex\ContextMenuHandlers holds more complex shell extensions, the kind that apps like WinRAR, antivirus programs, and cloud storage clients register.
Step 3: Remove an Item from the Right-Click Menu
Let’s say you want to remove a third-party item from the menu when you right-click a file. Here’s how:
- In Registry Editor, navigate to
HKEY_CLASSES_ROOT\*\shellex\ContextMenuHandlers. - Expand the key to see a list of subkeys. Each one represents an app that added itself to your right-click menu.
- Find the key that matches the app you want to remove (for example, WinRAR or 7-Zip).
- Before deleting, right-click the key and choose Export to save a backup of just that entry.
- Right-click the key and choose Delete, then confirm.
- Restart File Explorer to apply the change: open Task Manager (
Ctrl + Shift + Esc), find Windows Explorer in the list, right-click it, and choose Restart.
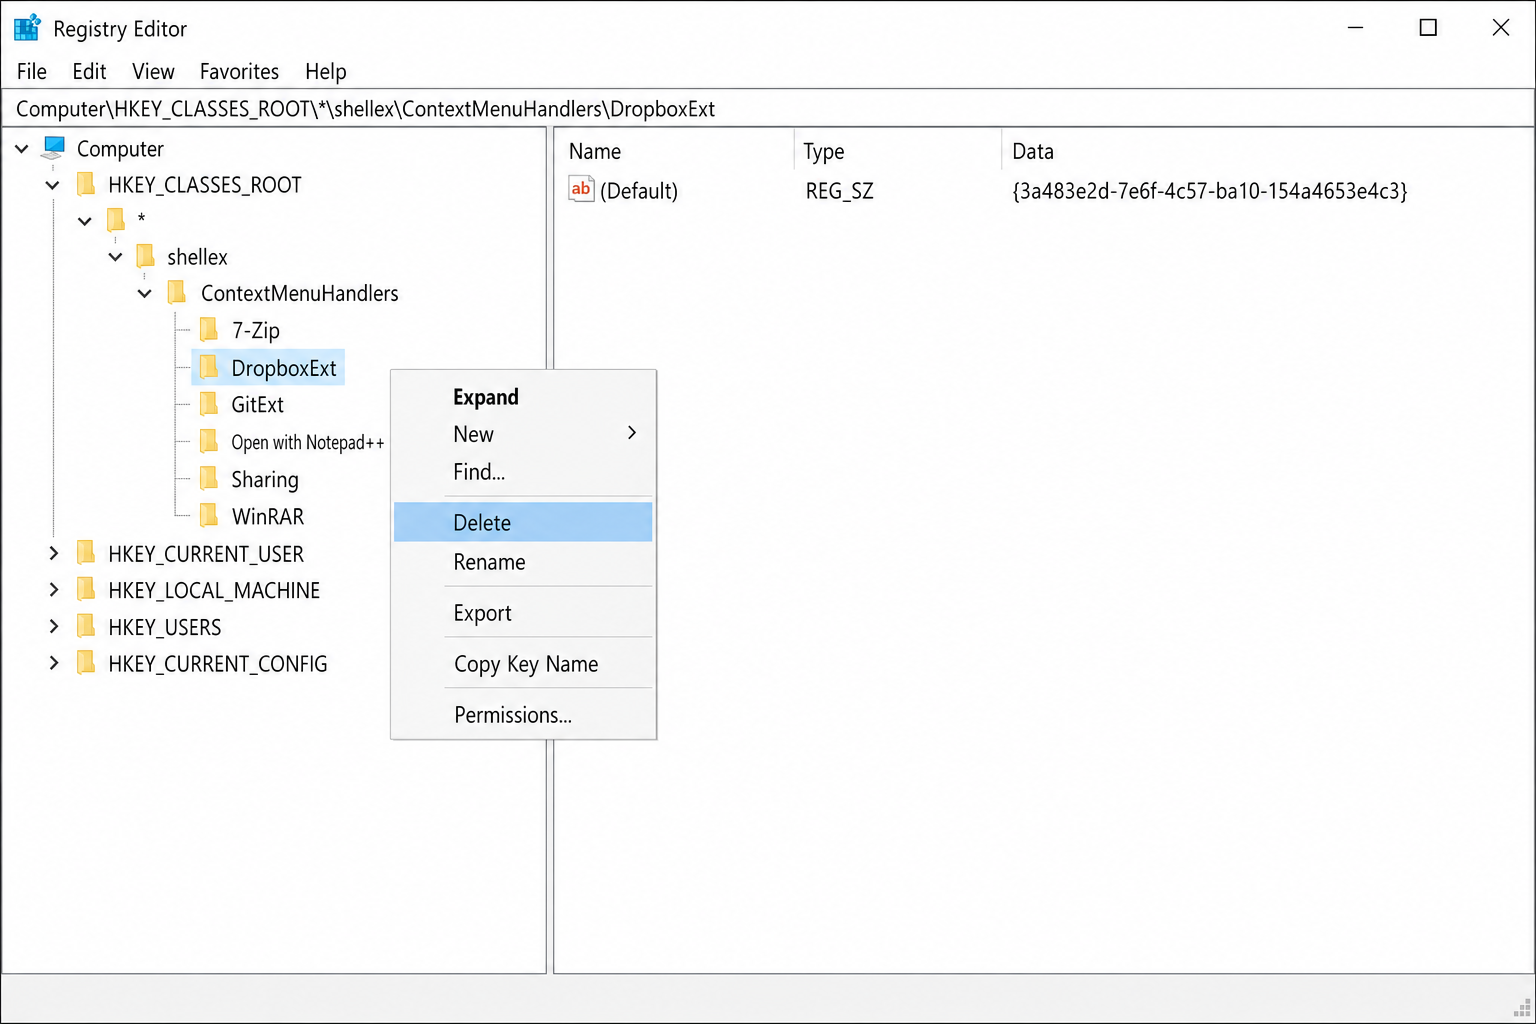
Right-click a file to confirm the item is gone. If you want it back, just double-click the .reg file you exported in step 4.
Step 4: Add a Custom Item to the Right-Click Menu
This is where things get fun. You can add any app or command you want to your right-click menu. Here’s an example: adding “Open with Notepad” for all files.
- Navigate to
HKEY_CLASSES_ROOT\*\shellin Registry Editor. - Right-click on shell and choose New > Key. Name it whatever you want to appear in the menu, for example,
Open with Notepad. - Right-click your new key and choose New > Key again. Name this one
command(lowercase, exactly). - Click the command key to select it. In the right pane, double-click the (Default) value.
- In the Value data field, type the path to your program followed by
"%1". For Notepad, that’s:notepad.exe "%1" - Click OK.
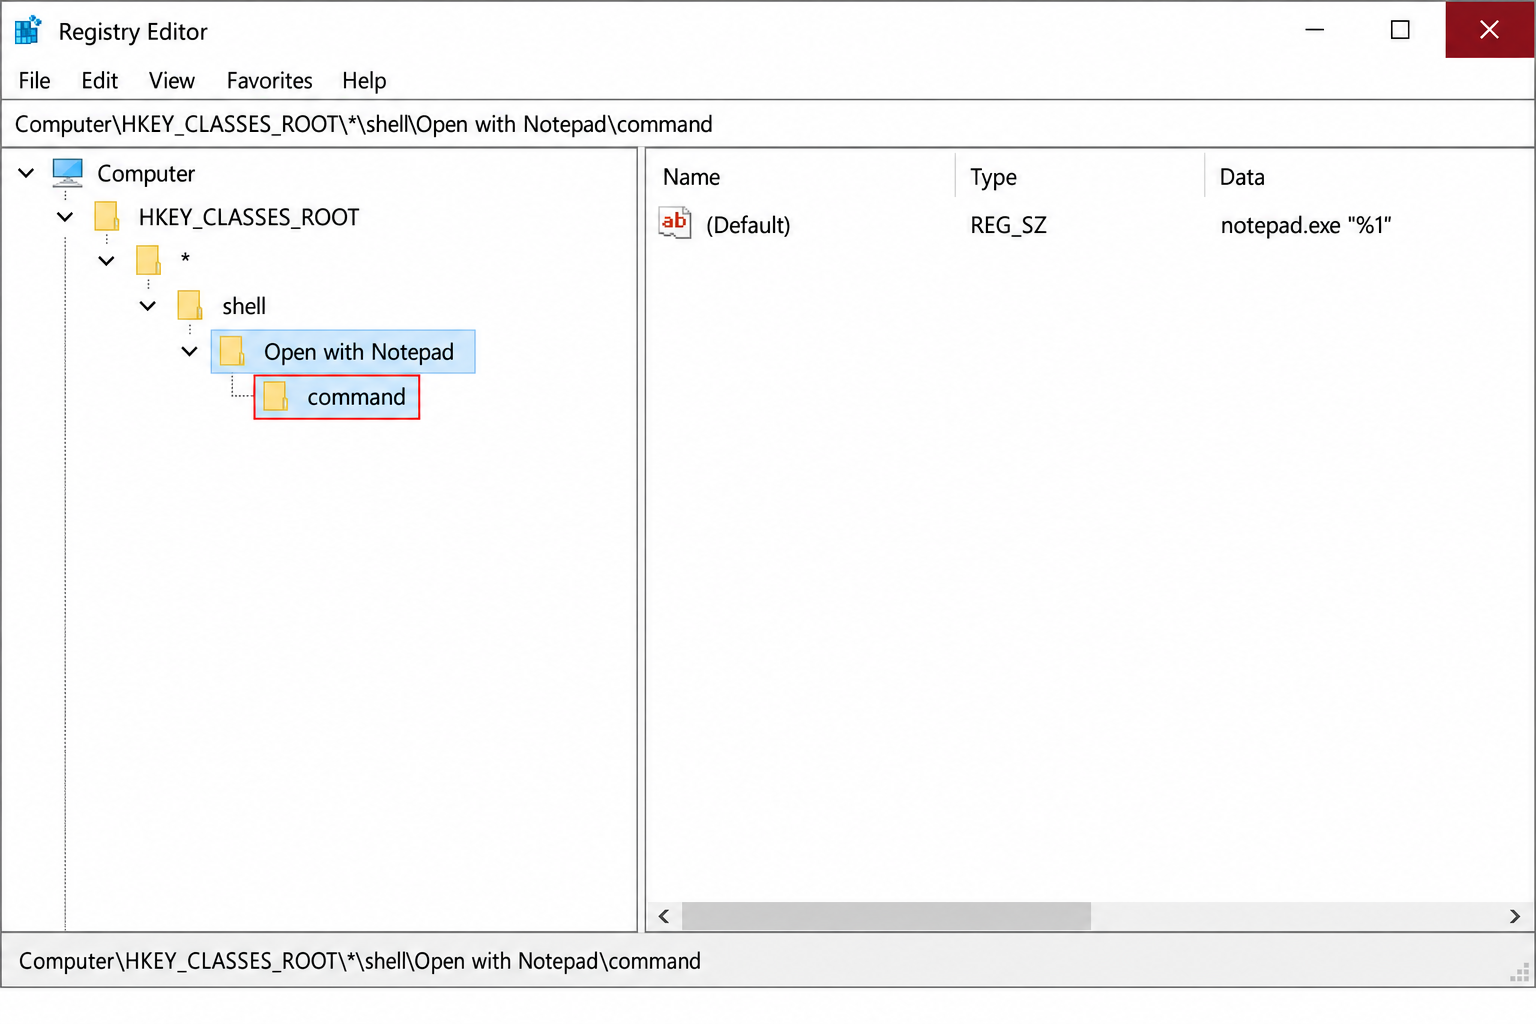
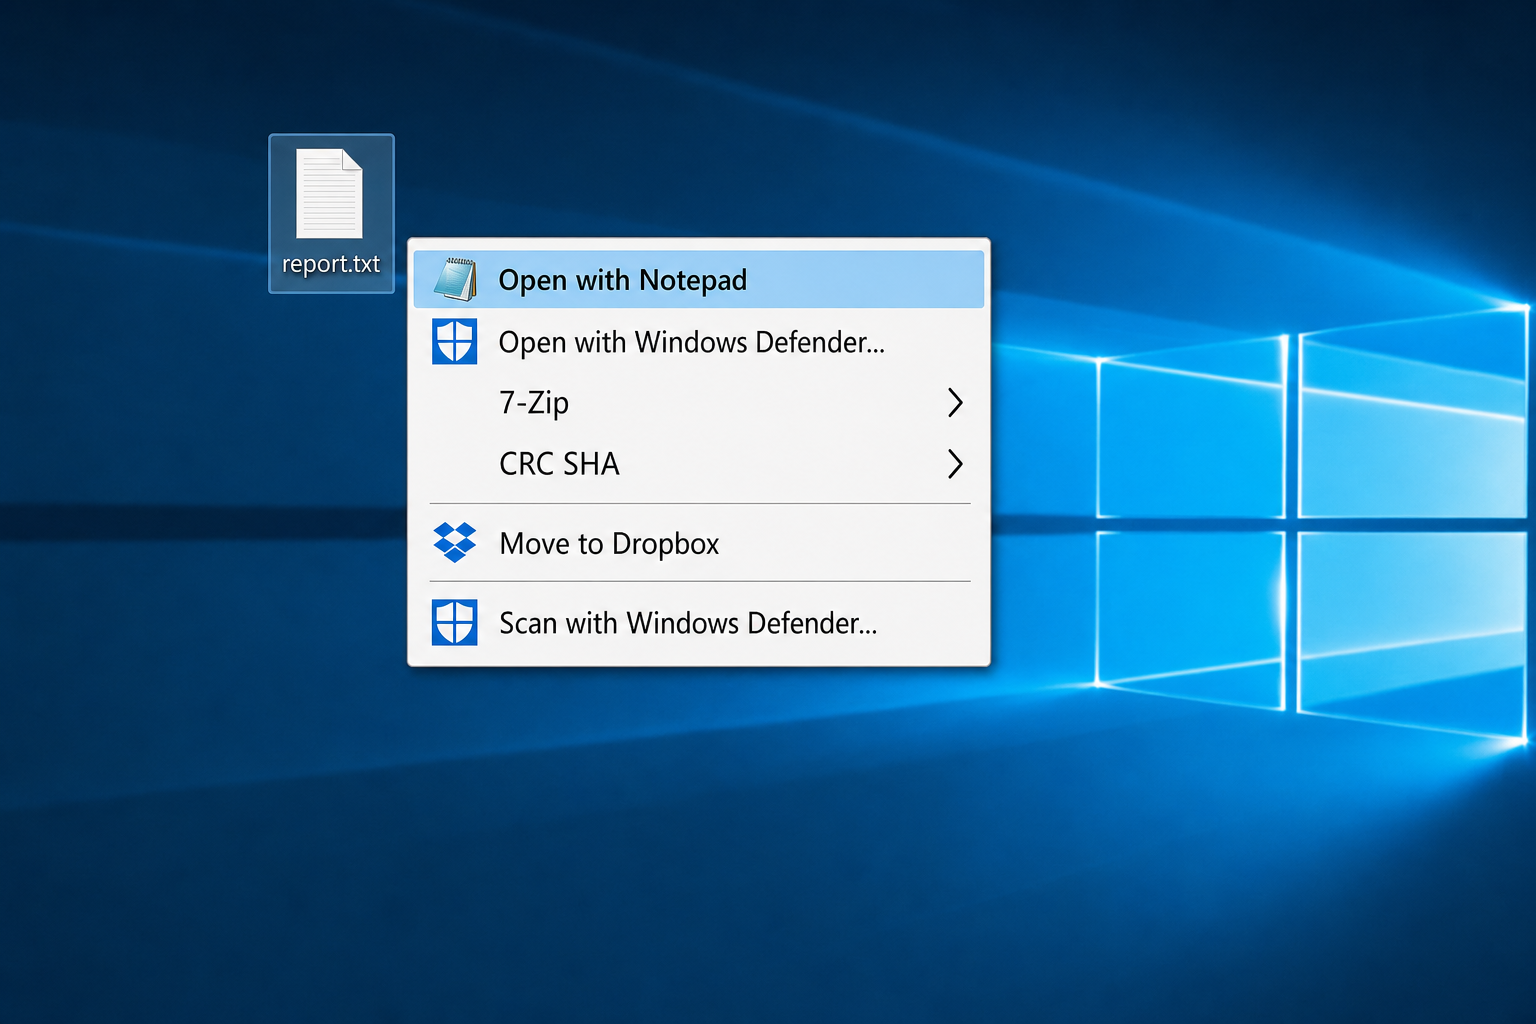
Now right-click any file and your new option will be right there in the menu. You can do this for any application, just swap out the path to Notepad for the path to whatever app you want to add.
Editing the Folder and Desktop Right-Click Menus
The exact same steps apply for folders and the desktop. It’s just a different registry path. Use the table above to navigate to the right location, then remove or add keys the same way.
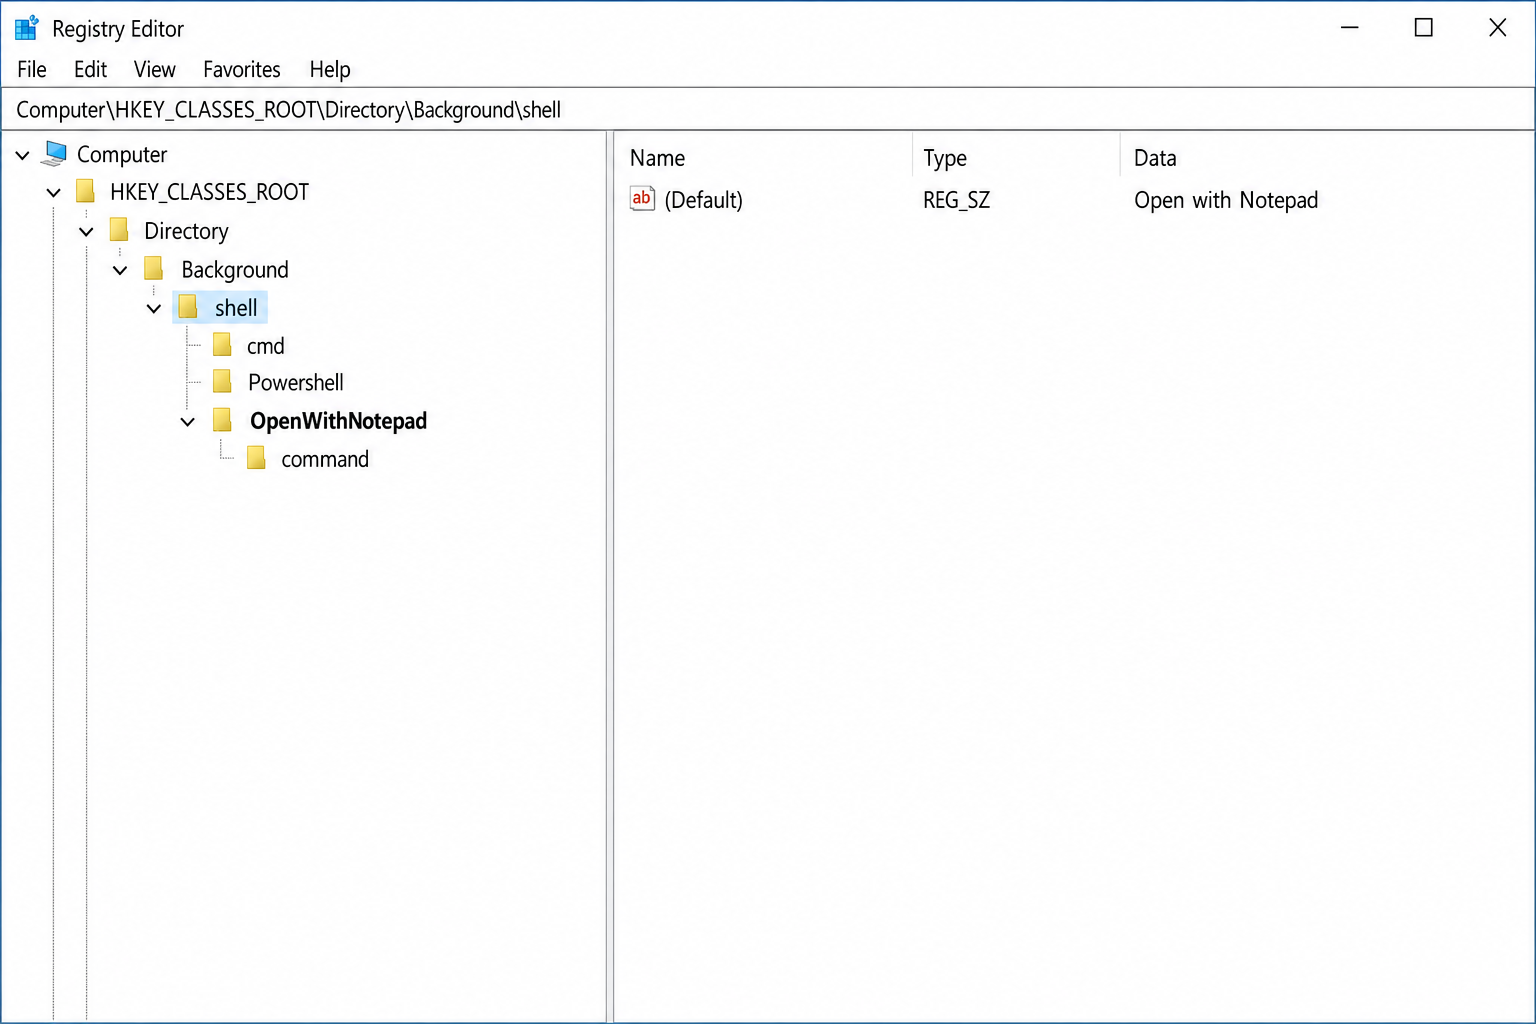
For example, to add a custom shortcut to the desktop right-click menu, navigate to HKEY_CLASSES_ROOT\Directory\Background\shell and follow the same key-creation steps above. It works like a charm for adding things like “Open Terminal Here” or a quick shortcut to a frequently used app.
Windows 11-Specific: Restoring the Classic Context Menu
If you’re on Windows 11 and the two-click process to reach the classic menu is driving you up the wall, there are a couple of options, but they come with some important caveats.
Registry Hack (Works on Windows 11 23H2 and Earlier Only)
There’s a well-known registry trick that forces Windows 11 to always show the classic context menu by default. Here’s how to do it:
- Open Windows Terminal or Command Prompt as an administrator. (Right-click the Start button and choose Terminal (Admin) or Command Prompt (Admin).)
- Paste in this command and press Enter:
reg.exe add "HKCU\Software\Classes\CLSID\{86ca1aa0-34aa-4e8b-a509-50c905bae2a2}\InprocServer32" /f /ve - Restart File Explorer (Task Manager > Windows Explorer > Restart).
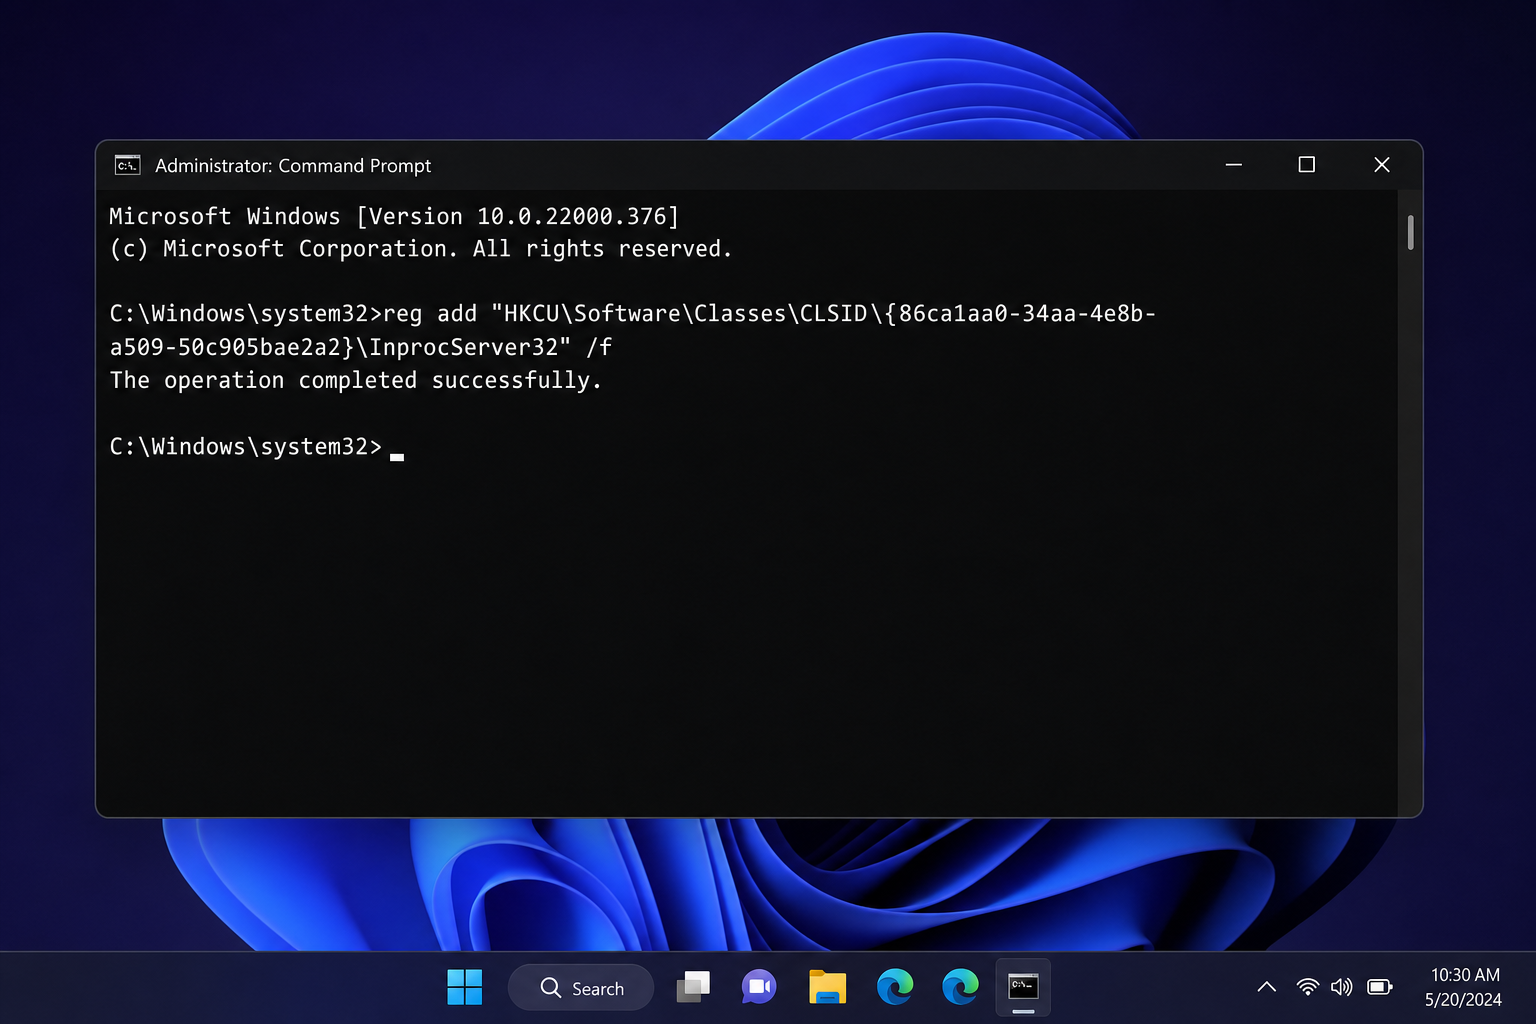
To undo this and go back to the compact menu, run:
reg.exe delete "HKCU\Software\Classes\CLSID\{86ca1aa0-34aa-4e8b-a509-50c905bae2a2}" /f
Important: This trick is blocked in Windows 11 24H2 and later. If you’ve updated to 24H2, this command won’t do anything useful, as Microsoft has patched it out. If you try it and it doesn’t work, that’s likely why.
Third-Party Tools for Windows 11 (Including 24H2)
If you’re on Windows 11 24H2 or just want a more complete solution, these tools can restore the classic context menu experience at a deeper level:
- ExplorerPatcher: A free, open-source tool that hooks into Windows Explorer and restores classic UI elements including the context menu. It’s actively updated to keep up with new Windows builds.
- StartAllBack: A paid option that brings back the Windows 10-style Start menu, taskbar, and context menus. Polished and reliable.
- Winaero Tweaker: A free tweaking suite that includes a toggle for restoring classic context menus (where supported) without needing to touch the registry yourself.
Keep in mind that these tools modify Windows at a fairly deep level, so always download them from their official sources and keep them updated alongside Windows.
Tips and Troubleshooting
Common Issues
Problem: My right-click menu is still slow even after removing items
The culprit is usually a shell extension that’s taking too long to load, not just the number of items. Cloud storage apps (OneDrive, Dropbox, Google Drive) and antivirus software are the most common offenders. Use ShellExView to sort by type, filter for Context Menu handlers, and disable third-party ones one at a time until the slowness goes away.
Problem: I deleted a registry key and now something is broken
This is exactly why we back up first! Double-click the .reg file you exported before making changes to restore that specific key. If things are really broken, use the full registry backup you made at the start (File > Import in Registry Editor). If Explorer won’t even open, boot into Safe Mode first, then restore.
Problem: A new app I installed isn’t showing up in the right-click menu on Windows 11
Most third-party apps only register themselves in the classic menu, not the new compact one. Try Shift + right-clicking to open the classic menu directly. Your app’s option is probably hiding there. There’s no officially supported way to force an arbitrary command into the new compact menu without third-party UI tools.
Problem: The classic menu registry hack stopped working after a Windows update
You’ve probably updated to Windows 11 24H2, where Microsoft blocked that trick. Run the delete command to remove the broken registry key (so it doesn’t cause side effects), then switch to ExplorerPatcher or StartAllBack if you really want the classic menu back permanently.
Pro Tips
- Check the app’s own settings first: Many apps (7-Zip, WinRAR, Dropbox, etc.) have a built-in option to show or hide their context menu entry. It’s always safer to turn it off there than to delete the registry key manually.
- Restart Explorer after every change: Registry edits don’t always take effect instantly. Use Task Manager to restart Windows Explorer after each change to see the result immediately.
- Clean up the “New” submenu too: That New submenu (New Text Document, New Bitmap Image, etc.) can get cluttered too. Use ShellMenuNew from NirSoft to manage it, or manually remove entries under
HKEY_CLASSES_ROOT\.ext\ShellNewfor specific file types. - Shift + right-click is your friend on Windows 11: Skip the “Show more options” click by holding Shift before you right-click. Works anywhere in File Explorer and on the desktop.
Wrapping Up
A bloated right-click menu is one of those small annoyances that adds up fast, but it’s completely fixable. For most people, ShellExView is all you need: it’s safe, reversible, and takes about five minutes to clean things up. If you want to go deeper, the registry method gives you full control over what shows up, what doesn’t, and even lets you add your own custom shortcuts.
If you’re on Windows 11 and frustrated by the new compact menu, the Shift + right-click shortcut is honestly the easiest workaround, and if you really can’t stand it, ExplorerPatcher is worth a look. Either way, you no longer have to sit there waiting two seconds every time you right-click a file. If you’re also looking to turn off visual effects in Windows 11 for better performance, that’s another great way to speed up your overall experience.