
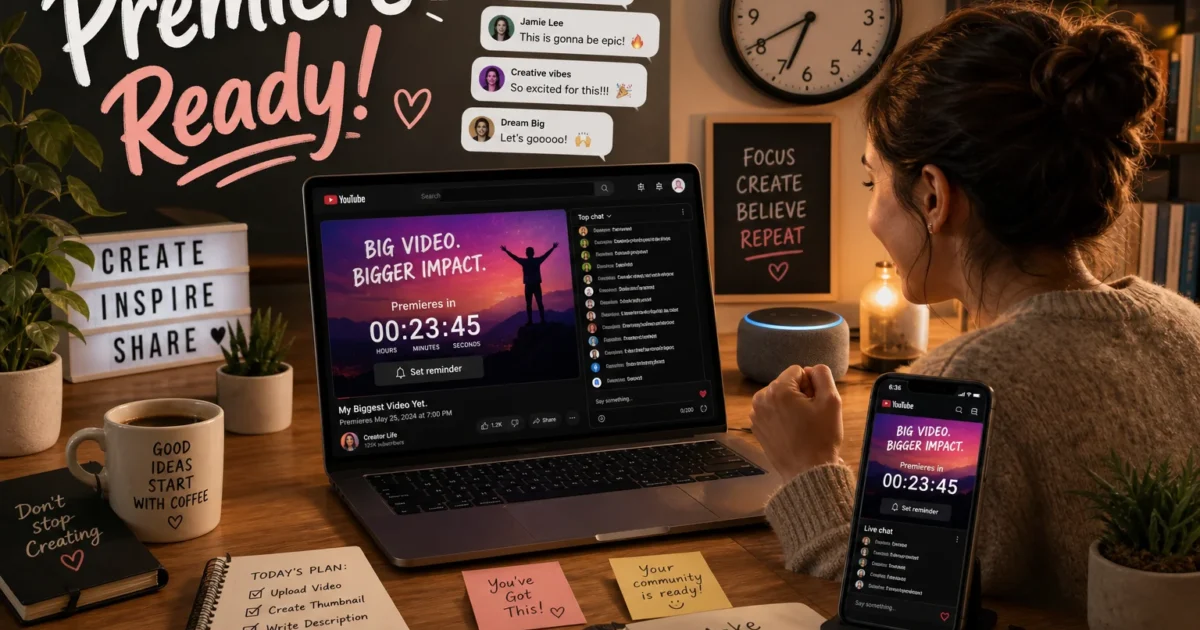
What’s more annoying than planning a big video release, only to have it quietly appear while nobody’s watching? A YouTube Premiere gives that prerecorded video a proper opening night, complete with reminders, a countdown, and live chat.
You can set one up in YouTube Studio on Windows, macOS, or the web. The YouTube app also has the main Premiere option on Android and iOS, though desktop gives you more control.
What Is a YouTube Premiere?
A YouTube Premiere is a prerecorded video that debuts at a shared start time. Think of it like a movie opening night: the film is finished, but everyone watches its first showing together.
A Premiere gives you:
- A public watch page: Share the video’s page before it begins.
- Viewer reminders: Viewers can ask YouTube to notify them before the start.
- A countdown: YouTube shows a short countdown before playback.
- Live chat: You and your viewers can chat during the shared debut.
- A regular video afterward: The upload stays on your channel after the event ends.
An ordinary scheduled upload publishes at the time you choose. A Premiere adds the countdown, watch page, reminders, and shared first viewing.
Live streams work differently. You send live video to YouTube as it happens, while a Premiere plays a completed file uploaded earlier. You can still chat with viewers, but the video’s content is already locked in (which takes some pressure off).
Prerequisites
Before starting, make sure you have:
- A Google account with a YouTube channel
- Access to the correct channel
- A completed video file
- A title, description, thumbnail, and audience selection
- A supported web browser for the full desktop setup
- The current YouTube app for the mobile flow
- Enough time for YouTube to upload and process the video
- A planned date and time if you want a scheduled Premiere
You don’t need to install a separate Premiere program. The feature lives inside YouTube Studio and the YouTube mobile app.
How to Premiere a YouTube Video Step by Step
The desktop browser has the clearest setup and the full set of controls. I’d start there whenever you can.
Step 1: Open YouTube Studio
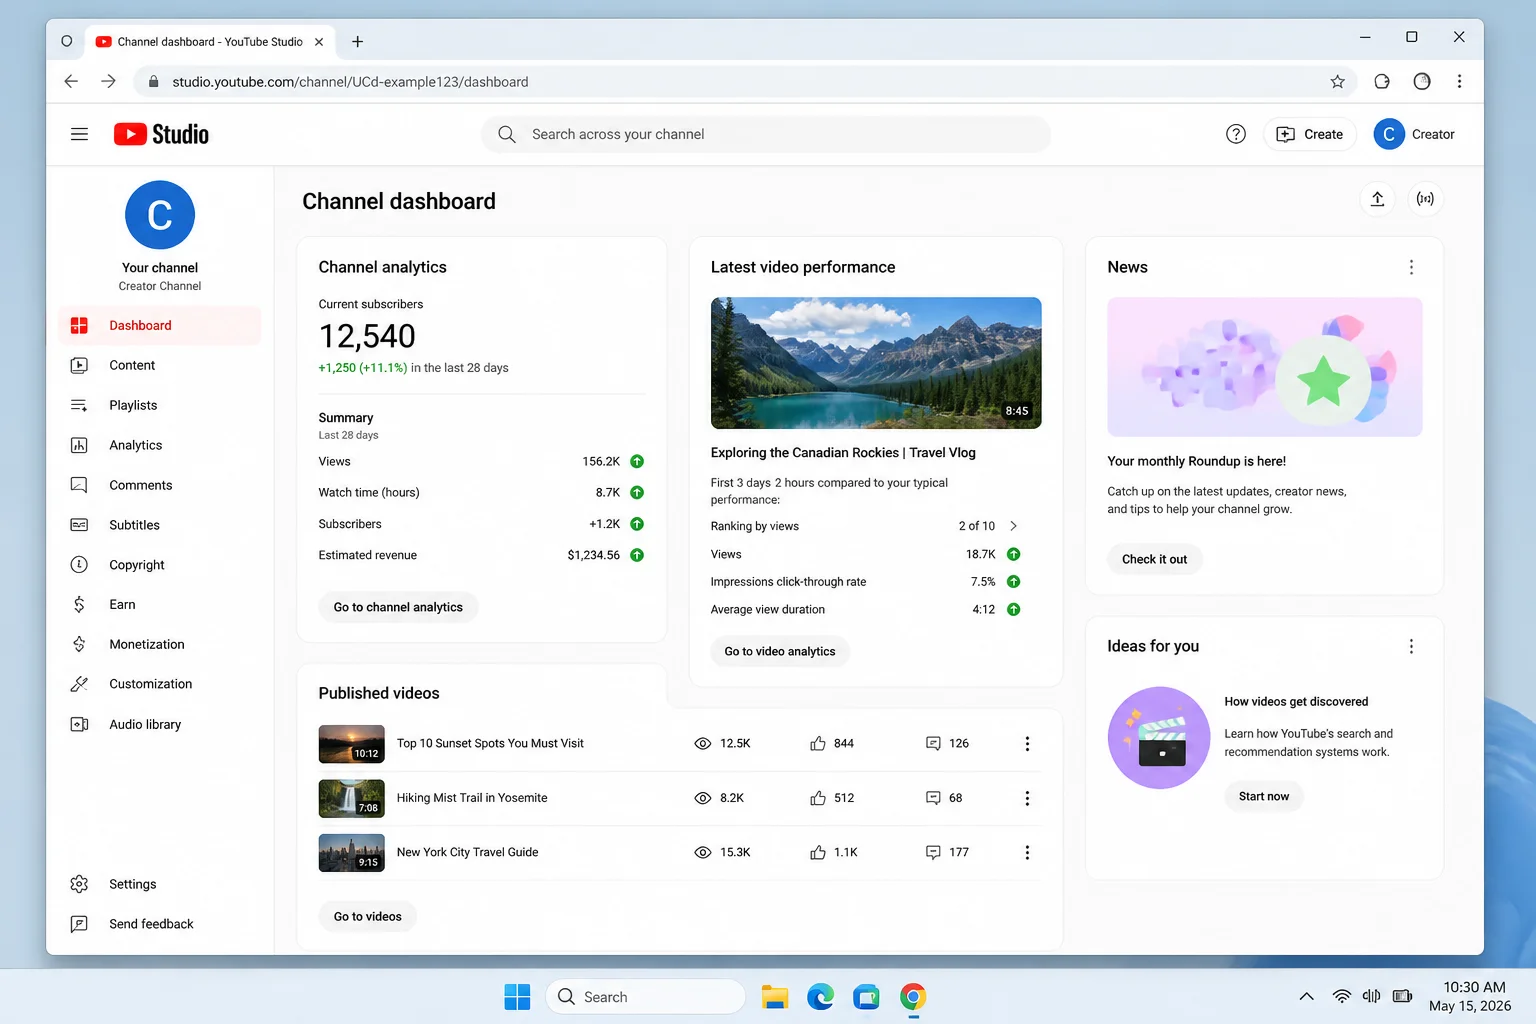
On Windows
- Open Chrome, Edge, Firefox, or another supported browser.
- Enter
studio.youtube.comin the address bar. - Sign in with the Google account that owns your channel.
- If you manage several channels, select the correct one before uploading.
On macOS
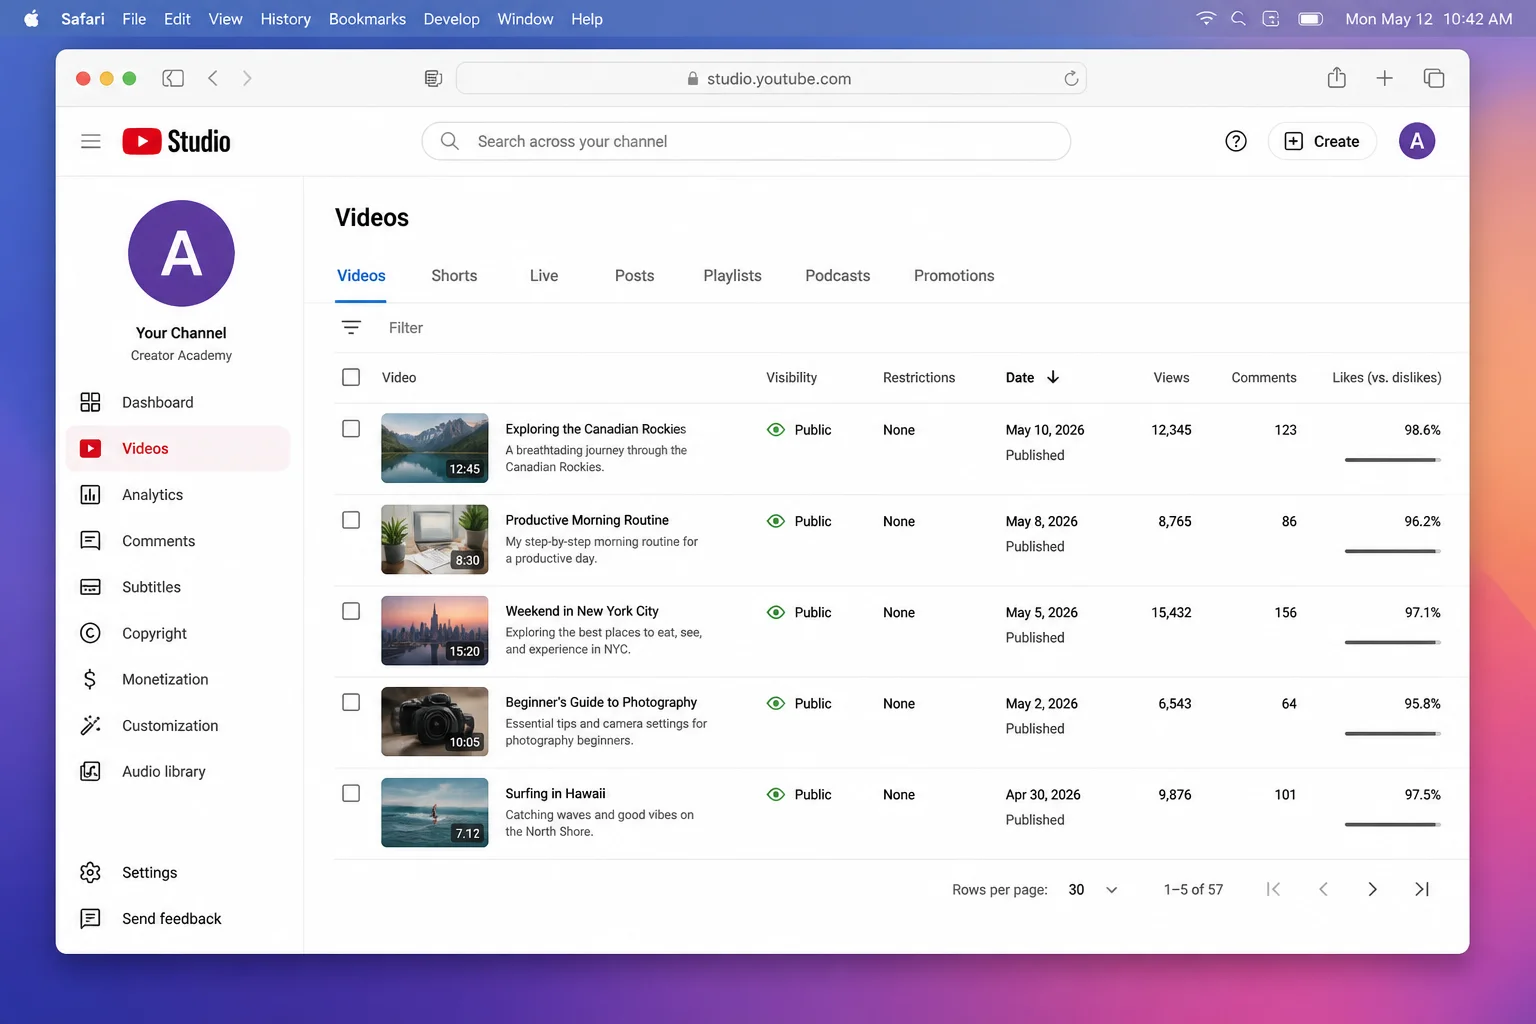
- Open Safari, Chrome, Firefox, or another supported browser.
- Go to
studio.youtube.com. - Sign in to the account that owns the channel.
- Confirm that the correct channel name and profile image appear.
On the Web
The same YouTube Studio website works on Windows, macOS, ChromeOS, and Linux. There’s nothing to download, and you won’t need a terminal command. Everything happens in the browser.
Expected result: The YouTube Studio dashboard opens and displays your channel.
Step 2: Start Uploading the Video
- Select Create in the upper-right corner.
- Choose Upload videos.
- Click Select files.
- Find the finished video on your computer and open it. You can also drag the file into the upload window.
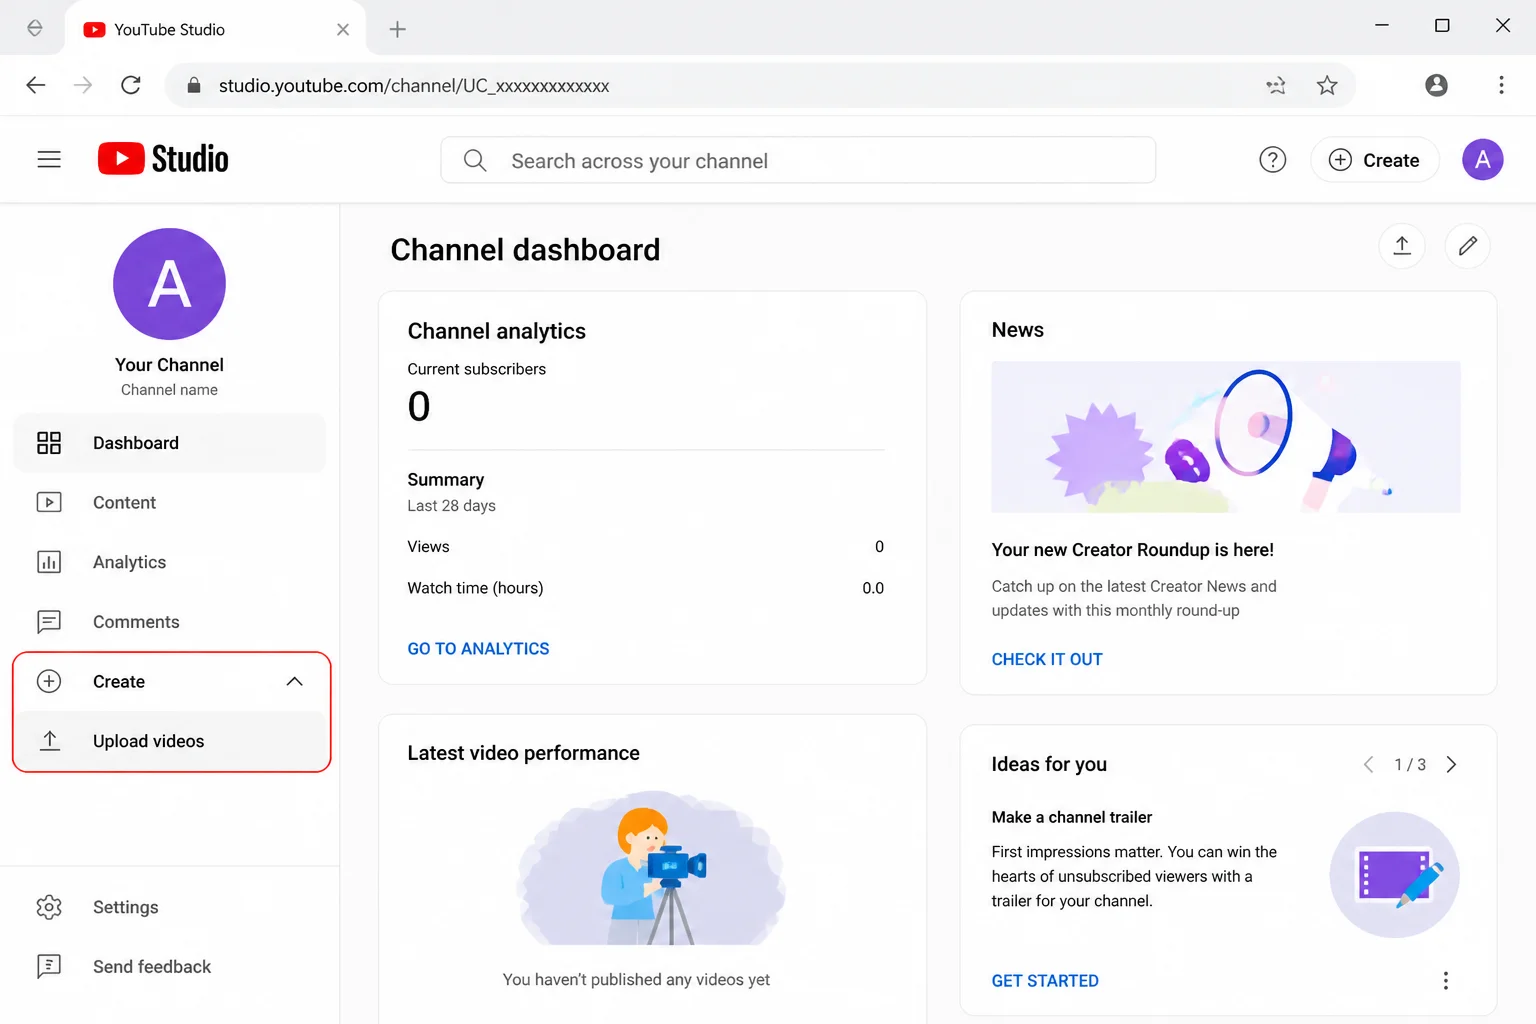
Expected result: YouTube starts uploading the file and opens the Details page.
Step 3: Complete the Video Details
- Enter a clear Title.
- Add a Description.
- Upload or select a Thumbnail.
- Add the video to a playlist if needed.
- Under Audience, choose whether the video is made for children.
- Open Show more if you need tags, language, recording details, or comment settings.
- Select Next to move through Video elements and Checks.
- Continue until you reach Visibility.
Take a minute with the title and thumbnail. They’re the sign hanging outside your little digital movie theater, so viewers should know what they’re about to watch.
Expected result: The Visibility screen displays options for saving, publishing, or scheduling the upload.
Step 4: Choose an Instant or Scheduled Premiere
You have two choices here. An instant Premiere runs after processing, while a scheduled Premiere waits for the date and time you pick.
Create an Instant Premiere
An instant Premiere starts as soon as YouTube finishes processing the upload.
- Under Save or publish, select Public.
- Check Set as instant Premiere.
- Double-check the title, thumbnail, and audience setting.
- Select Publish.
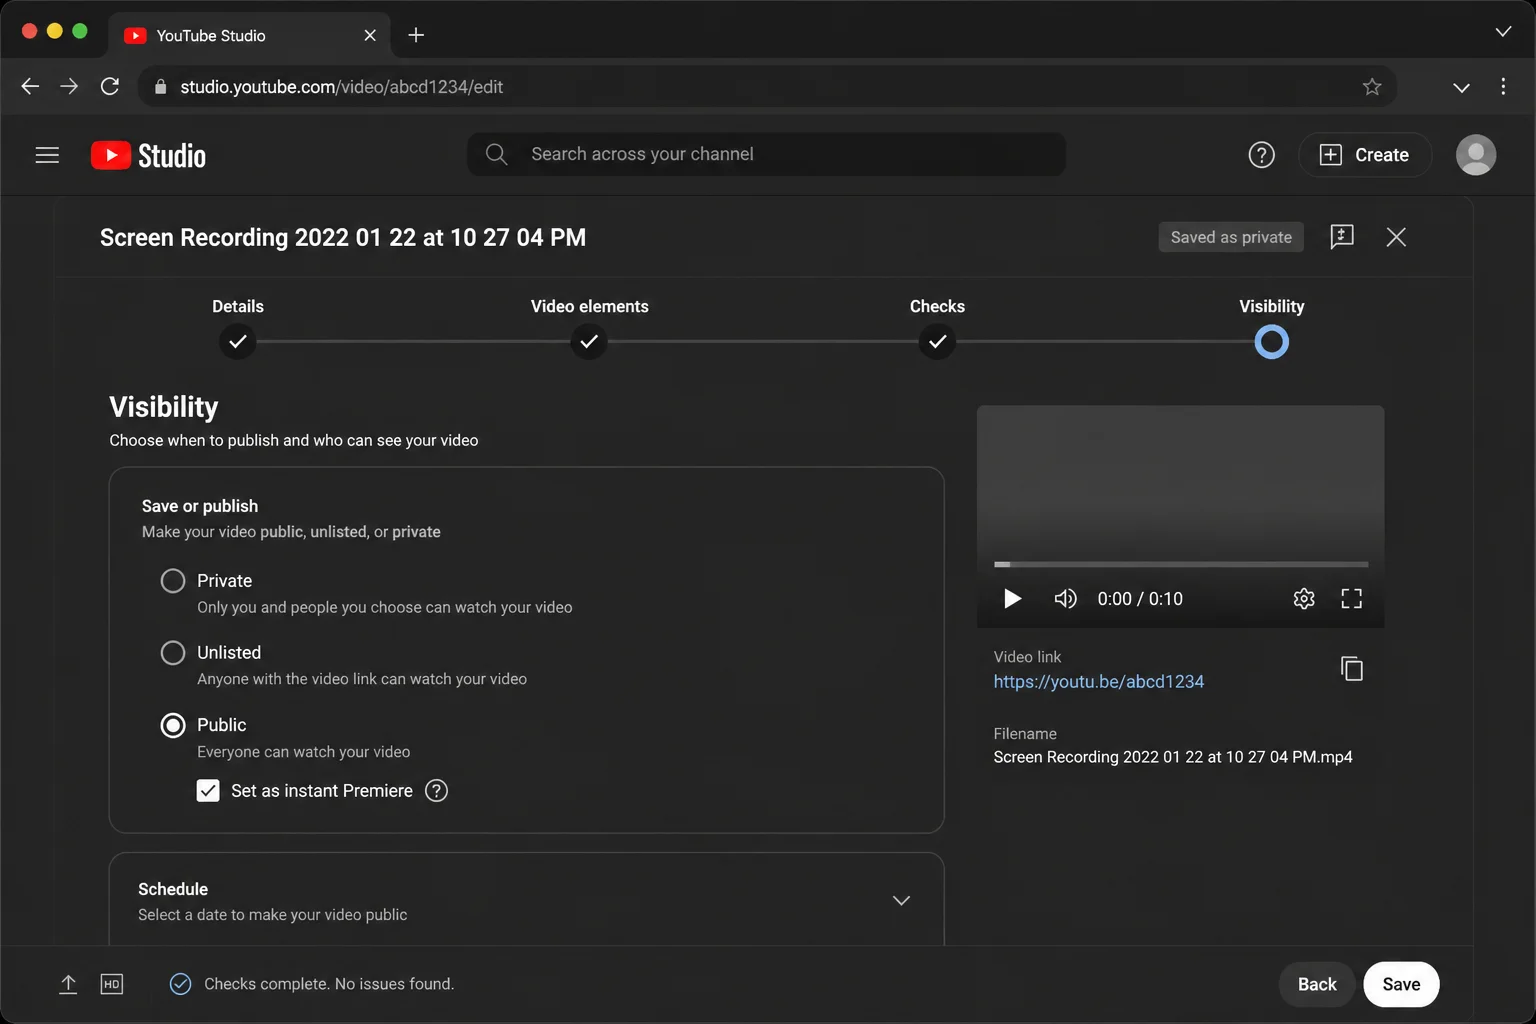
Expected result: YouTube processes the video and then starts its Premiere. “Instant” can be a slightly optimistic label. Large files may need some time in YouTube’s oven before the event begins.
Create a Scheduled Premiere
- On the Visibility screen, select Schedule.
- Choose the desired date.
- Enter the start time.
- Check the time zone shown with the schedule.
- Enable Set as Premiere.
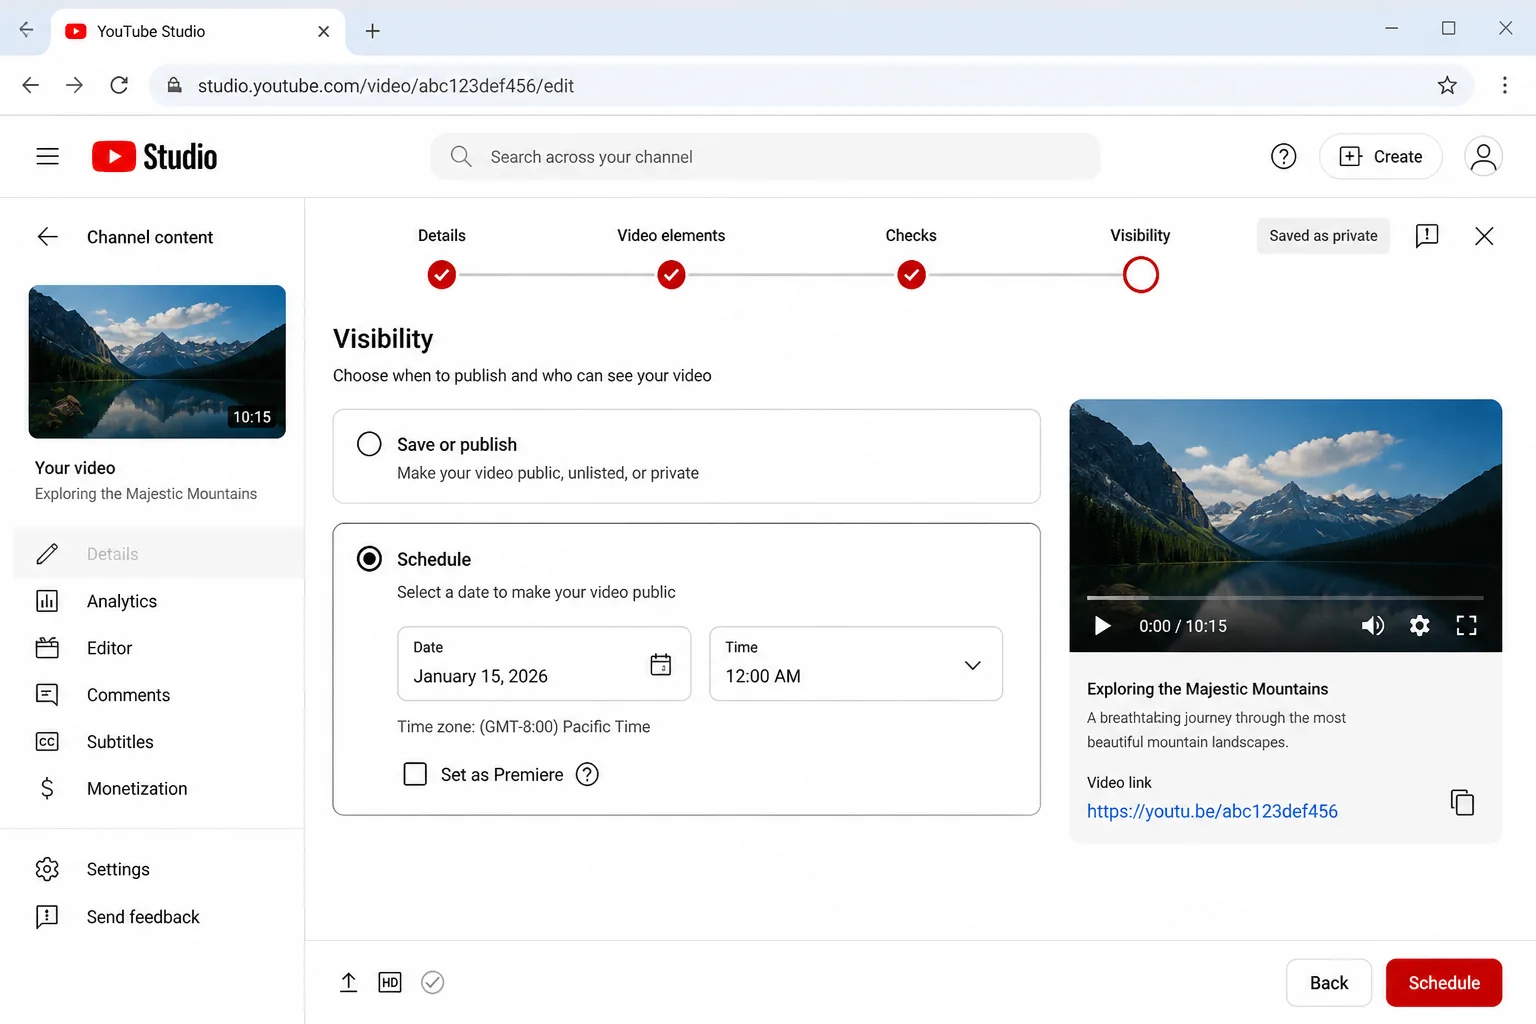
Expected result: The upload is marked as a Premiere and will begin at the chosen date and time.
Step 5: Customize the Countdown
- After enabling Set as Premiere, select Set up Premiere.
- Choose a Countdown theme.
- Choose the Countdown length.
- Select Done to save these choices.
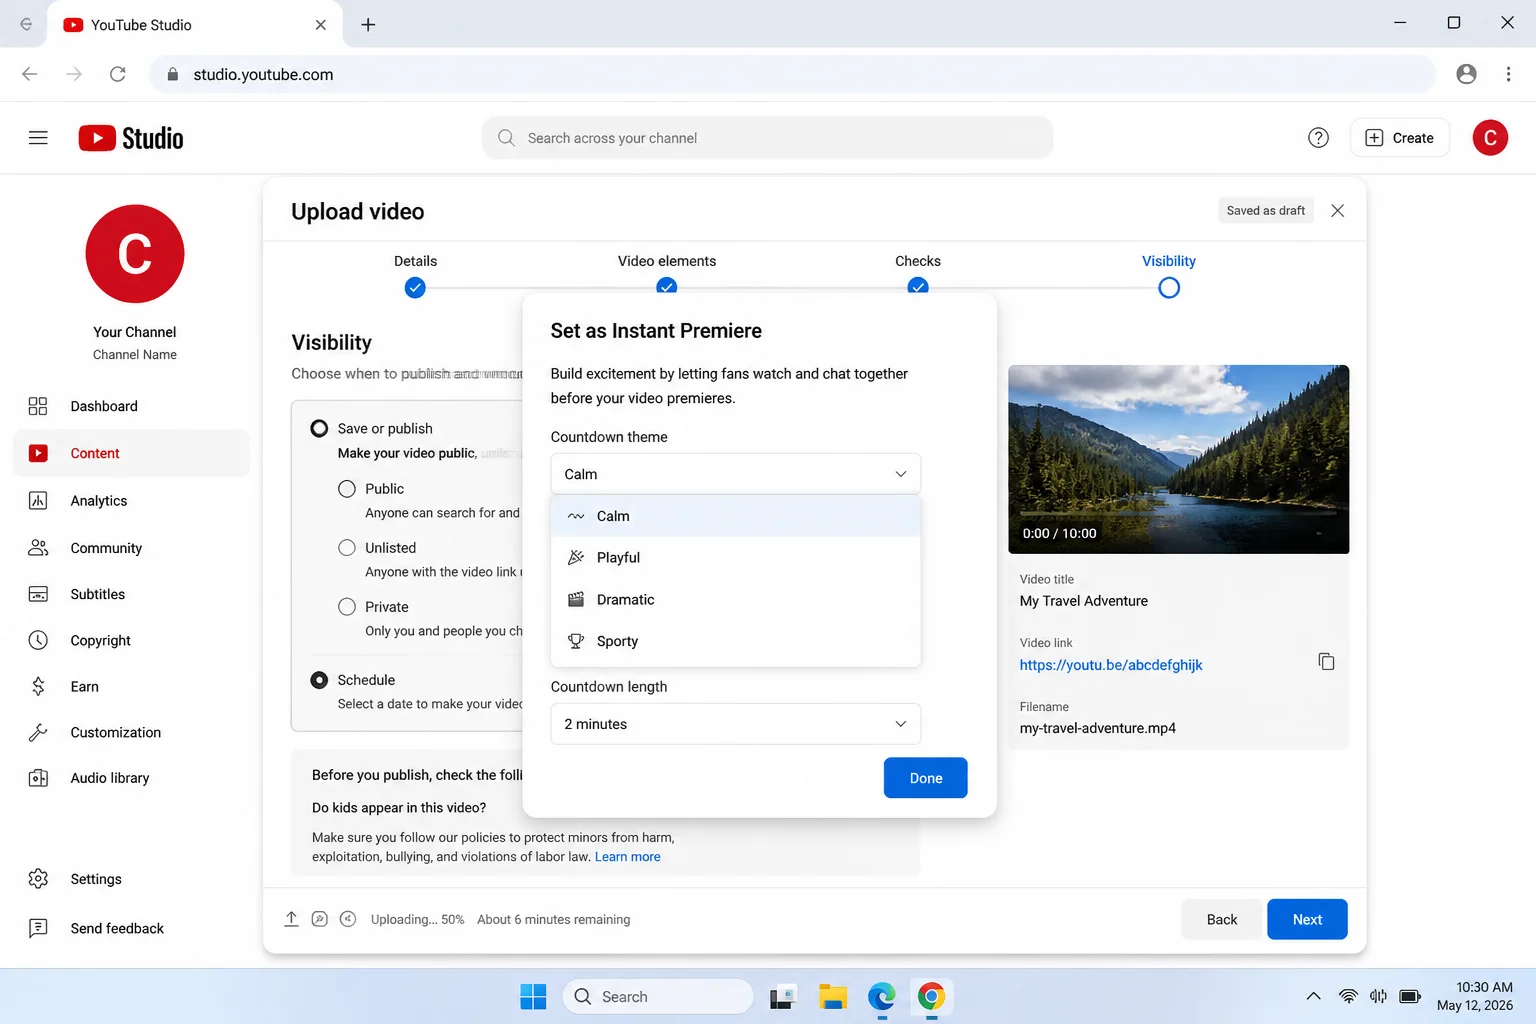
The countdown gives everyone a moment to settle in. A short countdown works well for a casual upload. For a bigger release, a longer one gives late arrivals time to find a seat.
Expected result: The selected theme and length appear in the Premiere setup.
Step 6: Schedule and Verify the Premiere
- Review the scheduled date, time, and time zone.
- Select Schedule.
- Wait for YouTube to confirm that the video has been scheduled.
- Open Content in YouTube Studio.
- Find the video and open its public watch page.
Check that public page before sharing the link. Catching a wrong time zone now is much easier than explaining to everyone why the “7:00 PM” event started at lunch.
Expected result: The public page shows the upcoming Premiere information. Depending on the channel and page state, it can also show reminder, comment, sharing, and live-chat areas.
Step 7: Set Up a Premiere on iOS
- Open the YouTube app on your iPhone or iPad.
- Sign in to the account that owns your channel.
- Start the normal video-upload flow using the app’s Create control.
- Choose your completed video.
- Enter the requested video details.
- Continue until the Set visibility page appears.
- Select Set as Premiere.
- Review the available publishing choices and complete the upload using the labels shown in your current app.
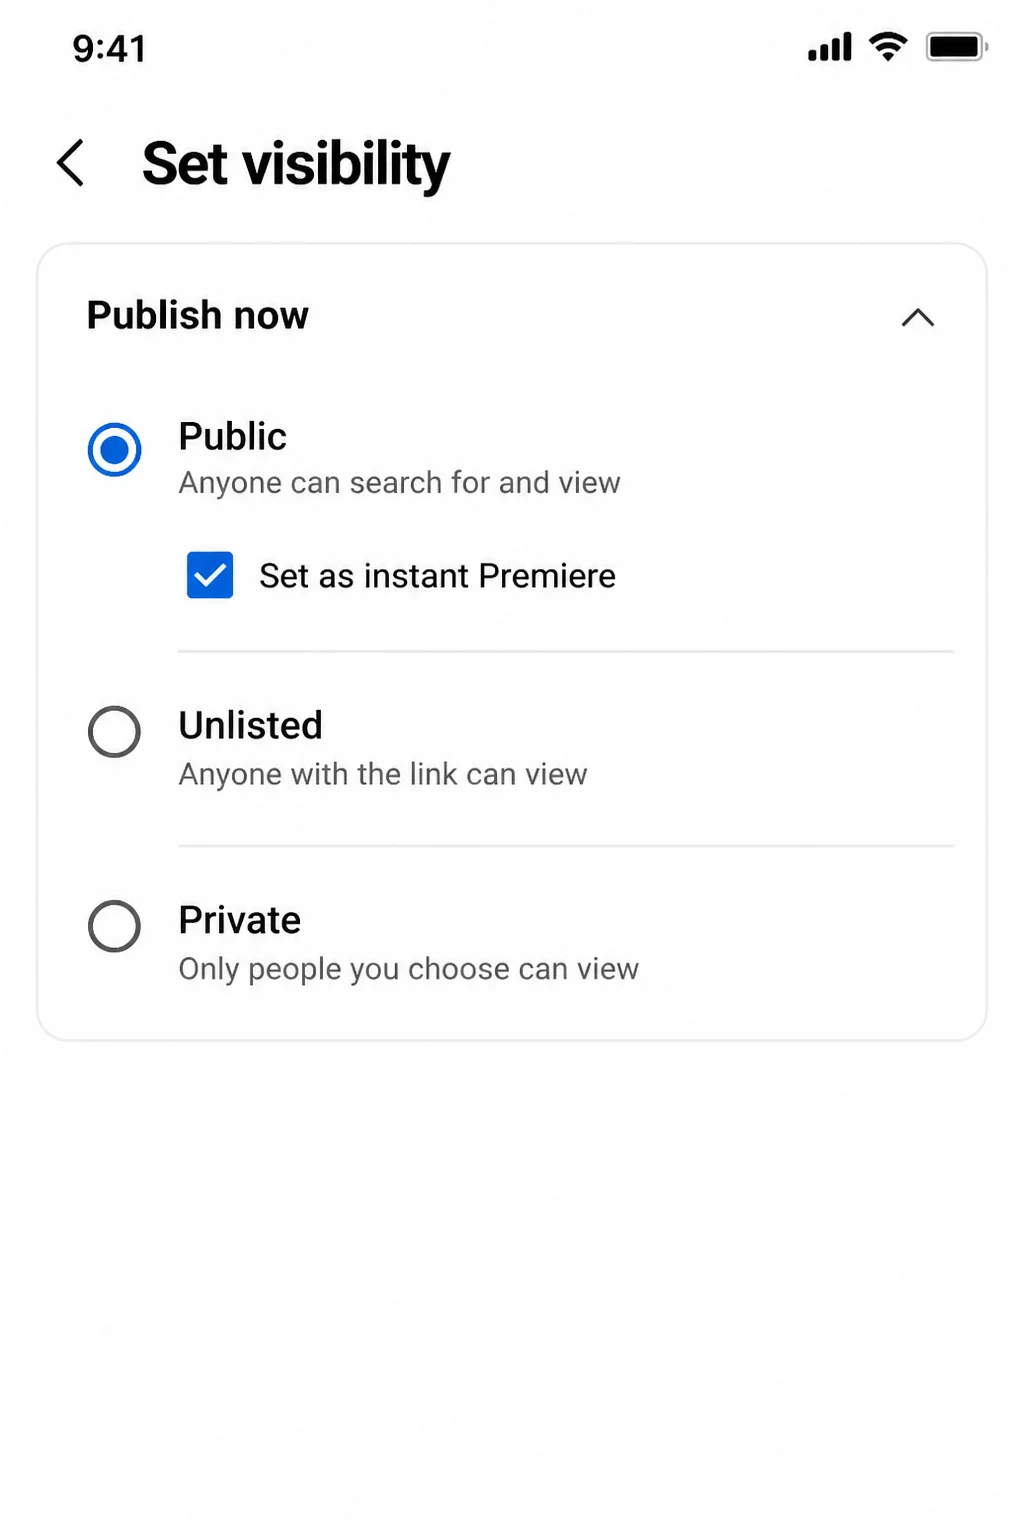
Expected result: The upload is configured as a Premiere rather than a normal public video.
YouTube’s official instructions confirm that Set as Premiere appears on the mobile Set visibility page. They don’t verify every button label that follows or confirm desktop countdown controls in the current iOS flow. Use desktop YouTube Studio when you need to choose the countdown theme and length.
Step 8: Set Up a Premiere on Android
- Open the YouTube app on your Android phone or tablet.
- Sign in to the channel account.
- Use the app’s Create control to begin uploading a video.
- Select your completed video and enter its details.
- Continue to the Set visibility page.
- Select Set as Premiere.
- Review the options displayed by your version of the app and finish the upload.
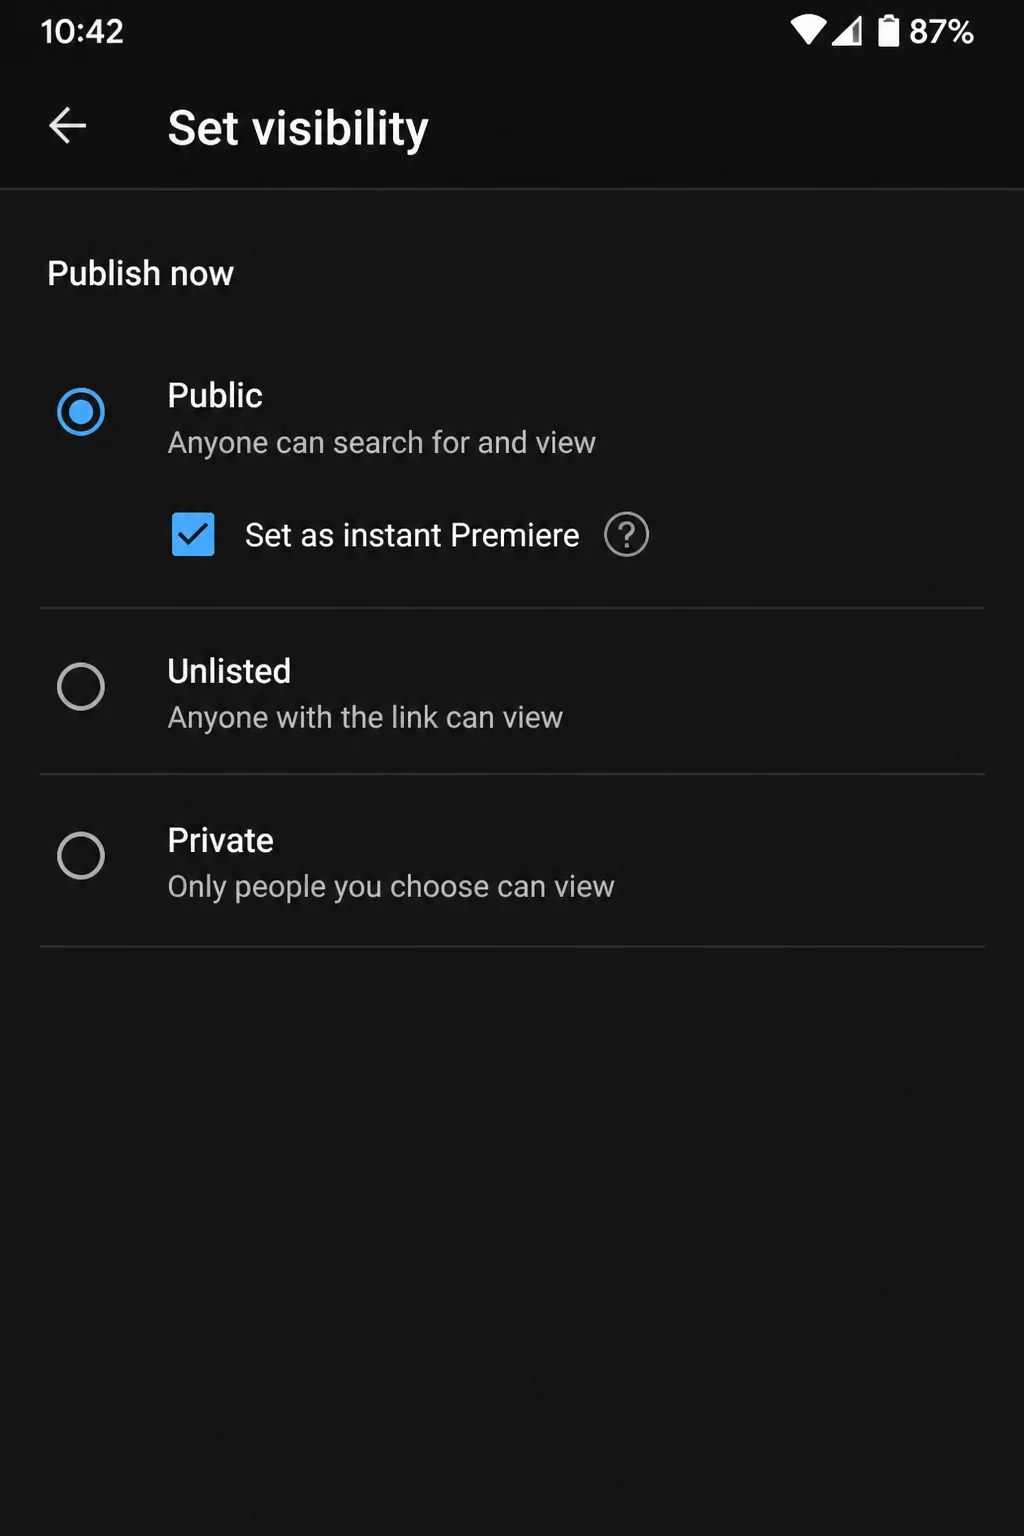
Expected result: YouTube treats the uploaded video as a Premiere.
The Android app has the same documented Set as Premiere option. YouTube’s official material doesn’t confirm every desktop control in the current Android flow, including detailed countdown settings. If a control has wandered off, open YouTube Studio in a desktop browser.
Step 9: Share the Watch Page
- Open the scheduled Premiere’s public watch page.
- Select Share.
- Choose an app or select Copy link.
- Post the link wherever your audience follows you.
- Ask viewers to open the page and select Notify me or the available reminder control.
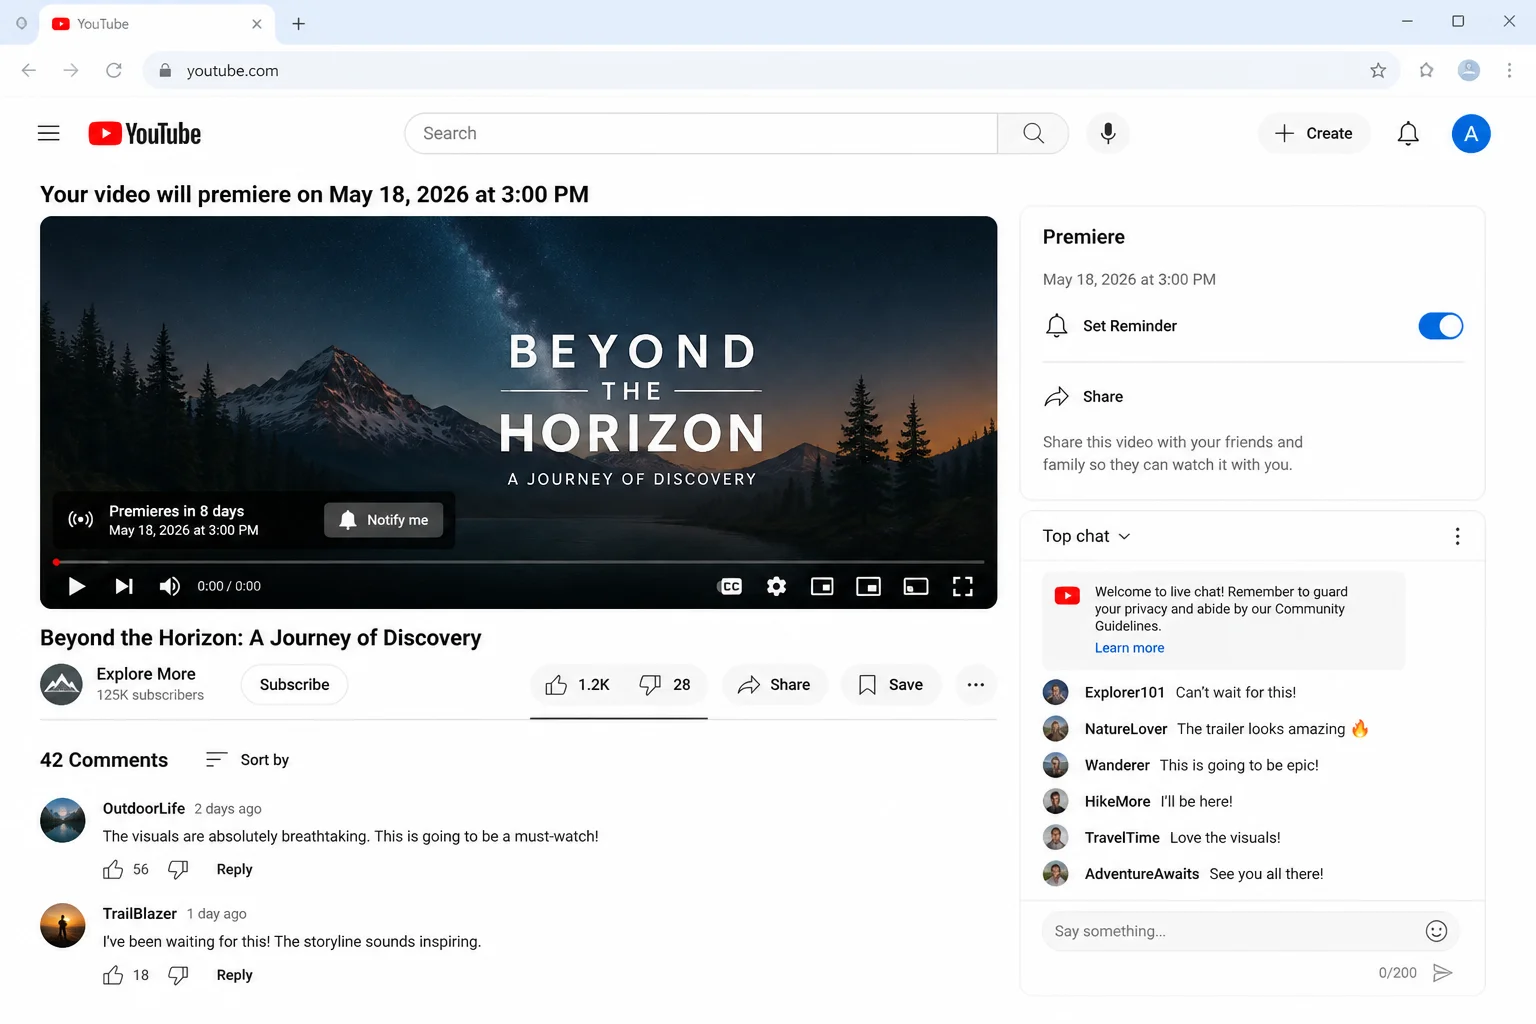
When practical, schedule and share the Premiere at least 24 hours ahead. YouTube recommends that window because viewers get more time to spot the thumbnail in their subscriptions feed and set a reminder.
Expected result: Viewers can visit the page before the video starts, see its scheduled time, and request a reminder. Comments and live chat may also appear, depending on your channel and video settings.
Step 10: Moderate the Premiere Chat
- Open the Premiere watch page before the countdown starts.
- Sign in as the channel owner or an approved moderator.
- Watch the live-chat panel during the countdown and playback.
- Use the menu beside a message to remove it, hide a disruptive user, or take another available moderation action.
- Reply to viewers and pin a useful message if that control is available.
- Keep the watch page open until playback ends.
Expected result: You can talk with viewers while the prerecorded video plays and clean up spam or unwanted messages.
After the Premiere finishes, the video remains on your channel as a regular upload. Anyone who missed the event can watch it normally. A replay of the Premiere chat may also appear when chat replay is enabled and available.
Configuration
These settings deserve one last check before you confirm the upload:
- Set as Premiere: Turns a scheduled upload into a shared release event. Scheduling alone doesn’t switch it on.
- Set as instant Premiere: Starts the event after a public upload finishes processing.
- Date, time, and time zone: Control exactly when the scheduled Premiere begins. Time-zone mistakes are sneaky little things, so check twice.
- Countdown theme: Changes how the countdown looks before playback.
- Countdown length: Controls how long viewers wait between the countdown starting and the video playing.
- Comments: Allow viewers to leave regular comments when comments are enabled.
- Live chat: Allows viewers to talk during the Premiere when chat is available.
- Audience setting: Videos marked as made for children have restricted engagement options. Some comment and chat controls won’t appear.
For the most dependable setup, use the desktop Visibility screen. The documented mobile flow includes Set as Premiere, but YouTube’s supplied guidance doesn’t verify desktop-style countdown controls in the current Android or iOS apps.
Tips and Troubleshooting
Problem: The Premiere option is missing on desktop
- Confirm that you’re uploading through YouTube Studio.
- Complete the upload details and continue to Visibility.
- Choose Schedule to look for Set as Premiere.
- Choose Public to look for Set as instant Premiere.
- Confirm that you’re signed in to the channel that owns the upload.
Problem: The video published as a normal upload
- Keep in mind that Public and Schedule don’t enable a Premiere by themselves.
- Before publishing, select Set as instant Premiere or Set as Premiere.
- Verify the setting before clicking Publish or Schedule.
This mix-up is annoyingly easy because scheduling and Premiering sit so close together. The extra checkbox makes all the difference.
Problem: Countdown settings are missing
- Use desktop YouTube Studio.
- Go to the upload’s Visibility screen.
- Select Schedule and enable Set as Premiere.
- Open Set up Premiere.
- Choose a theme and length, then select Done.
Problem: An instant Premiere hasn’t started
- Open Content in YouTube Studio.
- Check whether the upload is still processing.
- Wait for processing to finish.
- Don’t upload duplicate copies unless YouTube reports that processing failed.
Processing can feel stuck when you’re watching the clock, especially with a large video. Give YouTube time to finish before filling your channel with identical copies.
Problem: The mobile controls look different
- Update the YouTube app through the App Store or Google Play.
- Begin a normal upload.
- Look for Set as Premiere on the Set visibility page.
- If you can’t find countdown or scheduling controls, finish the setup in desktop YouTube Studio.
Mobile menus have a habit of moving around like keys in a junk drawer. Focus on the Set visibility page, since that’s where YouTube documents the Premiere option.
Problem: A particular video cannot be premiered
Run this quick checklist before contacting support:
- Confirm that the upload is a standard video rather than a Short. YouTube’s own Premiere documentation states Shorts aren’t supported for Premieres.
- Check the video’s resolution. Output above 1080p isn’t supported for Premieres, so a 4K or higher export will need to be re-exported at 1080p or lower.
- Determine whether it uses 360-degree or VR180 formatting. These immersive formats aren’t supported for Premieres either.
- Open YouTube Studio and check for Community Guidelines warnings or restrictions. YouTube doesn’t publish a Premiere-specific list of strike penalties, but a channel-level strike can limit posting and streaming features in general, so clear any warnings in Studio first.
- Confirm that the video is still processing successfully.
- Review the current YouTube Premiere Help page, which is the source for the Shorts, resolution, and 360/VR180 restrictions above.
- Check YouTube’s official Premiere tips.
If a Guidelines penalty has made a video private or limited channel options, follow the notice in YouTube Studio. Reschedule only after Studio confirms that the channel and video are eligible.
Share early: Schedule the Premiere at least 24 hours ahead when you can. Viewers will have time to find the page and set reminders.
Show up for the chat: A Premiere feels pretty empty when the creator disappears. Join before the countdown and greet viewers as they arrive.
Use a normal scheduled upload when appropriate: Routine videos don’t always need a countdown and live chat. I’d save Premieres for releases where watching together adds something.
Wrapping Up
| Step | Action | Applies To |
|---|---|---|
| 1 | Upload the completed video | Windows, macOS, web, iOS, Android |
| 2 | Choose instant or scheduled Premiere | Desktop and web |
| 3 | Enable Set as Premiere | All documented platforms |
| 4 | Customize the countdown | Verified desktop flow |
| 5 | Share the watch page and moderate chat | All viewers and creators |
A Premiere is worth the extra setup when viewers are waiting for a video and want to chat as it begins. The watch page and reminders also give the release some breathing room before showtime.
For everyday uploads, regular scheduling is easier. Save the Premiere button for videos that benefit from a shared opening night, then join the chat and enjoy watching with everyone.