
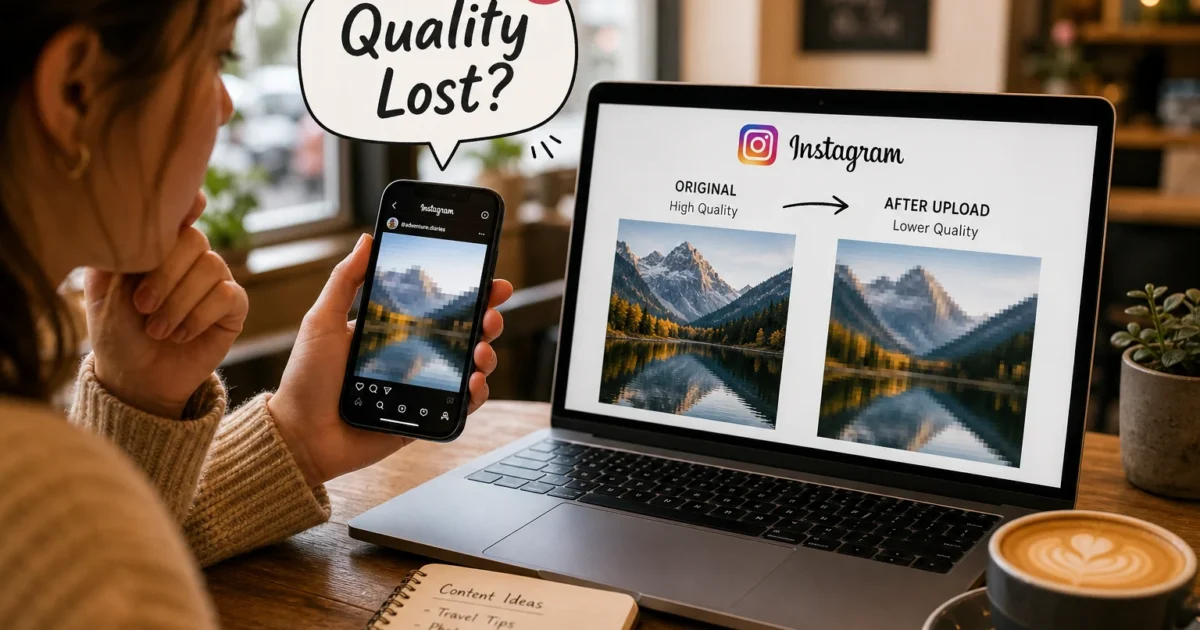
You take a great photo. It looks crisp on your phone. Then the second it hits your Instagram feed, it looks like it’s been through a photocopier five times. Sound familiar? You’re not doing anything wrong. This happens to almost everyone, and your camera isn’t the problem.
Instagram typically compresses and may resize photos you upload, and it forces images into set aspect ratios. If you’re on an iPhone, it also converts your photos from Apple’s HEIC format to JPEG behind the scenes. Any one of these steps can soften your image, and stacking them together produces that blurry, blocky, washed-out look. This guide covers why that happens. We’ll start with a 30-second settings toggle, then work up to how you shoot and export photos in the first place.
Quick Diagnosis
Before you go down the rabbit hole, run through this checklist first. It solves the problem for most people, and it takes maybe five minutes.
- Check your connection: Are you uploading over spotty Wi-Fi or weak cellular data? Switch to a strong Wi-Fi network before posting.
- Turn off Data Saver: This mobile setting deliberately shrinks your uploads to save data. Great for your data plan, bad for photo quality.
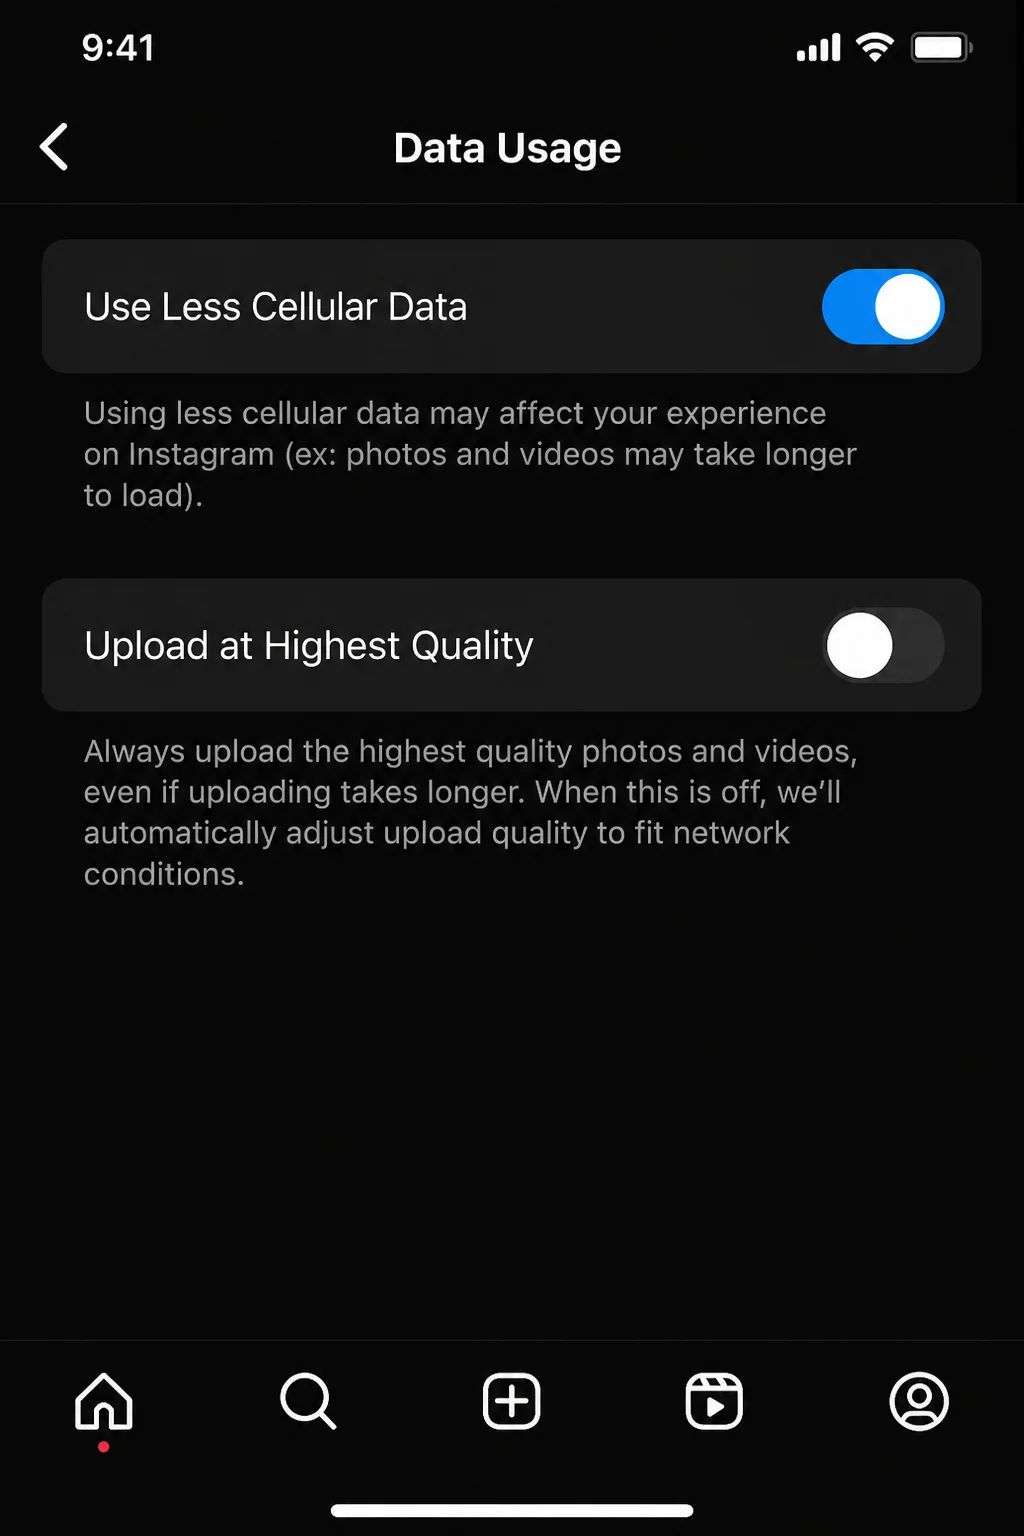
- Turn on Upload at Highest Quality: This single toggle is the biggest lever you have over Instagram’s compression.
- Check your image size and shape: Wildly oversized photos (think 12,000 pixels wide) and images that don’t match Instagram’s supported ratios get crushed or cropped hard.
- Re-upload the photo: Sometimes a bad upload really is just a one-off network hiccup. Try posting again on a better connection.
If you’ve done all that and photos still look soft, keep reading. The deeper causes and fixes are below.
Common Issues
Problem: Photos Look Blurry, Blocky, or “Muddy” Right After Posting
Symptoms:
- Sharp details turn soft or smeary once the post is live
- Flat areas of color (skies, walls, skin) show visible blocky patches
- Text in screenshots or graphics looks fuzzy or has halos around letters
Cause: Instagram re-encodes uploaded photos with lossy JPEG compression in the vast majority of cases. This keeps the app fast and saves server space. “Lossy” means some image data gets thrown away for good, to shrink the file. The more Instagram compresses, the more detail it tosses, especially in busy patterns, gradients, and fine text.
Solution:
- Open Instagram on your phone and go to your profile.
- Tap the menu icon and go to Settings and Privacy.
- Tap Data Usage (on some app versions this is under Account > Data Usage).
- Turn on Upload at Highest Quality.
- Re-upload the photo on a strong Wi-Fi connection.
Verification: Post the same photo again after enabling the setting and compare it to your earlier post. Zoom in on fine detail (text, hair, fabric texture). It should look noticeably sharper.
Tip: Upload at Highest Quality does use more mobile data per post. If you’re on a limited data plan, save your uploads for when you’re on Wi-Fi.
Problem: Parts of Your Photo Get Cut Off or Black Bars Appear
Symptoms:
- Heads, feet, or key subjects get chopped out of the frame
- Black or white bars appear above and below (or beside) your image
- The photo looks “squished” into a shape it wasn’t originally
Cause: Instagram enforces specific aspect ratios for feed posts. If your image doesn’t match one of the supported shapes, Instagram automatically crops it to fit or pads it with bars. It doesn’t ask you first unless you catch it in the crop preview.
There’s a second, newer cropping issue worth knowing about: as of January 2026, Instagram’s profile grid itself switched from a 1:1 square preview to a taller 3:4 preview. That means even a photo you uploaded correctly at 4:5 can still get its edges trimmed when it shows up on your profile grid, because the grid now crops closer to 3:4 than the in-feed 4:5 version. If you’ve noticed faces or text getting clipped specifically in your grid view (but not when someone opens the post itself), this grid crop is the likely cause, not a re-upload problem.
Solution:
- Before uploading, check your photo’s aspect ratio. These ratios apply to feed posts specifically: Instagram’s feed supports roughly 4:5 (portrait) up to 1.91:1 (landscape), with 1:1 (square) also common. Since January 2026, Instagram also supports a taller 3:4 (1080×1440px) option that lines up with the redesigned profile grid crop. Stories and Reels use a different, taller 9:16 canvas — see the Error Messages table below.
- Crop your photo to 4:5 (or 3:4 if you want it to match the grid crop exactly) in your phone’s Photos app (or a desktop editor) before uploading. Either ratio fills more screen space in the feed than a square crop, without triggering Instagram’s automatic crop.
- In the Instagram app, when creating a post, use the built-in crop tool and pinch or tap the aspect-ratio icon to preview exactly what will be cut before you share.
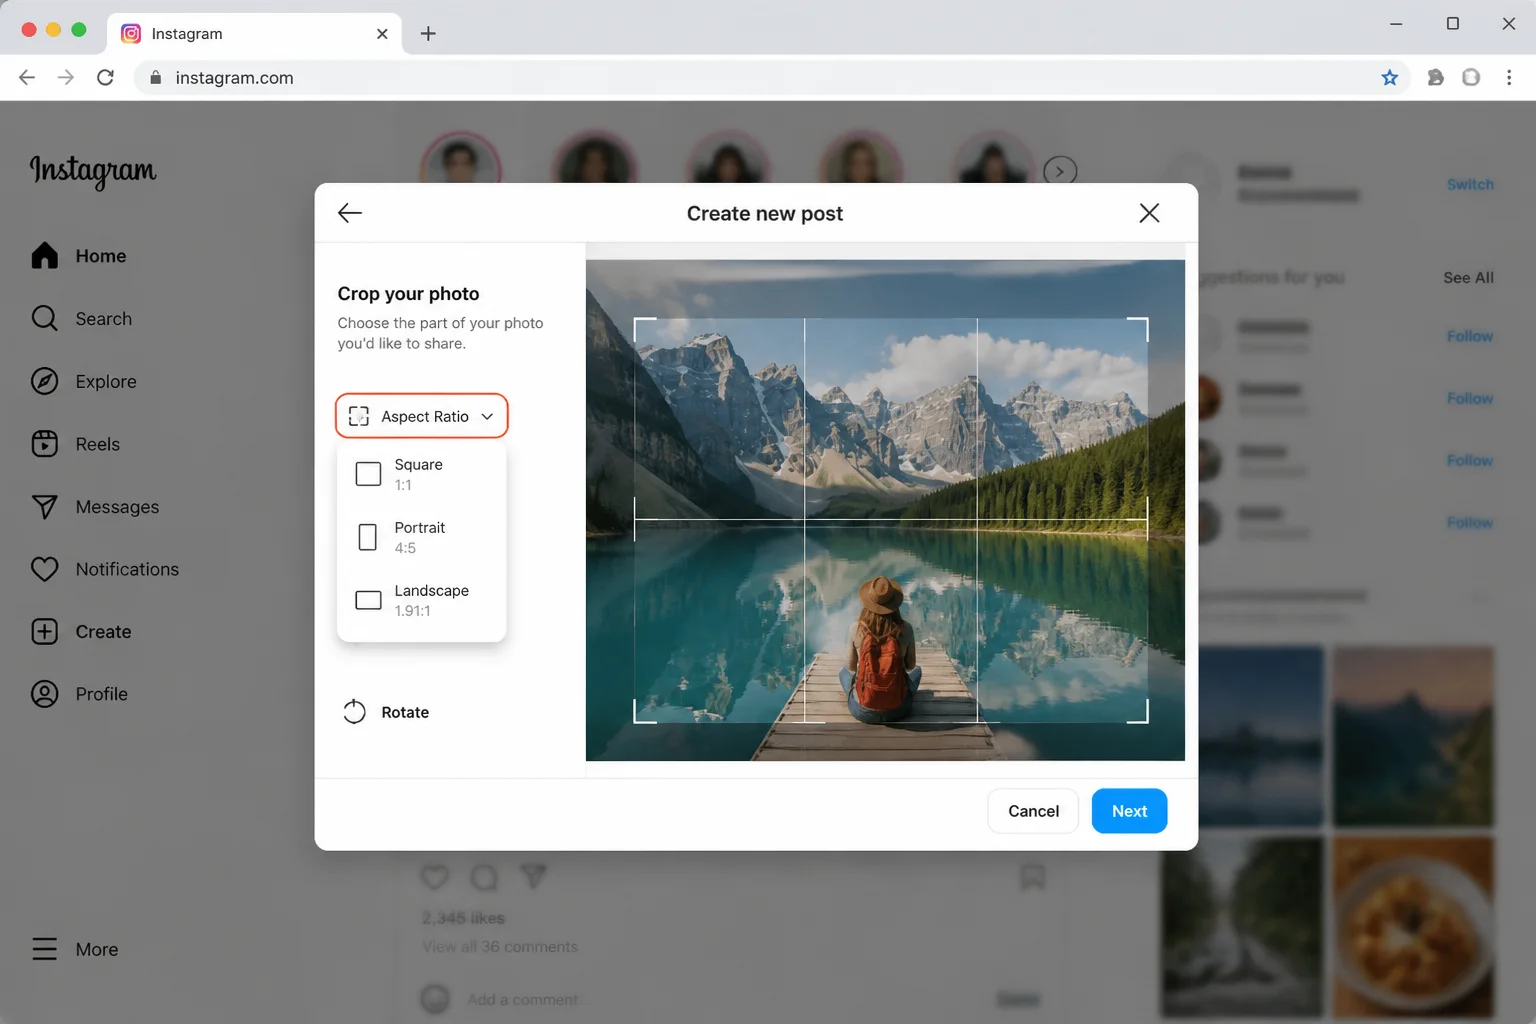
Verification: Preview the post before sharing. If your subject sits fully inside the crop frame with no bars, you’re good to go.
Problem: iPhone Photos Look Worse on Instagram Than in Your Camera Roll
Symptoms:
- The same photo looks sharp in Photos but soft or artifacty on Instagram
- Skin tones or skies show odd banding or blotchy patches after posting
Cause: iPhones capture photos in Apple’s HEIC format by default. HEIC is efficient, but Instagram doesn’t accept it directly, so in the standard upload flow it converts HEIC to JPEG during upload. That conversion, stacked on top of Instagram’s own compression, can add extra artifacts you wouldn’t see if you’d shot JPEG from the start.
Solution:
- On your iPhone, open Settings > Camera > Formats.
- Select Most Compatible instead of High Efficiency. This tells your camera to save photos as JPEG from the start, skipping Instagram’s HEIC conversion step entirely.
- For photos you’ve already taken in HEIC, export or share them as JPEG first (using the Photos app’s share sheet) before uploading to Instagram.
Verification: Check a new photo’s file type by looking at the filename in the Photos app (JPEG files typically show a .jpg extension when shared or exported). Post it and compare sharpness to a previous HEIC-sourced upload — most people see a visible improvement, though results vary by photo.
Tip: “Most Compatible” mode also makes it easier to share photos with non-Apple devices and apps generally, including Instagram.
Problem: Photos and Videos Look Worse on Weak Wi-Fi or Mobile Data
Symptoms:
- Uploads on Wi-Fi at home look fine, but the same shot posted from a cafe or on the go looks noticeably worse
- Quality seems inconsistent from post to post with no obvious pattern
Cause: On a slow or shaky connection, Instagram may apply extra compression to keep the upload from failing or timing out. Instagram’s Data Saver setting can make this worse, since it intentionally lowers quality to save your mobile data.
Solution:
- Connect to a strong, stable Wi-Fi network before posting anything important.
- In Instagram, go to Settings and Privacy > Data Usage.
- Turn off Data Saver (sometimes labeled Use Less Data).
- Re-upload the photo.
Verification: Compare an upload made on strong Wi-Fi with Data Saver off against a previous upload made on mobile data. The Wi-Fi version should hold detail better, especially in shadows and fine textures.
Problem: Photos Shot With Instagram’s In-App Camera Look Soft
Symptoms:
- Photos taken directly inside the Instagram app look lower-resolution than shots from your regular camera app
- Colors look flatter and edges look less defined
Cause: Instagram’s built-in camera is built for speed, not top image quality. It usually captures at a lower resolution. It also applies different processing than your phone’s native camera app, which is tuned for photo quality specifically.
Solution:
- Close Instagram and open your phone’s native Camera app instead.
- Take the photo there, where you get full resolution and your phone’s best image processing.
- Go back to Instagram, tap Create Post, and select the photo from your camera roll instead of shooting it live in-app.
Verification: Take two versions of the same shot, one with the native camera, one with Instagram’s camera, and compare them zoomed in after posting. The native-camera version should look sharper.
Problem: A Photo Gets Blurrier After Editing In-App
Symptoms:
- The photo looked fine right after selecting it, but got softer after applying filters or edits
- Repeated cropping or adjusting inside Instagram seems to make things worse each time
Cause: Every time Instagram processes your image, applying a filter, cropping again, adjusting brightness, it can add another layer of compression on top of what’s already there. Think of it like re-saving a JPEG over and over: each pass loses a little more detail.
Solution:
- Do your major edits, cropping, color correction, resizing, in a proper photo editor on your phone or computer before uploading to Instagram.
- Once in Instagram’s editor, keep changes minimal. Use the Sharpen, Contrast, or Structure sliders lightly; these can actually help claw back some perceived detail lost to compression.
- Avoid stacking multiple filters or repeatedly cropping the same image inside the app.
Verification: Compare the in-app preview before and after a light sharpen adjustment. Fine edges (like hair strands or text) should look a bit crisper without introducing obvious white outlines or noise.
Tip: Instagram’s editing tools can’t undo detail that’s already been thrown away by compression; they can only make what’s left look a little punchier. Get your source image right first.
Error Messages Table
Instagram doesn’t usually show a literal “error” for quality loss. It just happens quietly, without so much as a warning. This table connects what you see to what’s actually going on, and how to fix it.
| Symptom | Likely Cause | Quick Fix |
|---|---|---|
| Blurry or “muddy” feed photo right after posting | Lossy JPEG compression on upload | Turn on Upload at Highest Quality |
| Subject cropped or black bars added | Aspect ratio mismatch (not 4:5, 1:1, or 1.91:1) | Crop to 4:5 before uploading |
| Odd banding, blotchy skin tones, or extra artifacts (iPhone) | HEIC-to-JPEG conversion during upload | Switch Camera format to Most Compatible (JPEG) |
| Quality is inconsistent between posts | Weak Wi-Fi/cellular triggers extra compression | Upload on strong Wi-Fi, turn off Data Saver |
| Photos worse than camera roll originals | Oversized or undersized source image | Resize to ~1080–1800px on the long edge |
| Story/Reel looks stretched or pixelated | Content wasn’t shot/exported at 9:16 | Export at 9:16 before posting; avoid zooming in-editor |
| Photo gets softer after in-app edits | Repeated processing adds compression each time | Edit before upload; use in-app sharpen sparingly |
| In-app camera shots look low-res | Instagram’s camera captures lower resolution than native camera | Shoot with your phone’s native camera app instead |
Platform-Specific Issues
On iOS
Because Instagram’s Data Usage settings and camera controls live in the mobile app, iOS is where you’ll do most of the actual fixing.
- Go to Settings and Privacy > Data Usage in the Instagram app to toggle Upload at Highest Quality and turn off Data Saver.
- Go to your iPhone’s Settings > Camera > Formats and choose Most Compatible to shoot JPEG instead of HEIC.
- When creating a Story or Reel, hold off on pinch-zooming your image or video in the Stories editor; zooming upscales and blurs the content.
On macOS
Instagram doesn’t currently offer an official native Mac app, so posting through a browser at instagram.com is the most common and reliable method on a Mac. The main job on Mac is preparing your images correctly before upload.
- Open your photo in the built-in Preview app.
- Go to File > Export.
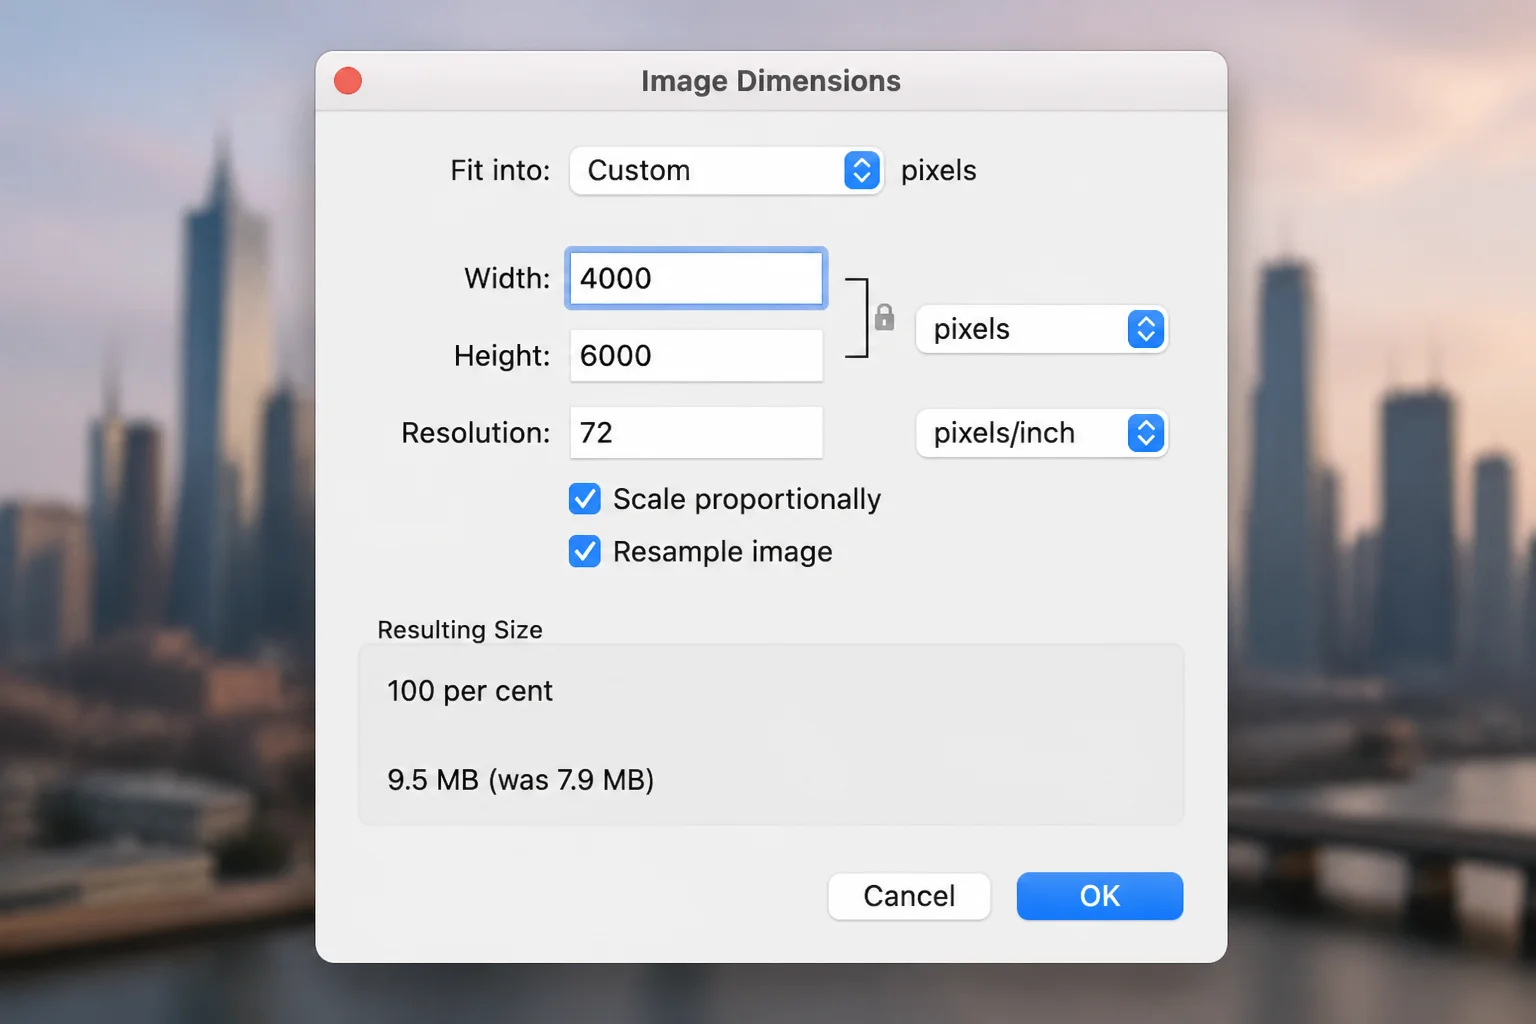
- In the export dialog, click the disclosure arrow next to Image Dimensions (or Resolution, depending on macOS version) and set the long edge to somewhere between 1080 and 1800 pixels.
- Choose JPEG as the format and set quality to around 80–90%, then click Export.
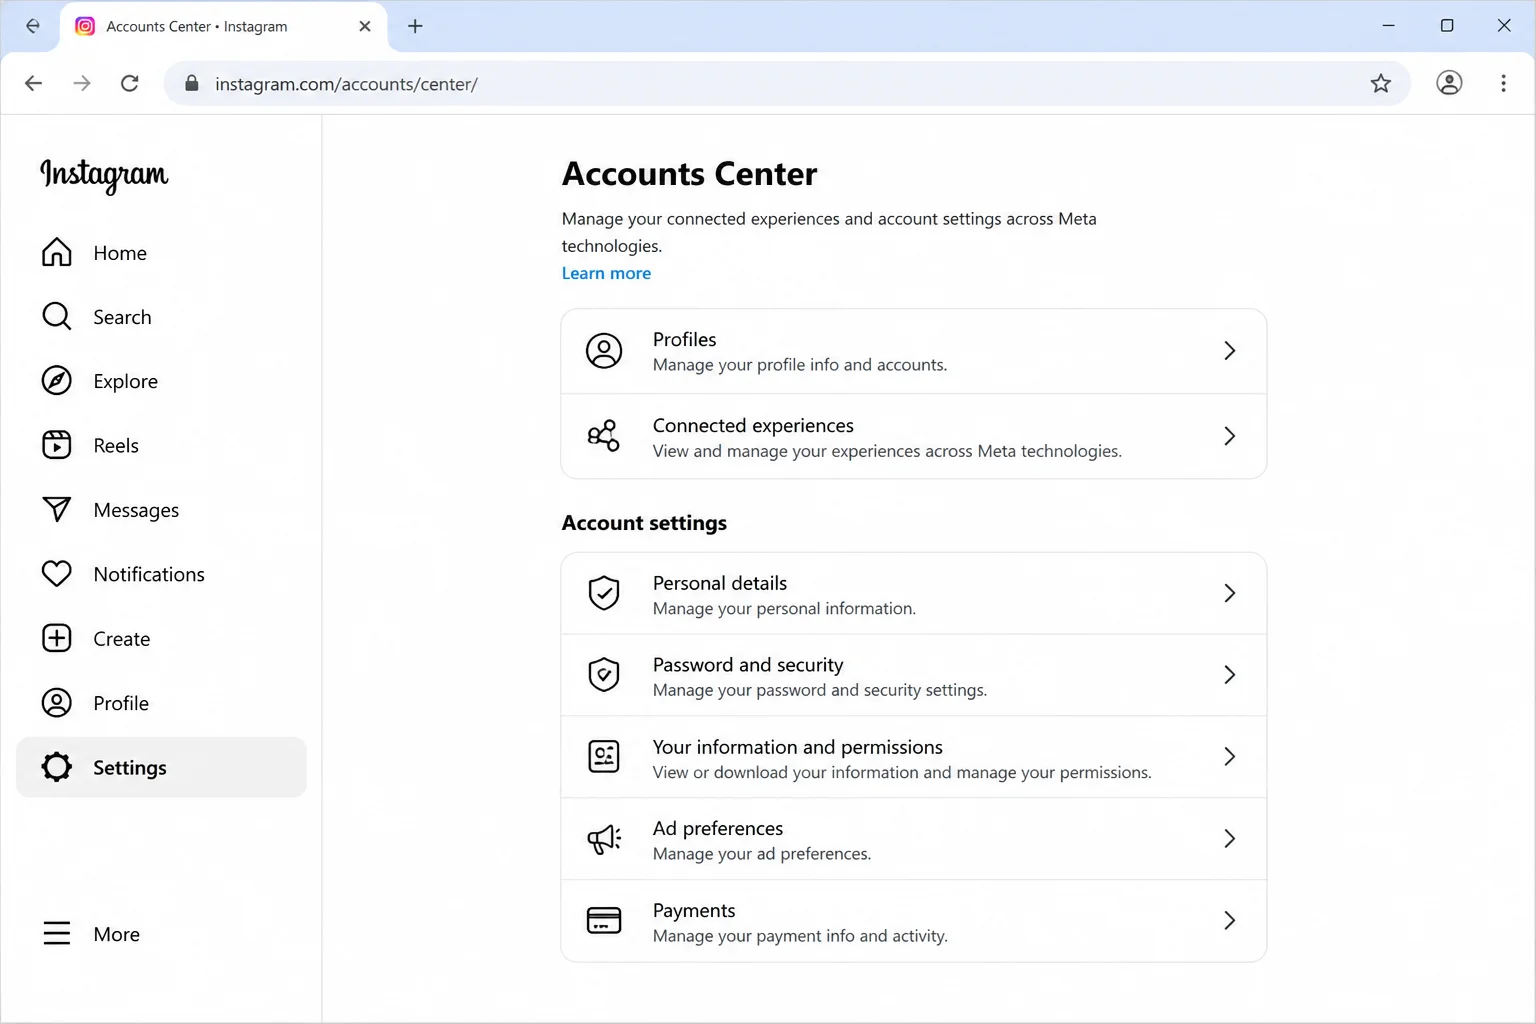
- Log in to Instagram at instagram.com, click the Create icon, and select your resized photo.
On Web
Posting from a browser works the same on any desktop OS. The key steps all live inside Instagram’s web interface.
- Go to instagram.com and log in.
- Click the Create (plus) icon to start a new post.
- Select your already-resized image (see the macOS or Windows prep steps).
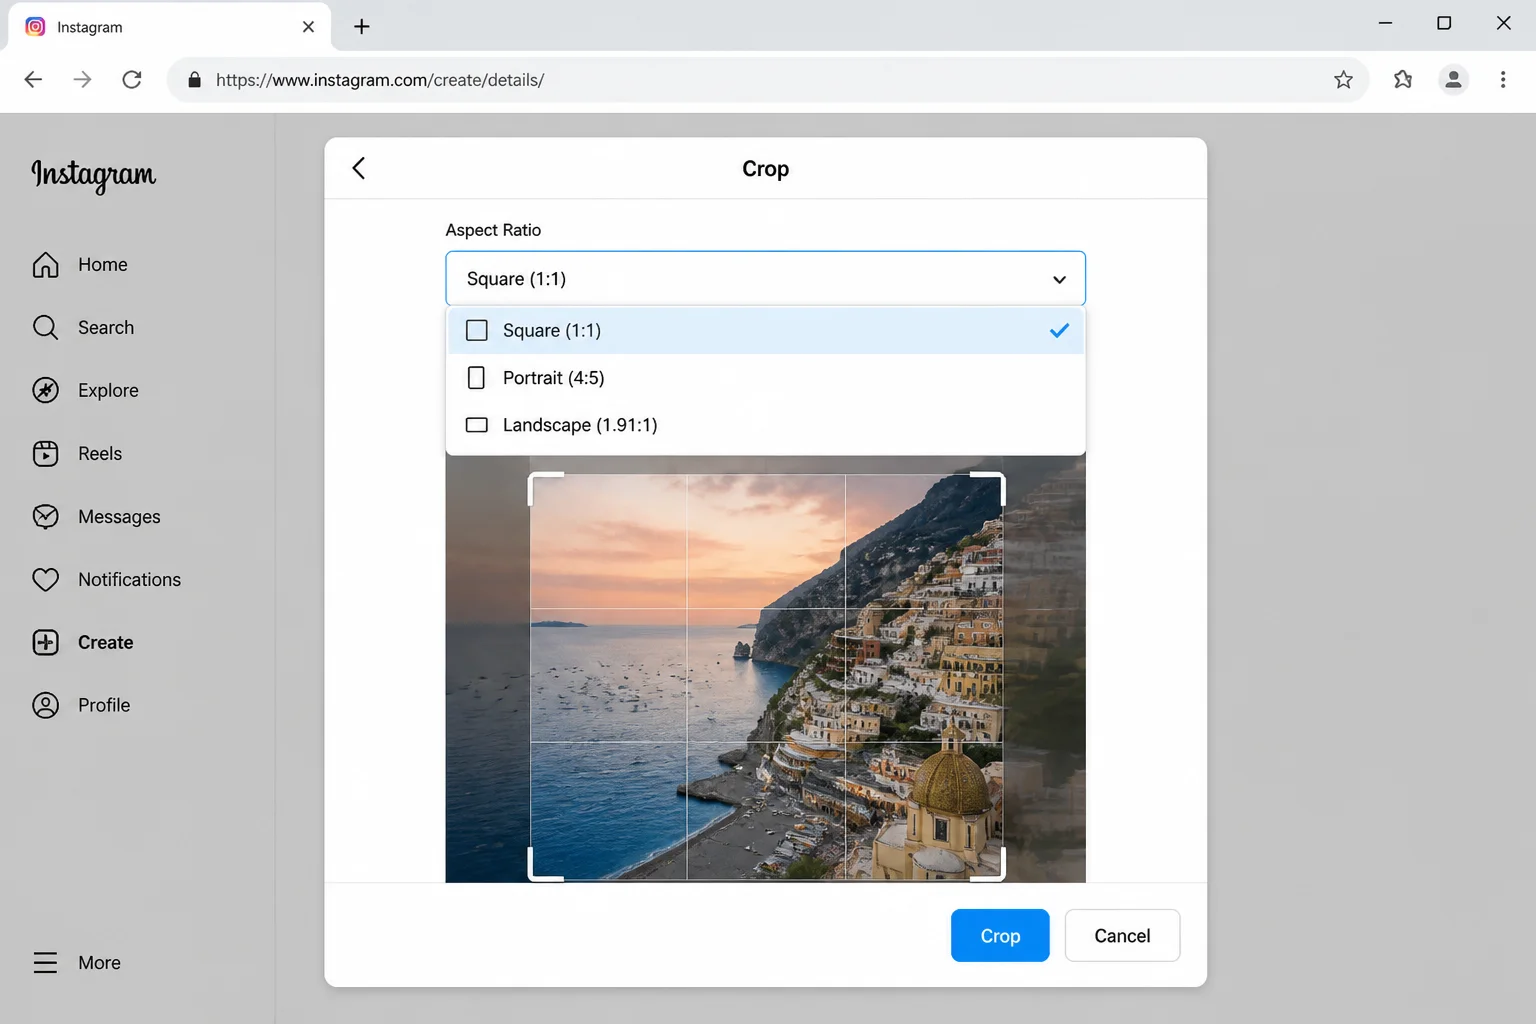
- On the crop screen, choose the aspect ratio icon and pick 4:5 or 1:1 to avoid an unwanted automatic crop.
- Add your caption and click Share.
Note: The Upload at Highest Quality and Data Saver toggles currently only exist in the iOS and Android apps, not on the web version. If you mainly post from a computer, focus on getting your image size and aspect ratio right before upload; that’s the part you can control from a browser.
Configuration Issues
A few common setup mistakes quietly wreck photo quality. Here’s what “wrong” and “right” look like:
Mistake: Uploading a massive, unedited original An image straight off a modern phone or camera can be 4,000–8,000 pixels wide. Instagram will resize it down automatically. But its own resizing algorithm isn’t as good as doing it yourself first. Huge files are also more likely to get hit with heavy compression on a slow connection.
- Uploading a 6000×4000px original straight from your camera
- Resizing to roughly 1350×1688px (a 4:5 ratio around 1350px wide) before uploading
Mistake: Ignoring aspect ratio until the crop screen Cropping after the fact inside Instagram is a coin flip. You might lose your subject’s head or feet.
- Uploading a random-shaped screenshot and hoping the auto-crop looks fine
- Cropping to 4:5 (portrait) in a photo editor first, so you control exactly what’s kept
Mistake: Leaving Data Saver on by default Plenty of accounts have Data Saver enabled without the user realizing it, especially after app updates.
- Data Saver left on, silently compressing every upload
- Data Saver off, Upload at Highest Quality on, for any post where quality matters
Getting Help
If you’ve tried everything above and photos are still coming out rough, it’s worth ruling out a few extra things.
- Check the Instagram Help Center: help.instagram.com has an official, regularly updated breakdown of upload requirements and known issues — search for “photo and video quality” or “upload at highest quality” to find the current guidance directly.
- Check your app version: Go to your phone’s app store and make sure Instagram is fully updated; quality bugs do occasionally get introduced and patched in app updates.
- Test with a different photo: If literally every post looks bad no matter what you do, try a very simple, well-lit photo to rule out something specific to that one image (heavy noise, extreme resolution, unusual color profile).
- Report a bug: In the Instagram app, go to Settings and Privacy > Help > Report a Problem if you suspect something is broken on Instagram’s end rather than a settings issue on yours.
Prevention Tips
- Resize before you upload: Keep your long edge between 1080 and 1800 pixels. Bigger isn’t better; it just gives Instagram more to crush.
- Shoot with your native camera app: Save Instagram’s in-app camera for quick, casual snaps only.
- Keep Upload at Highest Quality on permanently: There’s rarely a good reason to leave this off unless you’re seriously data-constrained.
- Crop to 4:5 before you upload: Decide your composition yourself instead of letting Instagram’s auto-crop decide for you.
- Export Stories and Reels at 9:16 from the start: Avoid zooming or heavy cropping inside the Stories editor.
- Post on Wi-Fi when quality matters: Save mobile-data posting for casual, low-stakes shots.
Frequently Asked Questions
Why do my Instagram photos look blurry or pixelated after I post them?
Mostly it’s Instagram’s lossy JPEG compression, which throws away image detail to keep files small and fast-loading. Aspect ratio cropping, HEIC-to-JPEG conversion on iPhones, and weak-connection re-compression can all make it worse.
How do I turn on Upload at Highest Quality on Instagram?
In the mobile app, go to Settings and Privacy > Data Usage and toggle on Upload at Highest Quality. This setting isn’t currently available on the web version.
What image size and aspect ratio should I use for Instagram to avoid quality loss?
Aim for roughly 1080–1800 pixels on the long edge and a 4:5 portrait ratio for feed posts. Avoid uploading oversized originals straight from your camera.
Does Instagram’s Data Saver setting make photos look worse?
Yes. Data Saver intentionally reduces the data used for photos and videos, which lowers visible quality. Turn it off under Settings and Privacy > Data Usage when quality matters more than saving mobile data.
Why do iPhone photos look worse on Instagram than in my camera roll?
iPhones shoot in HEIC by default, and Instagram converts HEIC to JPEG during upload, which can introduce extra artifacts. Switching your camera to Most Compatible (JPEG) mode under Settings > Camera > Formats avoids that conversion step.
Why do my Instagram Stories or Reels look blurry compared to the original video/photo?
Stories and Reels use a 9:16 vertical canvas. Content not shot or exported at that ratio gets stretched, cropped, or upscaled to fill the screen, which introduces blur. Export at 9:16 before posting and avoid zooming in the Stories editor.
Does using Instagram’s built-in camera reduce photo quality?
Yes, generally. The in-app camera captures at lower resolution and with different processing than your phone’s native camera app. Shoot with your regular camera app and import the photo instead.
Can editing tools in Instagram fix a blurry photo after it’s already compressed?
Not fully. Instagram’s Sharpen, Contrast, and Structure tools can make a compressed photo look a bit punchier, but they can’t restore detail that compression already threw away. Get your source image right before uploading for the best results.
Wrapping Up
Instagram’s photo quality problems almost always come down to the same handful of culprits: compression, aspect ratio cropping, HEIC conversion, and weak connections. Flip on Upload at Highest Quality, turn off Data Saver, resize your photos to around 1080–1800px in a 4:5 ratio, and shoot with your native camera app. Do those four things and most of the blur disappears.
The highest-quality toggle alone fixes this for a lot of people. Start there before you rebuild your whole workflow — it takes about ten seconds to turn on.
| Step | Action | Applies To |
|---|---|---|
| 1 | Turn on Upload at Highest Quality | iOS/Android app |
| 2 | Turn off Data Saver | iOS/Android app |
| 3 | Resize to 1080–1800px, 4:5 ratio | All platforms (before upload) |
| 4 | Switch iPhone camera to Most Compatible (JPEG) | iOS |
| 5 | Shoot with native camera, not in-app camera | iOS/Android app |
| 6 | Upload on strong Wi-Fi | All platforms |
| 7 | Export Stories/Reels at 9:16 | All platforms |
Last updated: 2026-08-04 | Applies to Instagram on macOS, iOS, and Web