
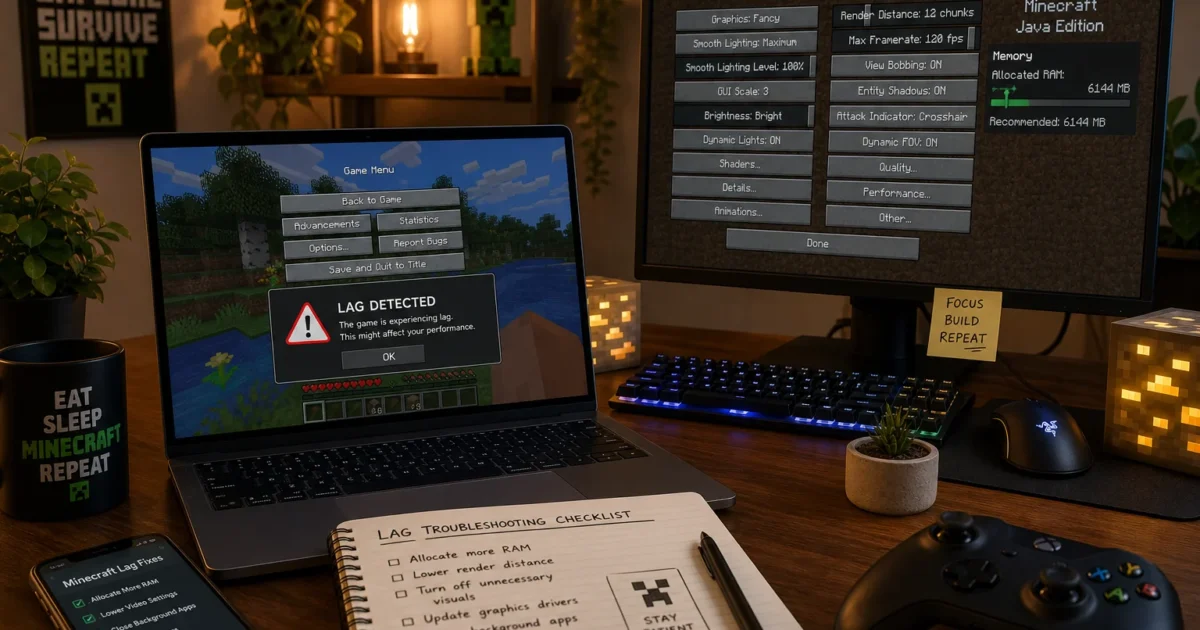
What’s more annoying than Minecraft freezing right when you’ve found something worth exploring? Java Edition looks simple, but it can push a computer surprisingly hard, and lag spikes, stuttering, and low FPS all point to different causes. You can often find the cause without buying new hardware — this guide covers Minecraft Java Edition performance on both Windows and macOS.
First, figure out which kind of lag you’re seeing. Then change one setting at a time. We’ll check visuals and add-ons first, followed by memory, Java, drivers, and multiplayer servers.
Quick Fixes to Try First
Before touching advanced settings, restart Minecraft and try these fixes in order:
- Close background apps: Quit browsers, game launchers, recording tools, and anything else you don’t need.
- Restart Minecraft: Fully quit the game and launcher, then reopen both (and you know how well restarting works on computers).
- Test one world: Return to the same spot in a single-player world after each change. That gives you a fair comparison.
- Disable shaders: Shaders often cause sudden FPS drops.
- Use default resources: Temporarily remove high-resolution resource packs.
- Lower render distance: Reduce it by several chunks, then test again.
- Check the lag type: Smooth graphics with delayed mobs or blocks usually point to network or server trouble, rather than low FPS.
Which change comes first? Disable shaders and switch to the default resource pack. Both changes are quick, easy to reverse, and often expose the culprit right away.
Quick Diagnosis: What Kind of Lag Is It?
“Another kind of lag” is probably Minecraft’s most annoying little surprise. The word covers three different problems. Picking the right one keeps you from changing settings that can’t help.
| Symptom | What It Usually Means | First Check |
|---|---|---|
| Movement and animation always look choppy | Low FPS, or too few frames rendered each second | Lower video settings |
| The game runs smoothly, then briefly freezes | Stuttering from world loading, memory pressure, mods, or assets | Disable shaders and resource packs |
| Blocks reappear or mobs respond late online | Network or multiplayer server lag | Compare with single-player |
| Only one server feels slow | That server may be overloaded | Check its TPS and MSPT |
| Performance drops after a visual add-on is enabled | Shader or resource-pack load | Return to default visuals |
Java Edition can show its FPS counter when you press F3 on many keyboards. On a Mac, you may need Fn + F3, depending on your keyboard settings. A low or wildly changing number confirms a graphics problem. If FPS stays steady while online actions arrive late, the trouble lies elsewhere.
Common Issues and Solutions
Problem: Minecraft Has Low FPS
Symptoms:
- Movement looks choppy all the time.
- The FPS counter stays below its usual range.
- Performance gets worse when you look across large areas.
- Single-player and multiplayer are both affected.
Why it happens: Minecraft may be drawing too many chunks or running costly visual effects. Clouds, particles, shadows, biome blending, entity distance, and smooth lighting all give your computer more work.
Fix:
- Open Minecraft Java Edition.
- Select Options > Video Settings.
- Reduce Render Distance first. Pick a moderate value instead of changing every option at once.
- Reduce Simulation Distance if it’s available. This controls how far away Minecraft keeps creatures and other world activity running.
- Change the graphics quality from its highest mode to a faster option.
- Lower entity distance, particles, biome blend, clouds, and smooth lighting as needed.
- Apply the settings and return to the same spot in your world.
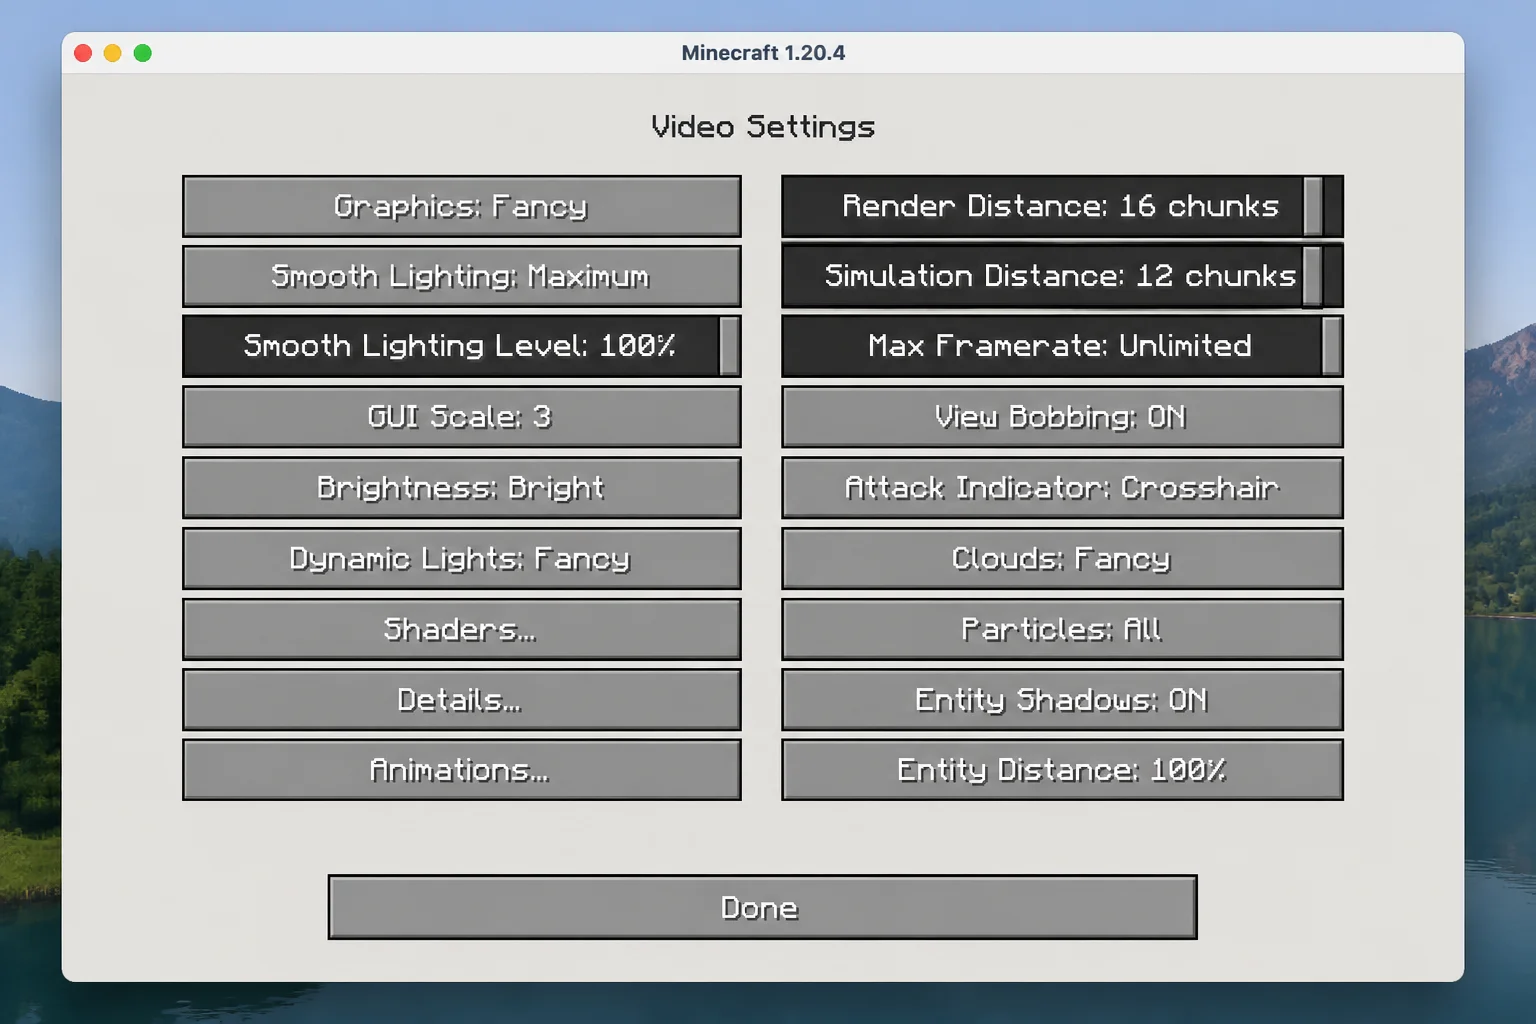
Verification: Watch the FPS counter for at least one minute while moving through the same area. If FPS rises and stays steadier, one or more video settings were asking too much of your computer.
Problem: Minecraft Stutters While Exploring
Symptoms:
- The game pauses briefly while you move.
- Stutters appear when new terrain comes into view.
- Average FPS looks fine between pauses.
- The problem gets worse after you’ve played for a while.
Why it happens: Minecraft loads and creates world data as you explore. Think of it like unpacking boxes while you’re still walking through the house. Shaders, large textures, clashing mods, background apps, and poor memory settings can make each pause more obvious.
Fix:
- Return to an area you know and stand still for one minute.
- Disable all shaders.
- Switch to Minecraft’s default resource pack.
- Lower render and simulation distances.
- Quit background apps you don’t need.
- Restart Minecraft before testing again.
- If you use mods, test a separate clean installation without them. Don’t remove files from your main profile; create a test profile instead.
Verification: Travel along the same route twice. A little loading during the first pass can be normal. If the second pass is much smoother, terrain loading was probably involved. Freezes that keep returning point to settings, memory, or mods.
Problem: FPS Drops When Shaders Are Enabled
Symptoms:
- FPS falls as soon as you enable a shader.
- Water, shadows, or weather make performance worse.
- Minecraft runs normally when shaders are off.
Why it happens: Shaders replace Minecraft’s basic lighting with effects such as moving shadows, reflections, and beams of light. They can make a sunset gorgeous, but your graphics processor pays the bill.
Fix:
- Open the shader-selection screen provided by your installed shader-compatible mod.
- Select Off, Disabled, or its matching option.
- Apply the change.
- Reload the same world.
- If performance returns, keep shaders disabled during the rest of your checks.
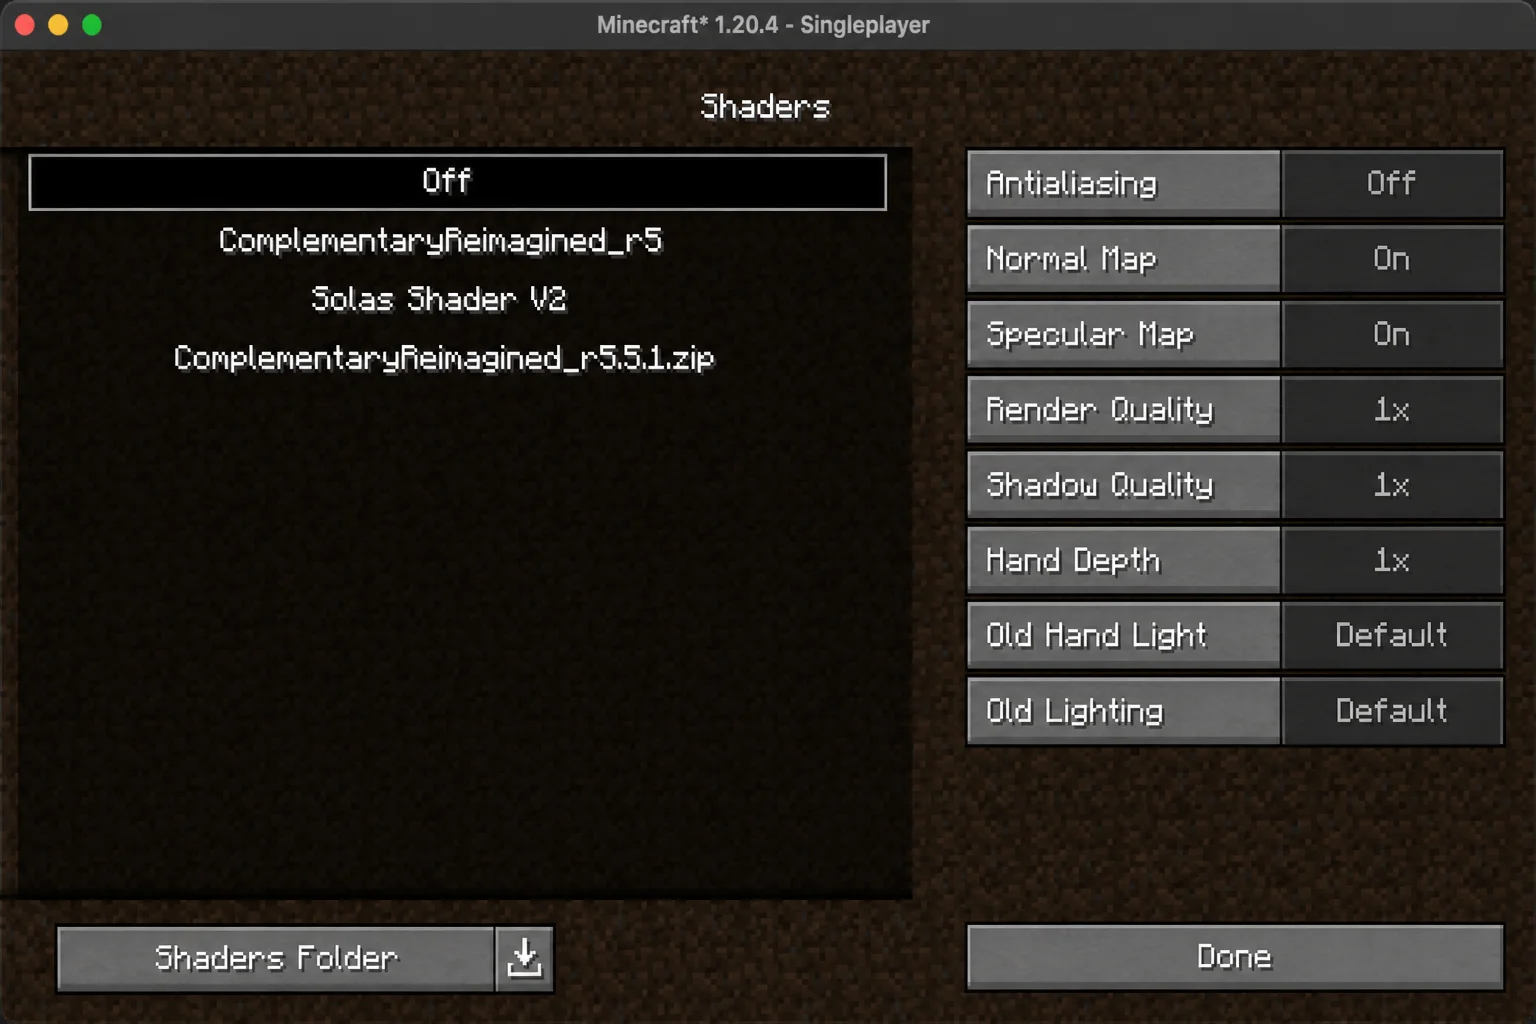
Verification: Compare FPS in the same scene with shaders on and off. A clear boost when they’re disabled confirms that the shader workload caused the slowdown.
Problem: A Resource Pack Causes Hitching
Symptoms:
- Pauses began after you installed a resource pack.
- Menus or worlds take longer to load.
- Turning quickly causes brief freezes.
- Default textures run better.
Why it happens: High-resolution textures hold far more image data than Minecraft’s default assets. That extra detail raises memory use and loading time. It’s like swapping a small photo album for a cabinet full of posters.
Fix:
- Select Options > Resource Packs.
- Remove the high-resolution pack from the selected list.
- Enable the default resources or a lower-resolution pack.
- Select Done and wait for the resources to reload.
- Re-enter the same test area.
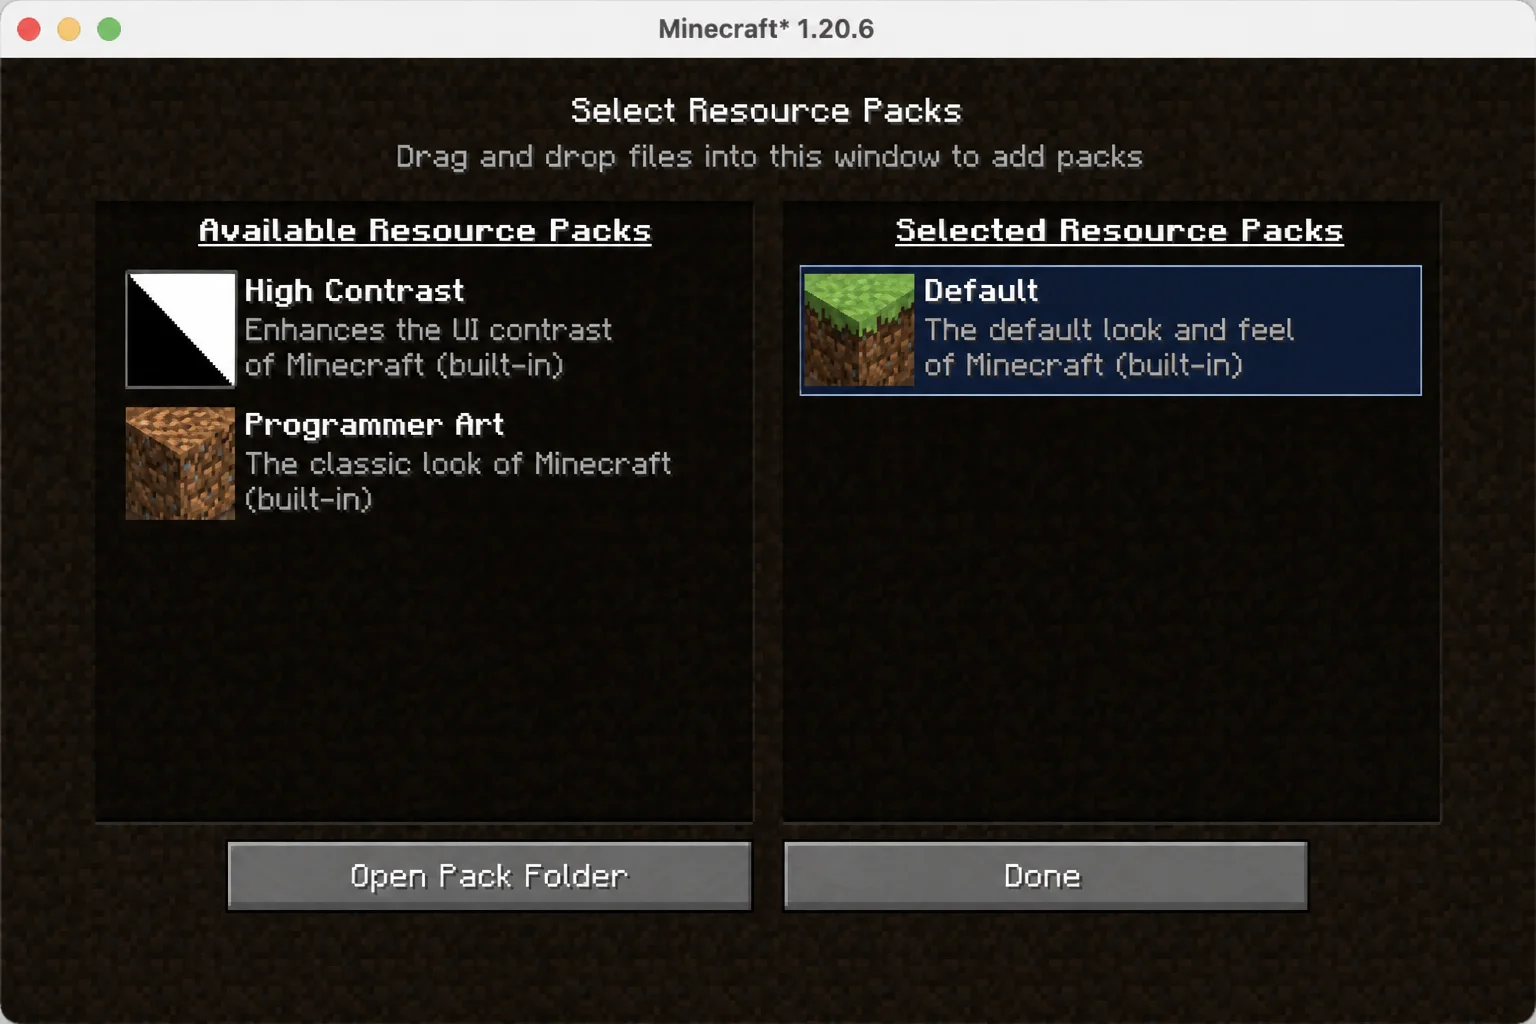
Verification: If the pauses disappear with default textures, the resource pack was adding to the problem.
Problem: Minecraft Still Stutters After Assigning More RAM
Symptoms:
- Raising the memory limit didn’t help.
- Pauses continue even with plenty of memory assigned.
- The trouble began after you changed JVM arguments.
- Other Mac or PC apps slow down while Minecraft runs.
Why it happens: More memory doesn’t always mean more speed. Minecraft benefits only when it was short on memory before. Give it too much, and macOS, Windows, and your background apps get squeezed. Large memory limits can also affect garbage collection, which is Java’s way of clearing old data.
Fix:
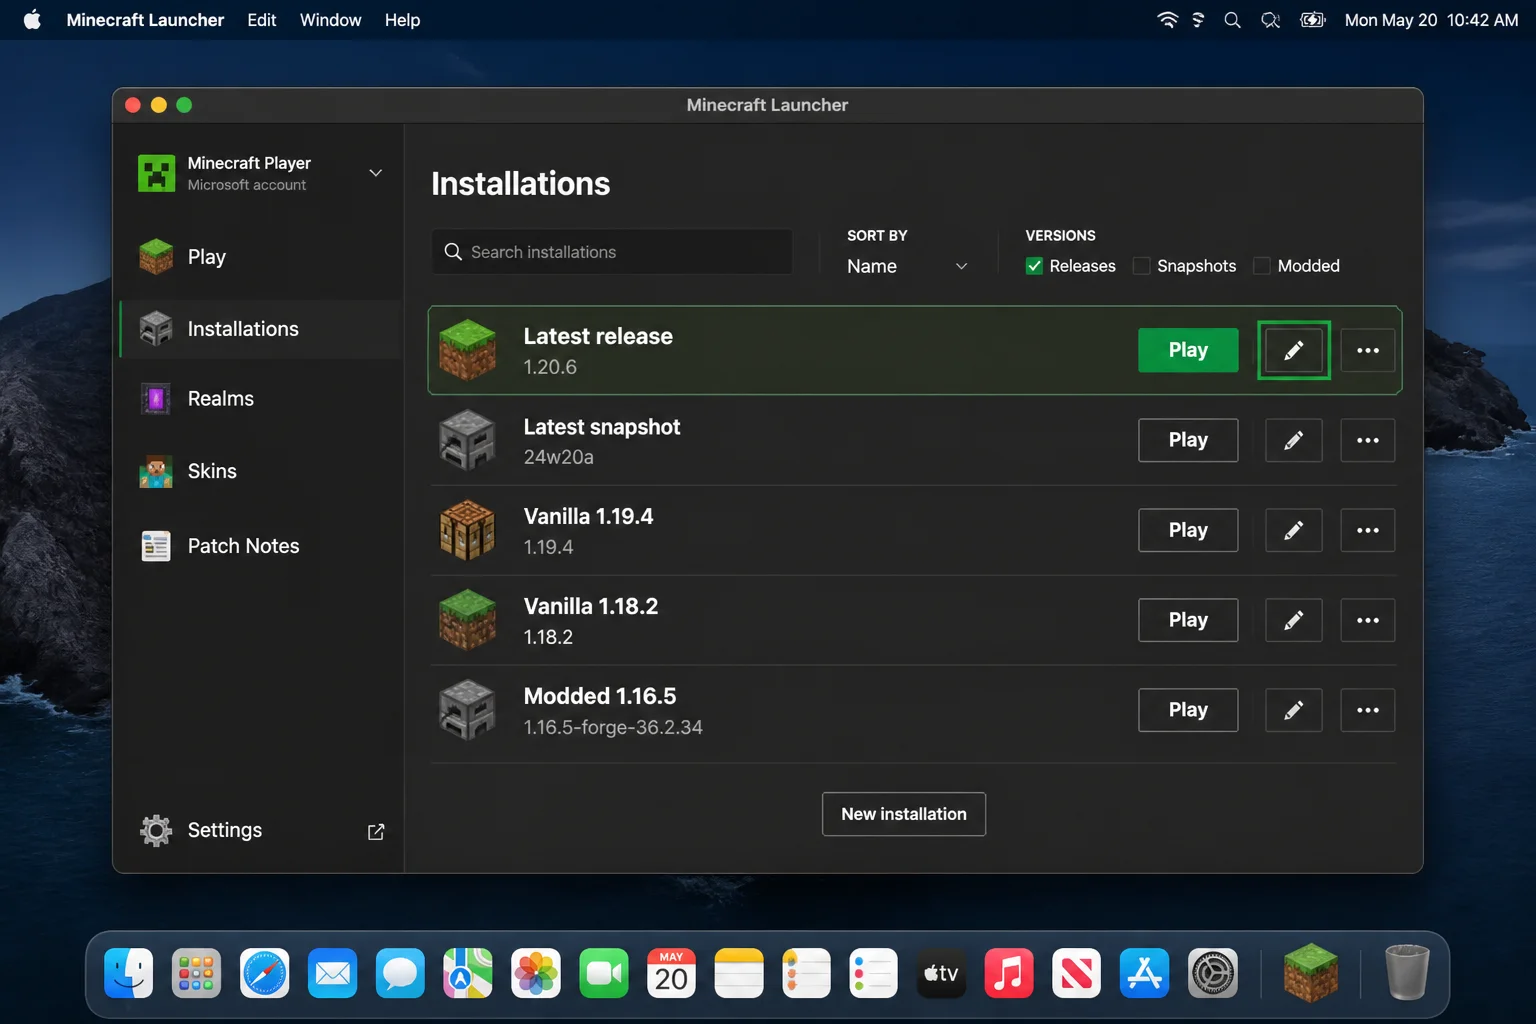
- Open Minecraft Launcher.
- Select Minecraft: Java Edition > Installations.
- Find the installation used by the Play button.
- Open its edit menu and select Edit.
- Expand More Options.
- Find the value beginning with
-Xmxin JVM Arguments.
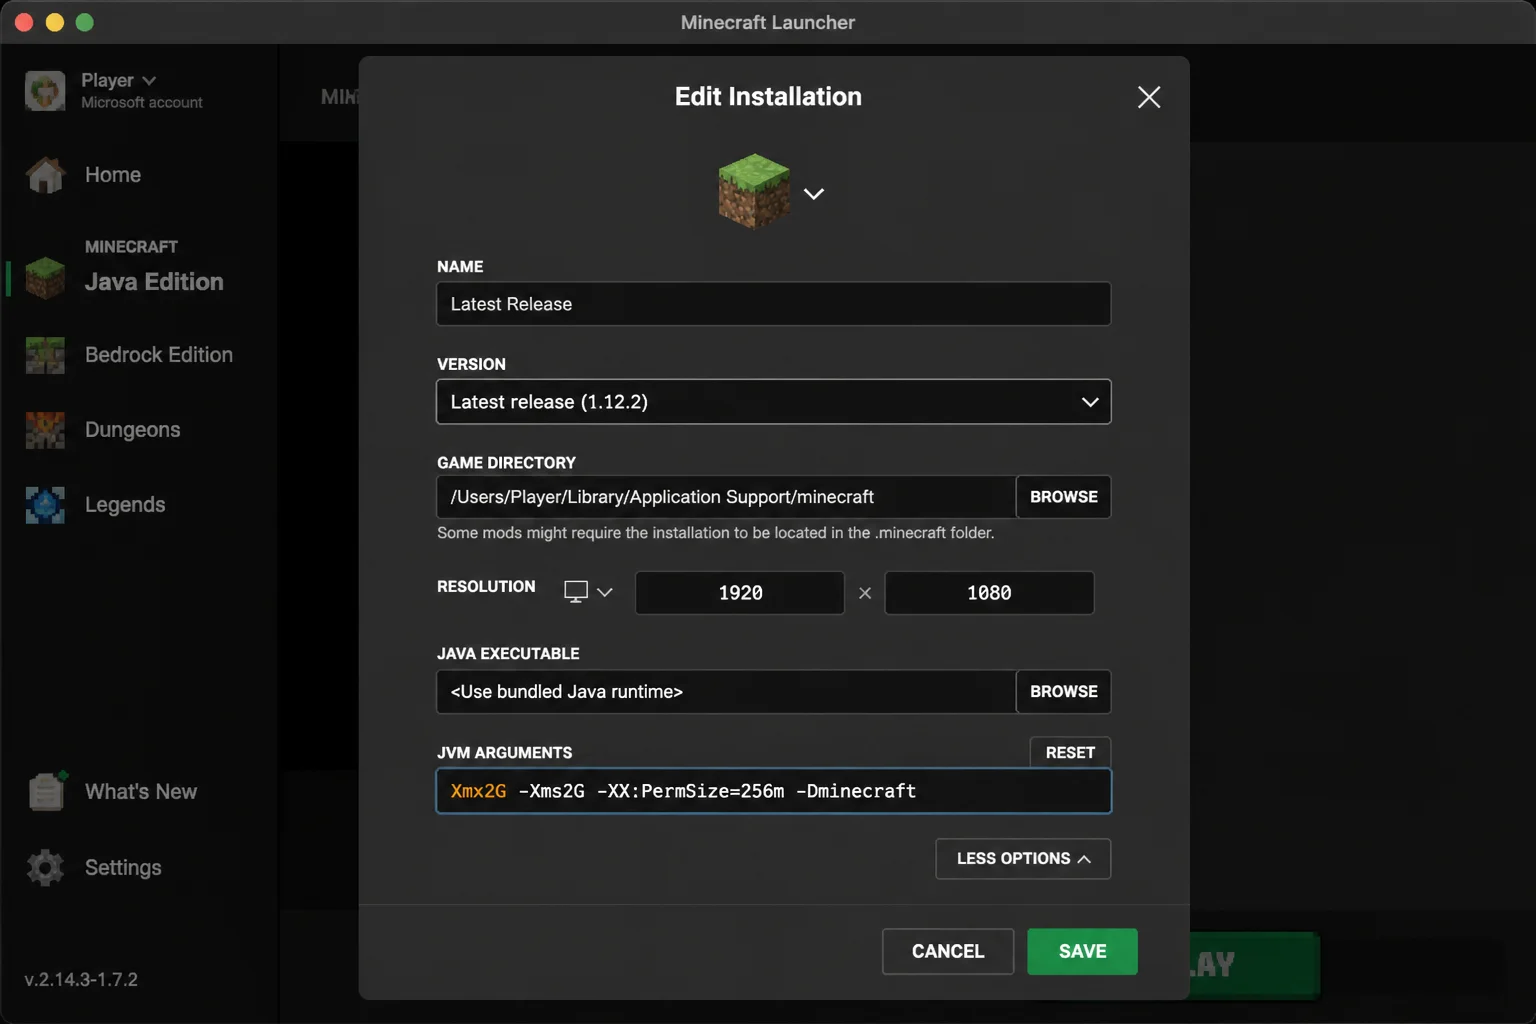
- Change only the memory value. For example:
-Xmx4G
This allows Minecraft to use up to 4 GB. G means gigabytes.
- Leave every unrelated JVM argument in place.
- Save the installation and restart Minecraft.
No single amount suits every setup. A basic game often needs less memory than a large modpack. As a cautious troubleshooting rule, don’t assign more than about 50% of your computer’s total memory. That’s a ceiling, not a goal. For example, on an 8 GB system start around -Xmx4G; on 16 GB, avoid going much higher than -Xmx8G while troubleshooting. Also check the needs listed by your modpack or launcher provider, since modpack-specific recommendations can override this general ceiling.
Verification: Press F3, or Fn + F3 on some Macs, and watch memory use while you recreate the problem. Make sure Minecraft starts from the installation you edited. Its debug details should show the new limit.
Problem: The -Xmx Change Has No Effect
Symptoms:
- The debug screen still shows the old memory limit.
- Minecraft starts with no change in performance.
- Several installations have similar names.
Why it happens: The launcher keeps separate JVM arguments for every installation. It’s easy to edit one profile and launch its nearly identical neighbor (Minecraft profiles can become quite the junk drawer). Third-party launchers may control memory through their own settings.
Fix:
- Return to Minecraft Launcher > Minecraft: Java Edition > Installations.
- Give the edited installation a clear test name.
- Save it.
- Select that exact installation beside the Play button.
- Launch the game again.
- If you use another launcher, check its own Java or memory settings. Don’t assume the standard launcher controls them.
Verification: Open the debug screen and confirm that its maximum memory matches the edited -Xmx value.
Problem: OptiFine or Sodium Will Not Load
Symptoms:
- Minecraft crashes during startup.
- The performance mod doesn’t appear.
- You see an incompatible-mod or missing-loader message.
- Problems begin after you combine performance mods.
Why it happens: The mod, Minecraft, mod loader, and Java runtime all need matching versions. A mod built for one game version may fail completely on another.
Fix:
- Record the exact Minecraft version displayed in the launcher.
- Check whether the installation is vanilla or uses a loader such as Fabric.
- For a vanilla or lightweight setup, consider a compatible OptiFine release.
- For a Fabric-based setup, consider a compatible Sodium release.
- Check support on the project’s official page before downloading anything.
- Don’t install OptiFine and Sodium together unless current documentation supports your exact combination.
- Test the performance mod in a separate installation before adding other mods.
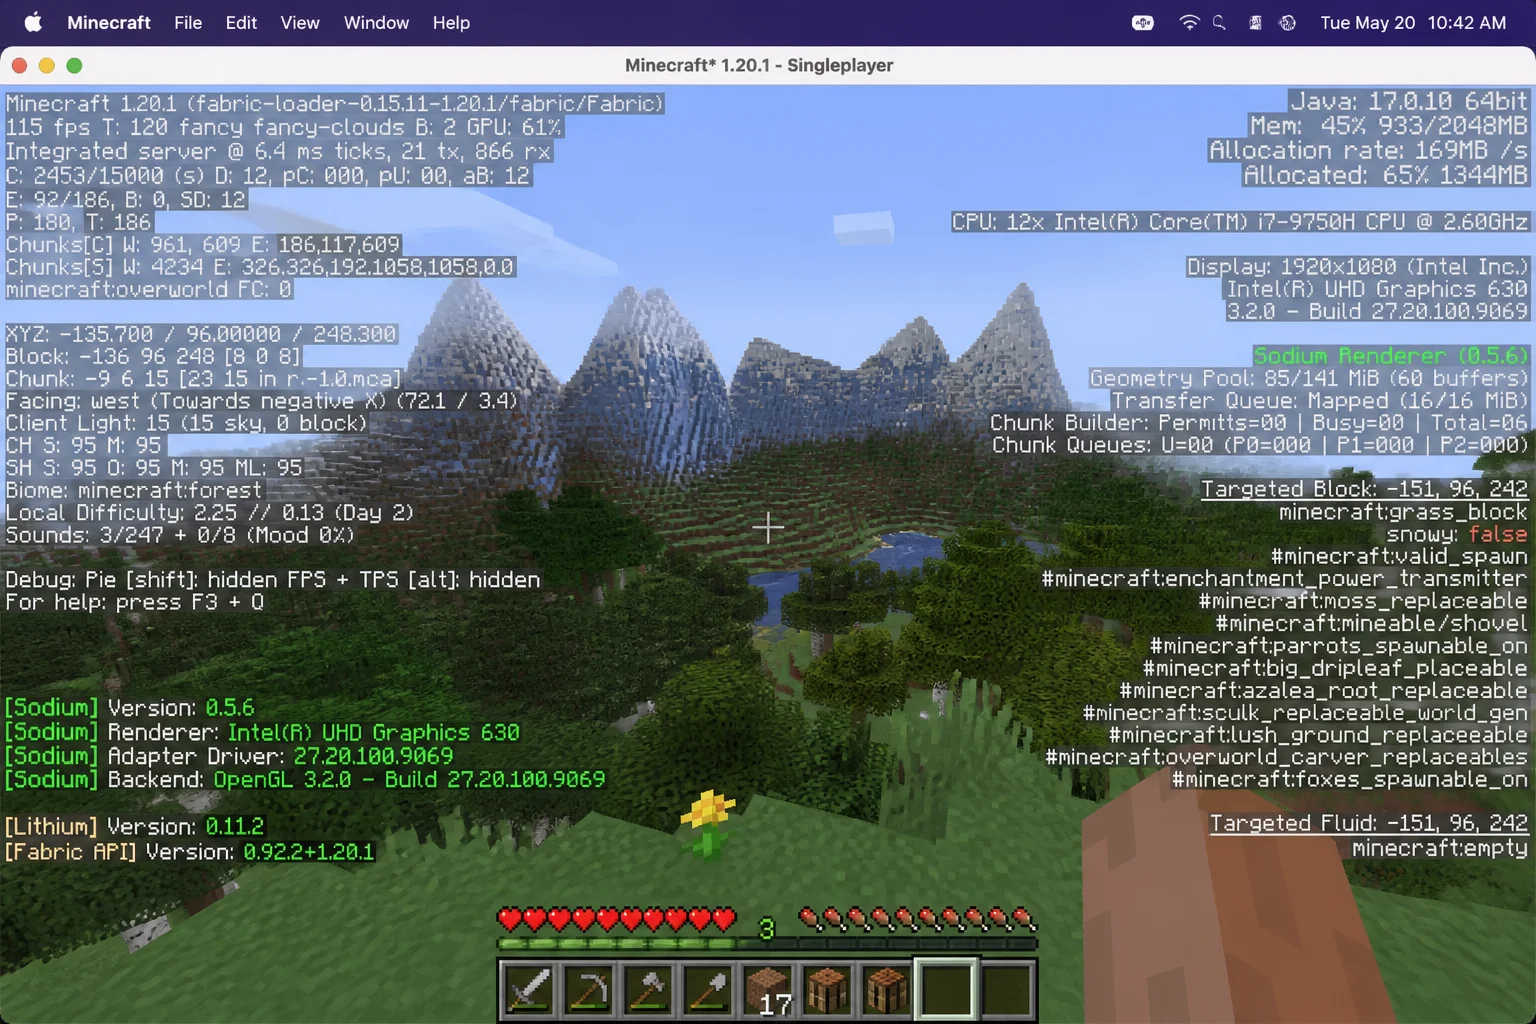
Verification: Minecraft should reach the main menu without an error. Its mods screen or video settings should also show the expected mod. If the game crashes, remove the test mod and review the latest log.
Problem: Minecraft Uses an Incompatible Java Version
Symptoms:
- The game fails before reaching the main menu.
- A mod reports an unsupported Java version.
- A custom Java executable causes startup errors.
- An older profile stopped working after a Java change.
Why it happens: Minecraft releases and mod loaders don’t all use the same Java version. Modern launchers normally provide a suitable runtime, but a custom executable can override it. Needs also vary between releases, so “every recent version uses Java 17” isn’t a safe rule.
Fix:
- Note the exact Minecraft release and mod-loader version.
- Check the release’s official requirements or the loader’s documentation.
- Open the installation editor and expand More Options.
- Review Java Executable.
- If you don’t need a custom runtime, restore the launcher-managed setting.
- If a modpack requires a certain Java release, select only the listed version.
- Restart the launcher after changing the runtime.
Verification: Start that exact profile and check the debug screen or latest log for the listed Java version. Make sure it matches the requirement for that release.
Problem: Only Multiplayer Feels Laggy
Symptoms:
- Single-player runs smoothly.
- Blocks reappear after you break them.
- Mobs freeze, jump, or respond late.
- Chat and inventory actions are delayed.
- Only one server has the problem.
Why it happens: You’re usually seeing response lag here. Your network or the server may be slow while your computer draws every frame perfectly. That’s why lowering pretty clouds won’t persuade a struggling server to hurry up.
Server owners often measure the problem with:
- TPS: Ticks per second. Minecraft aims to process 20 game ticks each second.
- MSPT: Milliseconds per tick. This shows how long the server takes to process one tick. Staying below roughly 50 ms gives it enough time to maintain 20 TPS.
Fix:
- Check whether single-player responds normally.
- Test another server, if practical.
- Ask whether other players on the affected server notice the same delay.
- Check the server’s available TPS or MSPT display if you have permission.
- Restart your router if every online server is affected. It’s like giving your network a quick rest.
- Stop changing graphics settings when FPS is steady. Graphics options can’t repair an overloaded server.
Verification: If single-player and other servers work normally, the affected server is the likely cause.
Error Messages Quick Reference
Minecraft’s exit codes can be wonderfully vague. The exact log message usually tells you far more than the number in the launcher.
| Error Message or Log Text | What It Means | What to Do |
|---|---|---|
Could not reserve enough space for object heap | Java cannot reserve the requested -Xmx memory | Lower -Xmx, save, and restart |
Invalid maximum heap size | The -Xmx value has invalid formatting or won’t work | Use a simple valid value such as -Xmx4G |
UnsupportedClassVersionError | The program was built for a different Java release | Verify the required Java version for the exact game or mod |
Incompatible mod set | One or more mods do not match the game, loader, or each other | Check every listed version and dependency |
Mod resolution encountered an incompatible mod set | Fabric cannot build a matching set from the installed mods | Follow the versions suggested in the error, then retest |
OutOfMemoryError: Java heap space | The game reached its Java memory limit | Remove demanding mods or packs, then raise -Xmx carefully if needed |
OpenGL error | A graphics feature, mod, or driver caused a display problem | Disable shaders, test without graphics mods, and update the driver |
Exit Code: 1 | A general launch failure, not a specific diagnosis | Read the latest log for the real error immediately above the exit |
Exit Code: -805306369 | Often linked to memory pressure or a Java-level crash | Reset JVM changes, close background apps, and inspect the crash log |
Can't keep up! Is the server overloaded? | The server is processing ticks too slowly | Check server MSPT and TPS; do not treat it as client FPS loss |
Exit codes alone rarely explain the whole problem. The useful clue usually appears near the end of latest.log or in the related crash report.
Platform-Specific Fixes
On macOS
macOS doesn’t have the per-app High Performance GPU option used in the Windows steps below. Don’t hunt for javaw.exe or copy Windows executable paths. That rabbit hole goes nowhere on a Mac.
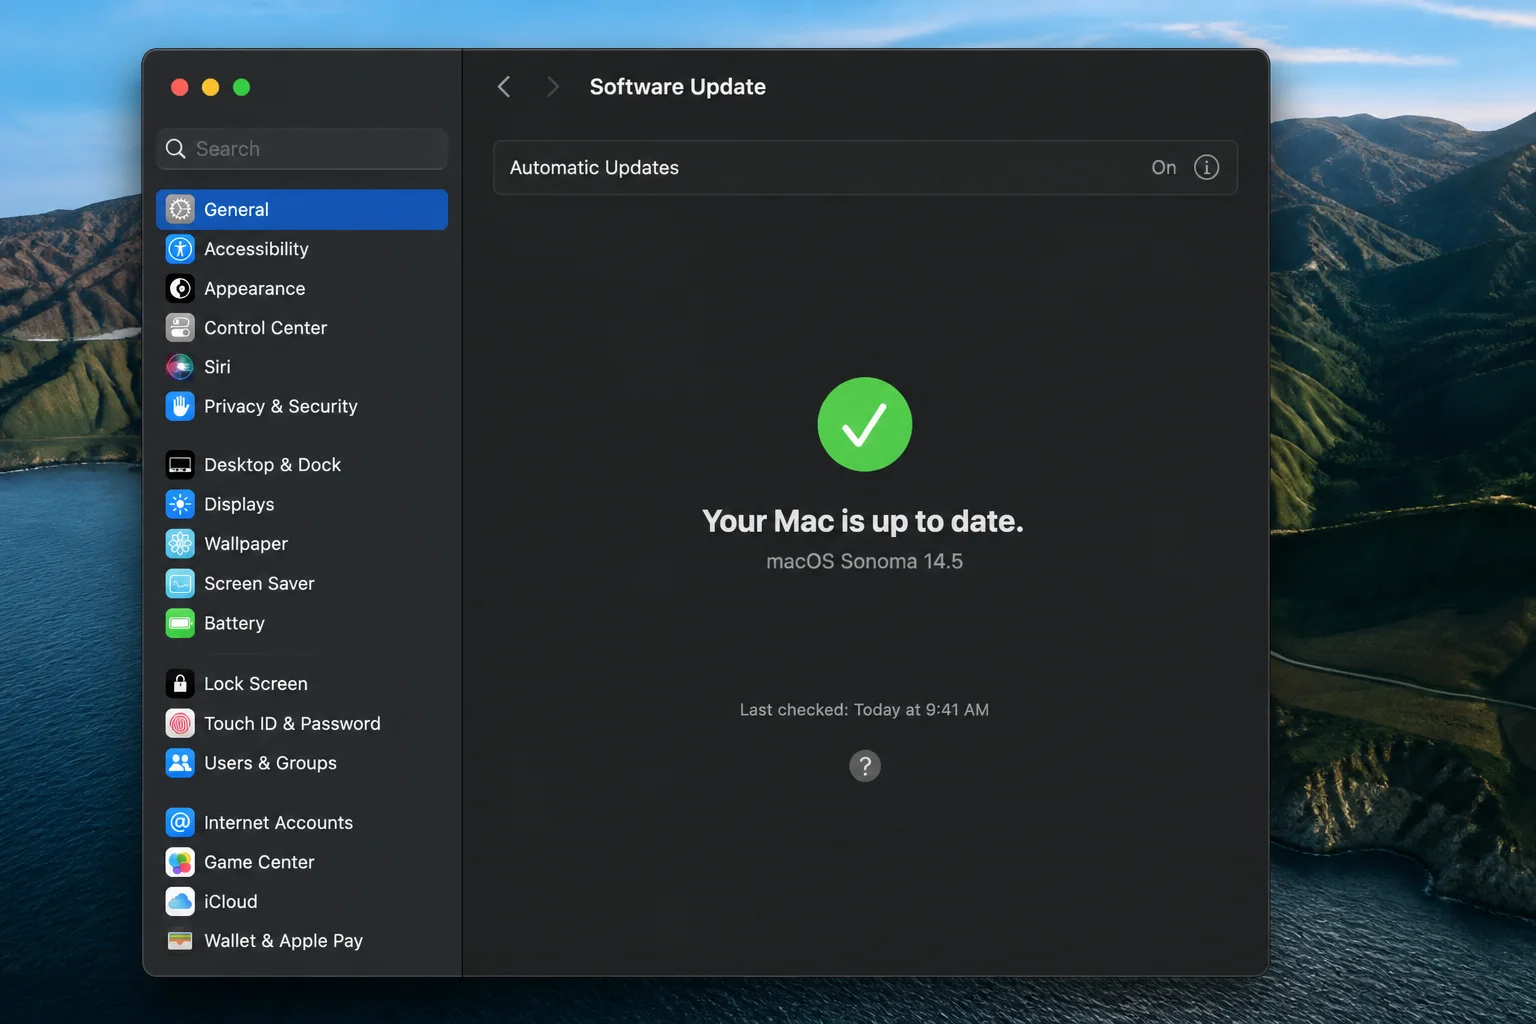
- Open System Settings > General > Software Update.
- Install an available stable macOS update. Apple includes graphics-driver updates with macOS. Typical Mac setups don’t use separate NVIDIA, AMD, or Intel installers. Staying on a significantly outdated macOS release can also limit which Java and GPU driver versions are available to Minecraft, so keeping macOS on a currently supported release is part of maintaining stable performance.
- Restart the Mac after the update.
- Reopen the active launcher installation and confirm its JVM arguments.
- On a MacBook, connect the power adapter and turn off Low Power Mode while testing. Its exact location varies by macOS release. You’ll normally find it under System Settings > Battery.
- Close demanding apps with Command +
Q. Closing a window doesn’t always quit the app (a small macOS habit that catches nearly everyone).
Verification: Run Minecraft in the same world and compare FPS, stutter frequency, and memory use.
On Windows
Update the Graphics Driver
- Open Device Manager > Display adapters to identify your GPU.
- Install the driver made for your exact GPU and Windows version.
- Restart Windows.
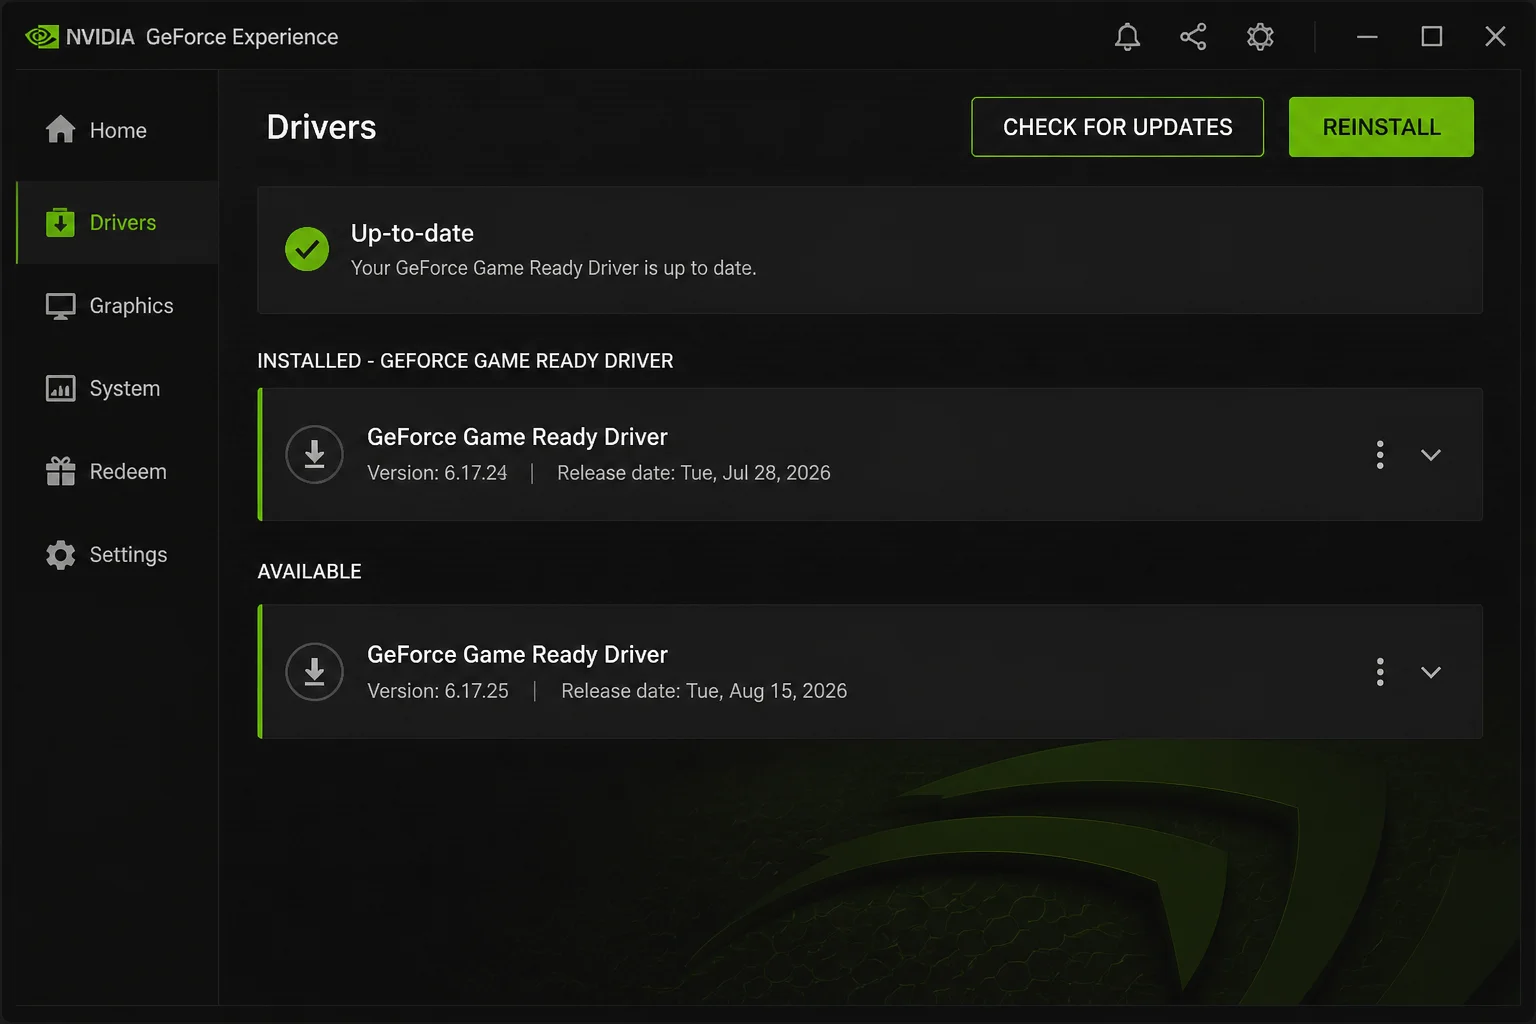
Verification: Reopen Minecraft and see if its OpenGL errors, low FPS, or visual glitches return.
Make Minecraft Use the High-Performance GPU
These steps apply to Windows computers with more than one graphics processor. Laptops are the usual suspects.
- Launch Minecraft and open Task Manager with
Ctrl+Shift+Esc.
- Find the active Java process, right-click it, and choose Open file location. This shows the exact
javaw.exeused by that profile.
- Open Settings > System > Display > Graphics.
- Add or select the active
javaw.exeas a desktop app.
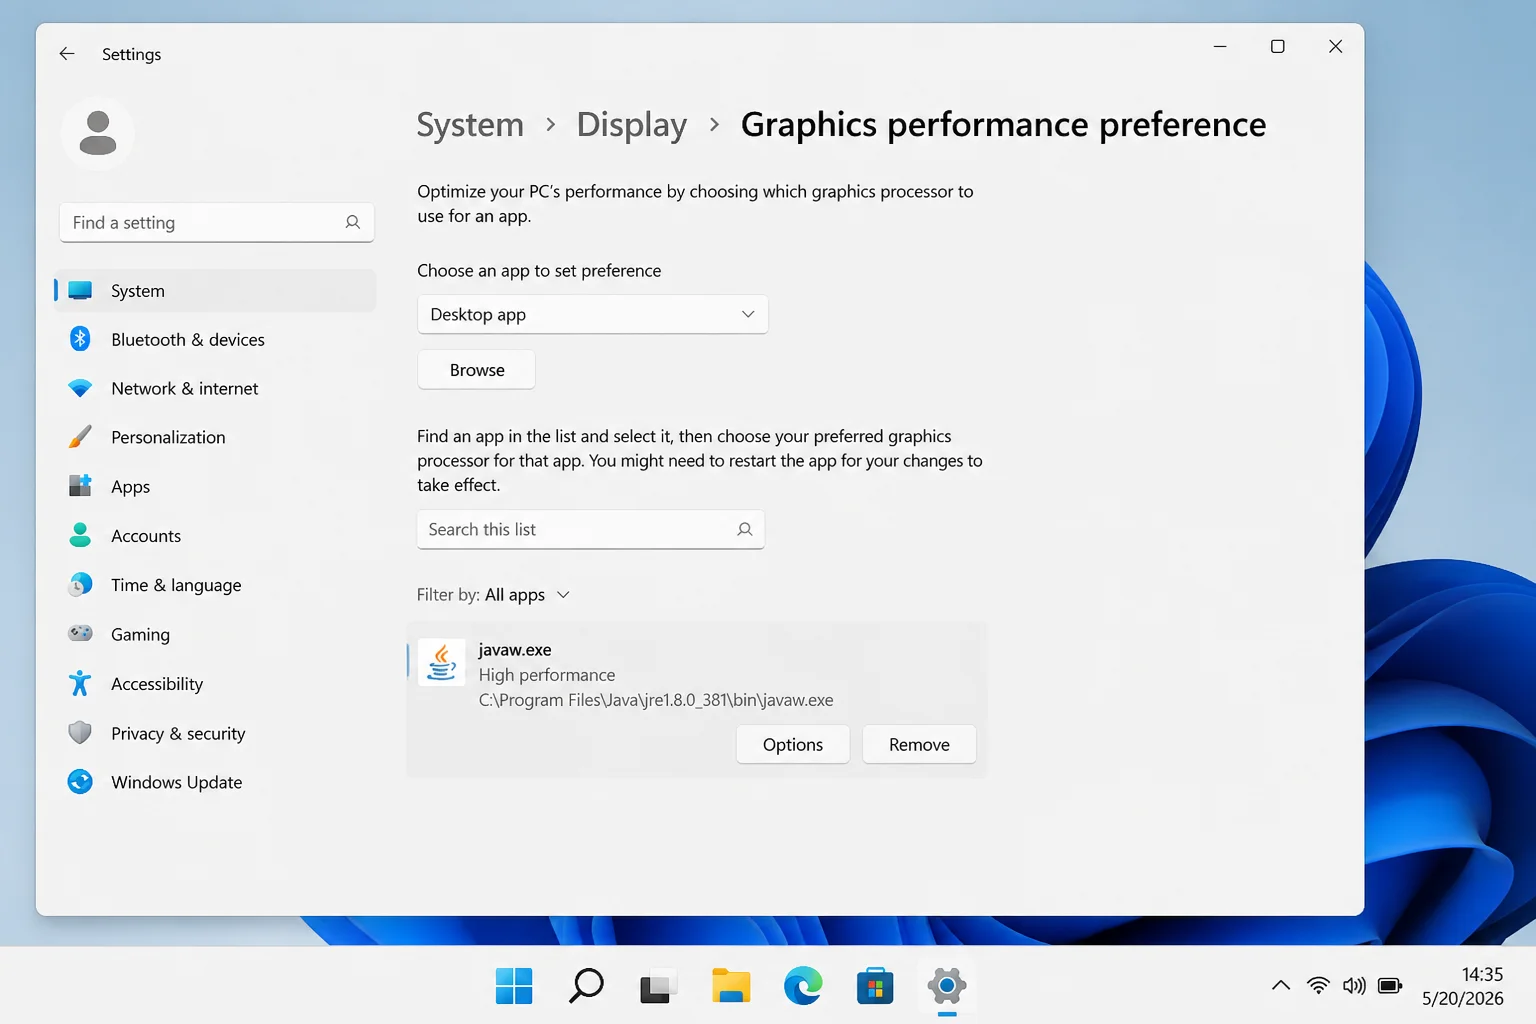
- Select its entry and open Options.
- Choose High performance.
- Select Save, then restart Minecraft and its launcher.
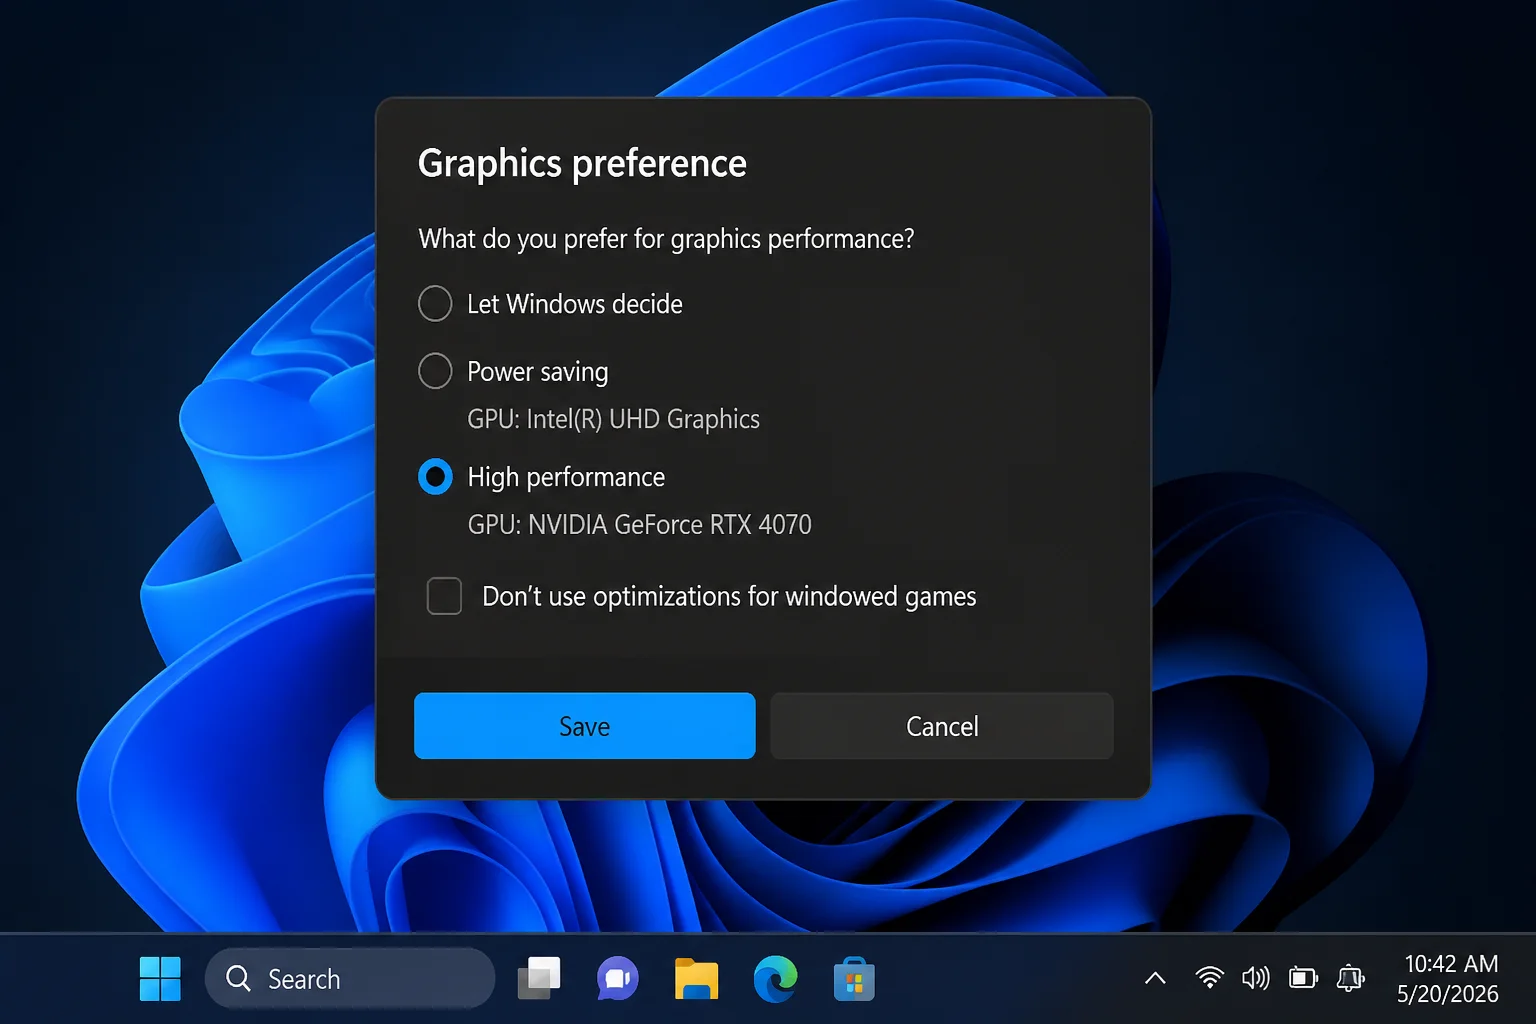
Verification: Press F3 in Minecraft and inspect the renderer or display details. They should name the intended GPU. If they don’t, repeat the steps for the exact Java executable used by the active installation.
Configuration Issues to Check
A few easy mistakes can undo an otherwise solid Minecraft performance fix:
- Editing the wrong profile: Change the installation selected beside the launcher’s Play button.
- Replacing every JVM argument: Edit only the existing
-Xmxvalue unless trusted documentation tells you to change something else.
- Using malformed memory syntax: Use a value such as
-Xmx4G, with no space between the number andG.
- Assigning almost all system memory: Leave plenty for macOS or Windows. Treat roughly 50% of total memory as a troubleshooting ceiling, not a universal goal.
- Changing everything at once: Test one setting at a time in the same place. Otherwise, you won’t know which switch did the job.
- Mixing unsupported mods: Match the exact Minecraft release, loader, mod release, and dependencies.
- Leaving shaders enabled: Keep them off until the base game runs smoothly.
- Testing with a large resource pack: Use default textures until you’ve found the cause.
- Forcing a custom Java path without a reason: Let the official launcher manage Java unless verified modpack instructions say otherwise.
A Quick Note on Hardware Limits
Software tweaks only go so far. If you’re on an older laptop, an integrated GPU, or a system that struggles even at Minecraft’s lowest settings, some of that lag is a hardware ceiling rather than a misconfiguration. Getting closer to smooth performance is still worth doing, but very old or entry-level integrated graphics may never run heavily modded or shader-enabled setups smoothly, no matter how much you tune -Xmx or video settings.
Getting Help
If Minecraft still lags or crashes, gather a few details before asking for help. A clear report saves everyone from playing twenty questions while staring at Exit Code: 1.
Log Locations
On macOS, open Finder, select Go > Go to Folder, and enter:
~/Library/Application Support/minecraft/logs
On Windows, enter this path in File Explorer’s address bar:
%APPDATA%\.minecraft\logs
Useful files include:
latest.logfor the latest game session.- Files in
crash-reportswhen Minecraft creates a crash report. - Launcher logs when the game never starts.
Before posting a log publicly, check it for your username, computer paths, server addresses, and other private details. Logs can collect personal crumbs like a desk drawer collects loose batteries.
Include your operating system, Minecraft version, launcher, Java version, mod loader, mod list, resource pack, shader, and -Xmx value. Also say if the problem occurs in single-player.
Use the Minecraft Help Center for official support. For modded installations, use the support page linked from the mod or loader’s verified official project page. Avoid random download mirrors.
Prevention Tips
- Keep a clean test profile: A separate vanilla installation makes mod problems much easier to find.
- Add mods gradually: Start the game after each small batch instead of installing everything at once.
- Match versions carefully: Confirm the game, loader, Java, and mod versions before updating.
- Keep JVM arguments simple: Don’t paste “ultimate FPS” argument lists from unknown sources. Those lists often create a second problem while pretending to fix the first.
- Use one visual baseline: Test with shaders off and default resources before judging a new setup.
- Update through supported sources: Use the launcher, Apple Software Update, or the GPU maker’s official method.
- Record stable settings: Take a screenshot of working launcher and video settings before making major changes.
Frequently Asked Questions
How Much RAM Should I Assign to Minecraft?
Assign enough for your game or modpack, but leave plenty for the operating system. Basic installations often need less than large modpacks. During diagnosis, avoid going above roughly half of your total system memory unless verified instructions give you a good reason.
Can Assigning Too Much RAM Make Troubleshooting Harder?
Yes. It can squeeze other apps and change Java’s cleanup behavior, which may create or hide pauses. Start with a sensible amount and adjust it in small steps.
Should I Use OptiFine or Sodium?
OptiFine works well with many vanilla or lightweight installations. Sodium is made for Fabric-based setups. Choose one based on your exact Minecraft version, loader, and other mods. Claimed FPS numbers don’t tell you if the parts will fit together.
Why Is Minecraft Java Edition Stuttering?
Common causes include terrain loading, shaders, large textures, demanding video settings, memory pressure, clashing mods, the wrong Java runtime, and graphics-driver trouble. Testing the same route with default visuals helps narrow that list quickly.
Do Shaders and High-Resolution Resource Packs Reduce Performance?
They can. Shaders add costly lighting effects, while high-resolution packs load larger textures. Disable both while you diagnose performance.
Which Java Version Does My Minecraft Release Require?
That depends on the exact Minecraft release and mod loader. Check the official requirement for your release instead of using one Java rule for every installation. For an unmodified game, the launcher-managed runtime is usually the safest choice.
Quick Troubleshooting Checklist
- Restart Minecraft and its launcher.
- Test the same single-player location.
- Disable shaders.
- Switch to default resources.
- Lower render and simulation distances.
- Close background apps.
- Confirm the active installation’s
-Xmxvalue. - Avoid assigning more than about half of total memory without verified guidance.
- Test without mods.
- Choose OptiFine or Sodium only when compatible.
- Verify Java for the exact Minecraft release.
- Update graphics drivers through a supported source.
- On Windows, assign the active
javaw.exeto High performance. - Compare single-player with multiplayer.
- Check server TPS and MSPT when only online play lags.
- Review
latest.logfor specific errors.
If you’ve worked through everything above and Minecraft still lags or crashes, revisit the Getting Help section to collect logs and system details before asking for support.
Wrapping Up
The best fix finds the cause without changing a small mountain of settings. I’d start by disabling shaders, restoring default textures, and lowering render distance. Those checks give you useful answers quickly, and they’re easy to reverse.
Once Minecraft runs smoothly, add your extras back one at a time. It’s slower than flipping every switch together, but you’ll know which one brought the stutter back.
| Step | Action | Applies To |
|---|---|---|
| 1 | Disable shaders and custom resources | Windows and macOS |
| 2 | Lower demanding video settings | Windows and macOS |
| 3 | Check -Xmx and the active profile | Windows and macOS |
| 4 | Verify mods and Java compatibility | Windows and macOS |
| 5 | Update supported graphics software | Windows and macOS |
| 6 | Select the high-performance GPU | Windows only |
| 7 | Check TPS and MSPT | Multiplayer servers |
Last updated: August 4, 2026 | Applies to Minecraft Java Edition on macOS and Windows
You can also learn more about changing tick speed in Minecraft or compare PlayStation Plus and Xbox Game Pass for your gaming needs. For more information on Minecraft performance, visit the official Minecraft Help Center or check out this YouTube video for tips on optimizing your game. Additionally, you can find more guides on customizing your Minecraft world or learn about the Minecraft Badlion Client. If you’re looking for the best Minecraft server hosting options, we’ve got you covered. For handheld gaming, consider checking out the top handheld gaming consoles.