Use this trick to dupe your parents
You’ve probably read a bunch of posts on how to create hidden folders, secure folders, locked folders, etc, in Windows on many occasions! Heck, one of the most popular articles on this blog used to be on how to create a secure and locked folder in Windows XP. However, hiding a folder is a tricky proposition and usually doesn’t work well unless you use something like Bitlocker or FileVault.
So here’s another way to “hide” your data, but with the big caveat that it can easily be found by someone who has some technical skills. If you’re trying to dupe your computer illiterate parents or friends, then feel free to try the following method. It’s basically a registry hack that hides a computer drive, i.e. C, D, etc, from the Windows Explorer interface.
Table of Contents
Even though you can’t see the drive in Explorer, it can still easily be accessed via the command prompt or by manually typing in the path into the address bar in Explorer. Also, the drive will still show up in third-party programs and in tools like Computer Management, etc. That’s no real security, but if someone doesn’t know the drive even exists, it might be a quick way to keep it out of sight.
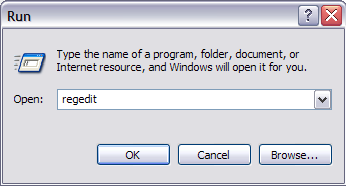
I tried this hack on Windows XP, Windows 7 and Windows 8 and it worked on all three. Ok, so here’s how to implement the hack: first off, back up your registry as this requires adding a key to the registry. Once you’ve backed up your registry, open the registry editor by clicking on Start, Run and typing in regedit.
Now navigate to the following registry hive shown below:
HKEY_LOCAL_MACHINE – Software – Microsoft – Windows – CurrentVersion – Policies – Explorer
Right-click on Explorer and choose New and then DWORD Value. In Windows 7 and Windows 8, you can choose DWORD (32-bit) Value.
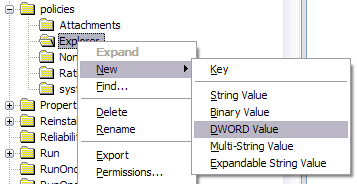
Name the new value NoDrives and then double click on it to open the properties dialog box. Click on Decimal for the Base unit.
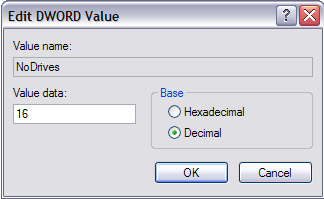
Type in one of the following values depending on the drive letter you want to hide.
A: 1, B: 2, C: 4, D: 8, E: 16, F: 32, G: 64, H: 128, I: 256, J: 512, K: 1024, L: 2048, M: 4096, N: 8192, O: 16384, P: 32768, Q: 65536, R: 131072, S: 262144, T: 524288, U: 1048576, V: 2097152, W: 4194304, X: 8388608, Y: 16777216, Z: 33554432, All: 67108863
If you want to hide drive E, just type in the value 16. The really cool thing about this trick is the fact that you can hide multiple drives by adding the numbers of the particular drives together. For example, if you want to hide drive E and drive G, you would type in the number 80, which is 64 + 16.
Restart your computer and your drive will now be hidden! You can even hide the C drive, though I don’t see any point to doing that. Everything still works fine, in case you were curious.
When you want to get your drives back, change the value of NoDrives to 0 or simply delete the value altogether. If you need to hide and un-hide the drive quite often, it might be better to write a script to do it for you. As mentioned earlier, though, you can access the drive covertly while it’s hidden, so there is no real reason to un-hide it.
This trick also works for mapped drives, so if you want to hide mapped drives, you can do it this way (though it might just be easier to disconnect a mapped drive). If you have any questions, post a comment. Enjoy!


