Here are a few free tools that will do the trick
There are a lot of reasons why you might need to resize a video and in this post I’m going to mention a couple of freeware app that will help you easily change the resolution of your videos. If you have one of those 1080p 60fps HD video cameras, you understand the need for some serious conversion. With the introduction of 4K camcorders on the market, you’ll need a beast of a PC along with a 4K monitor to even have a chance of playing that high quality
There are currently no default tools built into Windows that you can use to resize videos. You can use Windows Movie Maker to edit videos and add transitions, etc, but not to change the actual video resolution.
Table of Contents
If you do a search for RESIZE VIDEOS in Google, you’ll get a list of a bunch of commercial applications that you would have to shell out cash for! So if you’re lucky enough to have run across this post, I’ll show you a couple of free ways to resize videos quickly and easily.
HandBrake
HandBrake is my all time favorite utility for converting and encoding videos. Basically, it can take as input pretty much any video file you can throw at it and it gives you two options for output: MP4 and MKV. You can also pick from three video codecs for the two video containers: H.264, MPEG-4 and MPEG-2.

In HandBrake, you can either choose a preset by clicking the Toggle Presets button, which will show up on the right side. If you’re not interested in any of those items, you can leave it at the default Normal under the Regular heading.
To get started, just click on the Source button and choose your video file. You can change the destination, format and video codec if you like, but if you’re only interested in changing the resolution of the video, then leave the values alone. Now go ahead and click on the Picture Settings button at the top.

Here you can change the width of the video and it will automatically adjust the height to maintain the aspect ratio. At this point, you don’t have to do anything else other than click on the Start button. If you want to convert multiple videos files all at once, you can click the Add to Queue button and then click the Source button again to choose another video. Keep adding to the queue and when you’re done click Start.

You’ll see the progress of the conversion at the bottom of the program window. The amount of time will depend on the original size and encoding of your video.
VirtualDub
VirtualDub is a free video capture and video processing software app. It doesn’t have many of the video editing features that you would find in Adobe Premiere, but it is streamlined for performing linear operations on video very fast. It also has batch-processing capabilities for processing large number of video files.
You can do a TON of stuff with VirtualDub, including add special effects to your videos such as blurs, black and white, flipping, and lots more. However, we’ll only going to go over how you can use it to resize your videos. It should be noted that VirtualDub works best on AVI files and will require additional codecs installed in order to work with other files types like AVCHD, MP4, etc.
First download VirtualDub and extract it to a folder on your hard drive. VirtualDub does not require any installation; it simply runs directly via an EXE! That means it doesn’t mess around with your registry or anything else in Windows.
Once installed, launch the program by clicking on the VirtualDub icon. You’ll get a blank screen with some controls across the bottom. Now I’m assuming you already have your video that you would like to resize, so to get going, click on File and choose Open Video file.

Browse to the location of your video and open it. You’ll now see your video appear twice in the main window. This is because the left one is considered your original and the right one is your “processed” or altered version. When you apply a filter to your video, the right one updates and you can watch both at the same time! Cool!
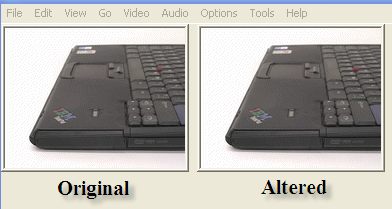
Right now they are both the same since nothing has been done. Ok, so now that the video is imported, go to Video and click on Filters.

Click on the Add button at the right and scroll down till you see resize.

Click Ok and you’ll now be brought to the resize filter options. Do not be intimidated by this screen if you’ve never heard of most of things listed, I haven’t either! What you’re interested in is the top section where you choose a new size. You can choose an absolute size and type that in manually if you like, or you can specify a size relative to the current size.

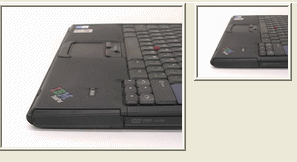
Go ahead and choose how you want to resize your video. If you know you want it to be 640×480, then click on Absolute and type that in yourself, otherwise choose Relative. I’m making mine 50% smaller. There are a bunch of other options listed, such as adding a frame, or changing the aspect ratio of the video, but you can just leave that all the same if you just want to resize. Click Ok and then Ok again.
You should now see your original video on the left and your processed video on the right, in my case, half the size!
Now to save your newly resized video, click on File and choose Save As AVI. And that’s it! Go ahead and play your video and you should have it in the smaller or larger resolution! Easy as that!
Freemake Video Converter
I would have recommended Freemake Video Converter over VirtualDub because it accepts so many different video formats as input, but I purposely am listing it last because the installer for the program has a lot of junkware. This is not malware or spyware, but it’s just junk that you would not want on your system.
When you install the program, you need to make sure you click the Custom Installation radio button and choose not to install several programs. It’s also deceiving because they purposely make that radio button greyed out as if you could not click on it. However, when you click the radio button, it becomes active, so don’t be fooled.
Anyway, outside of that, the program works fine and doesn’t have any ads, malware, spyware, etc. To get started, click the big add video button to choose the video file you want to convert.

You’ll see the video load into the main window and at this point you can pick one of the many options down at the bottom. You’ll also see a button to the right with a green play icon and some scissors on it. If you click on that, you can do some basic video editing that includes cutting and rotating the video.

In order to choose a new size for your video, you’ll first have to choose an option like to Apple, to MP4, to WMV, to AVI, etc. If you click on MP4, for example, you’ll get a pop up window with some preset values or you can choose a custom value by click on Add your preset.

Here you can pick from some preset sizes again or click on Custom and then enter your own width and height. You can also adjust the frame rate, bitrate, video codec, audio channels and more.

I really like this program because it has a ton of options that will let you get your video onto pretty much any device you can think of. I really just wish they didn’t try to bundle that crapware along with the installer! You can even send the video directly to YouTube, convert it to HTML5 compatible format, convert it to Xbox and Playstation format and even burn to DVD or Blu-ray disc right from the program. If you’re an Apple user, you’ll love the to Apple option, which lets you pick the exact device you want the video to be played on.

So those are a couple of good options for getting your video into a size and resolution that your computer, device or online service can handle. In summary, HandBrake works best for converting to Apple friendly devices, VirtualDub can work for any file, but you’ll need to install the codecs for certain file formats and Freemake works for everything but you have to make sure to avoid the junkware when installing it. If you have any questions, post a comment. Enjoy!


