The complete solution to this annoying notification
Being the computer guy in my family, I perform all the technical support tasks and sometimes run into strange issues that I decide to write about.
Of course with Windows, it seems you never really run out of strange issues to deal with! There’s always some crazy and cryptic error popping up that makes you scratch your head.
Table of Contents
One such issue is with Windows and it relates to the following errors:
Microsoft Windows Search Indexer stopped working and was closed
or
Windows could not start the windows search service on the local computer error 1067
This is quite an unusual problem, but if it happens to you, it’s very annoying! Anytime you try to open, move, or copy something, you will get this error. It’s usually also associated with slow computer performance and crashing of the entire OS.
There are a couple of things you can try out to fix this annoying issue in Windows:
Rebuild Windows Search Index
This method is quick and easy, but may not work if you are having serious issues. Still it’s worth a shot before going to the other steps where you have to delete stuff.
First, type Indexing Options in the Start Menu’s search box, then click on the Advanced tab/button and then click Rebuild.
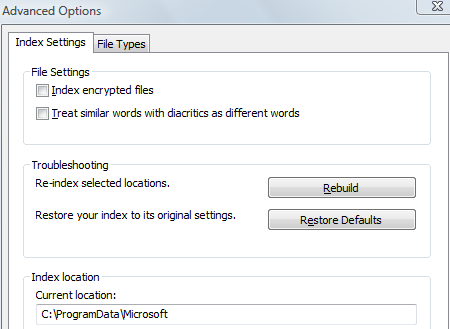
You can also try clicking on Restore Defaults if Rebuild does not work. If, for some strange reason, you are not able to select anything on this page, you can rebuild the searcher index manually by editing the following registry key:
HKLM/Software/Microsoft/Windows Search/SetupCompletedSuccessfully

Change the value to zero and then restart the machine. However, if you can avoid registry key modifications, that’s the best! Also, make sure to create a restore point before making any registry edits.
Delete the Windows Search Index Program Folder
If the above method did not work, you can try to delete all of the files associated with search indexing in Windows by deleting everything inside these folders:
C:\ProgramData\Microsoft\Search\Data\Applications\Windows

C:\ProgramData\Microsoft\Search\Data\Temp
If you do not see these folders, you need to turn on viewing for hidden folders by going to Windows Explorer or My Computer and then choosing Tools, Folder Options.
Go to the View tab and scroll down till you see Show hidden files and folders. You should now be able to see the ProgramData folder. In Windows 10, just click on the View tab and check the Hidden Items box.
Again, make a backup of the files in the directories before deleting them just in case, but they really are not that important.
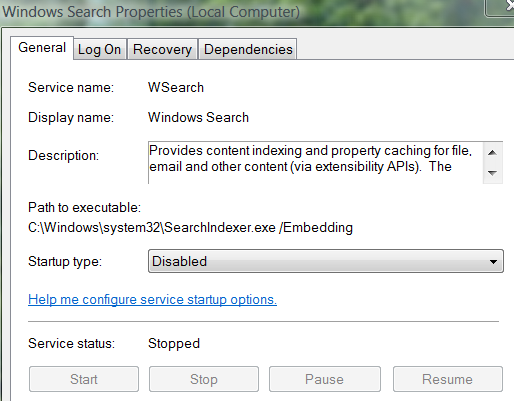
If you get an Access is Denied message when trying to delete the files, you will first need to stop the Window Search Index service by going to Control Panel, then Administrative Tools, and then clicking on Services.
The service should be called Windows Search or Windows Searcher. Double click on the service and click Stop.
After you delete the files, restart the computer and the index will be rebuilt and hopefully your error will be gone!
Remember the search index service is not critical, so you’re not going to mess up your computer by disabling the service or deleting its files. Enjoy!


